Introduction
Events, workshops, and training programs usually end the same way: every participant expects a certificate, and someone on the organizing team has to produce and send them. Filling in names by hand, exporting each certificate to PDF, and attaching it to an individual email is slow work that doesn’t scale past a handful of attendees, and a single typo in a name is enough to make a certificate unusable. In this tutorial, we’ll build an automated workflow with Pipedream and DocuGenerate that takes care of the whole process, from receiving the participant’s data to delivering the finished PDF to their inbox.
The workflow has three steps. A webhook trigger receives the participant’s details as a JSON payload, the DocuGenerate Generate Document action merges that data into a Word template to produce a PDF certificate, and the Gmail Send Email action sends the certificate to the participant as an attachment. Because the entry point is a plain HTTP endpoint, the same workflow can be called from a registration platform, a form, a spreadsheet script, or your own backend. By the end of this guide, you’ll have a working workflow that you can copy into your own Pipedream account with a single click.
Setting Up the Certificate Template
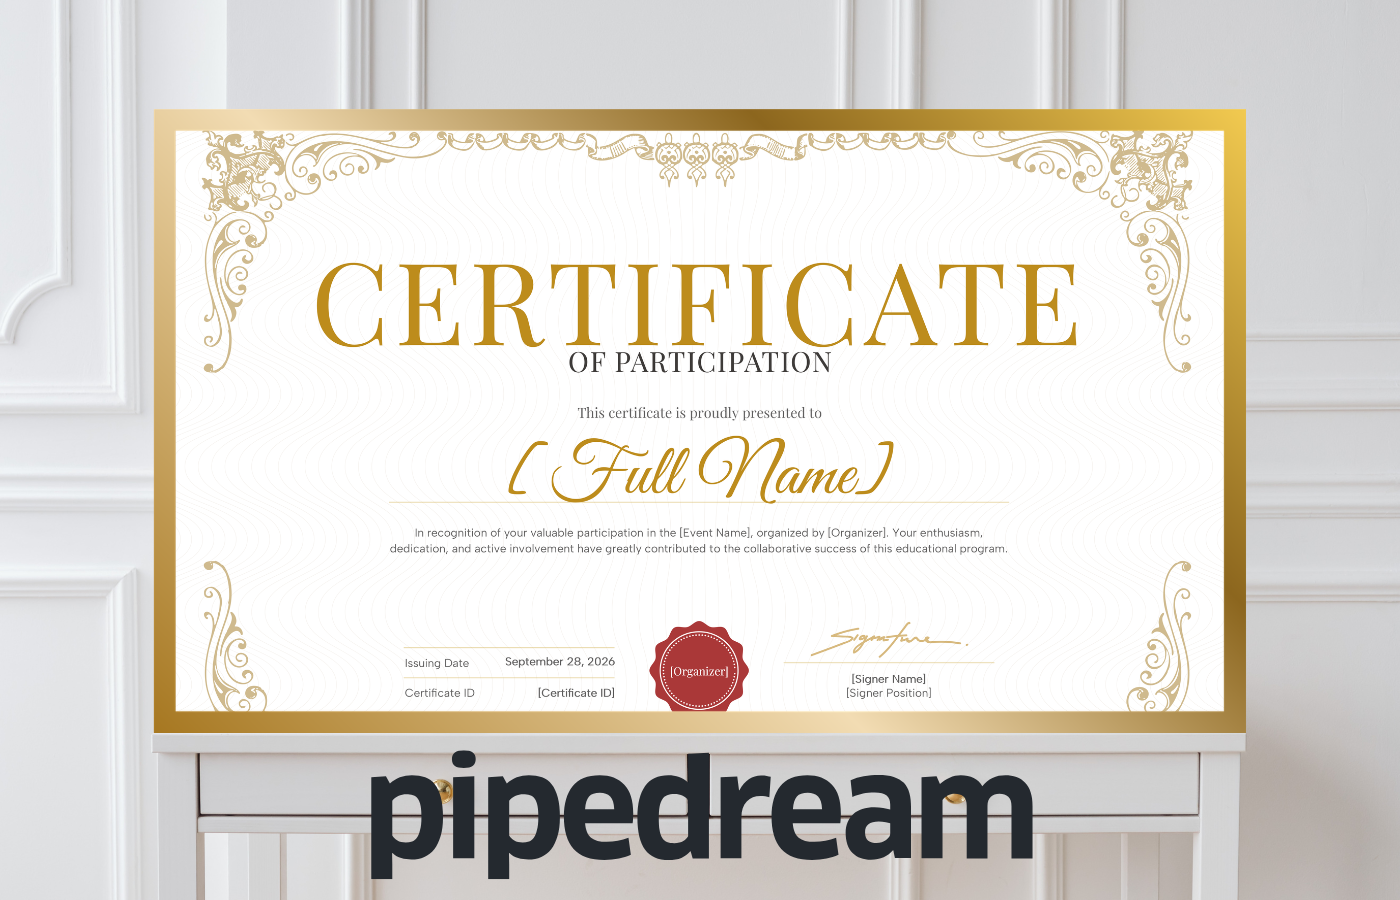
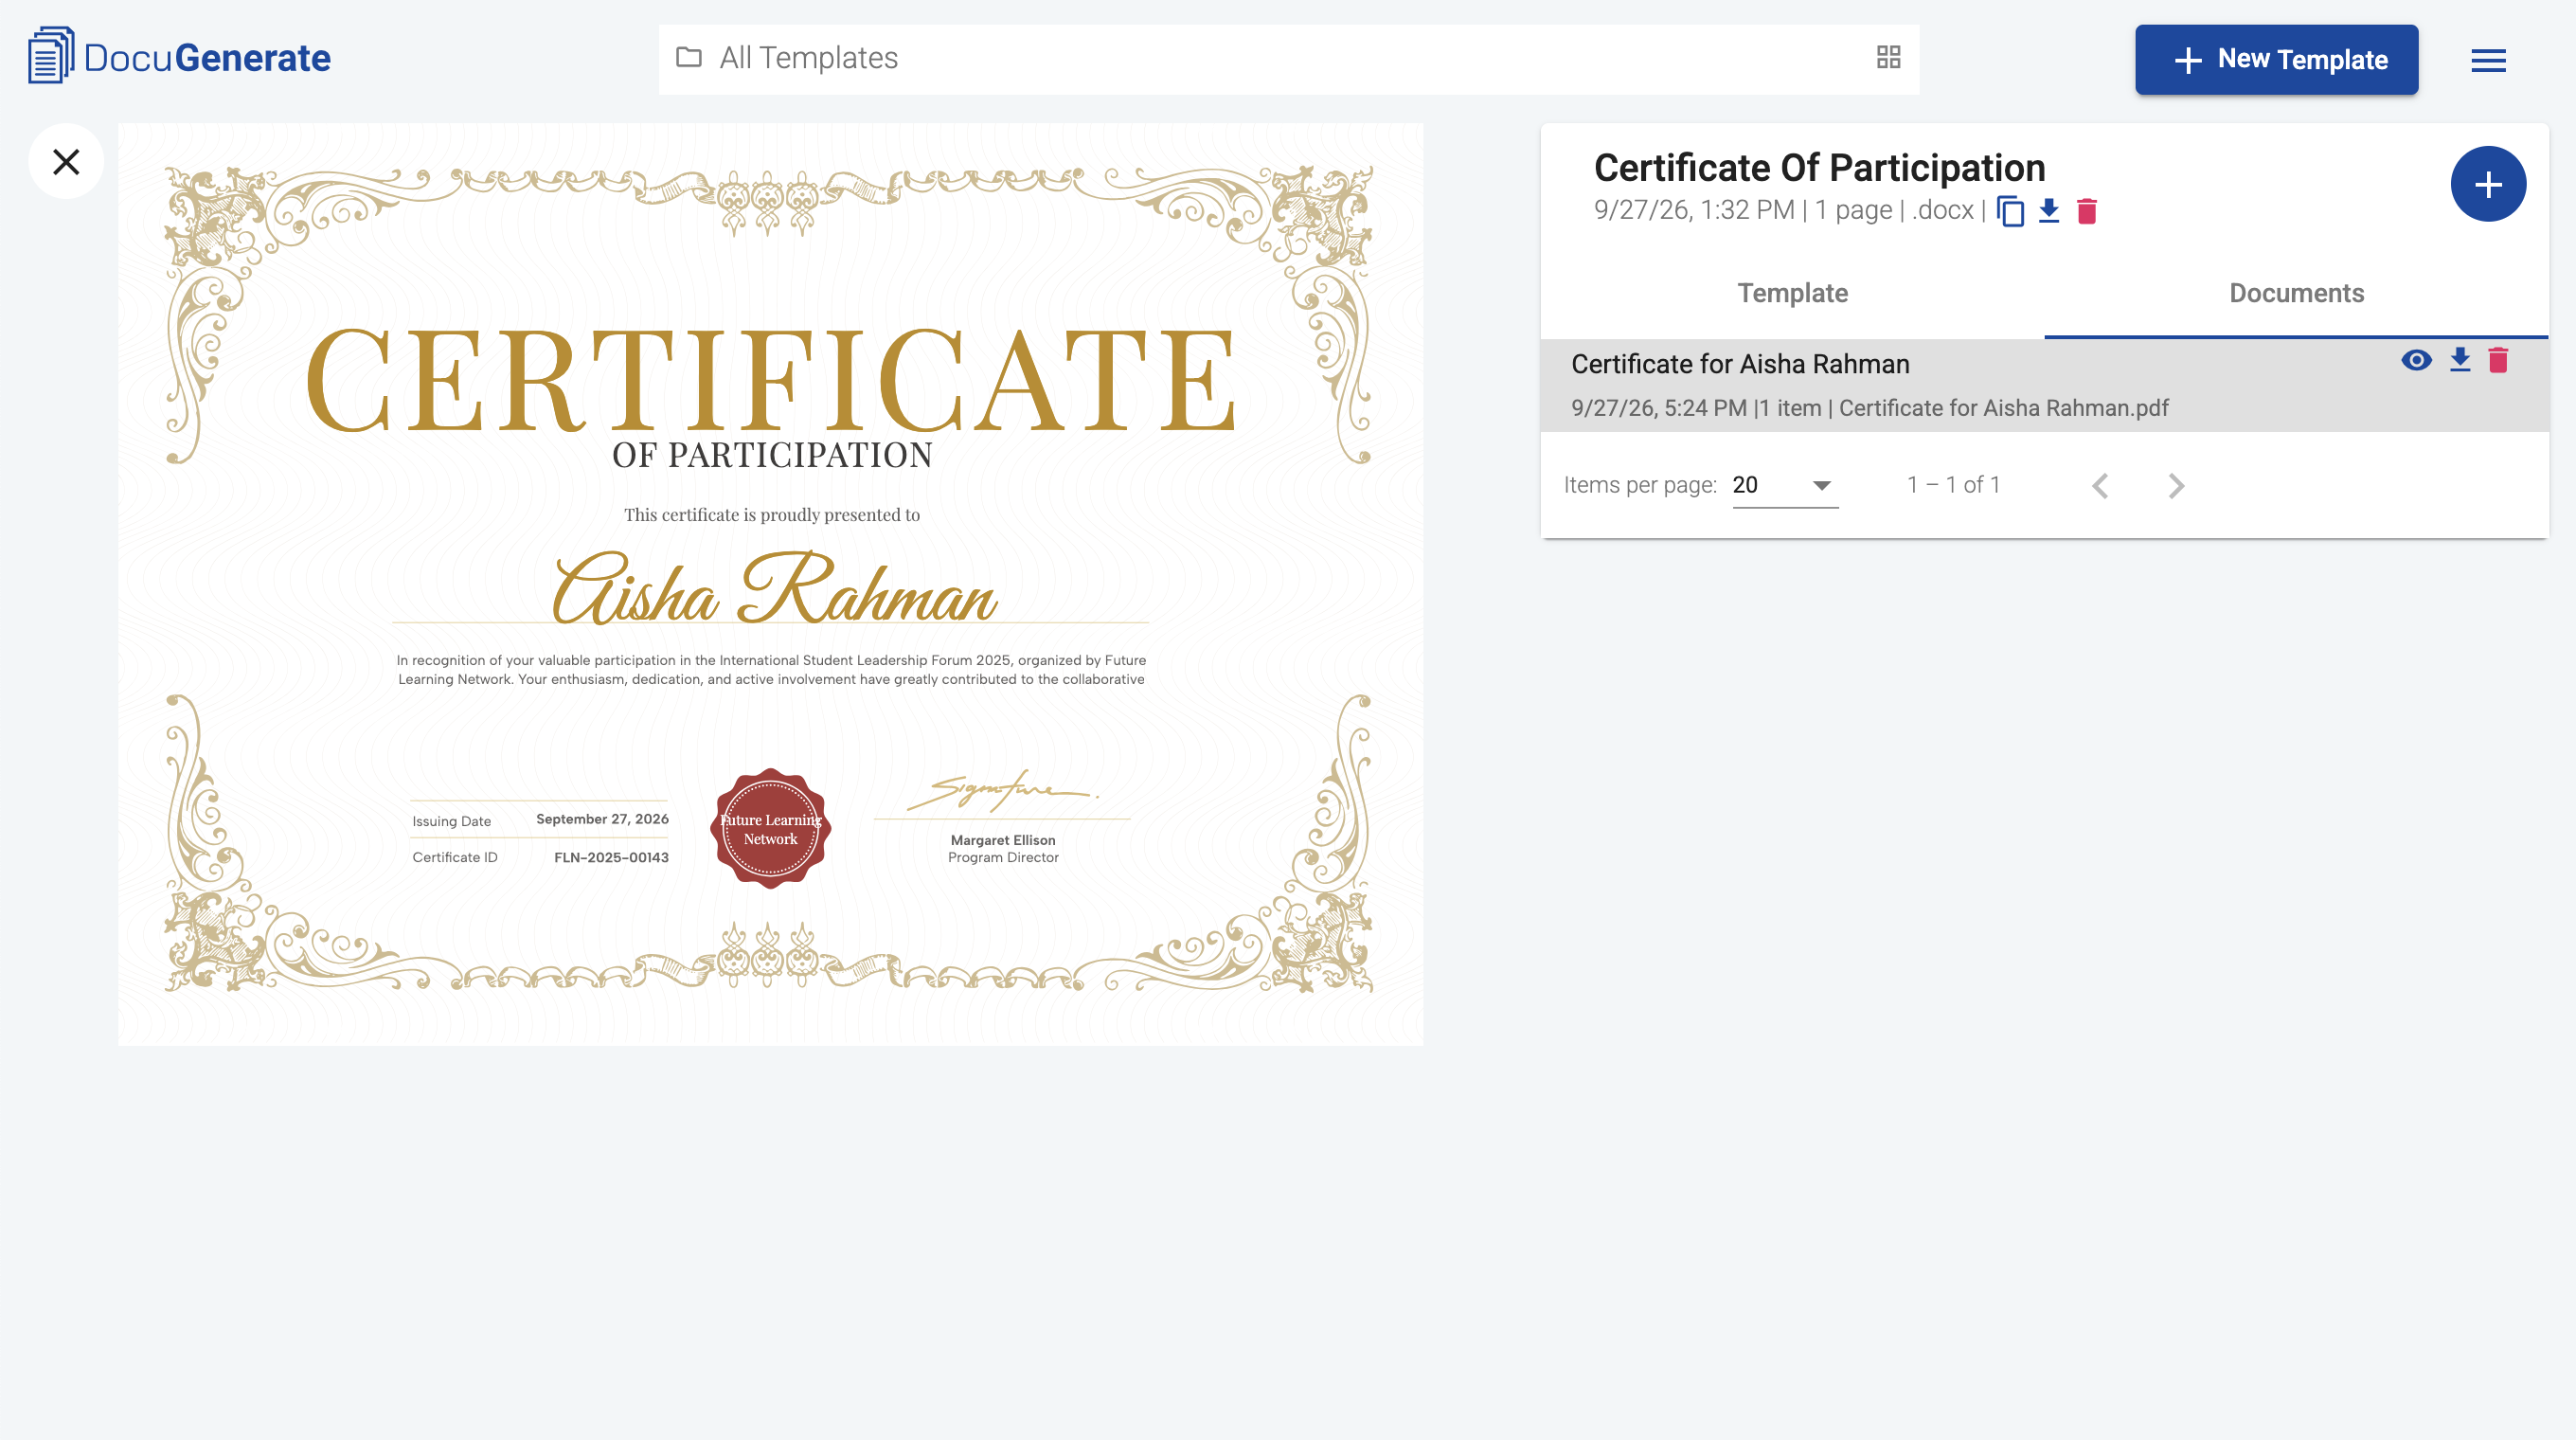
Before building the workflow, we need a certificate template in DocuGenerate. For this tutorial, we’ll use the Certificate Of Participation Word template, a landscape certificate with an ornate gold border, a large script font for the recipient’s name, a wax seal in the center, and a signature block at the bottom right.
Once you’ve uploaded the template to your DocuGenerate account, 6 merge tags are detected automatically: Full Name, Event Name, Organizer, Certificate ID, Signer Position, and Signer Name. The Full Name tag is displayed prominently in the middle of the certificate, Event Name and Organizer appear in the recognition text below it, and Organizer is also printed inside the wax seal. The Certificate ID sits next to the issuing date, while Signer Name and Signer Position fill the signature block.
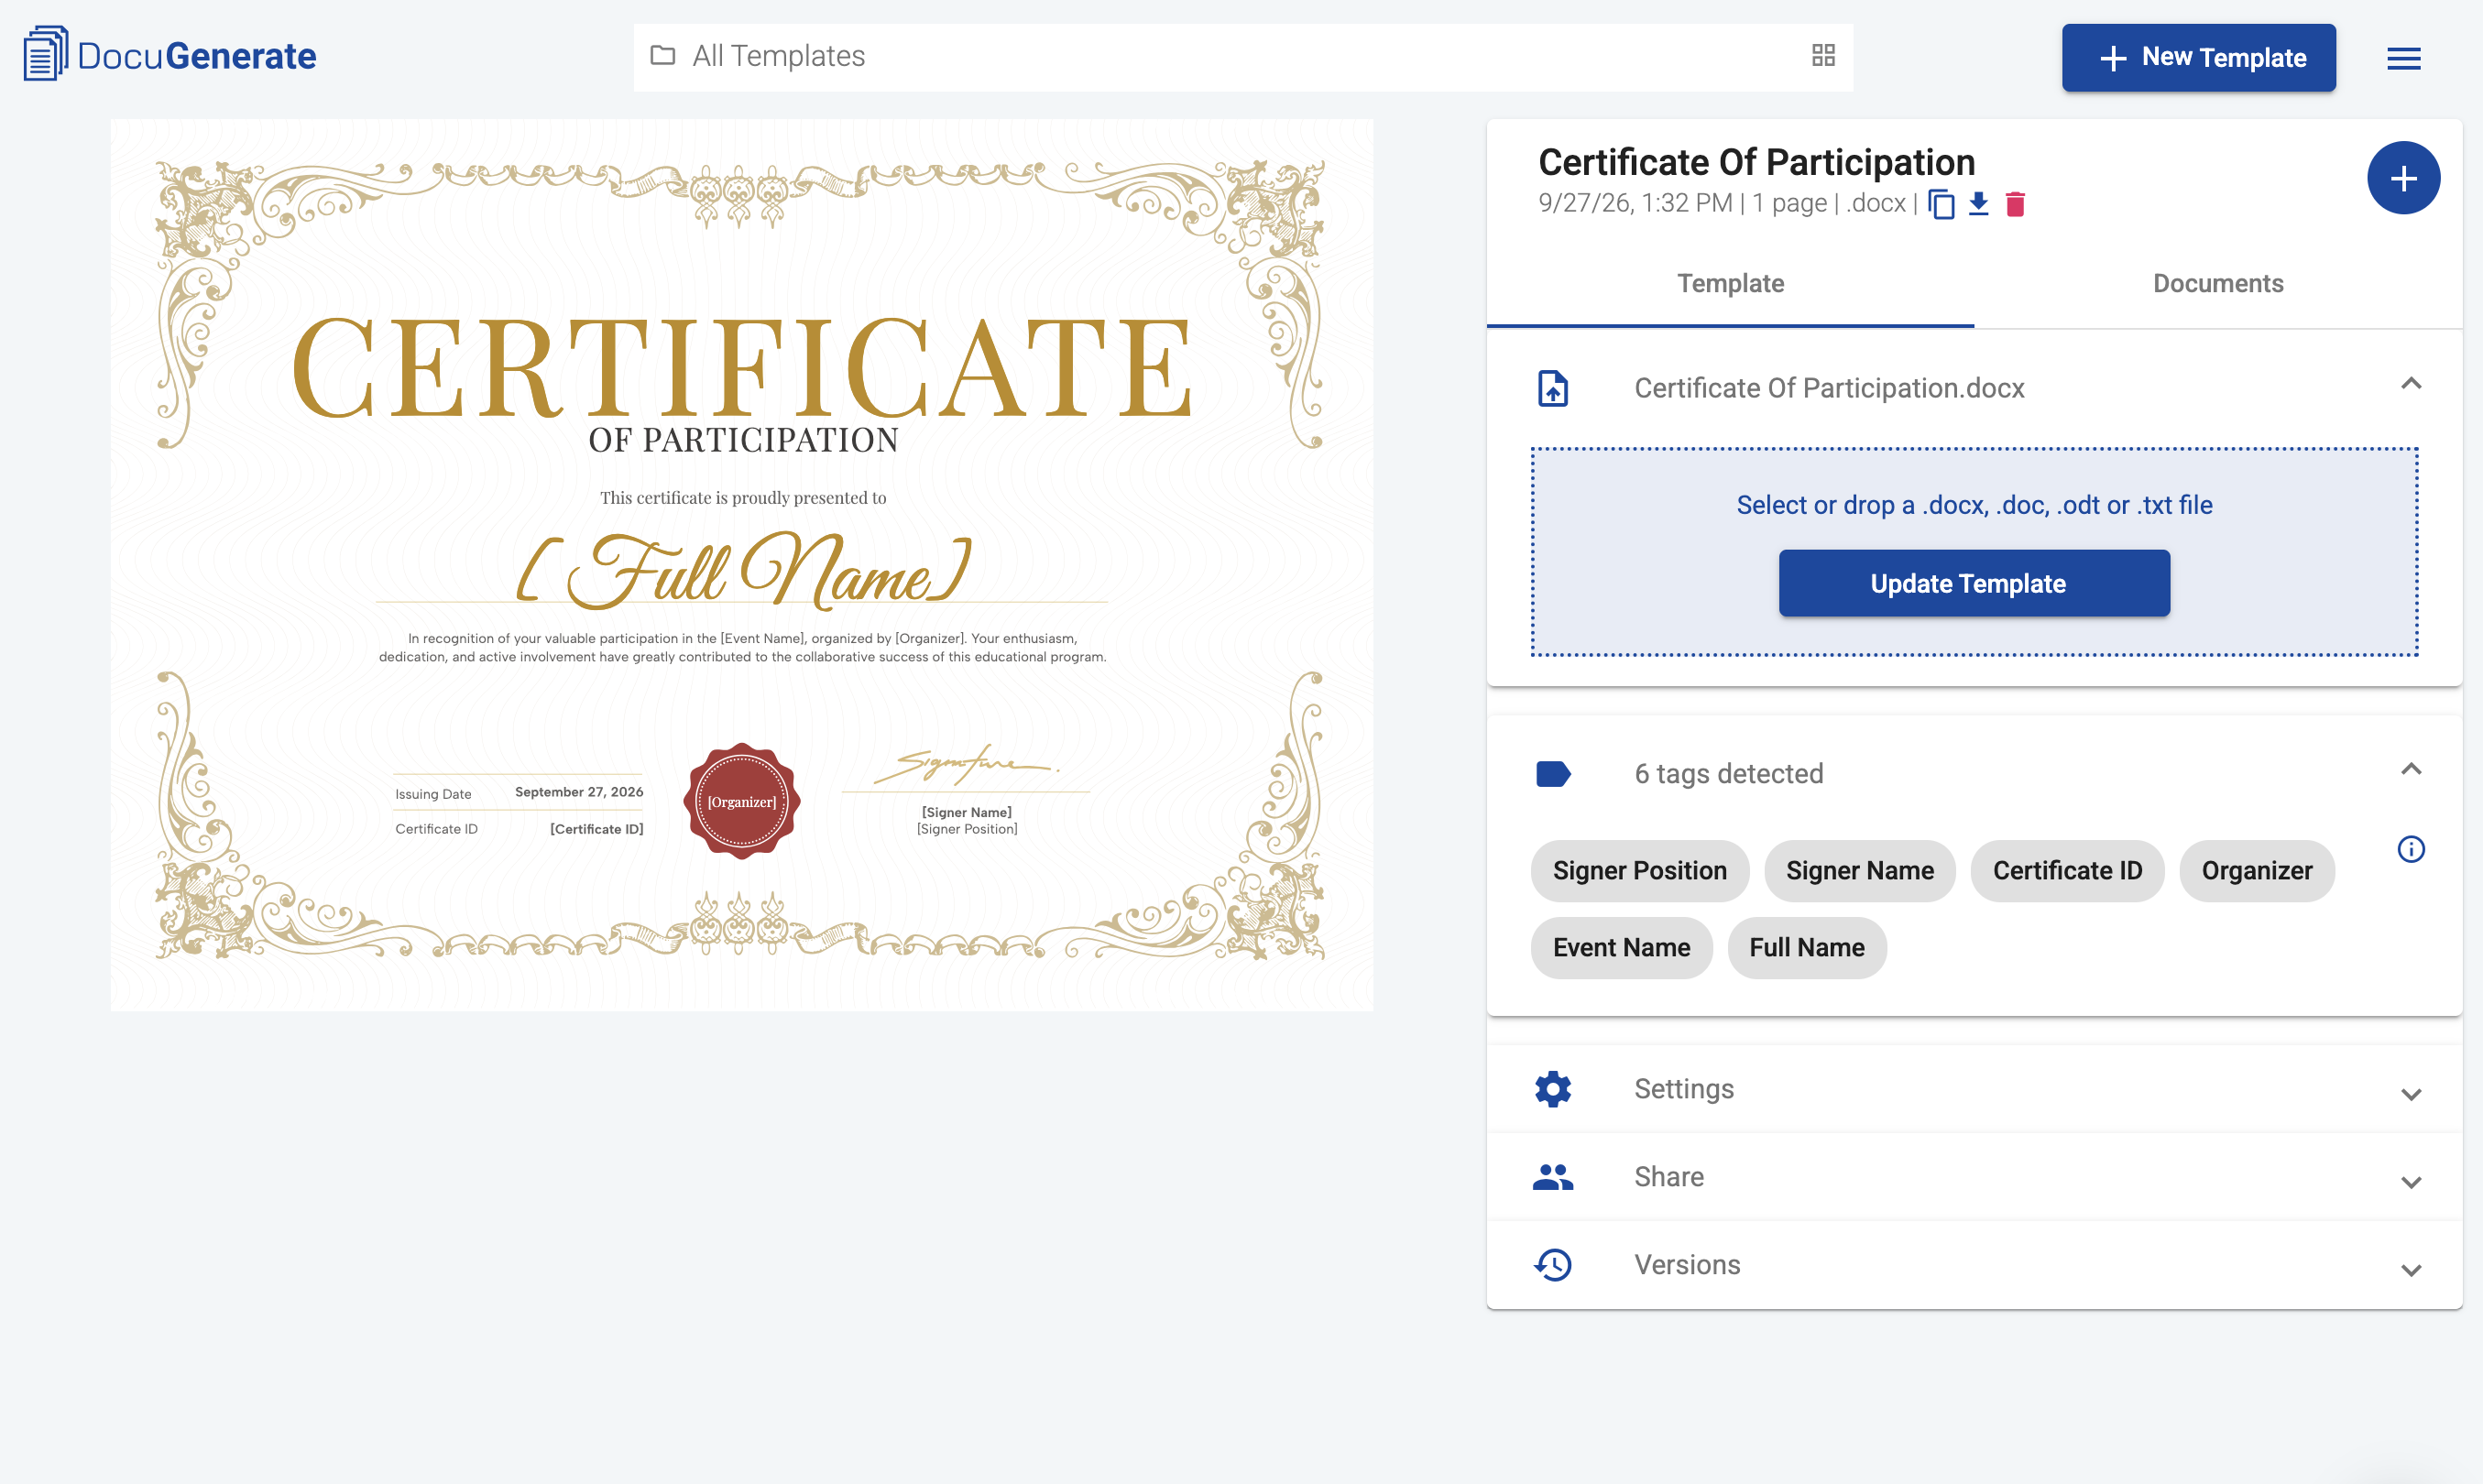
The issuing date next to the certificate ID doesn’t need a merge tag at all. It’s a DATE field inserted directly in Word, so it’s filled in with the current date every time a certificate is generated. Our blog post on inserting today’s date in a template explains how to add this kind of field in Word or LibreOffice and choose its display format.
Configuring the Webhook Trigger
With the template ready, we can create a new workflow in Pipedream. Every workflow starts with a trigger, which determines where the data comes from and when the workflow runs. The data could come from a spreadsheet, a database like Airtable or Notion, a form builder, or any other app Pipedream connects to. For this tutorial, we’ll use an HTTP trigger that listens for incoming requests on a unique URL, since it’s the most flexible option and works with any system that can send an HTTP request.
Click Add Trigger and select the New HTTP / Webhook Requests trigger. The default configuration is a good fit for this workflow, so you can leave the parameters as they are:
- Event Data:
Full HTTP request, which exposes the body, headers, and other request details to the following steps via the steps object. - HTTP Response:
Return HTTP 200 OK, so the caller receives an immediate confirmation. - Domains:
pipedream.net, the domain used for the generated trigger URL. - Authorization:
None, meaning any request sent to the URL is accepted. We’ll come back to this in the production section.
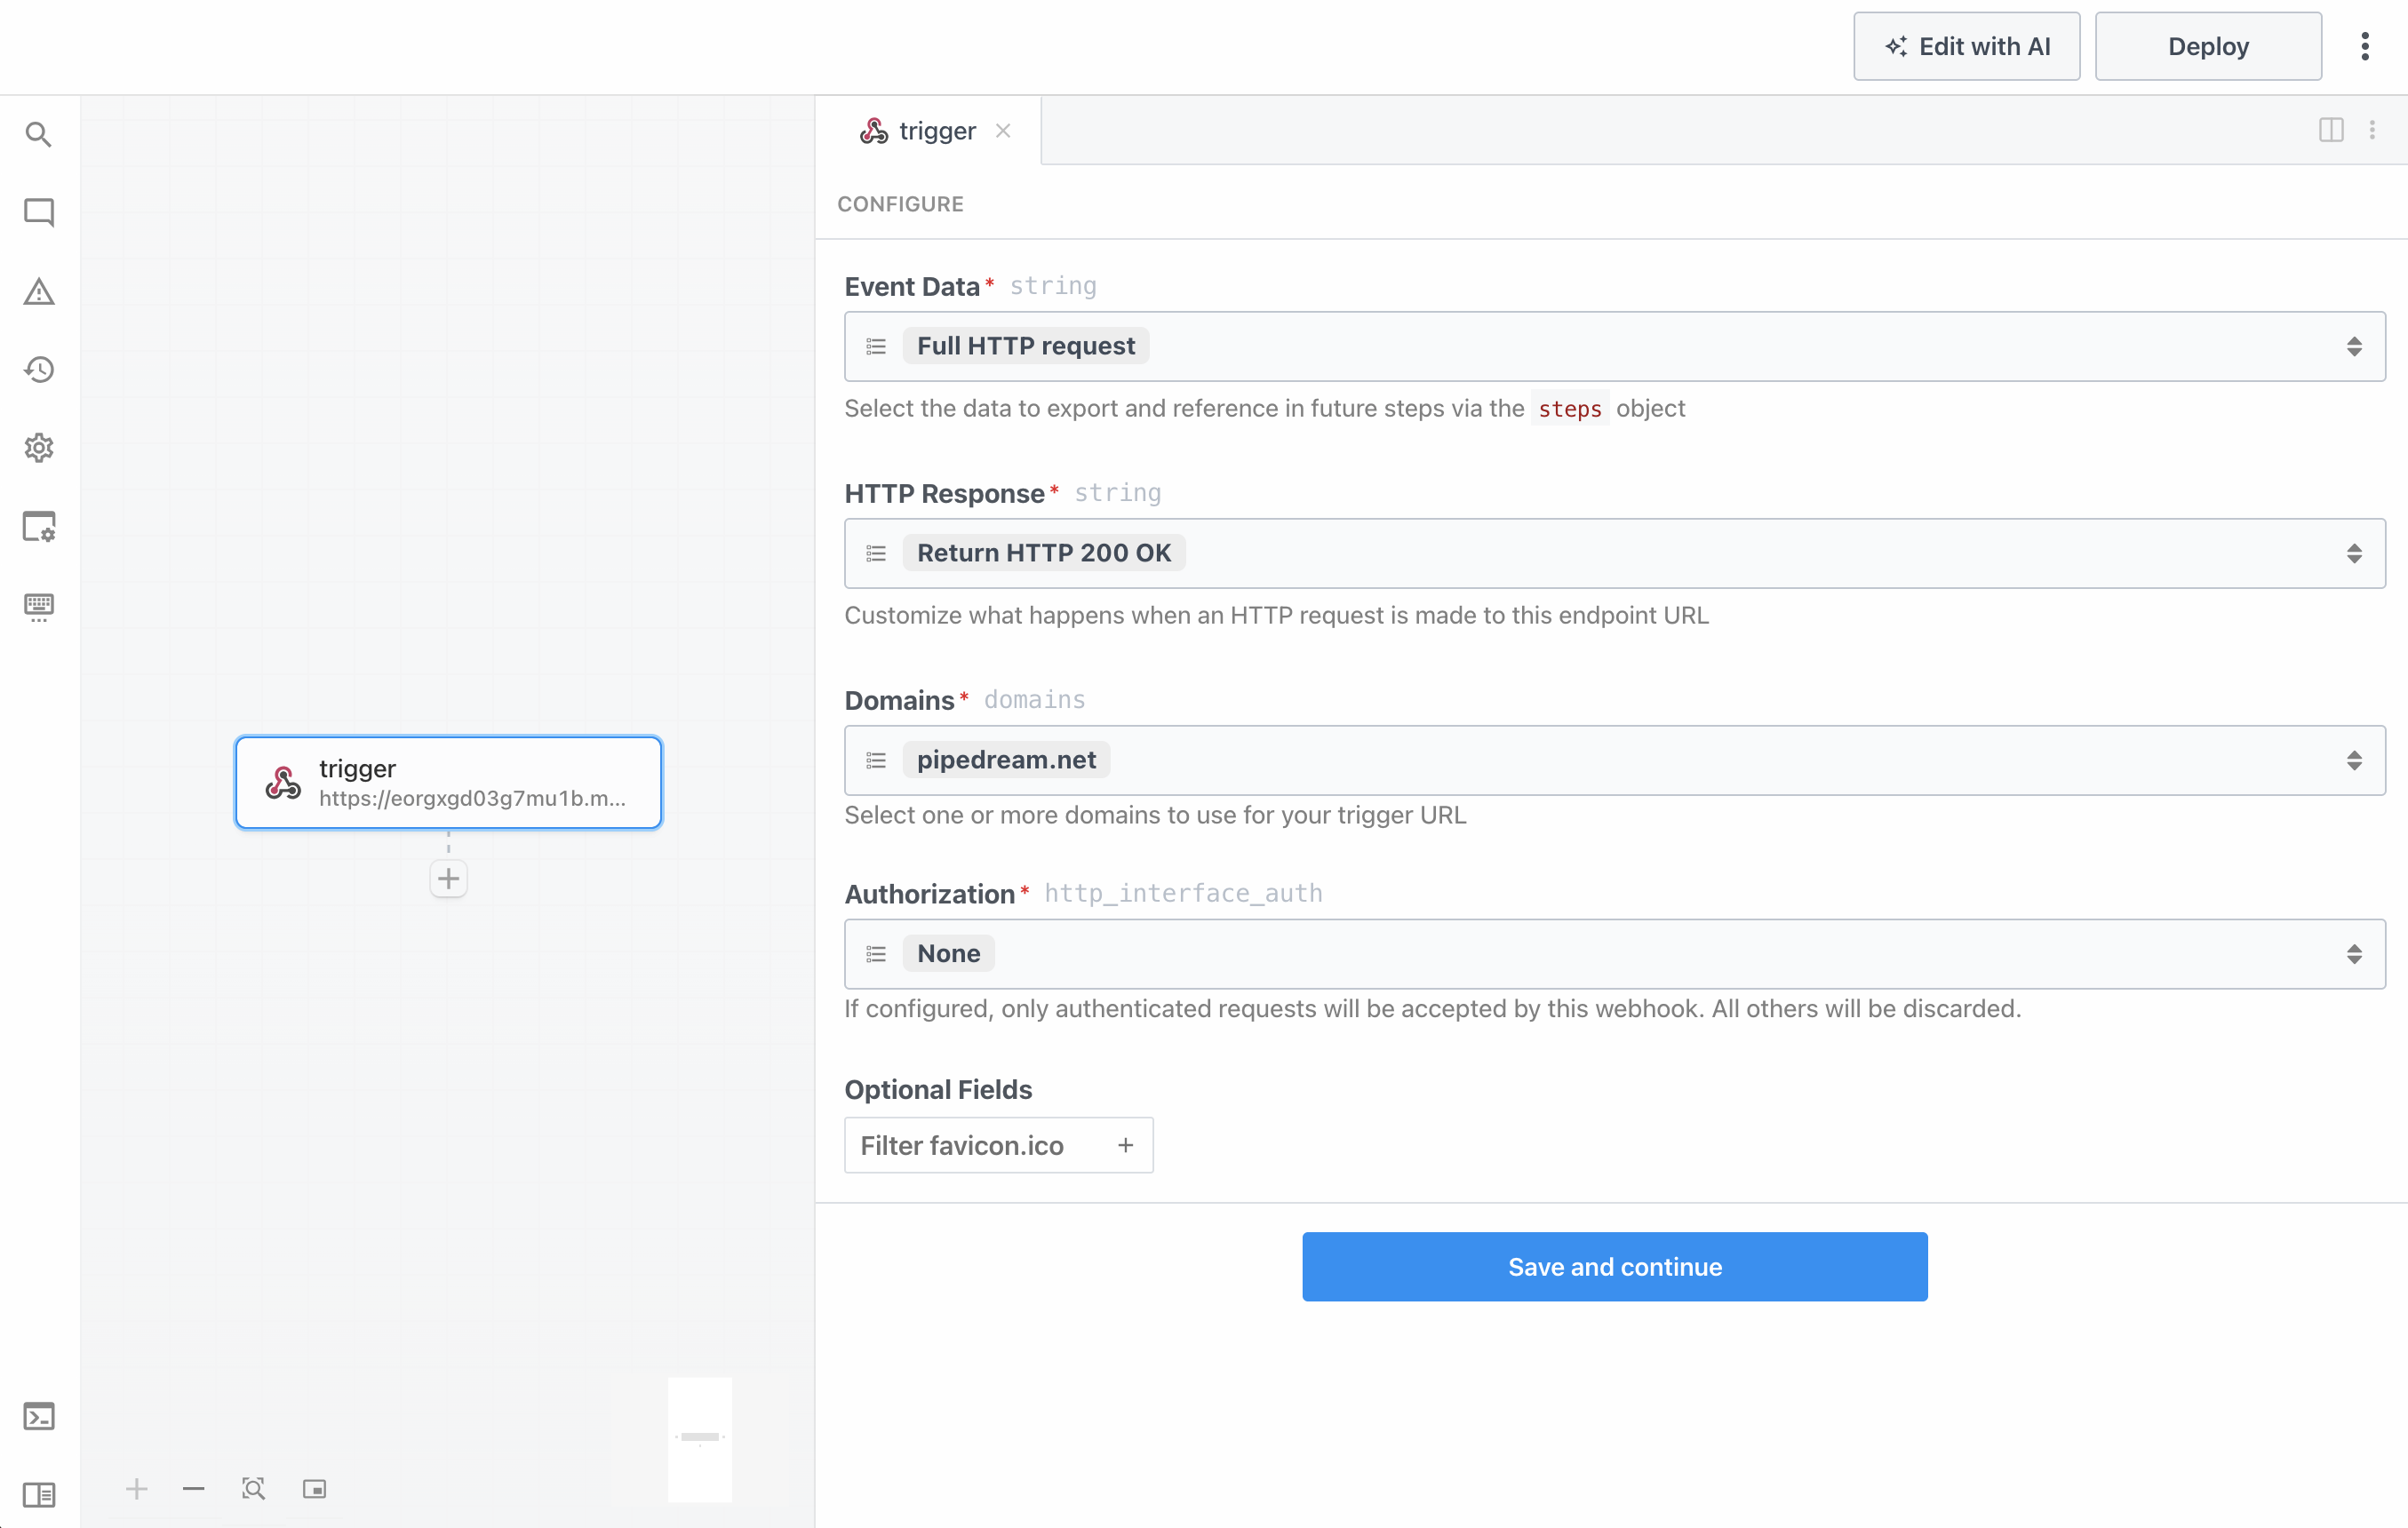
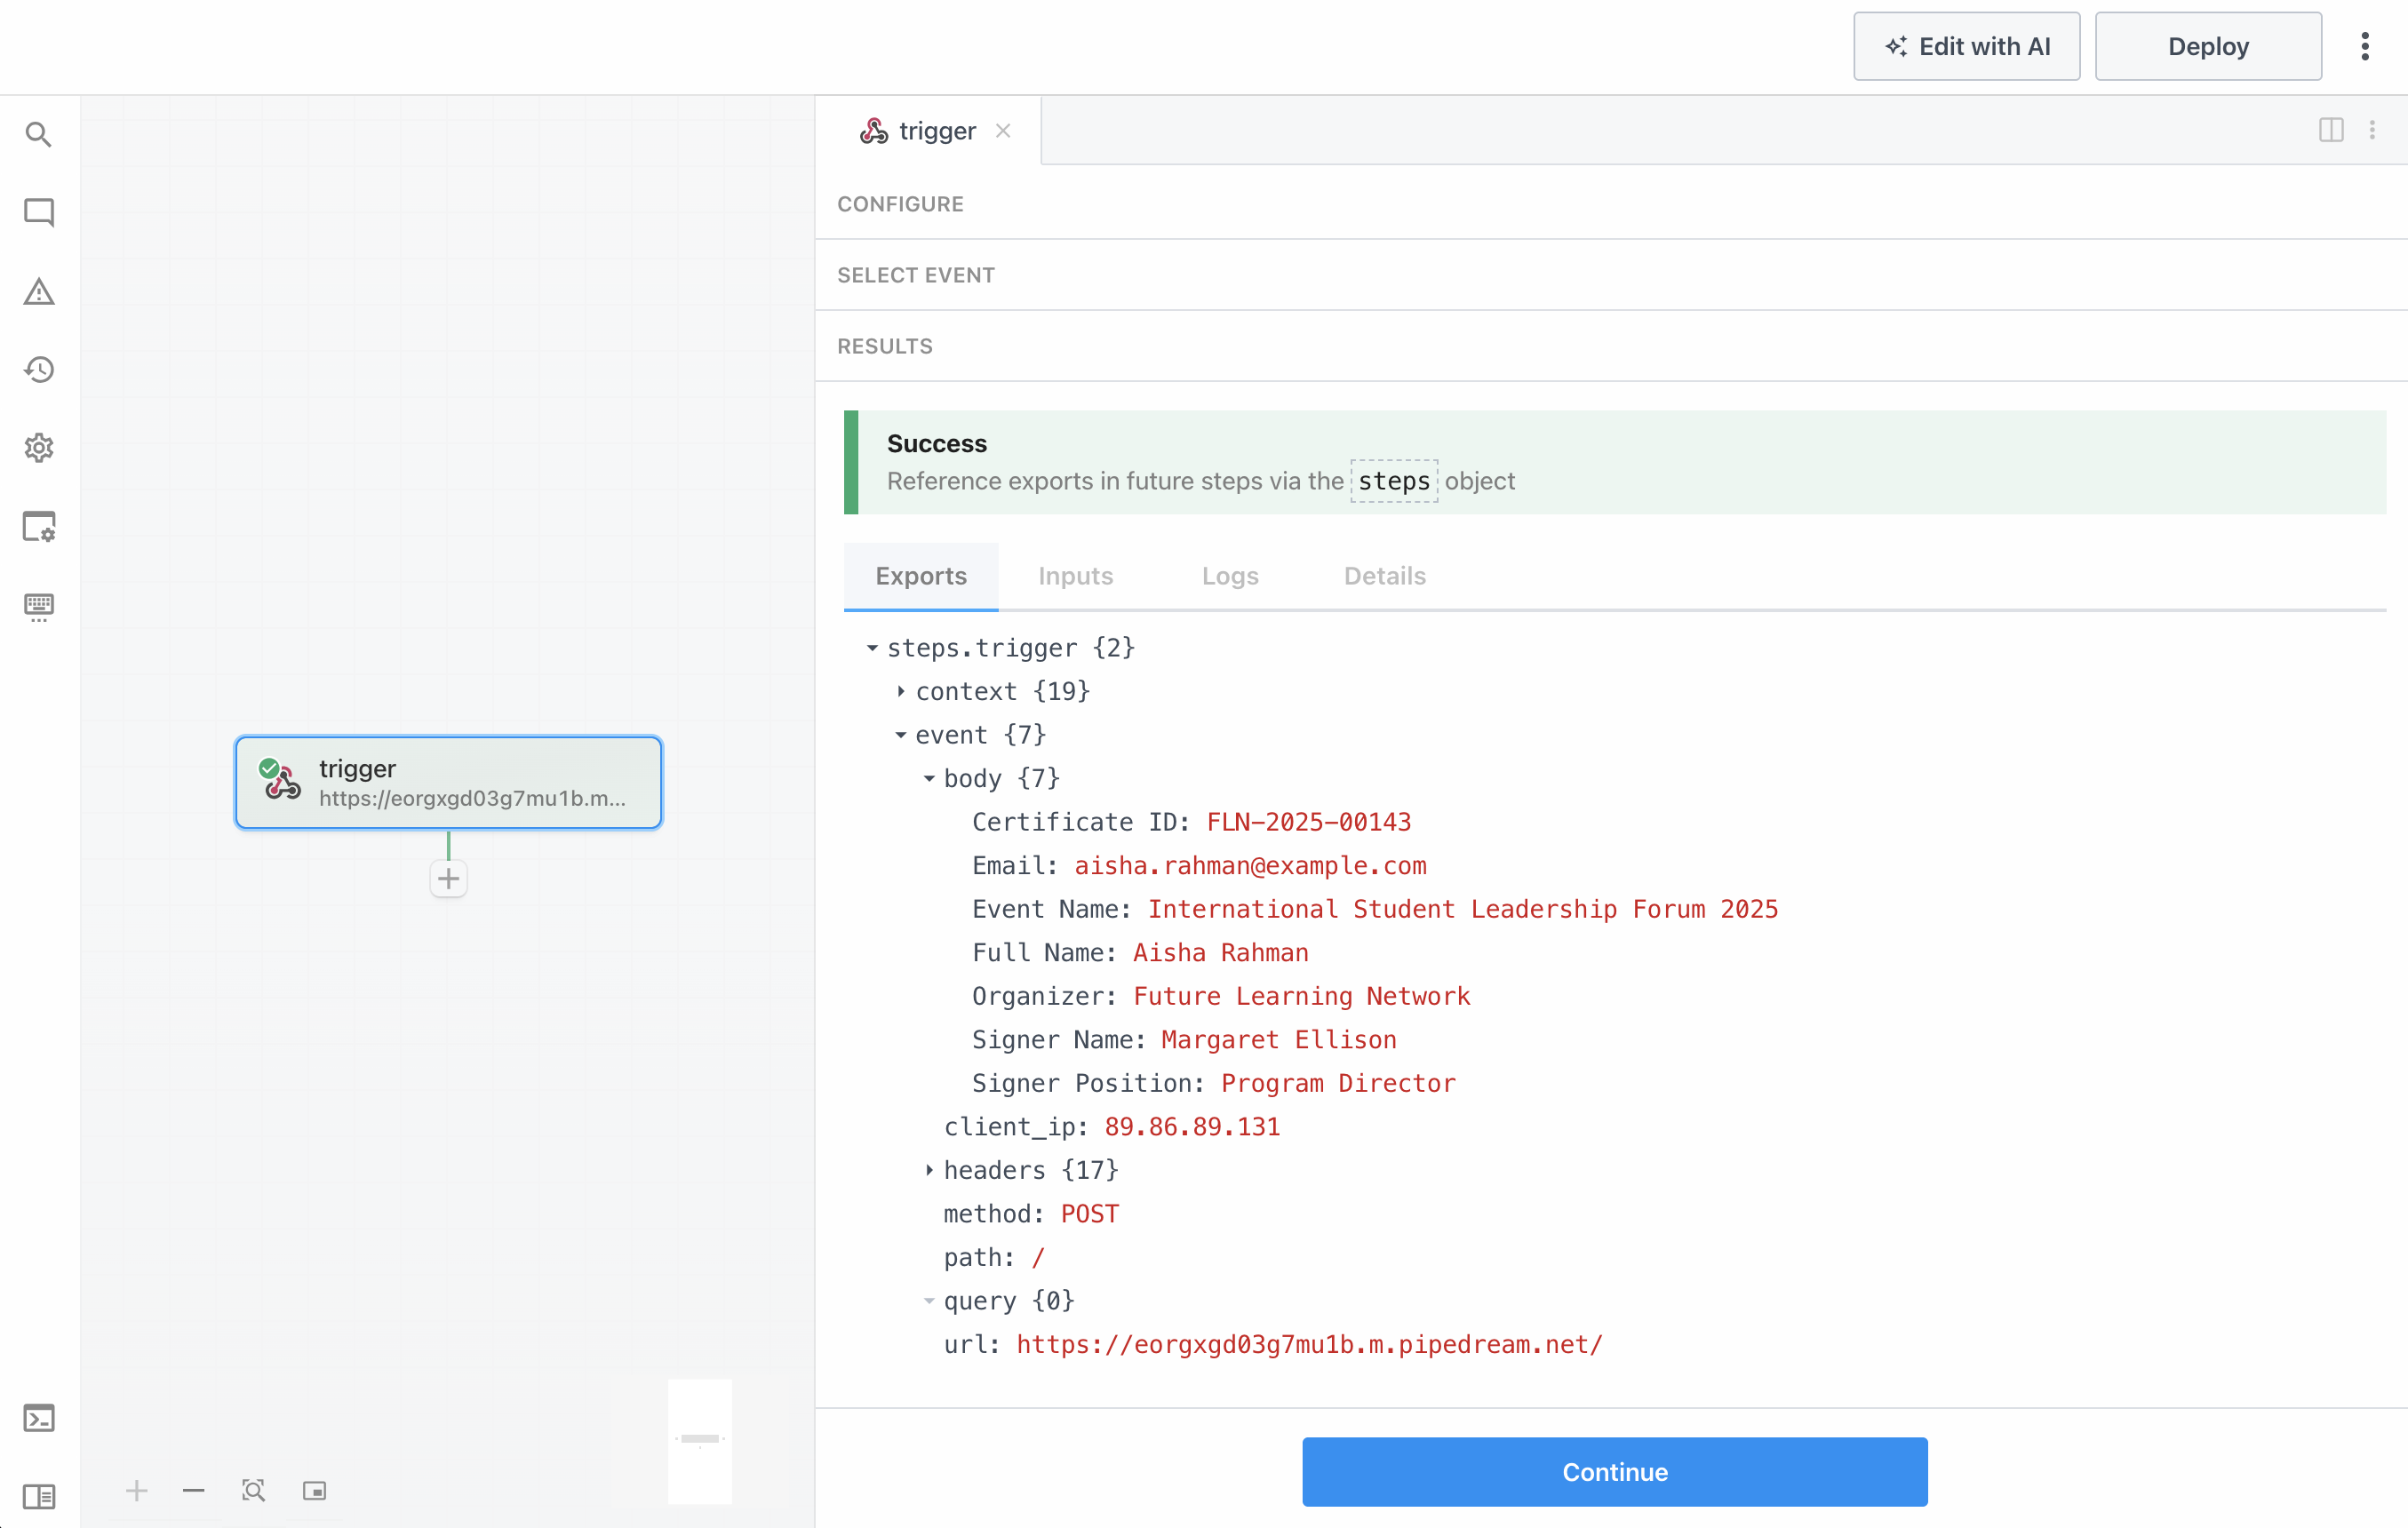
Click Save and continue to create the trigger. In the SELECT EVENT section, Pipedream displays the unique URL generated for this workflow, which in our case is https://eorgxgd03g7mu1b.m.pipedream.net. Any HTTP request sent to this URL will start the workflow.
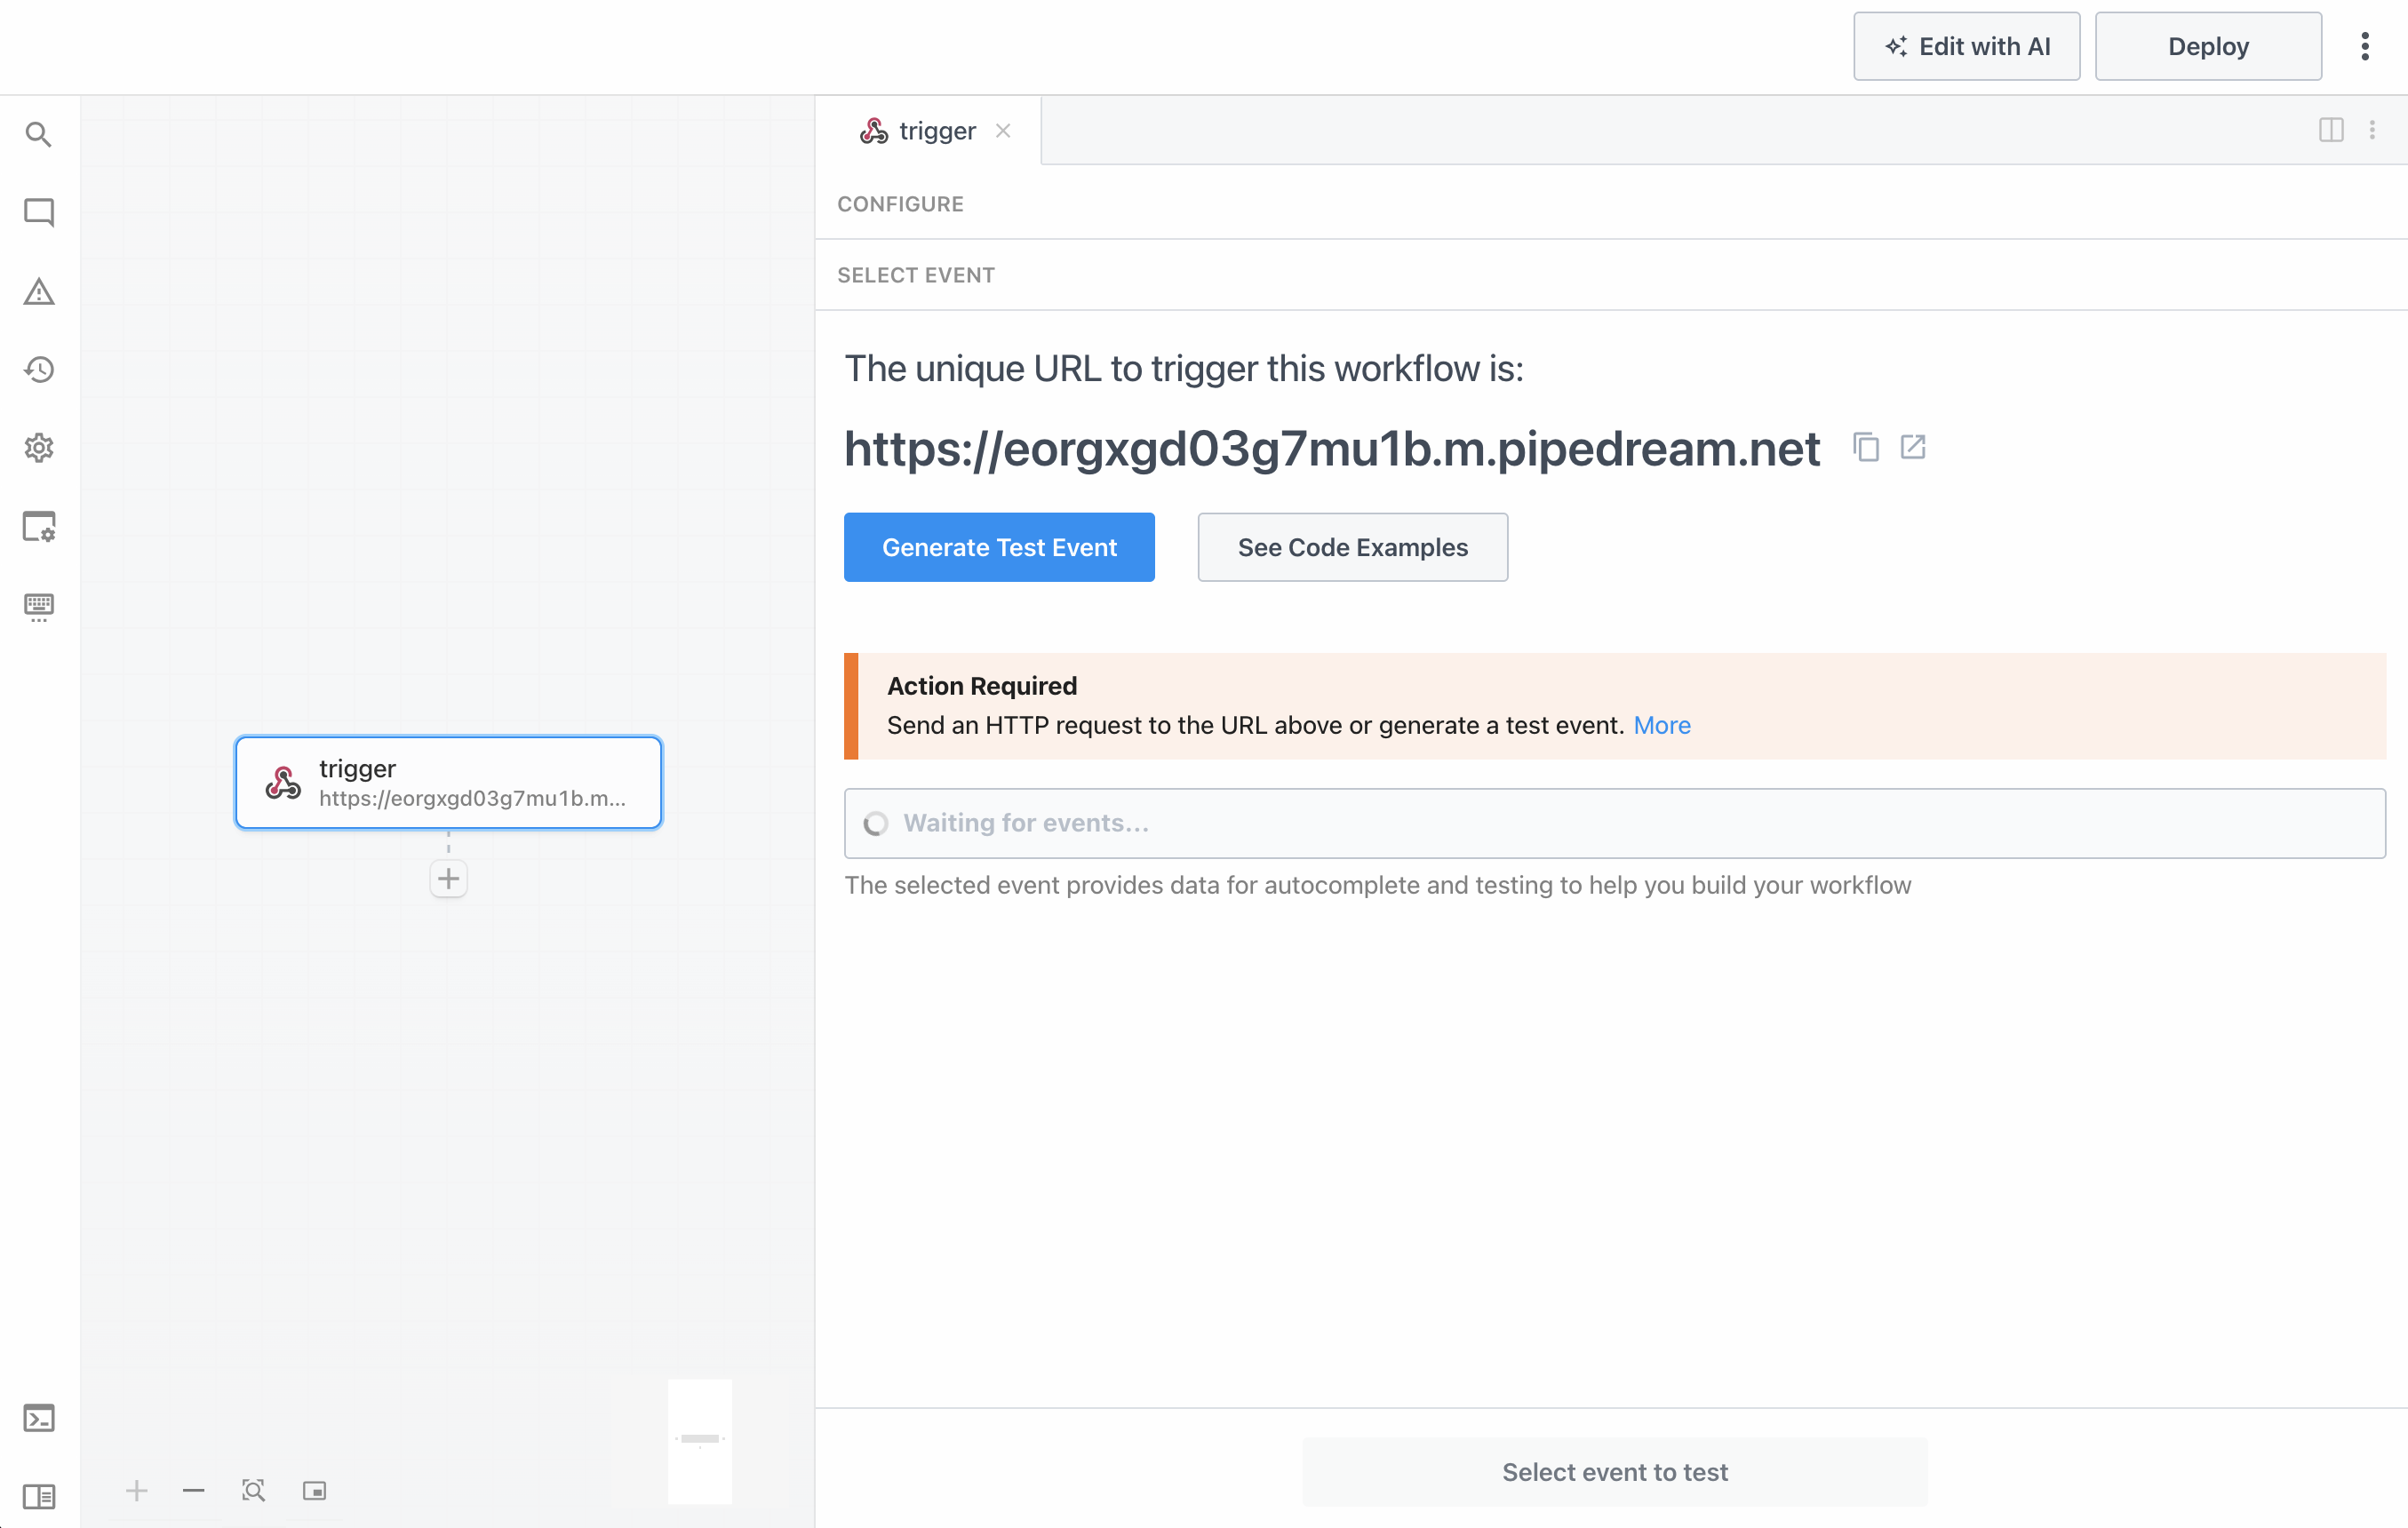
Sending a Test Event
To configure the next steps, Pipedream needs a sample event so it can show the structure of the incoming data and offer it for autocompletion. Click Generate Test Event, open the Body tab, select application/json as the Content-Type, and enter the following payload in the Raw Request Body field:
{
  "Signer Position": "Program Director",
  "Signer Name": "Margaret Ellison",
  "Certificate ID": "FLN-2025-00143",
  "Organizer": "Future Learning Network",
  "Event Name": "International Student Leadership Forum 2025",
  "Full Name": "Aisha Rahman",
  "Email": "aisha.rahman@example.com"
}
The first six keys match the merge tags in the certificate template exactly. The Email key isn’t used in the template, but we include it in the payload because the workflow needs to know where to send the certificate once it’s generated.
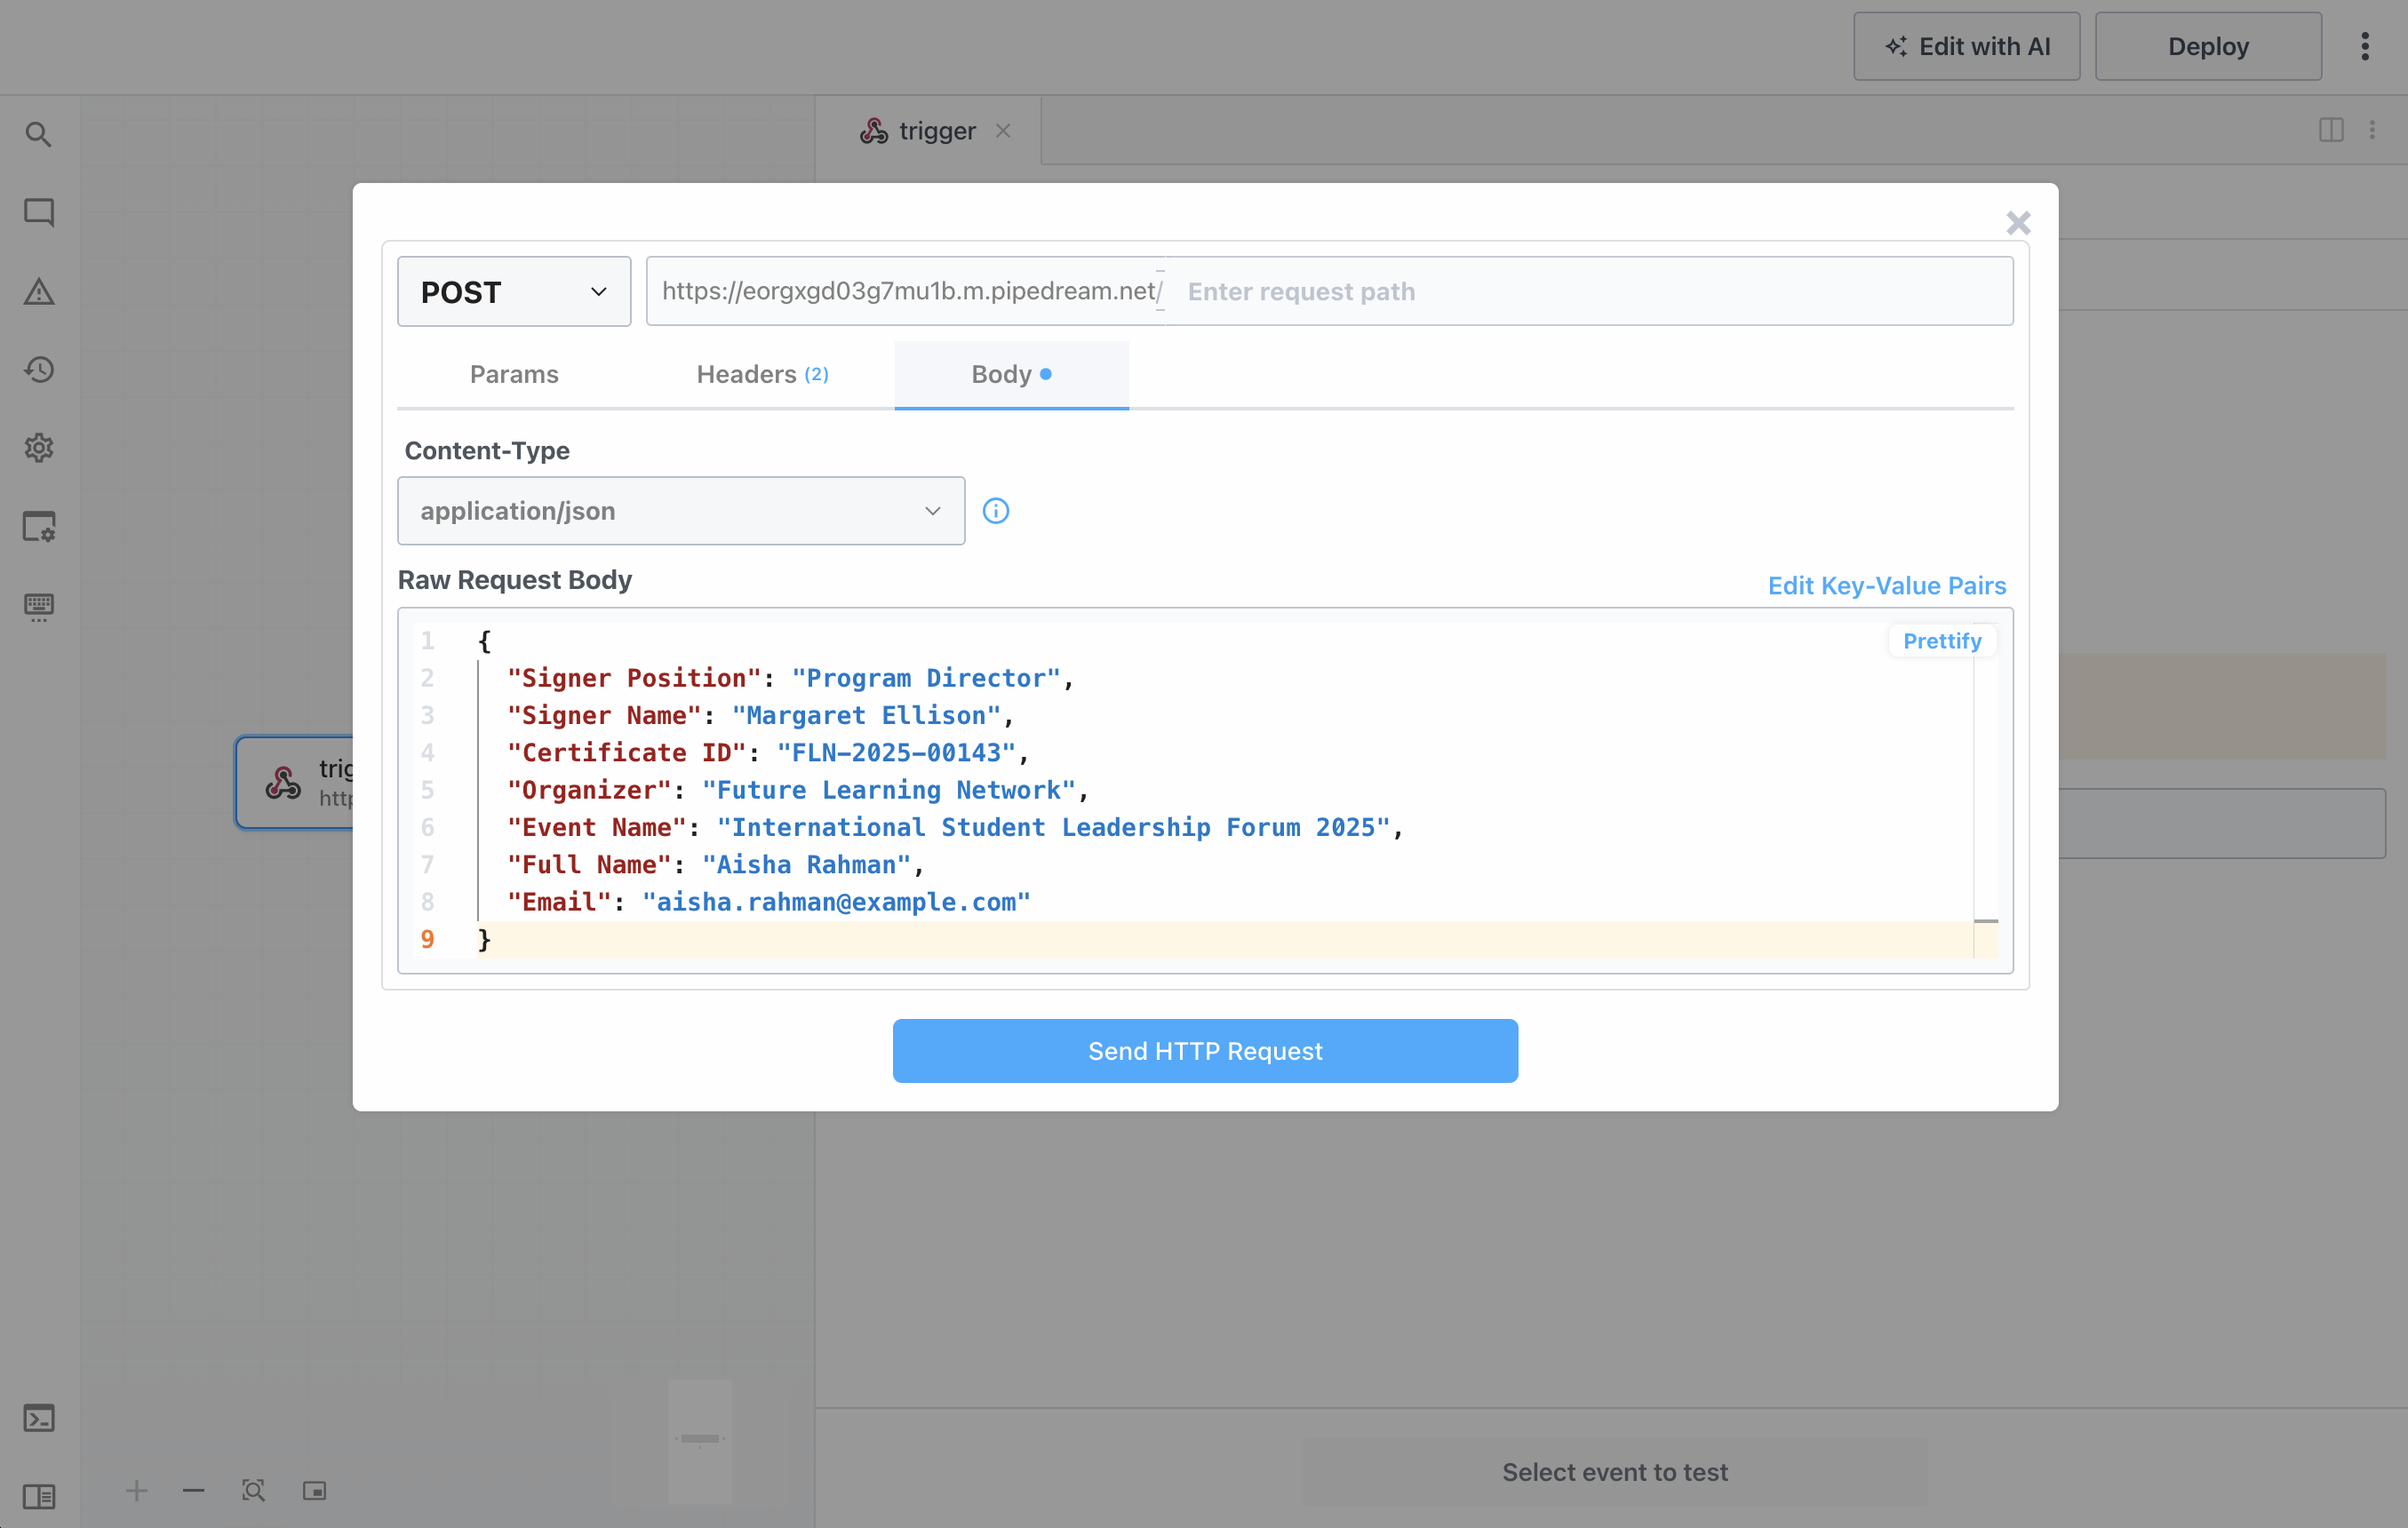
Click Send HTTP Request to submit the test event. The RESULTS section confirms that the request was received and shows how the data is exported under steps.trigger.event. The seven fields from our payload are available in the body object, alongside other request details like the headers, the method, and the url.
Generating the Certificate
Next, click the + button below the trigger, search for DocuGenerate, and select the Generate Document action from the DocuGenerate App. The first time you use it, you’ll need to connect your DocuGenerate account with your API Key. The integration guide covers this setup in more detail.
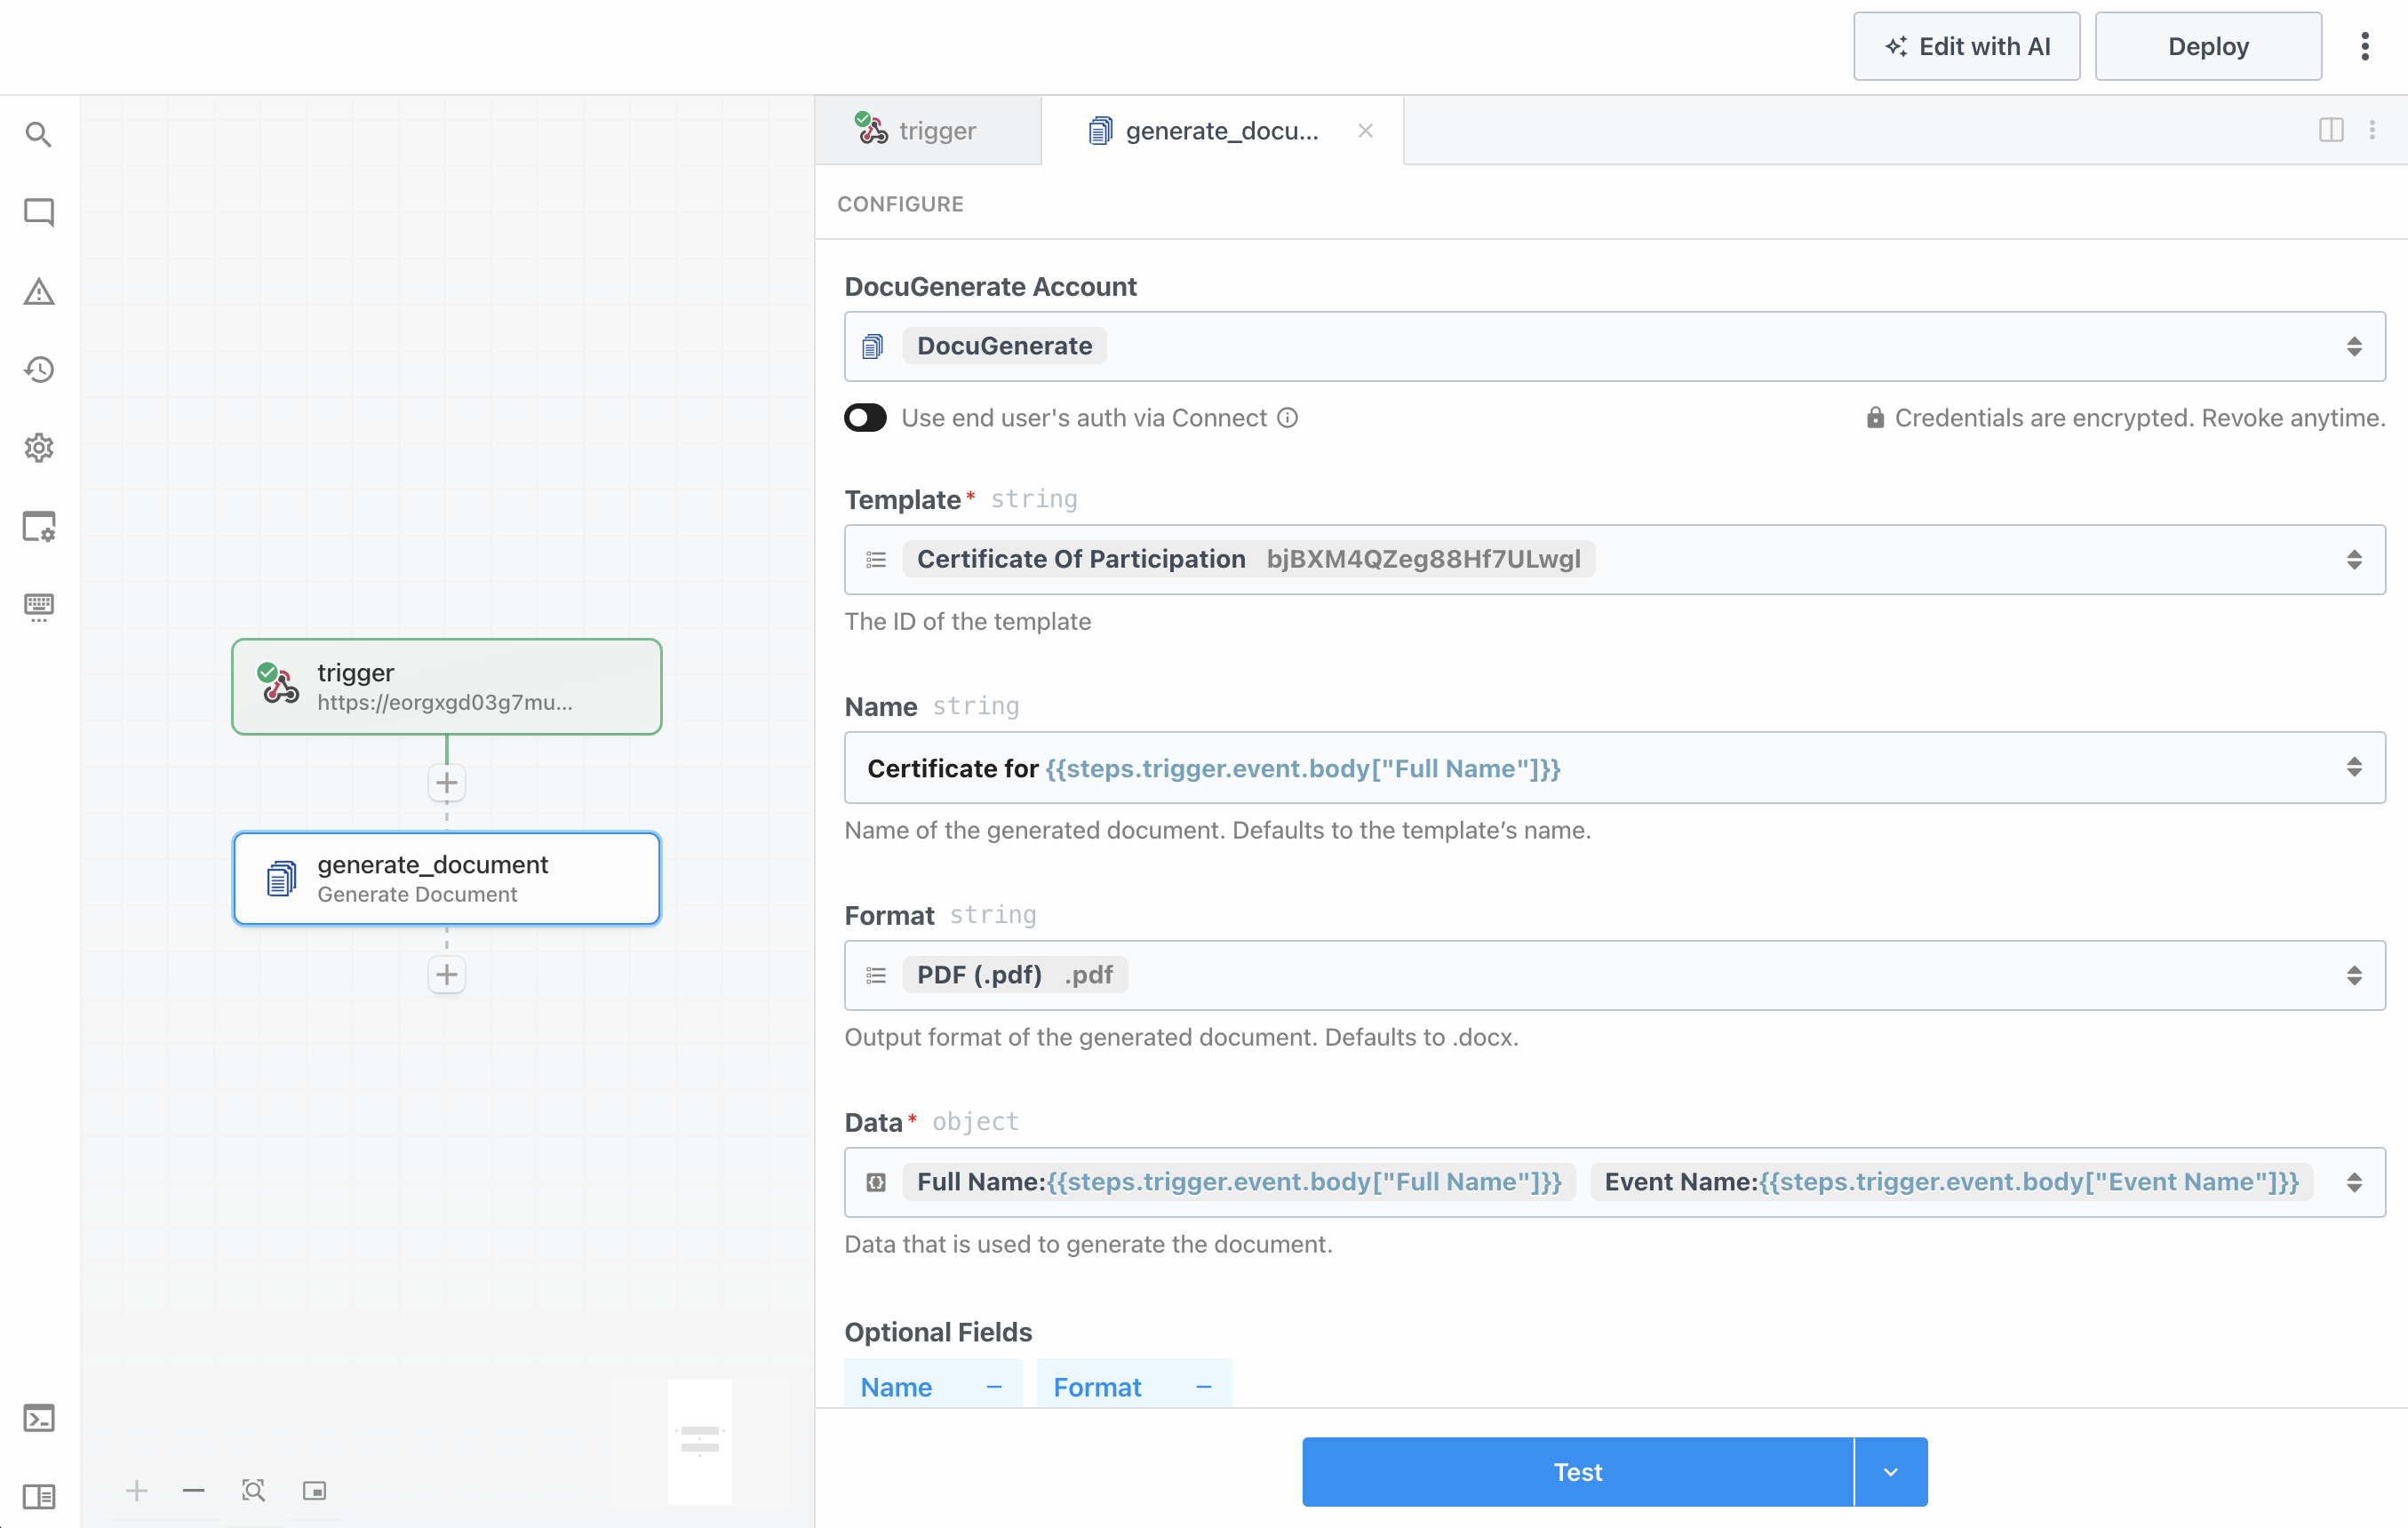
Configure the action with the following parameters:
- DocuGenerate Account: The account connected with your API Key.
- Template: The Certificate Of Participation template uploaded in the template setup step.
- Name:
Certificate for {{steps.trigger.event.body["Full Name"]}}, which gives each document a name based on the participant, such as Certificate for Aisha Rahman. - Format:
PDF (.pdf), so the certificate can be attached to an email and opened on any device. - Data: An object mapping each merge tag to the corresponding value from the trigger, as explained below.
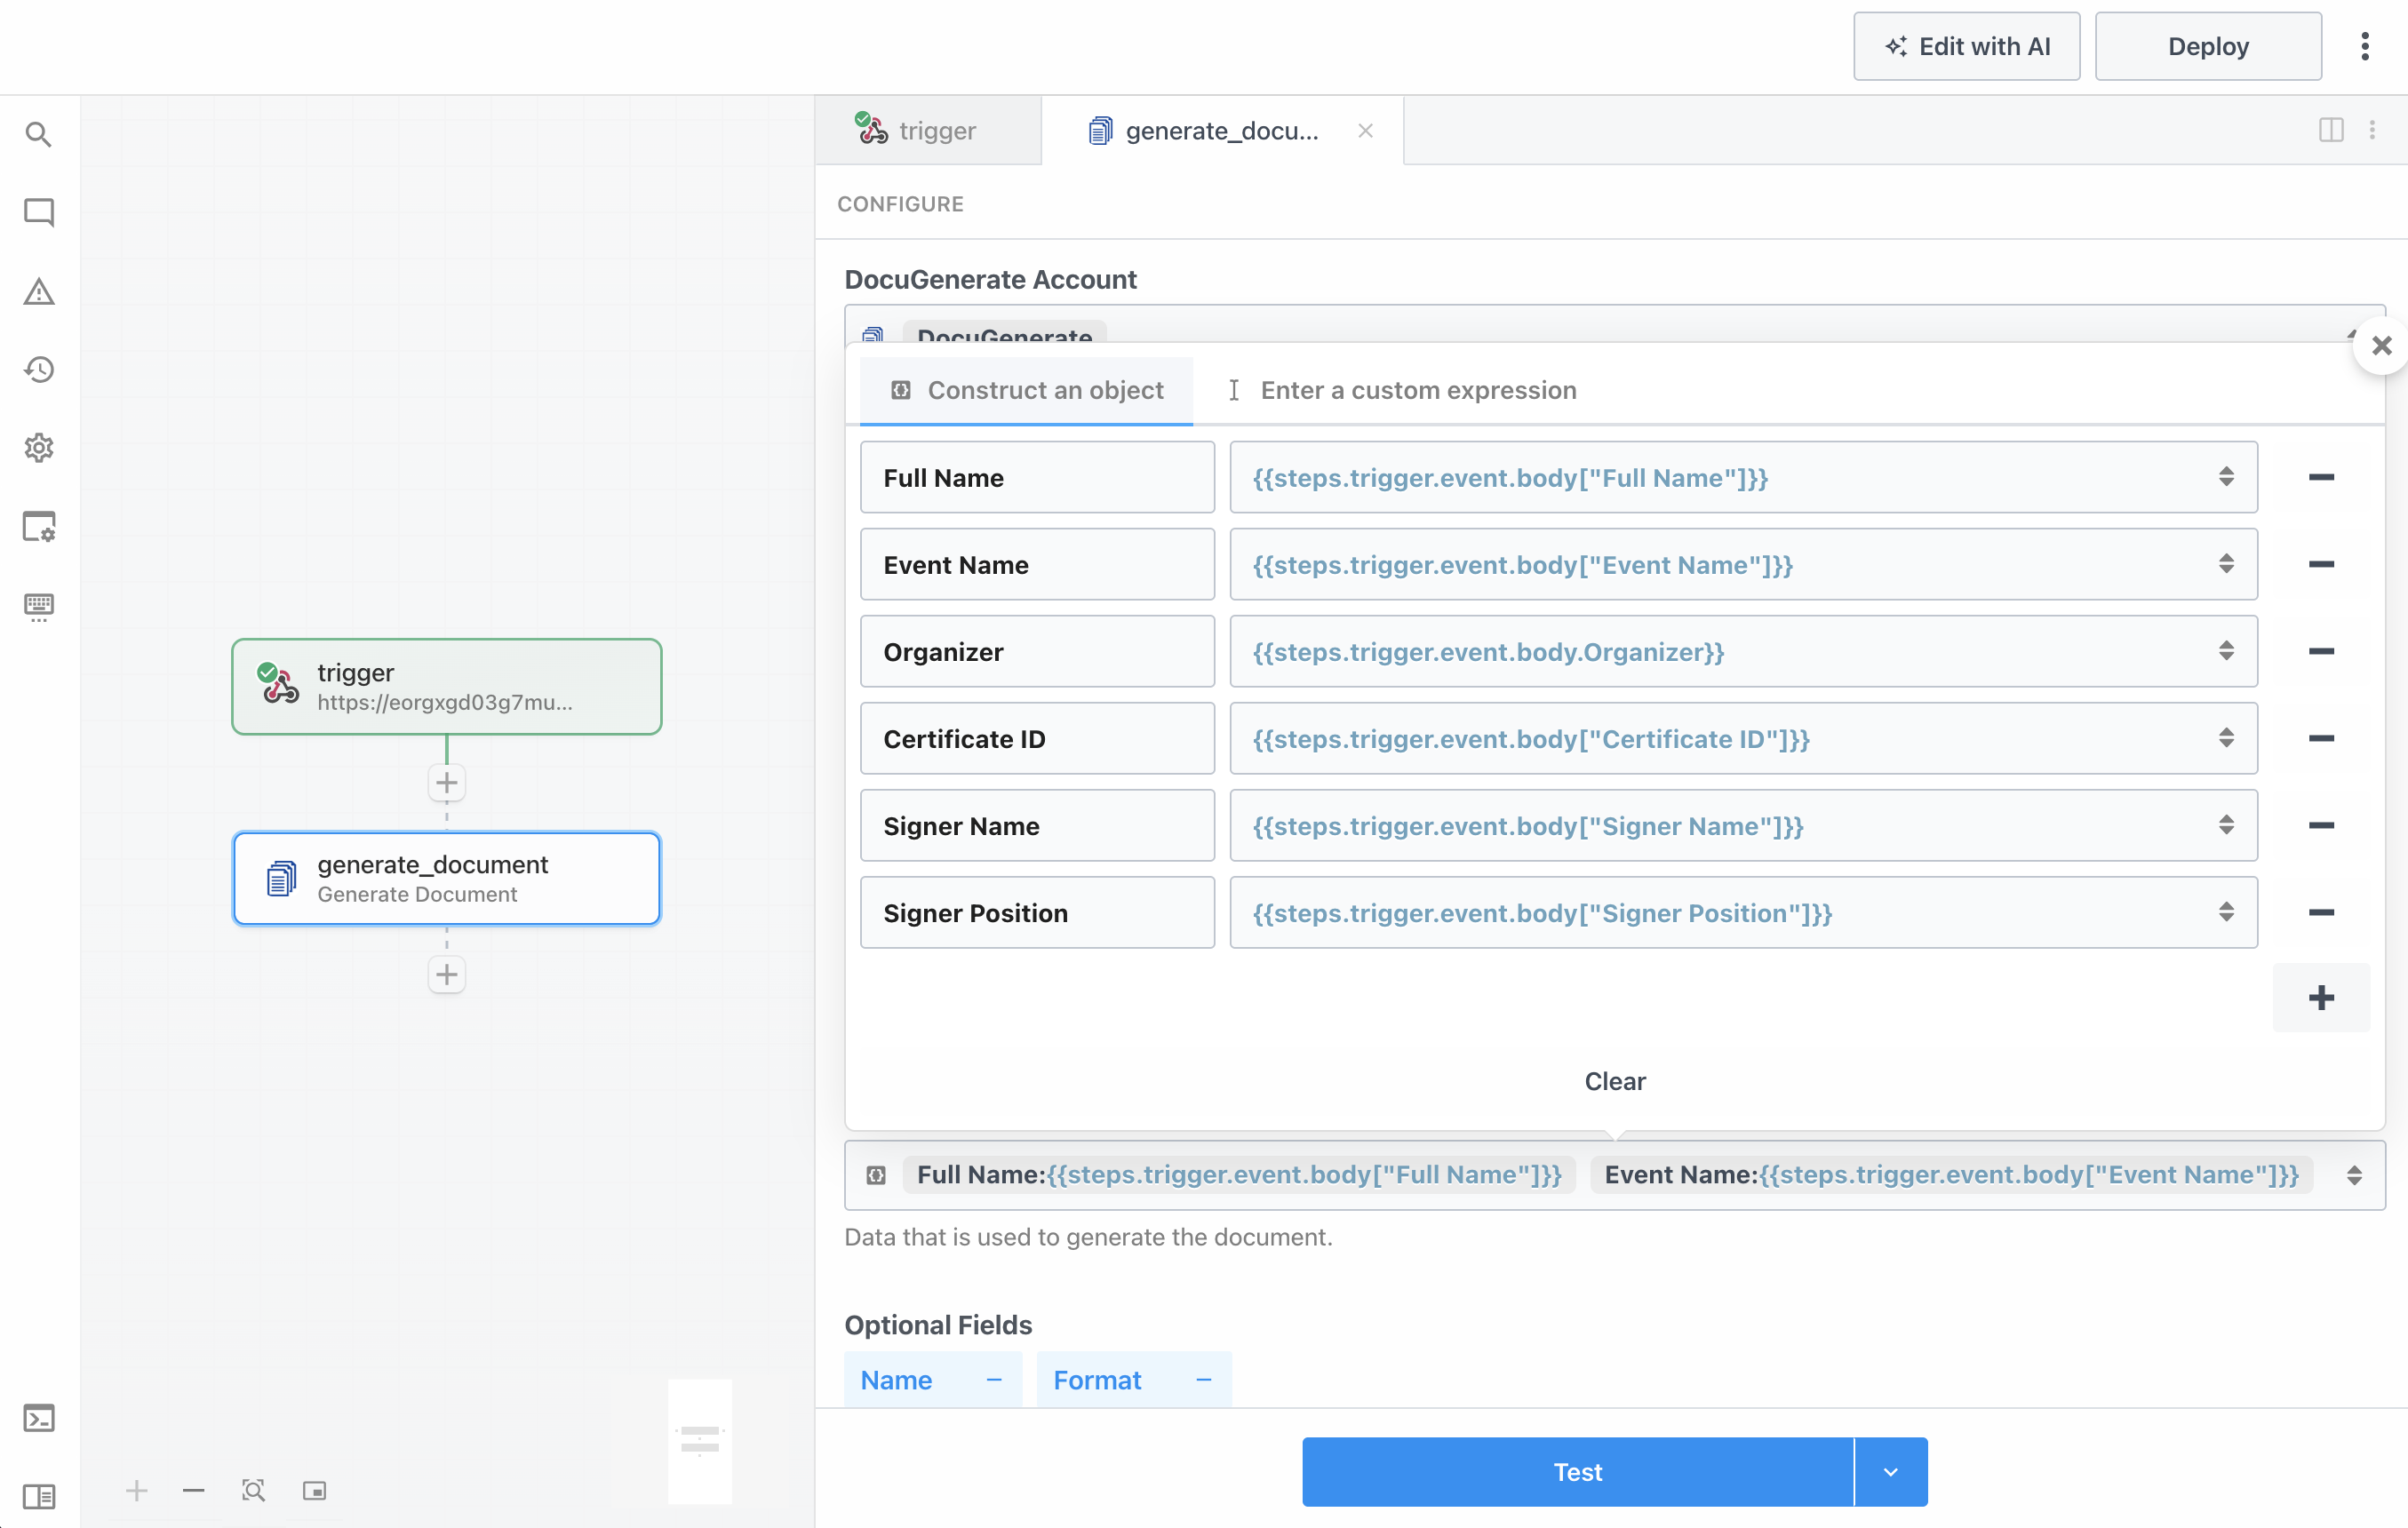
For the Data parameter, select the Construct an object option and add one row for each of the 6 merge tags. The key of each row is the merge tag name, and the value references the matching field in steps.trigger.event.body. Keys that contain spaces must use bracket notation, as in {{steps.trigger.event.body["Full Name"]}}, while single-word keys like Organizer can use the shorter dot notation, {{steps.trigger.event.body.Organizer}}. The Email field is left out, since the template doesn’t use it.
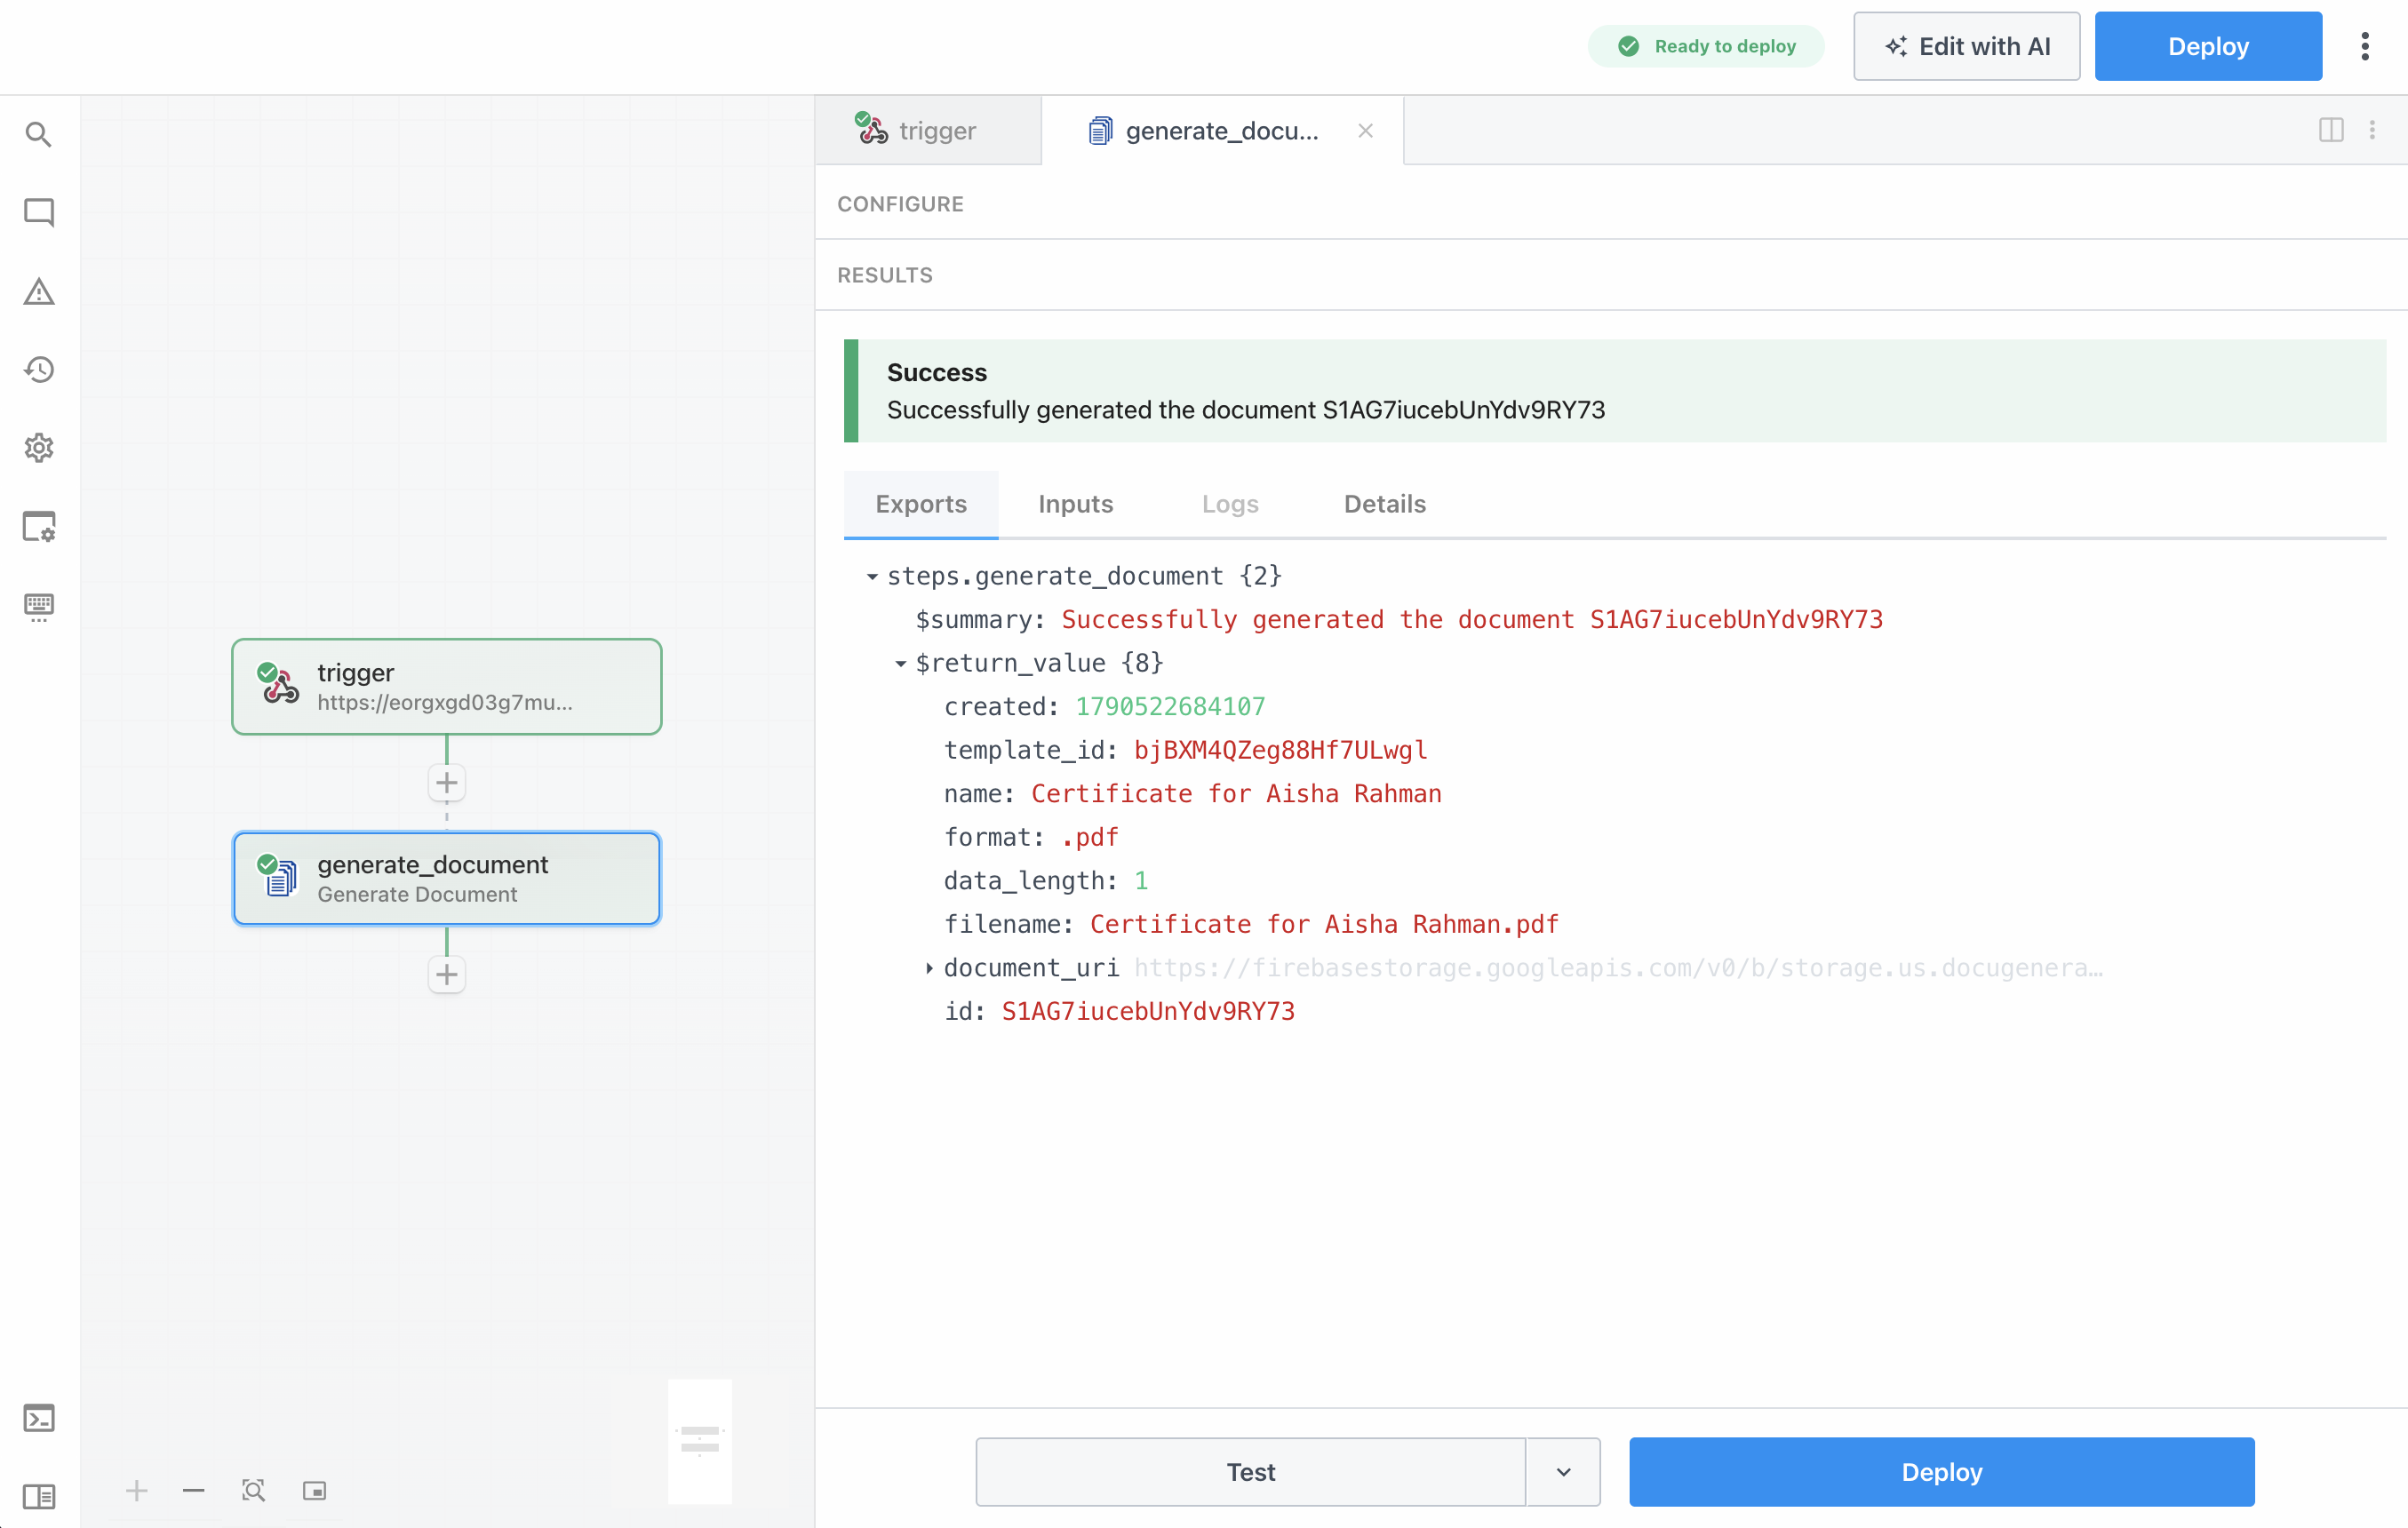
Click Test to run the action with the test event. The RESULTS section confirms that the document was generated, and the exported $return_value contains the details of the new document:
{
  "$summary": "Successfully generated the document S1AG7iucebUnYdv9RY73",
  "$return_value": {
    "created": 1790522684107,
    "template_id": "bjBXM4QZeg88Hf7ULwgl",
    "name": "Certificate for Aisha Rahman",
    "format": ".pdf",
    "data_length": 1,
    "filename": "Certificate for Aisha Rahman.pdf",
    "document_uri": "https://firebasestorage.googleapis.com/v0/b/storage.us.docugenerate.com/o/documents%2FS1AG7iucebUnYdv9RY73%2FCertificate%20for%20Aisha%20Rahman.pdf?alt=media&token=81c6ffdb-282d-4a89-a2b9-e96542f6aee2",
    "id": "S1AG7iucebUnYdv9RY73"
  }
}
The two fields we’ll need in the next step are filename, the name of the generated file, and document_uri, a URL pointing to the generated PDF.
You can also verify the result in DocuGenerate. The Documents tab of the Certificate Of Participation template now lists a document named Certificate for Aisha Rahman, with every merge tag replaced by the values from the test event, including the organizer’s name inside the seal and the signer’s details in the signature block. You can download the generated certificate to see the final PDF.
Sending the Certificate by Email
The final step delivers the certificate to the participant. Click the + button below the Generate Document action and select the Send Email action from the Gmail app, then connect the Gmail account the emails should be sent from. Pipedream supports many other email providers, but the Gmail action is complete and quick to set up, which makes it a good choice for this tutorial.
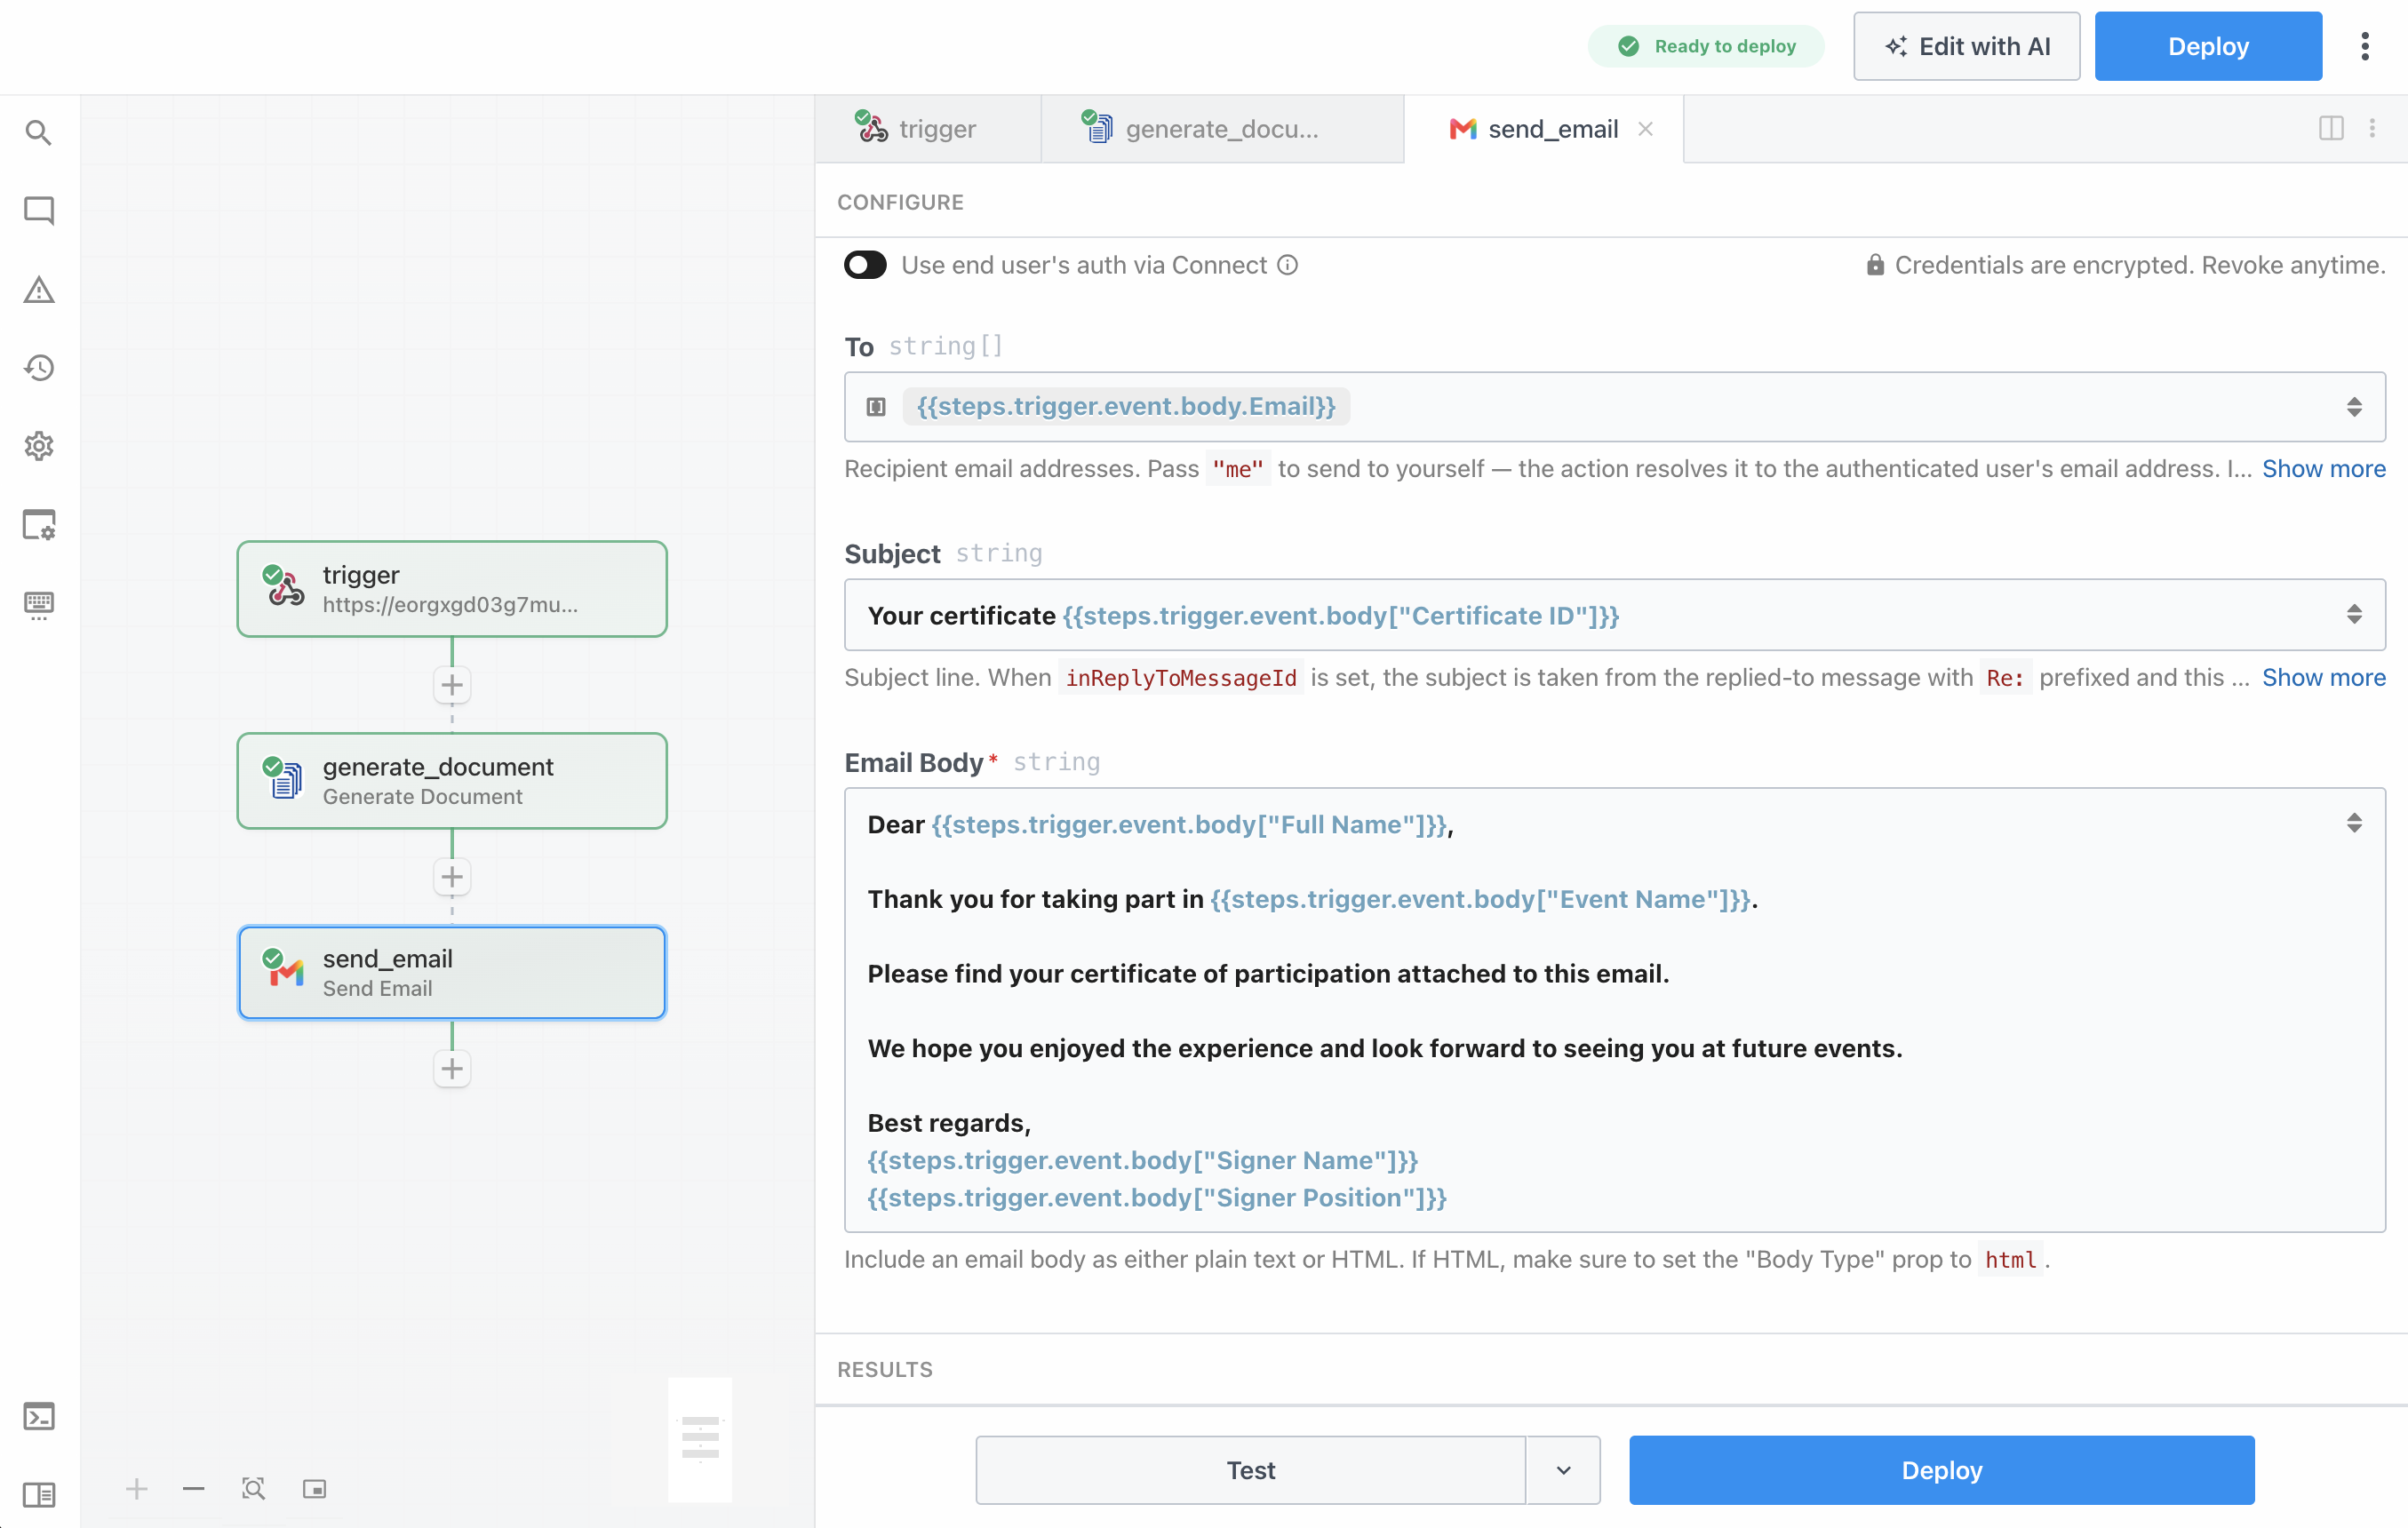
Configure the action with the following parameters:
- To:
{{steps.trigger.event.body.Email}}, the email address received in the webhook payload. - Subject:
Your certificate {{steps.trigger.event.body["Certificate ID"]}}, which includes the certificate ID so the participant can reference it later. - Email Body: A short message personalized with the participant’s name, the event name, and the signer’s details (shown below).
- Attachment Filenames:
{{steps.generate_document.$return_value.filename}}, the filename returned by the Generate Document action. - Attachments:
{{steps.generate_document.$return_value.document_uri}}, the URL of the generated PDF.
Here is the complete text used in the Email Body field:
Dear {{steps.trigger.event.body["Full Name"]}},

Thank you for taking part in {{steps.trigger.event.body["Event Name"]}}.

Please find your certificate of participation attached to this email.

We hope you enjoyed the experience and look forward to seeing you at future events.

Best regards,
{{steps.trigger.event.body["Signer Name"]}}
{{steps.trigger.event.body["Signer Position"]}}
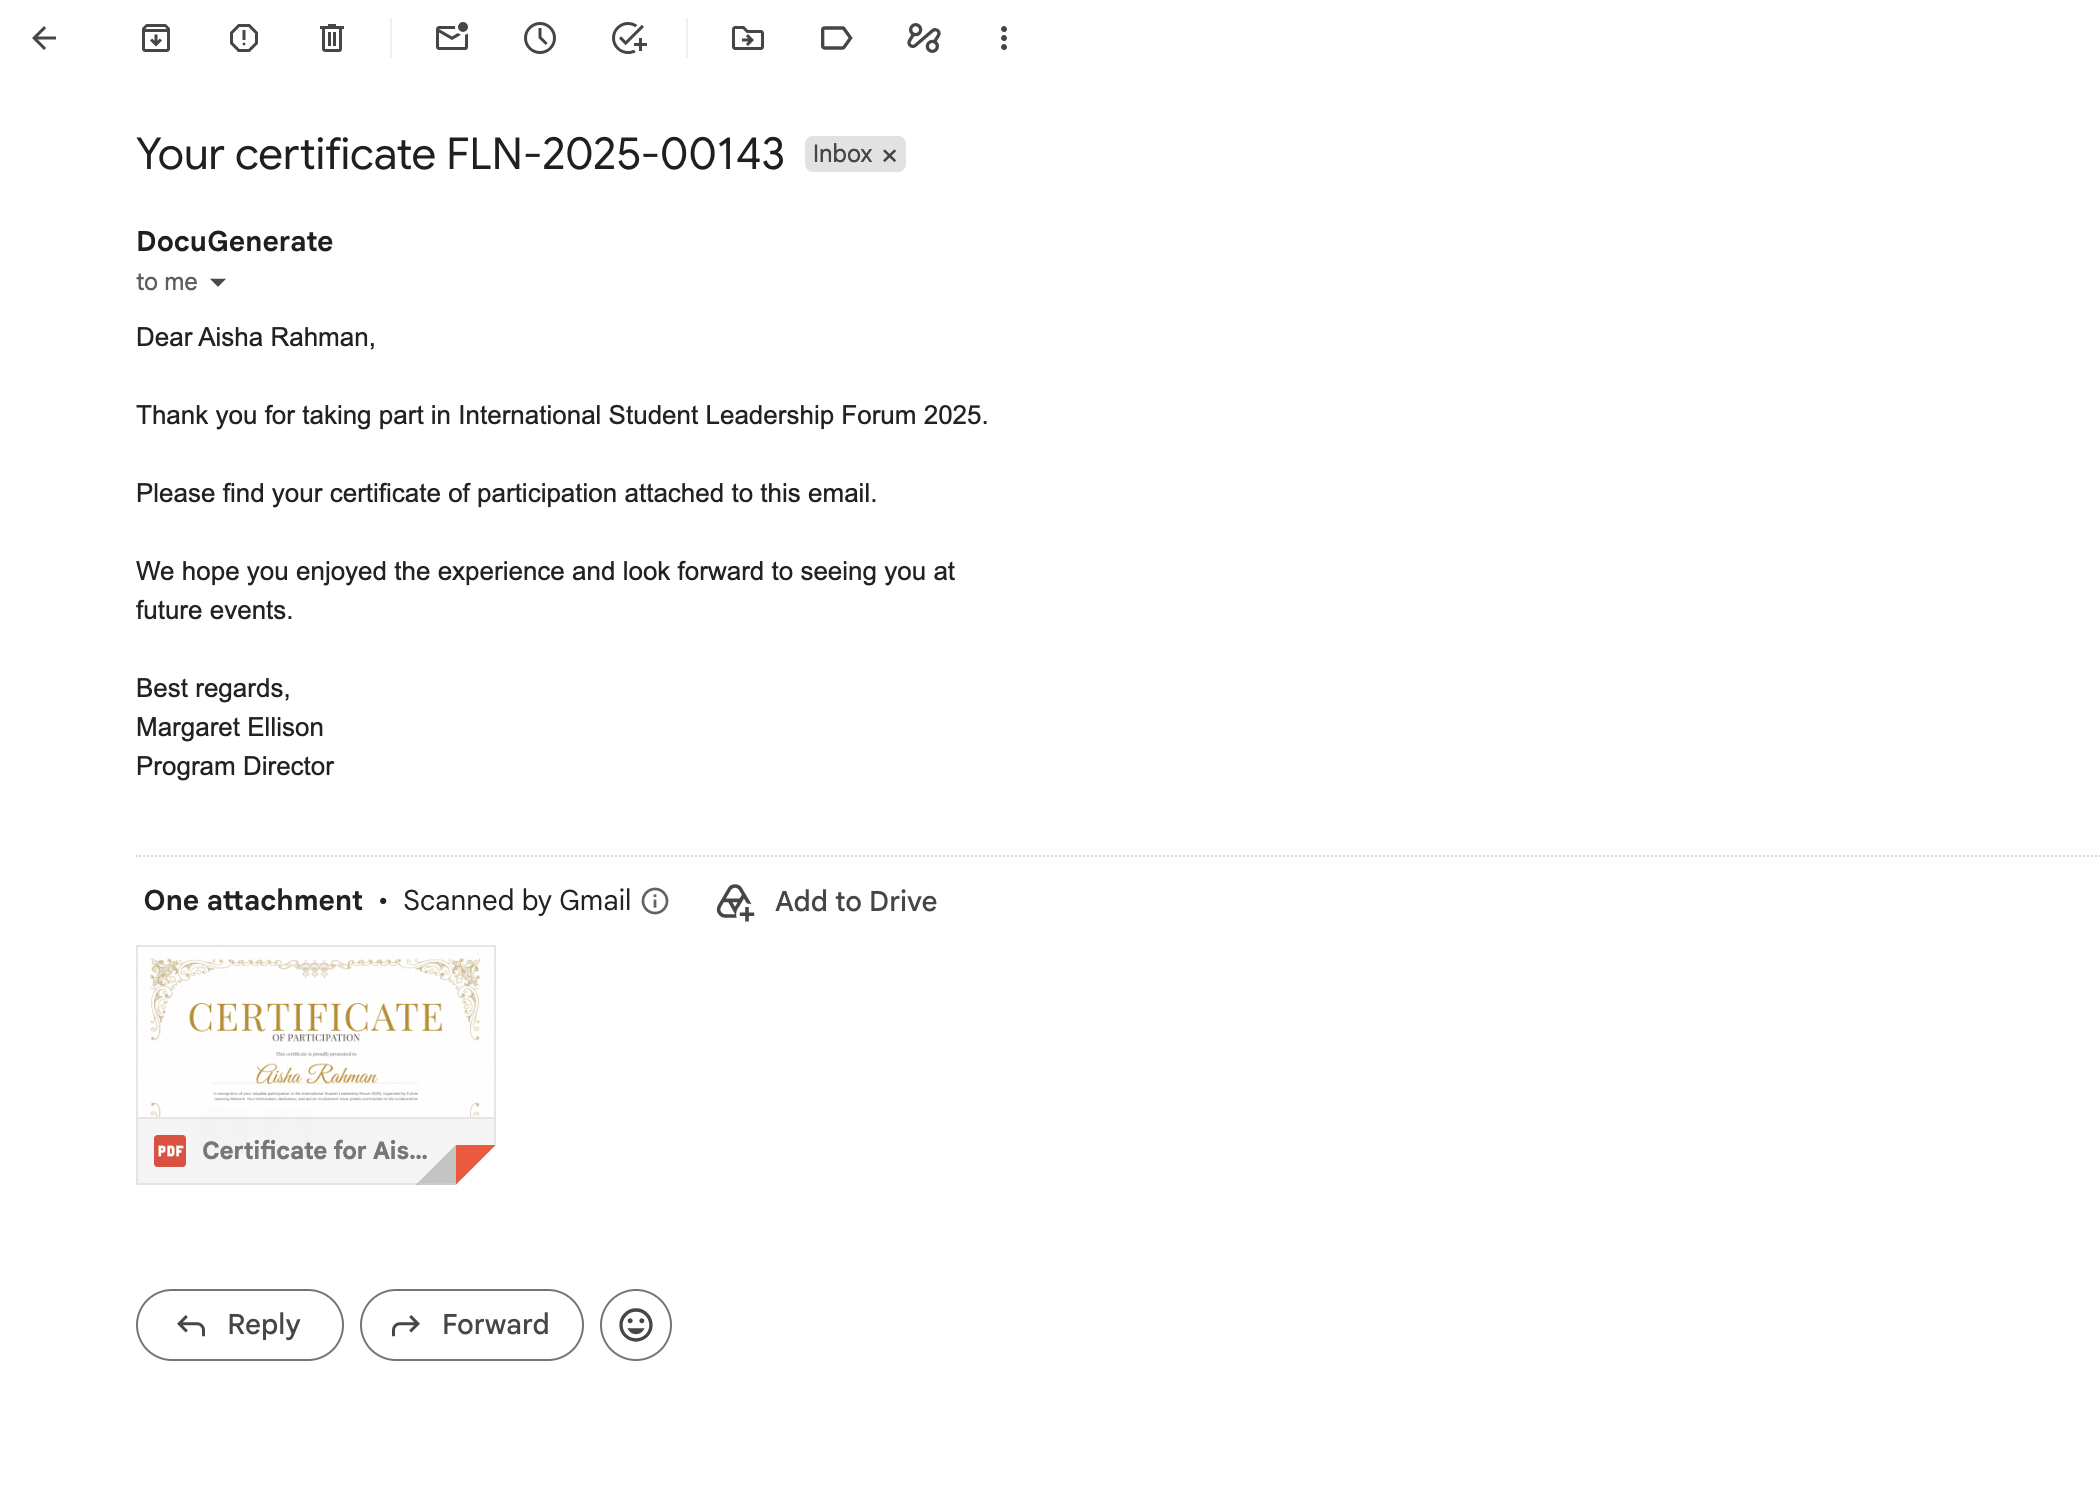
A convenient detail of the Gmail action is that the Attachments field accepts public URLs as well as file paths. This means the document_uri returned by DocuGenerate can be passed directly, without adding an intermediate step to download the PDF to temporary storage first. Click Test to send the email for the test event. The participant receives a message with the subject Your certificate FLN-2025-00143, the personalized body text, and the certificate attached as Certificate for Aisha Rahman.pdf.
Testing the Workflow End to End
So far, each step has been tested individually using the sample event. To run the complete workflow the way it will run in practice, click Deploy so the trigger URL starts processing live requests. Then send a real HTTP request to the trigger URL from outside Pipedream. If you’re not sure how to do this from your own system, the See Code Examples button in the trigger’s SELECT EVENT section provides ready-made snippets in several languages, including cURL, JavaScript, Node, Python, PHP, Go, and Ruby.
We’ll use the following cURL command, which sends the same participant data as the test event:
curl -X POST https://eorgxgd03g7mu1b.m.pipedream.net \
  -H "Content-Type: application/json" \
  -d '{
    "Signer Position": "Program Director",
    "Signer Name": "Margaret Ellison",
    "Certificate ID": "FLN-2025-00143",
    "Organizer": "Future Learning Network",
    "Event Name": "International Student Leadership Forum 2025",
    "Full Name": "Aisha Rahman",
    "Email": "aisha.rahman@example.com"
  }'
Within a few seconds of sending the request, the workflow runs through all three steps: the trigger receives the payload, DocuGenerate generates the certificate, and Gmail sends it to the participant’s inbox. Each run is recorded in the workflow’s event history in Pipedream, where you can inspect the inputs and exports of every step if something doesn’t look right. To generate certificates for a whole list of participants, send one request per participant with their own details.
If you’d like to try this workflow yourself, you can use this share link to copy it into your own Pipedream account. Connected accounts are not included in shared workflows, so you’ll need to connect your own DocuGenerate and Gmail accounts and select your own copy of the certificate template.
Taking the Workflow to Production
The workflow we’ve built is complete, but a couple of adjustments are worth making before relying on it for a real event. The most important one is the trigger’s Authorization setting. With None, anyone who knows the trigger URL can generate a certificate and have it emailed to any address. Pipedream lets you authorize HTTP requests with a custom token or OAuth, so that only requests from your own systems are accepted and all others are discarded.
The second consideration is where the data comes from. Calling the webhook from a registration platform, a form builder, or your own backend works well when certificates should go out as soon as someone completes an event. If your participant list lives in a spreadsheet or a database instead, you can swap the HTTP trigger for a Pipedream trigger that fires on a new row in Google Sheets or a new record in a database. The Generate Document and Send Email steps stay the same, and only the references to steps.trigger.event.body need to be updated to point at the new trigger’s data.
Conclusion
In this tutorial, we built a Pipedream workflow that turns a single HTTP request into a personalized PDF certificate delivered by email. The webhook trigger receives the participant’s details, the DocuGenerate Generate Document action merges them into a Word template, and the Gmail Send Email action attaches the PDF directly from its URL, with no intermediate download step and no manual work once the workflow is deployed.
The same pattern works for any document that needs to reach a recipient right after it’s created, such as course completion certificates, event tickets, registration confirmations, or receipts. Replace the template, adjust the payload to match its merge tags, and update the email text, and the rest of the workflow remains unchanged.
Resources