Create Salary Increase Letters with n8n and DocuGenerate
By DocuGenerate
August 18, 2026
Introduction
Salary increase letters are one of those documents that need to go out to every affected employee at the same time, worded consistently, and free of copy-paste mistakes. When a review cycle covers dozens of employees, writing each letter by hand or manually merging a spreadsheet into a Word document quickly becomes a bottleneck for HR teams. In this tutorial, we’ll build an automated workflow using n8n and DocuGenerate that turns a Google Sheets spreadsheet of salary review data into personalized PDF letters, with no manual document creation involved.
The workflow watches a Google Drive folder for a new spreadsheet. As soon as one appears, it reads every row, and for each employee it merges that row’s data into a Word template, generates a PDF, and uploads the finished letter to a dedicated output folder in Drive. HR only has to prepare the spreadsheet with that cycle’s raises; the letters are generated and filed automatically. By the end of this guide, you’ll have a fully functional n8n workflow that you can import and adapt to your own salary review process.
Setting Up the Salary Increase Letter Template
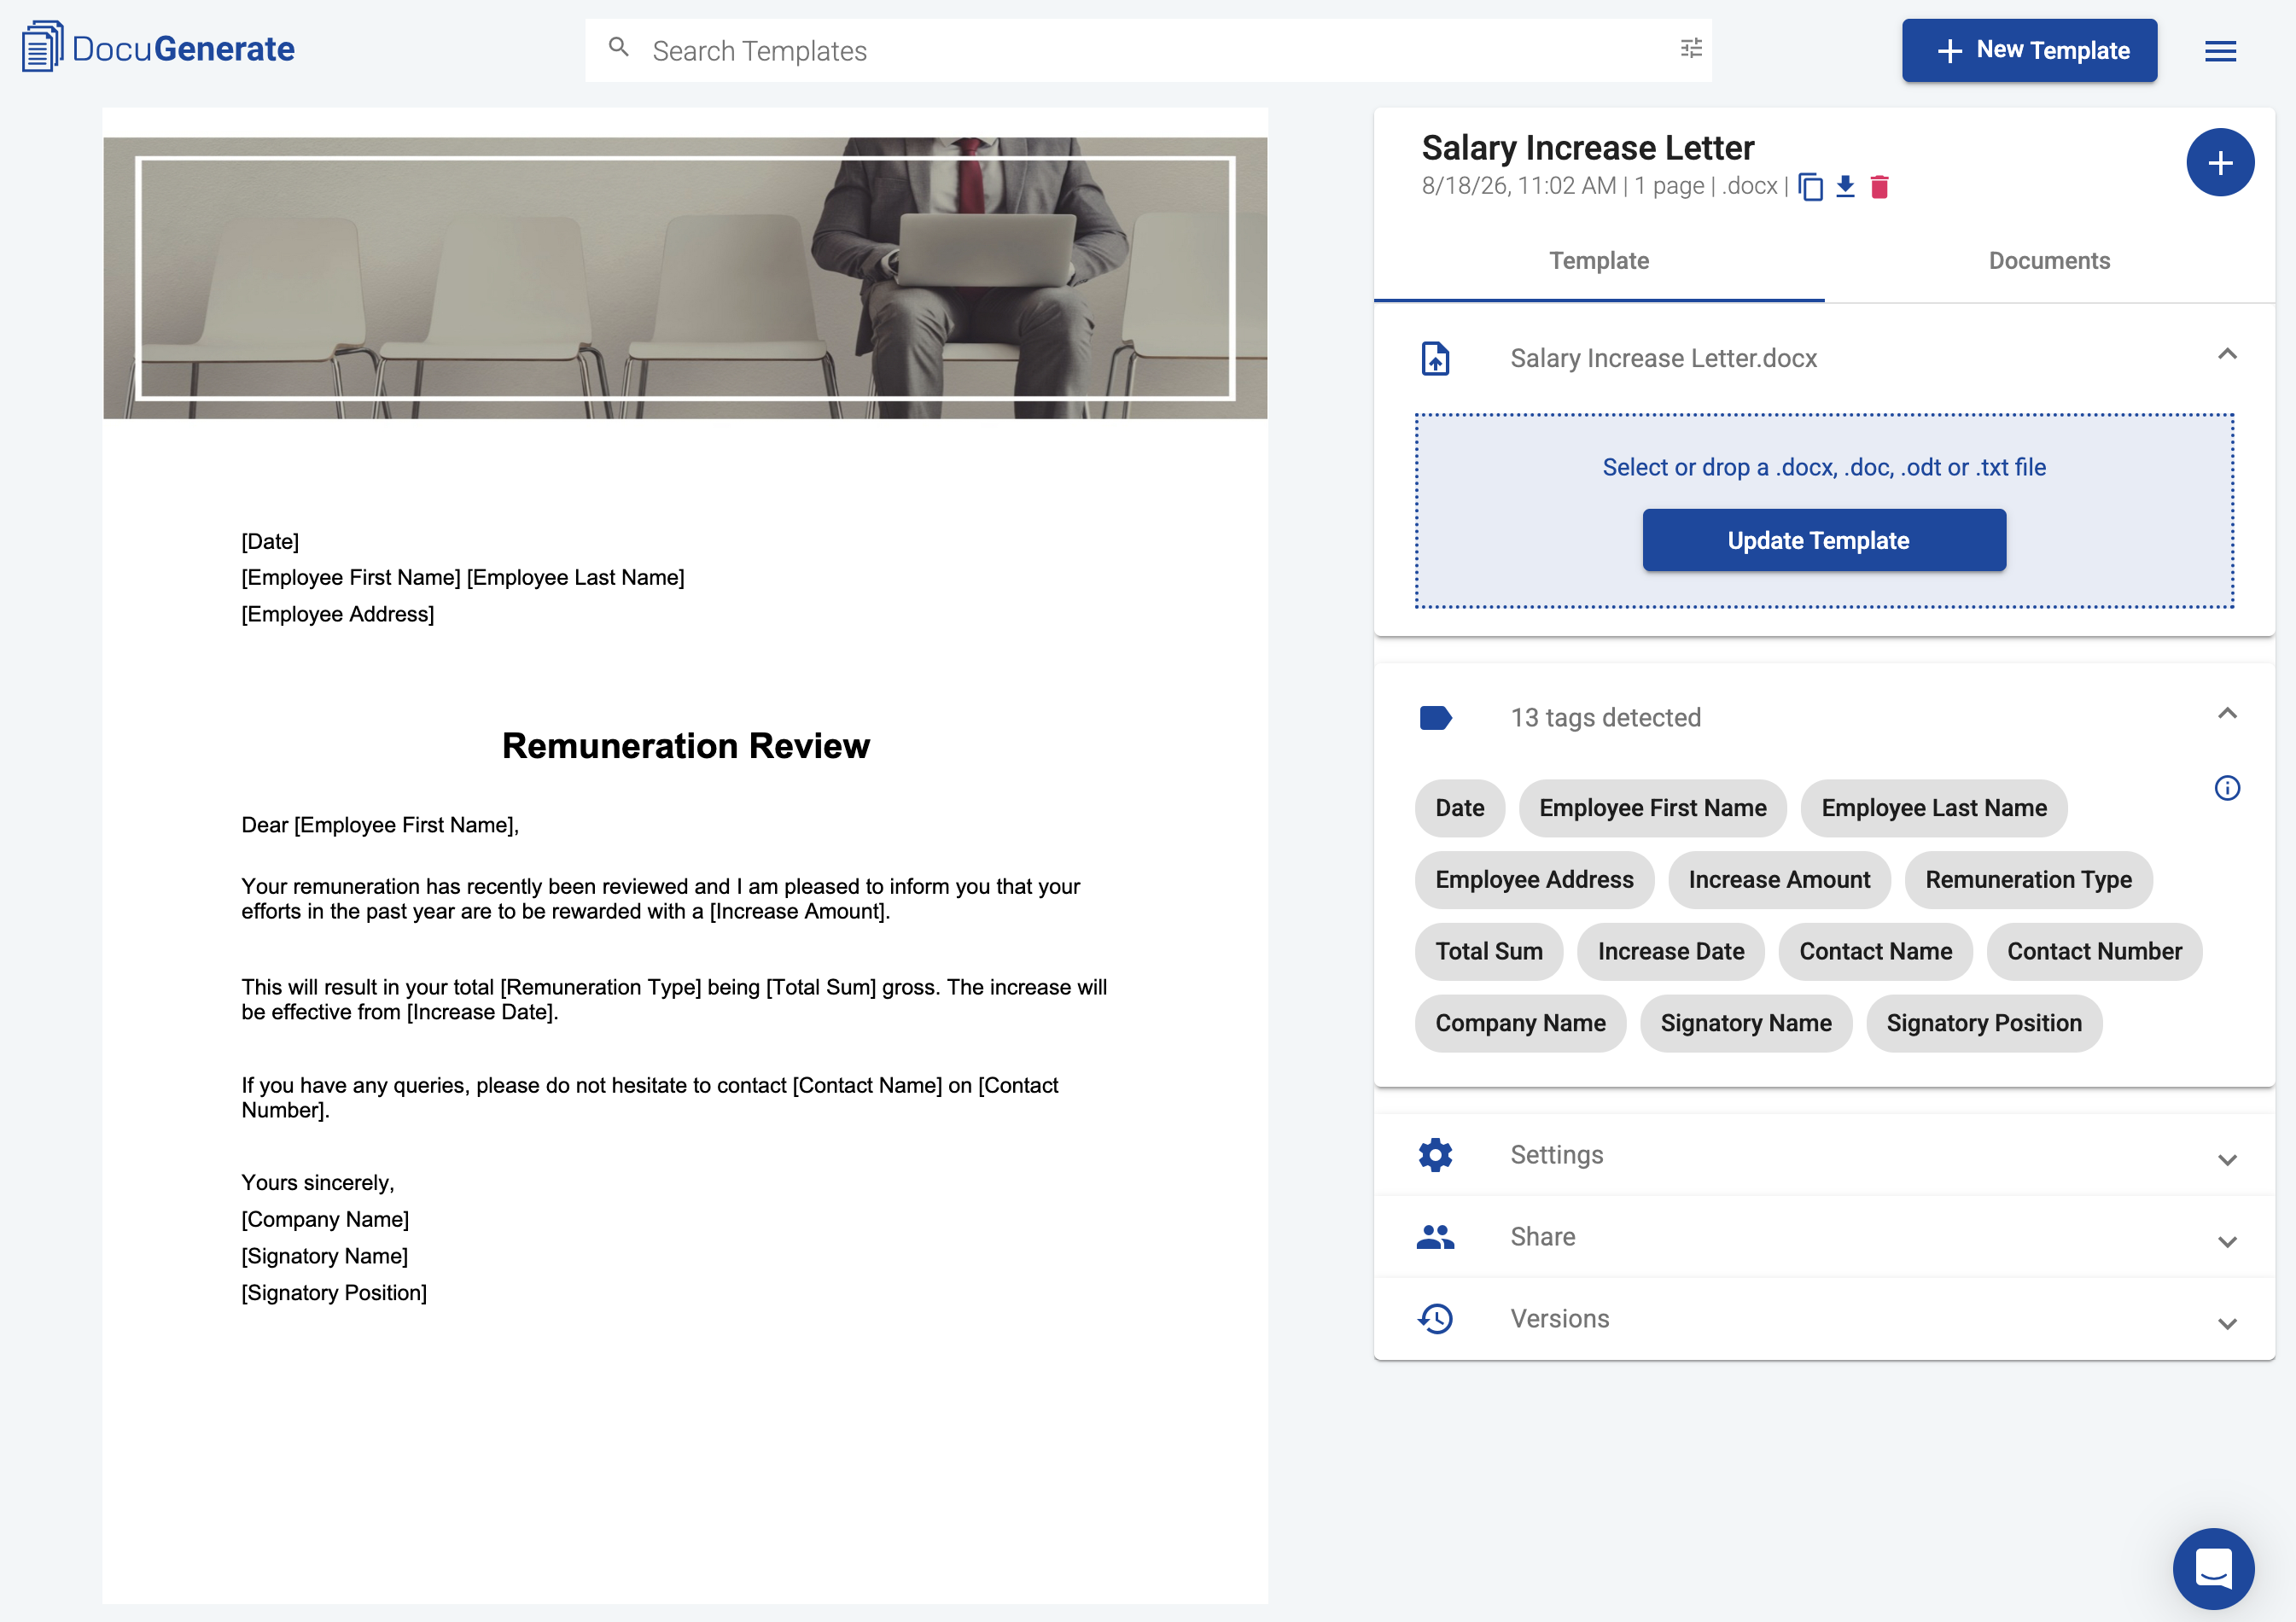
Before building the n8n workflow, we need a document template in DocuGenerate. We’ll use the Salary Increase Letter Word template, a short remuneration review letter that informs an employee of their raise, the new total pay, and who to contact with questions.
Once you’ve uploaded the template to your DocuGenerate account, 13 merge tags are detected automatically: Date, Employee First Name, Employee Last Name, Employee Address, Increase Amount, Remuneration Type, Total Sum, Increase Date, Contact Name, Contact Number, Company Name, Signatory Name, and Signatory Position. These merge tags cover both the employee-specific details of the raise and the fixed details of the company and signatory, all of which will come from the spreadsheet rows.
Preparing the Data in Google Sheets
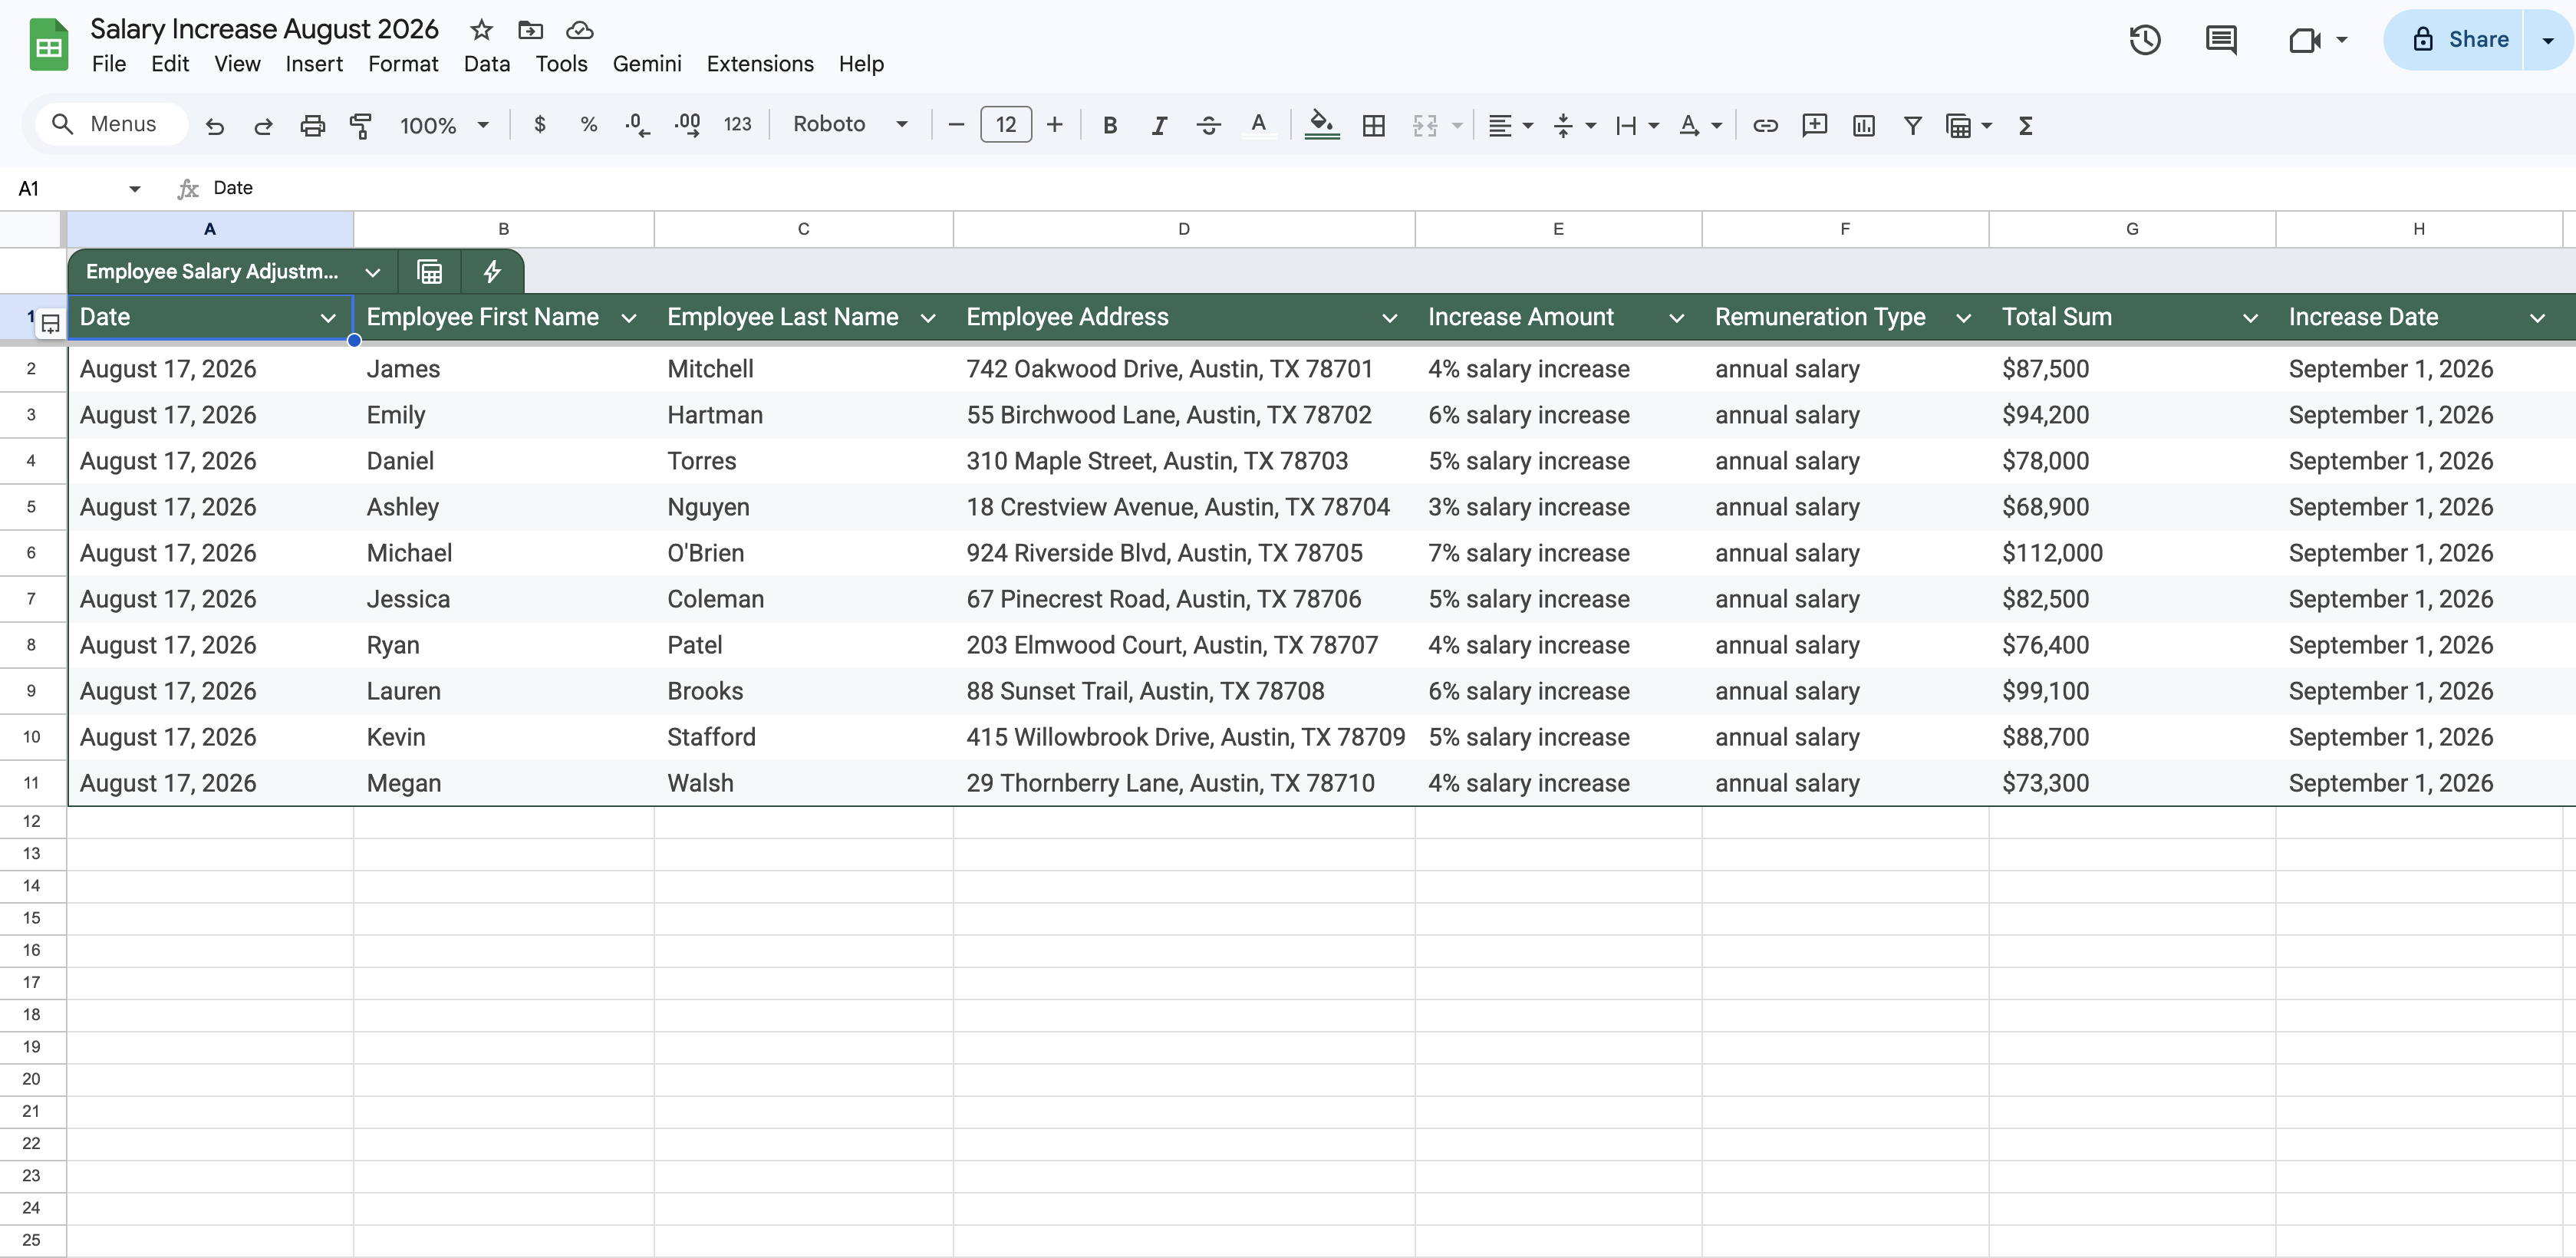
The data for this workflow lives in Google Sheets. For this tutorial, we’re using the sample Salary Increase Data Excel file, imported into a Google Sheets spreadsheet named Salary Increase August 2026. Each of the 10 rows represents one employee’s raise, with a column for every merge tag in the template: name, address, increase amount, remuneration type, total sum, and the increase date, alongside the shared contact and signatory details repeated on every row.
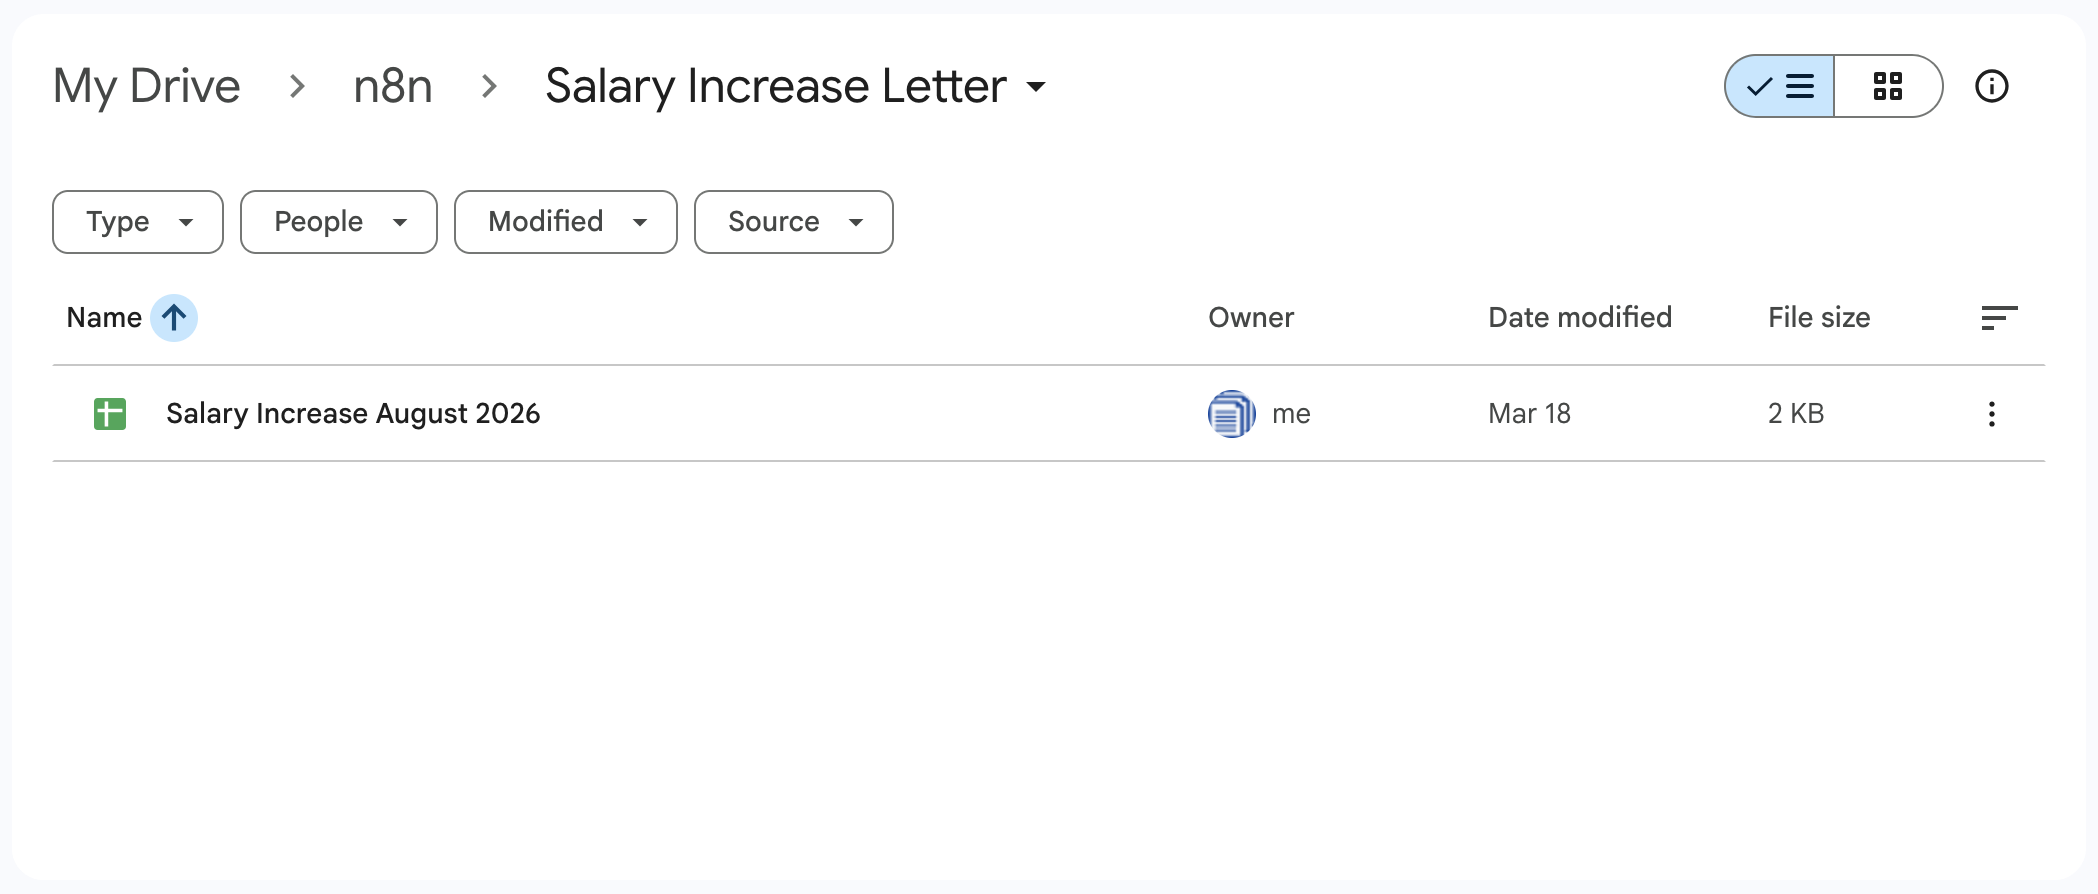
This spreadsheet lives inside a Salary Increase Letter folder in Google Drive, which also holds the folders of letters generated for past review cycles. Each new cycle starts the same way: a new spreadsheet with that cycle’s data is added to this folder, which is exactly the event our workflow will watch for.
The n8n Workflow Overview
With the template and the data source ready, here’s what the complete workflow looks like in n8n. You can download the workflow JSON file and import it directly into your n8n instance, then update the DocuGenerate template, the Google credentials, and the Drive folder ID to match your own setup.
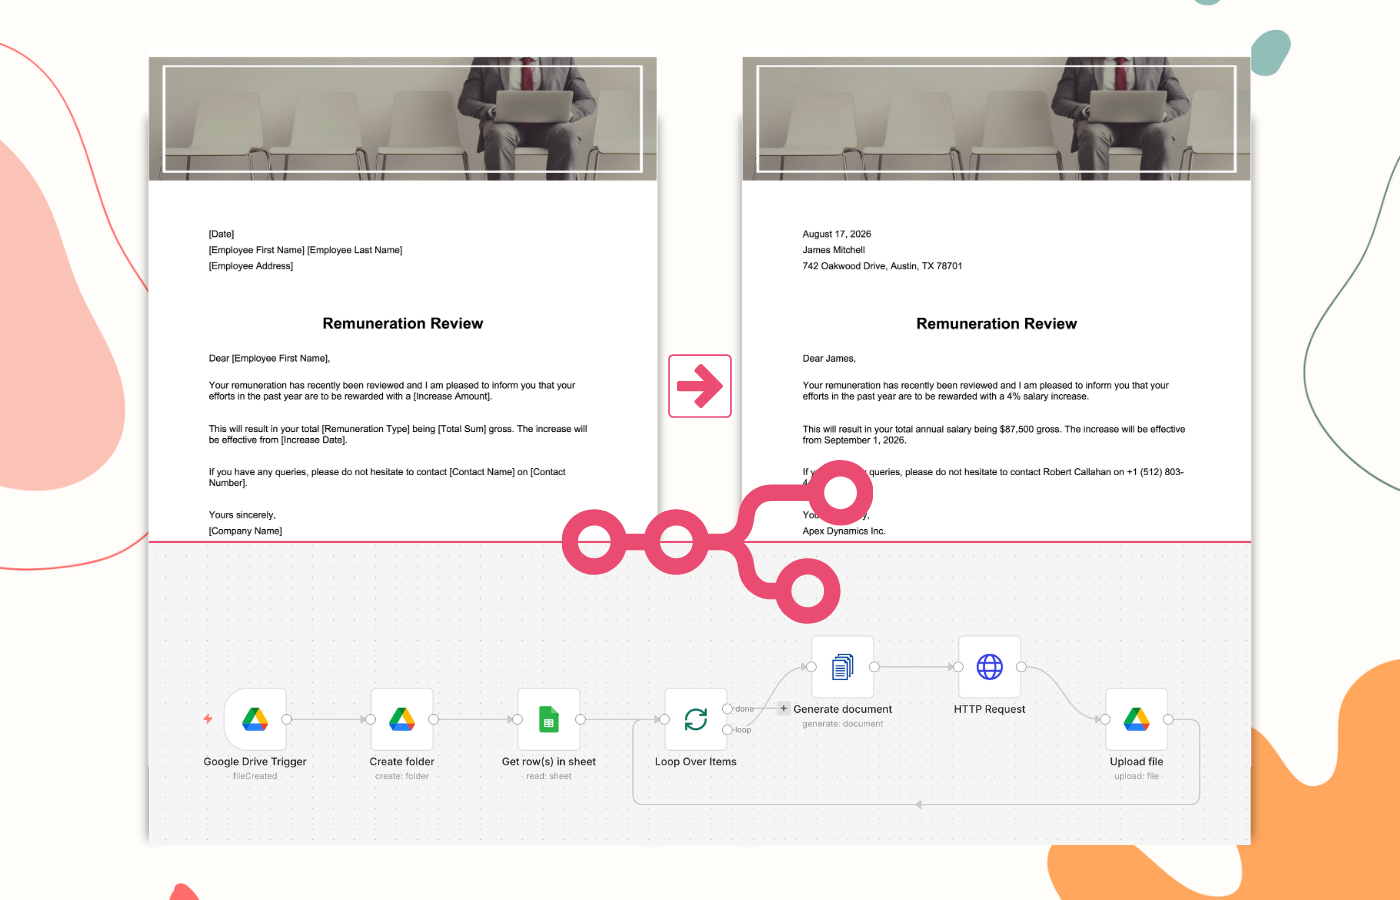
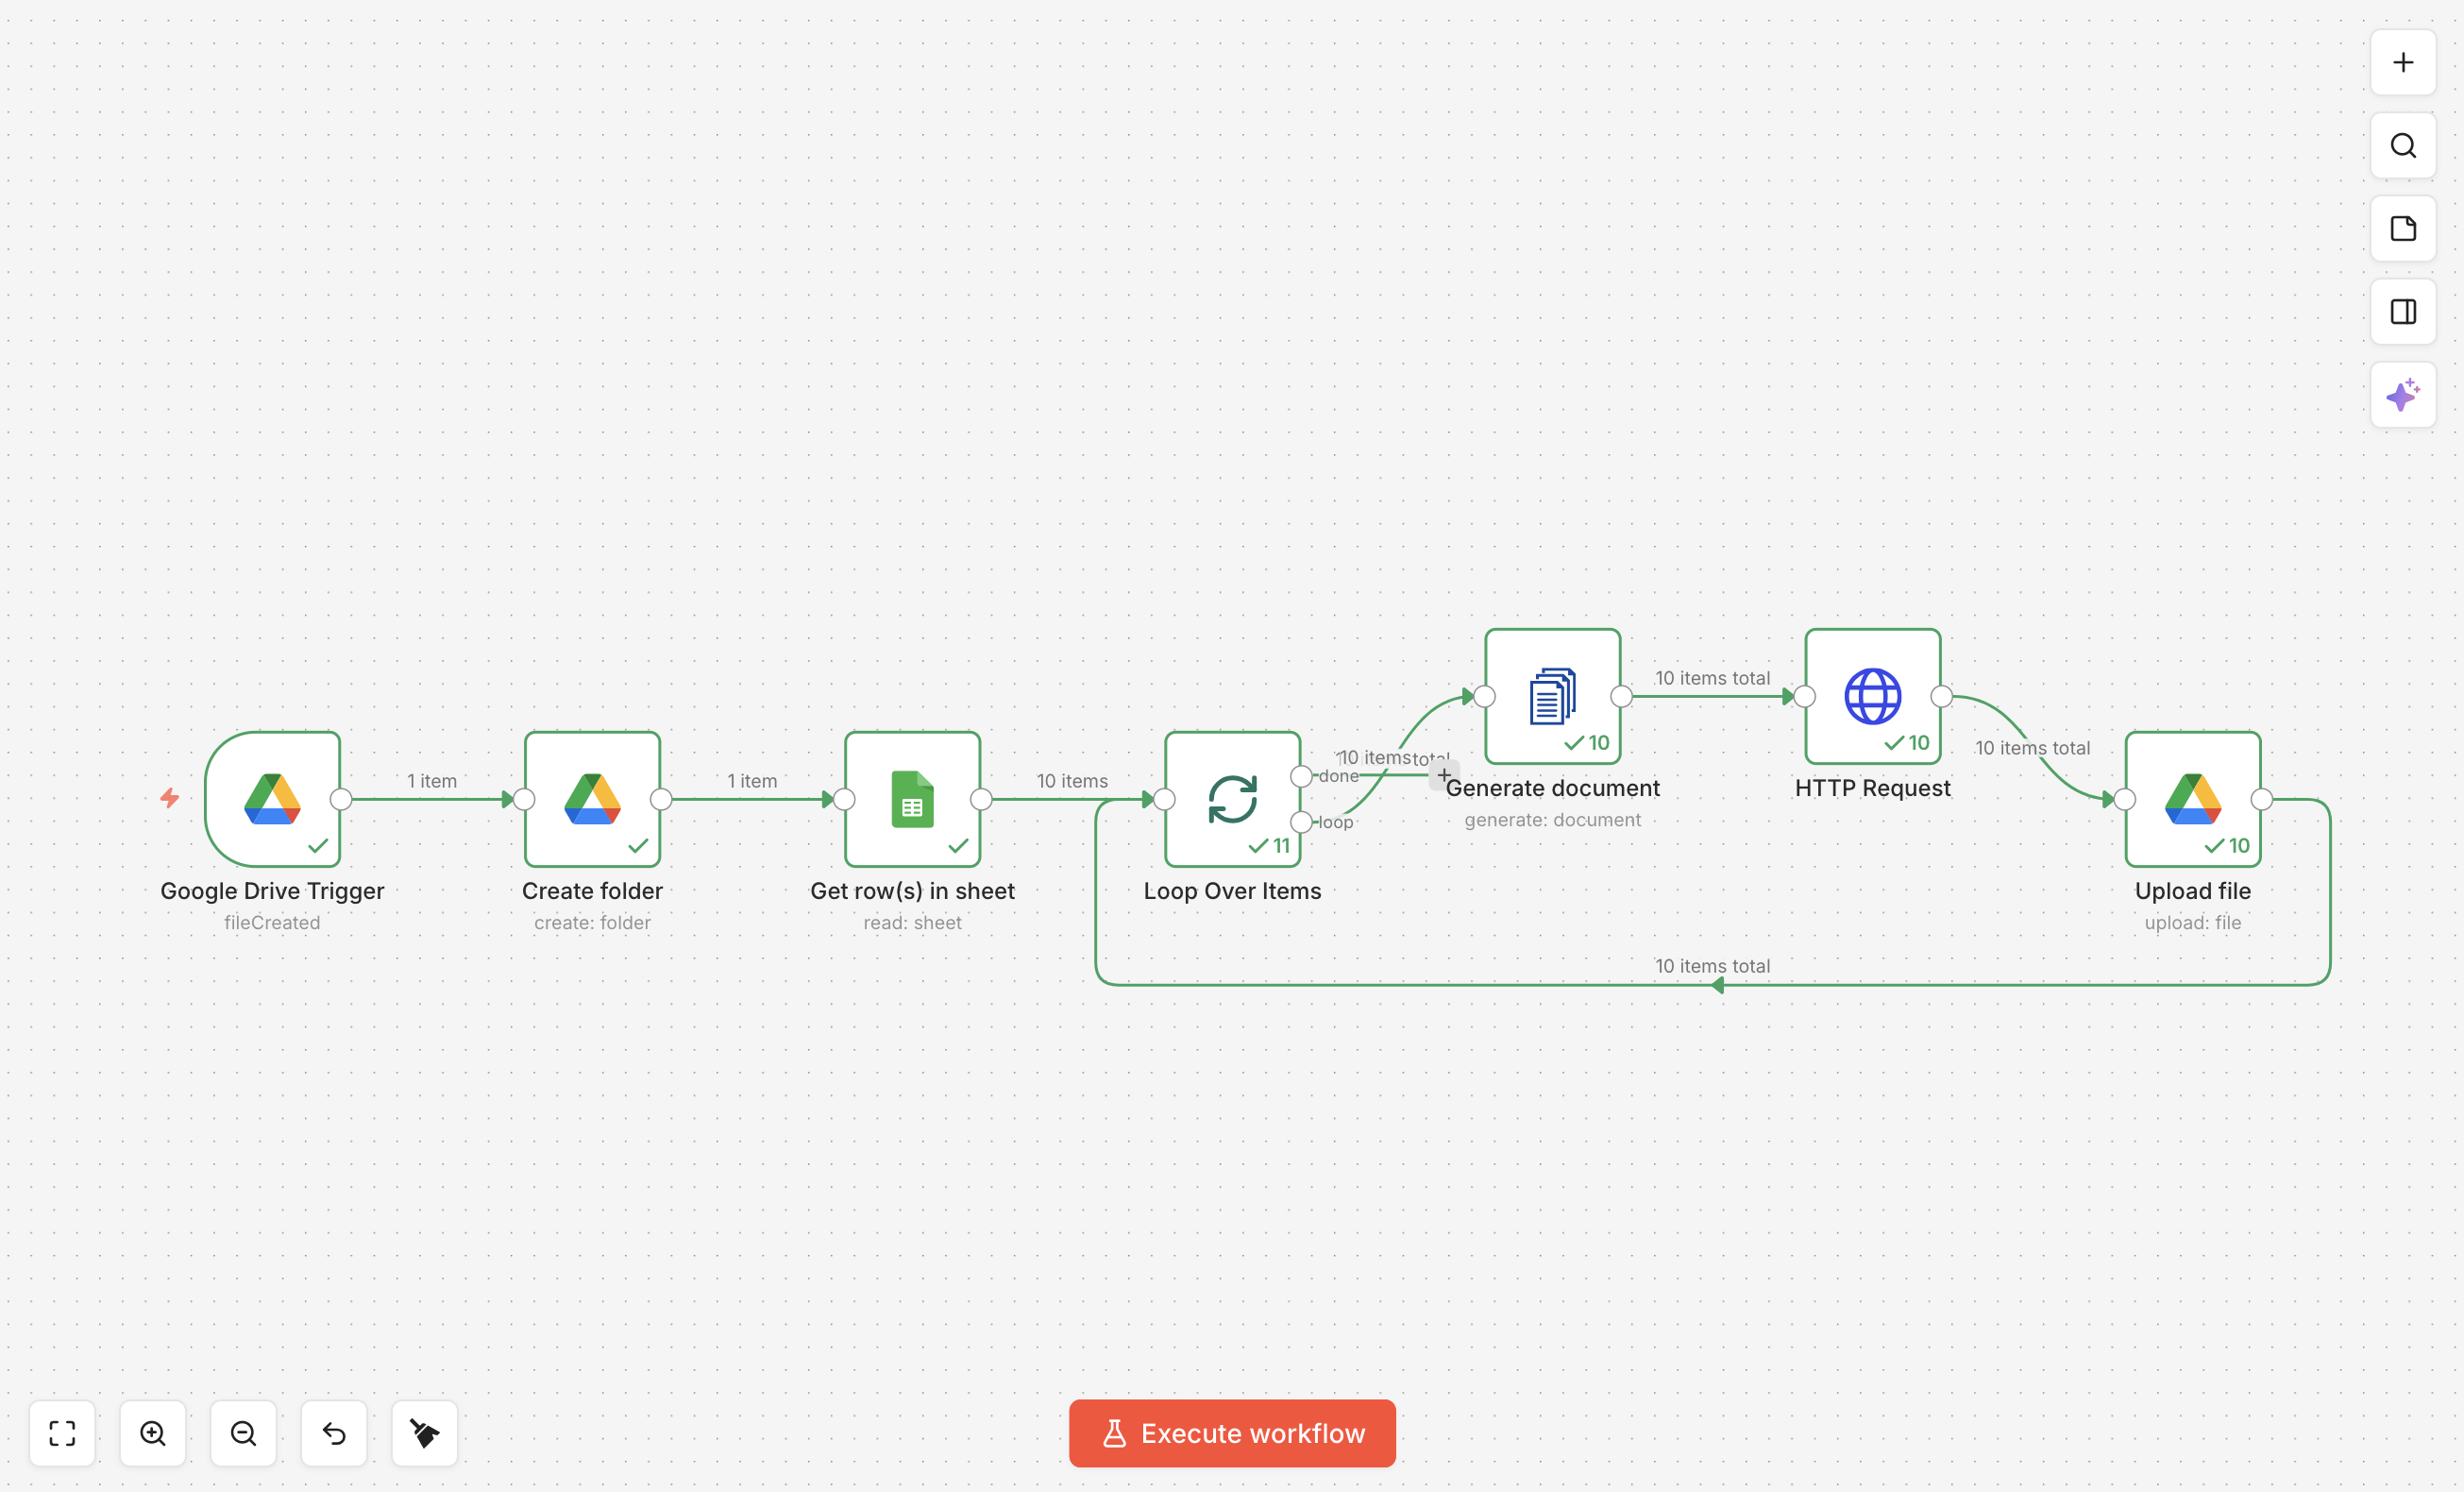
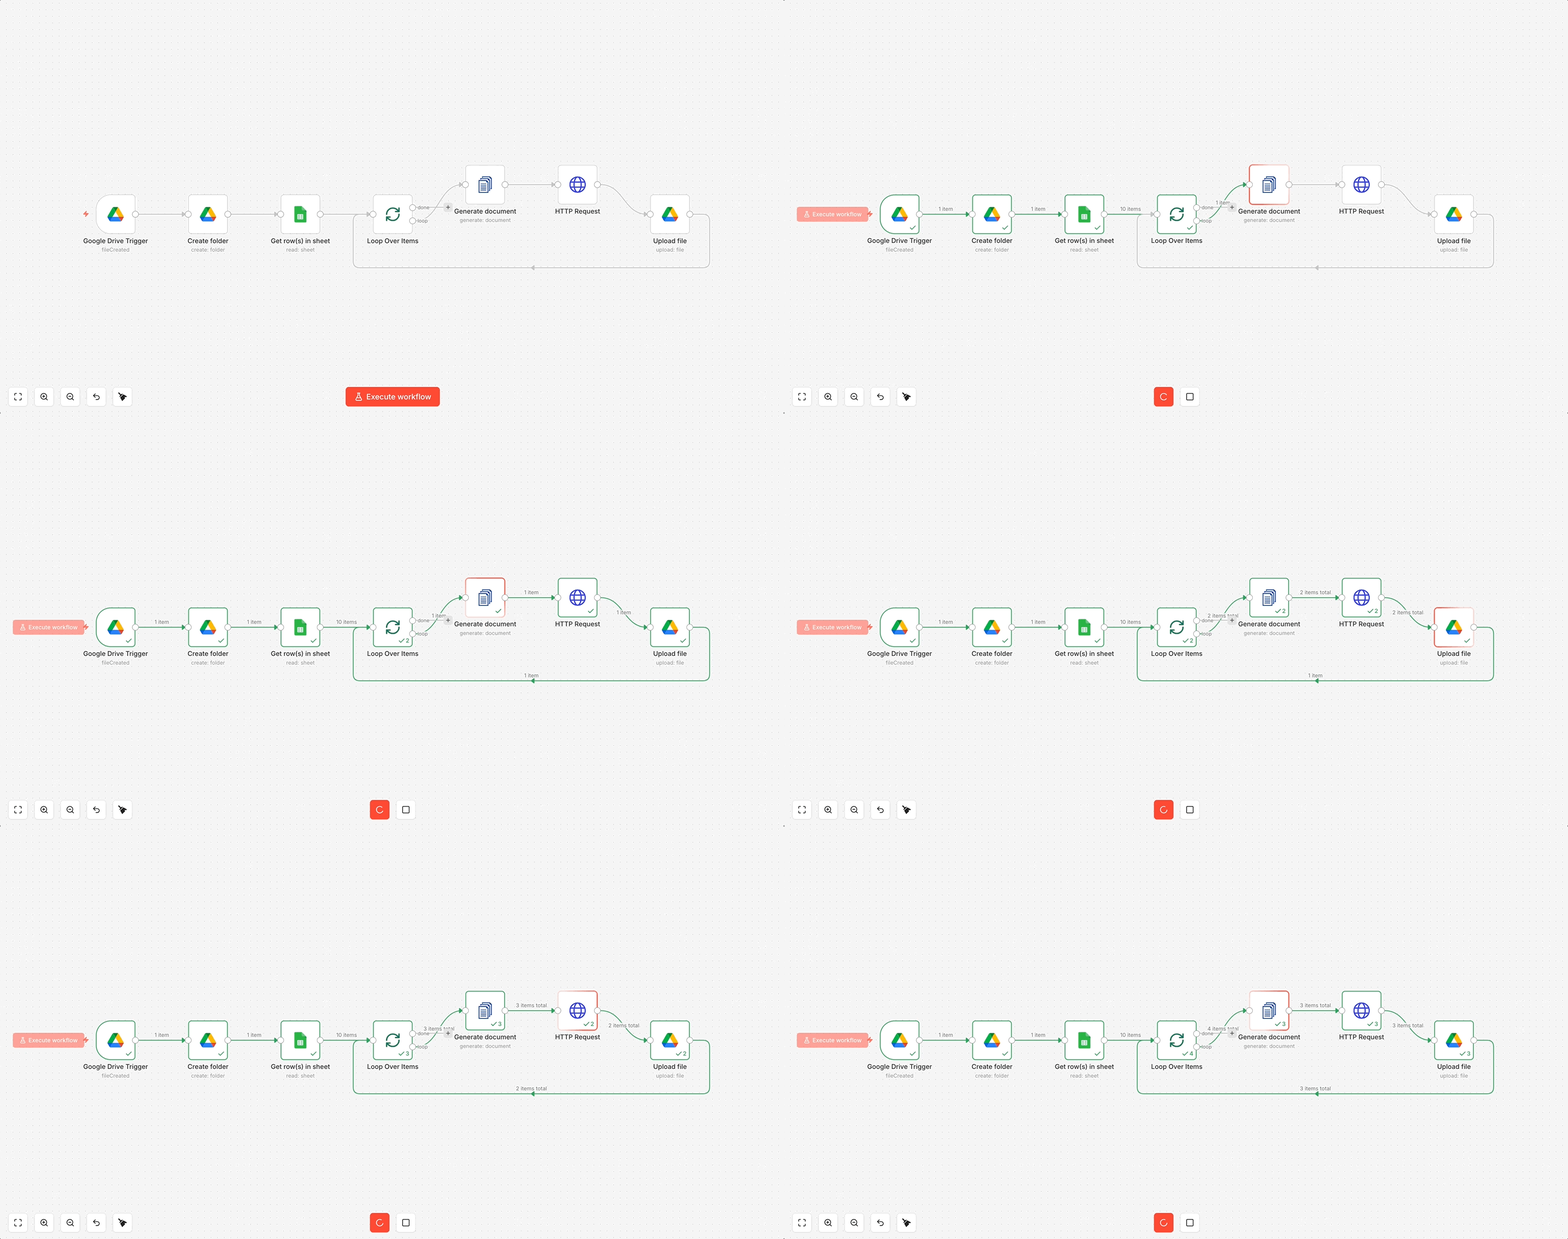
The workflow begins with a trigger that watches the Salary Increase Letter folder for a new Google Sheets file. When one appears, it creates a matching output folder, reads every row from the sheet, and loops through the rows one at a time, generating a PDF letter for each employee and uploading it to the new folder. Let’s walk through each node.
Watching for New Spreadsheets with the Google Drive Trigger
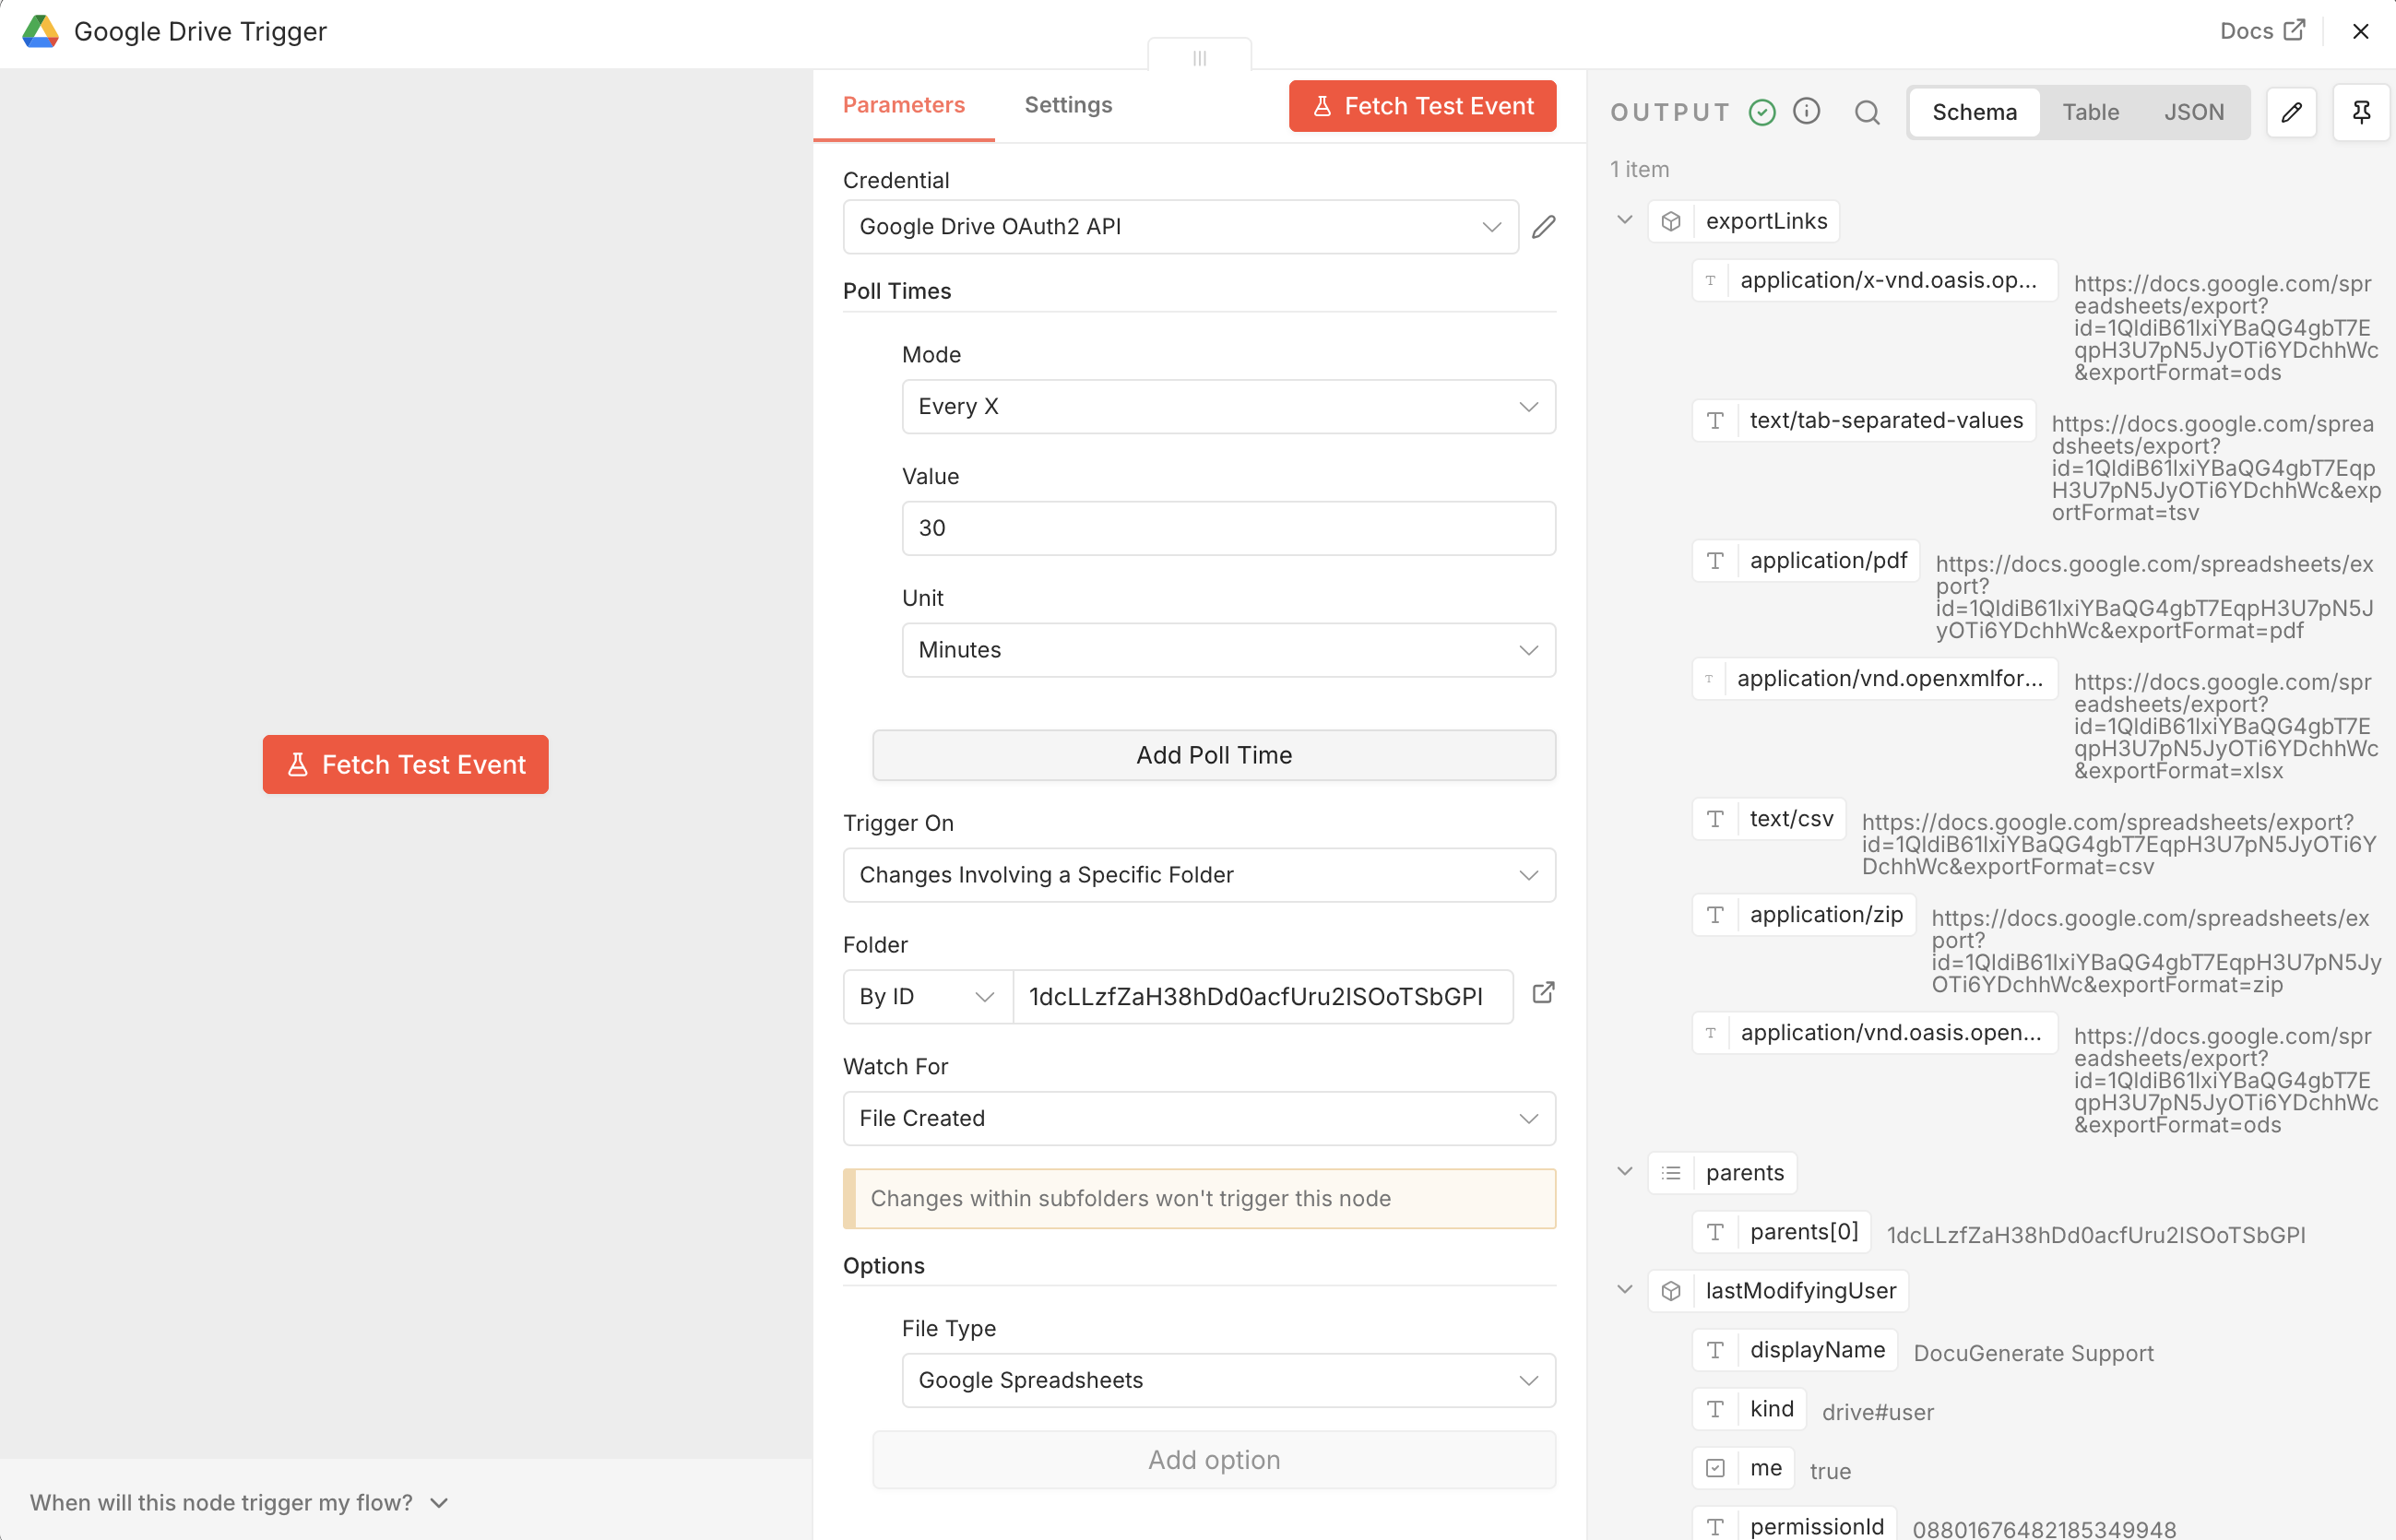
The Google Drive Trigger node polls a specific Google Drive folder and starts the workflow when a matching change occurs.
The node is set to poll Every X30Minutes, with Trigger On set to Changes Involving a Specific Folder. The Folder parameter accepts the target folder in three ways: From list, By URL, or By ID; here it’s set to By ID with the ID of the Salary Increase Letter folder.
You can find a folder’s ID in its Google Drive URL, it’s the string of characters after /folders/. For example, the ID for the URL https://drive.google.com/drive/folders/1dcLLzfZaH38hDd0acfUru2ISOoTsbGPI is 1dcLLzfZaH38hDd0acfUru2ISOoTsbGPI.
Finally, Watch For is set to File Created, and the File Type option under Options is restricted to Google Spreadsheets, so the trigger only fires when a new spreadsheet is added to the folder.
Creating an Output Folder
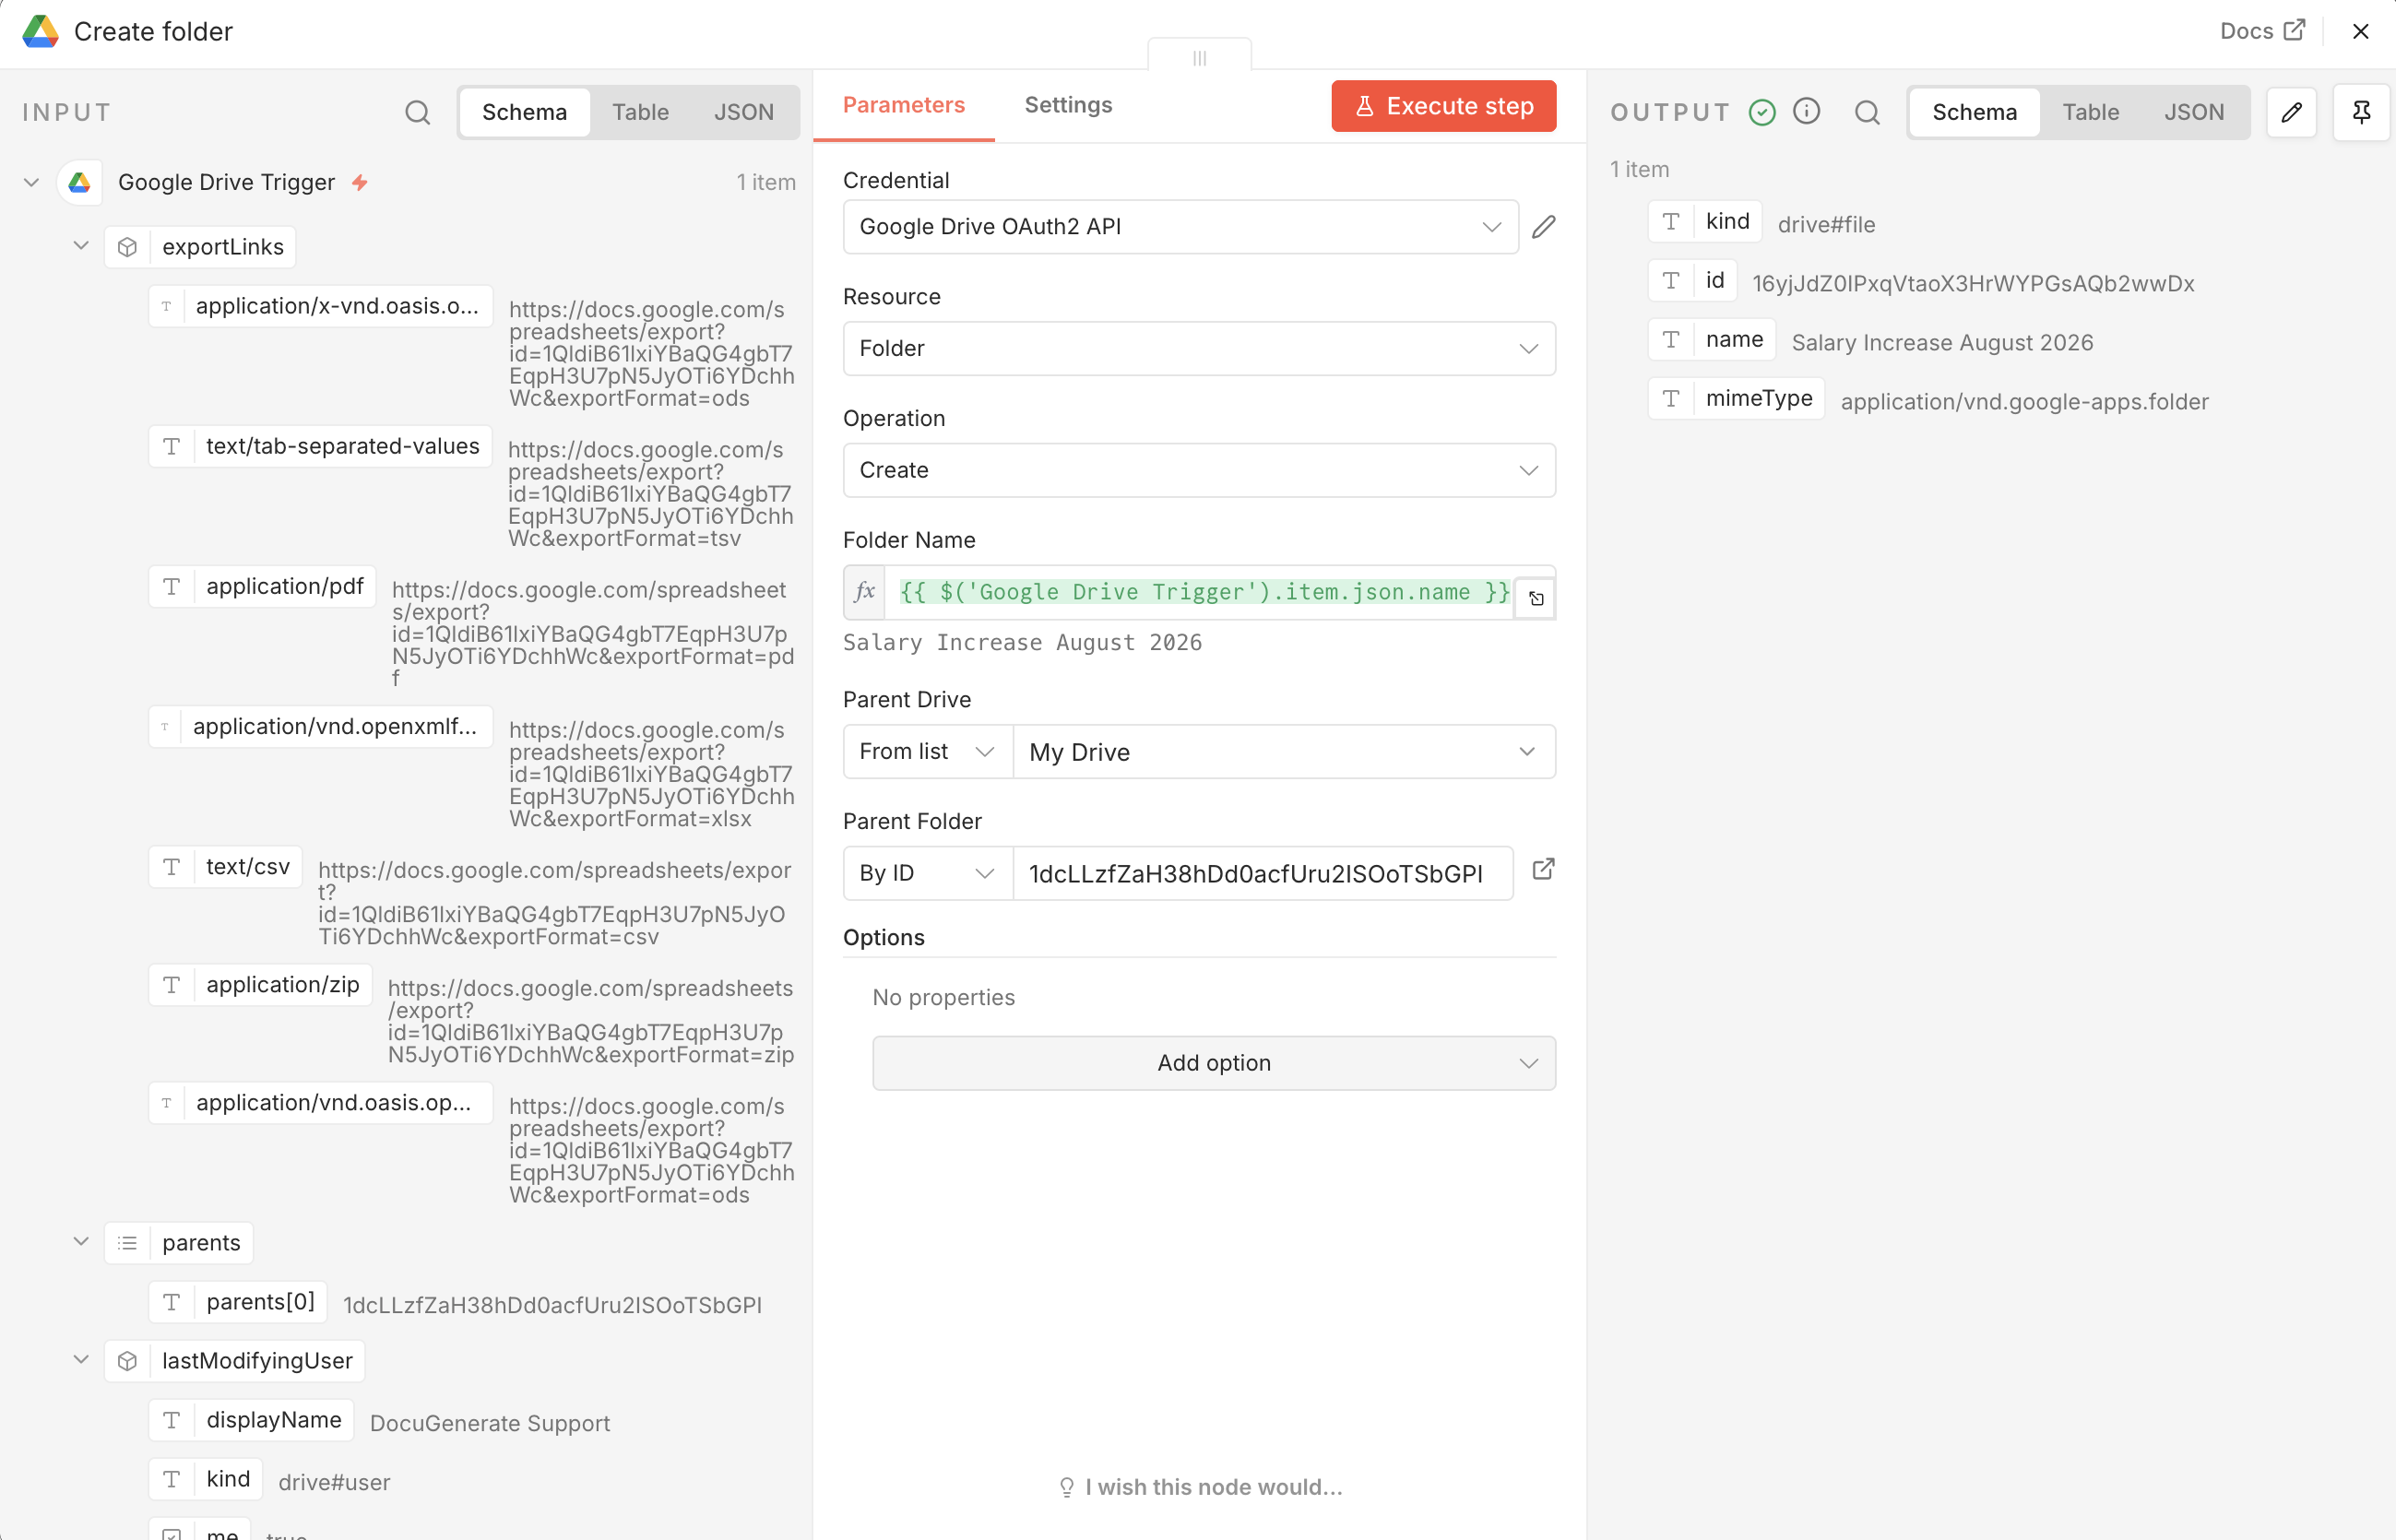
Once a new spreadsheet is detected, the workflow needs somewhere to put the generated letters. The Google Drive node’s Create operation on the Folder resource handles this.
The Folder Name parameter uses the expression {{ $('Google Drive Trigger').item.json.name }}, which resolves to Salary Increase August 2026, the name of the spreadsheet that triggered the workflow. The Parent Folder is set to the same folder ID used in the trigger, so the new output folder is created as a sibling of the source spreadsheet inside Salary Increase Letter. Naming the folder after its source spreadsheet keeps each review cycle’s letters grouped with the data that produced them.
Reading the Employee Data
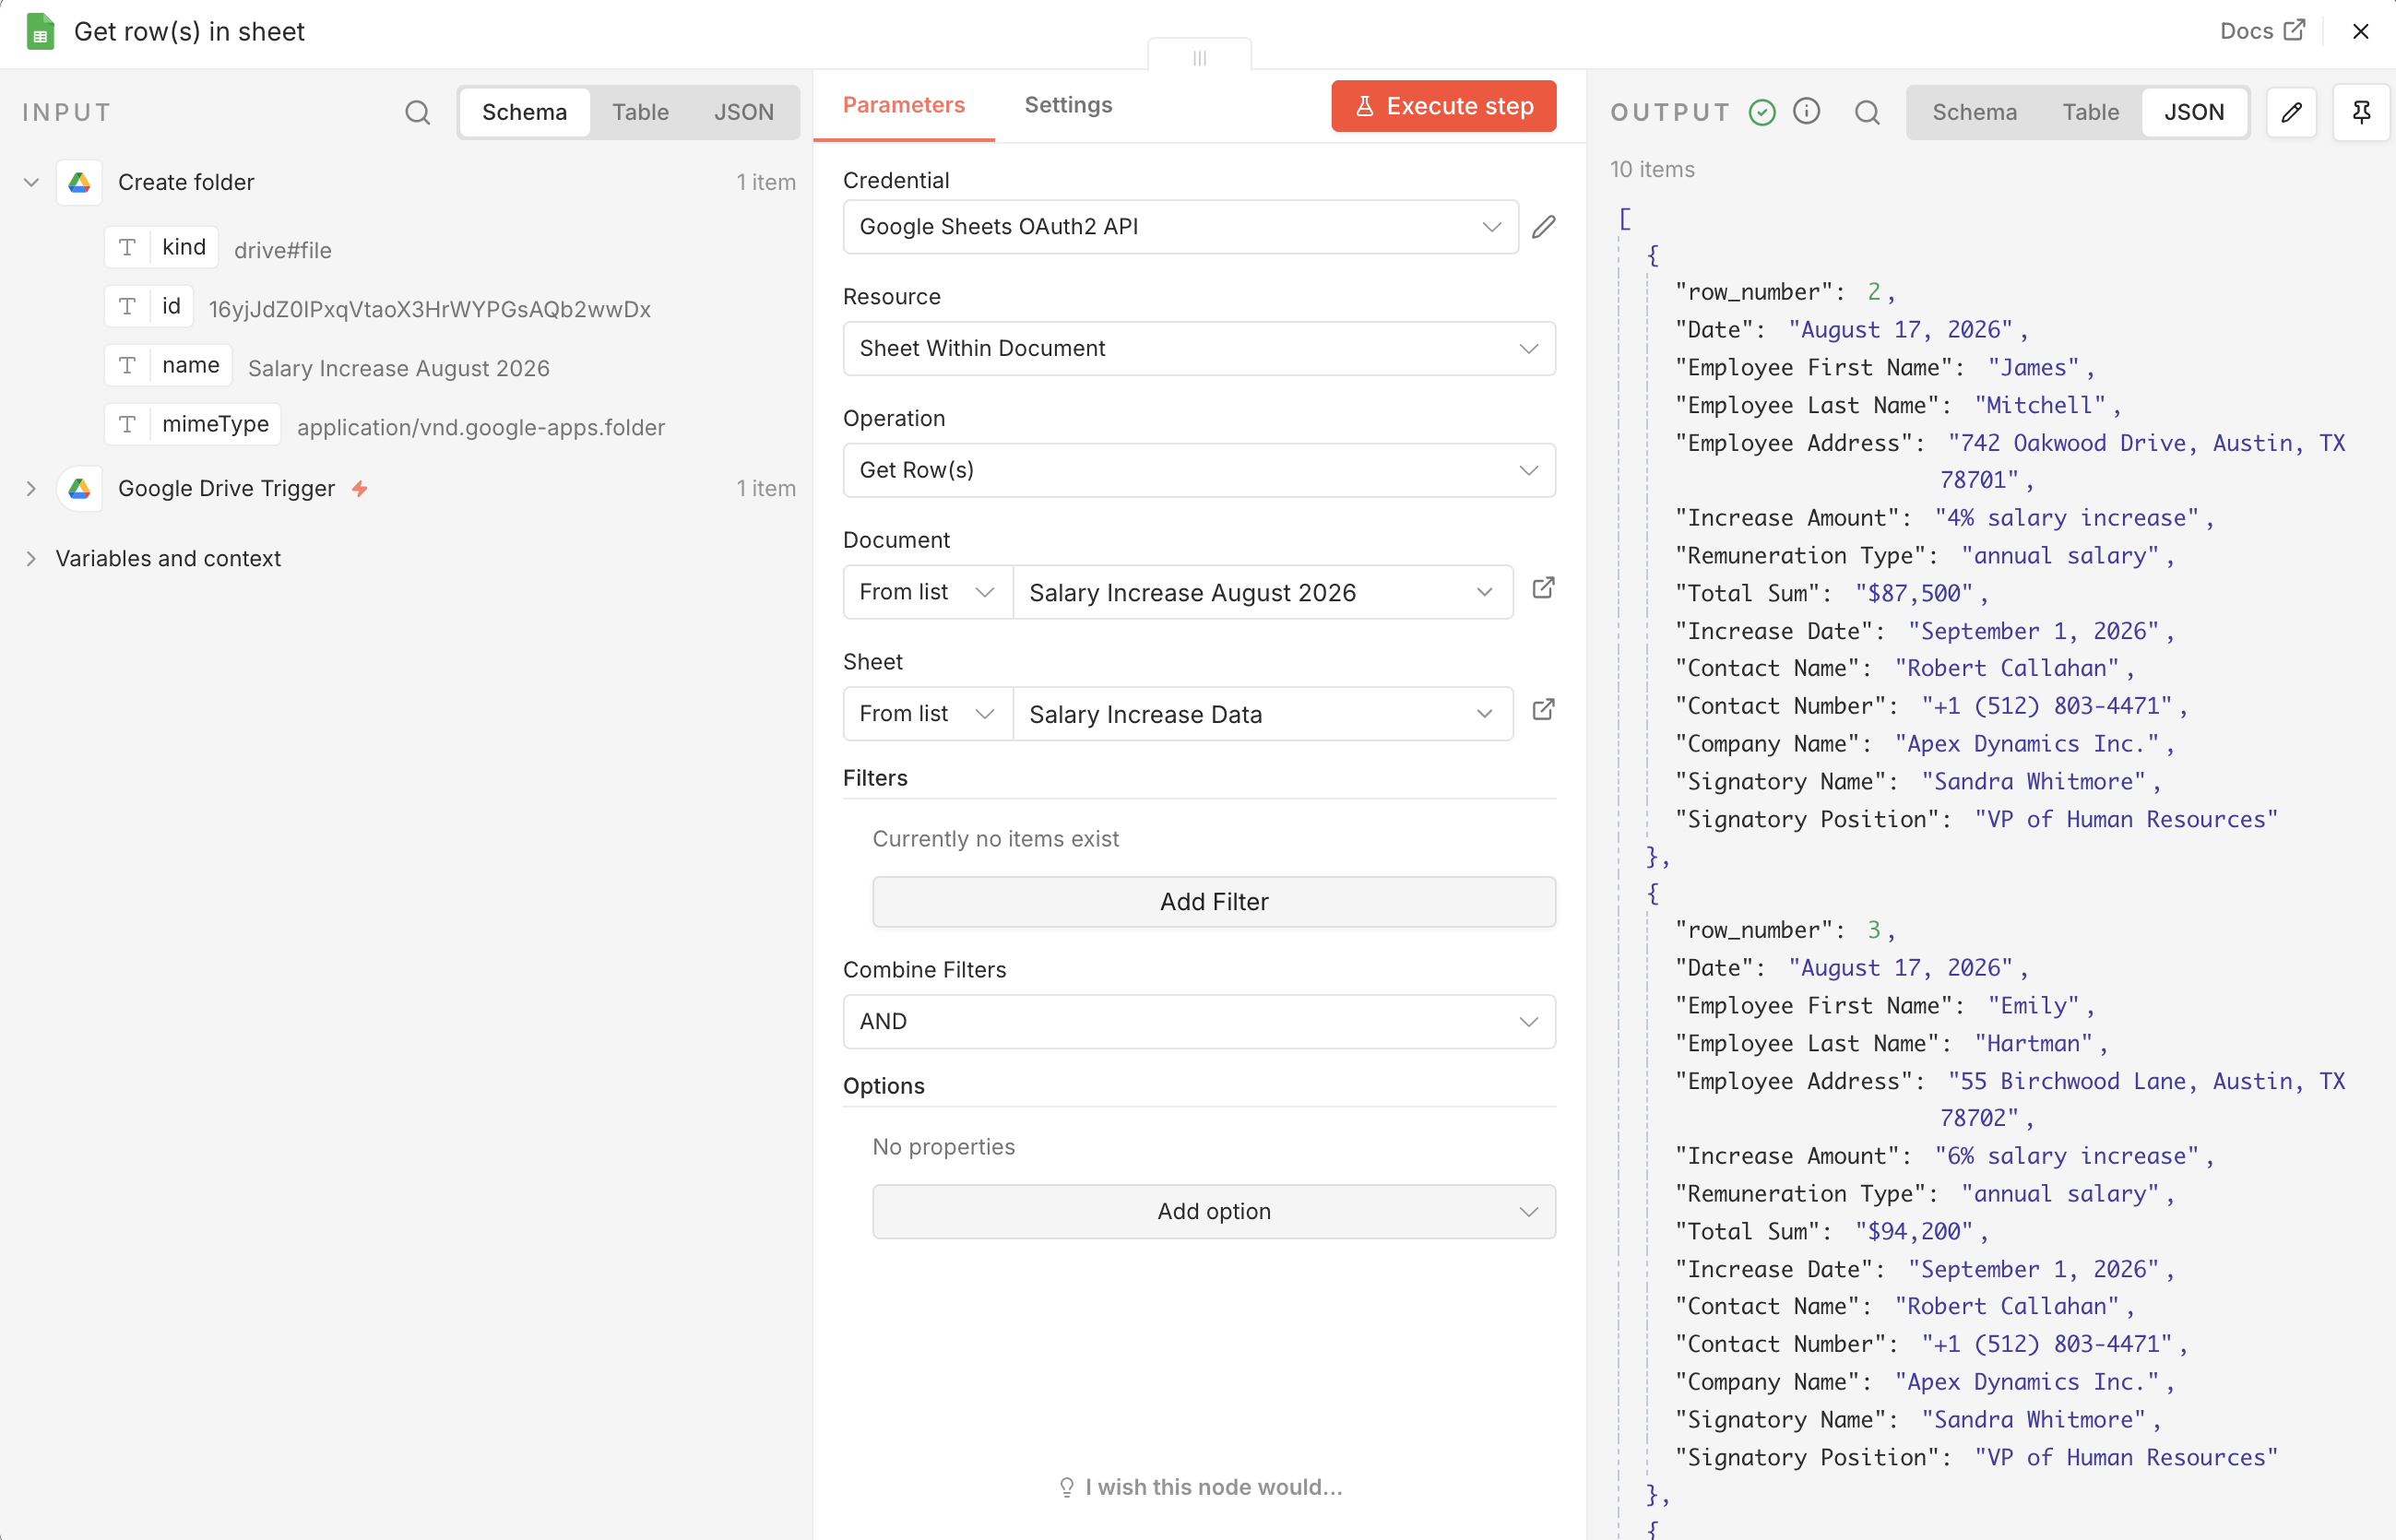
With the destination folder ready, the Google Sheets node’s Get Row(s) operation on the Sheet Within Document resource reads the employee data.
The Document is set to Salary Increase August 2026 and the Sheet to Salary Increase Data, both picked from the From list dropdowns. The node returns all 10 rows as separate items, each containing the full set of fields we saw in the spreadsheet: employee details, raise figures, and the shared contact and signatory information.
Looping Through Each Employee
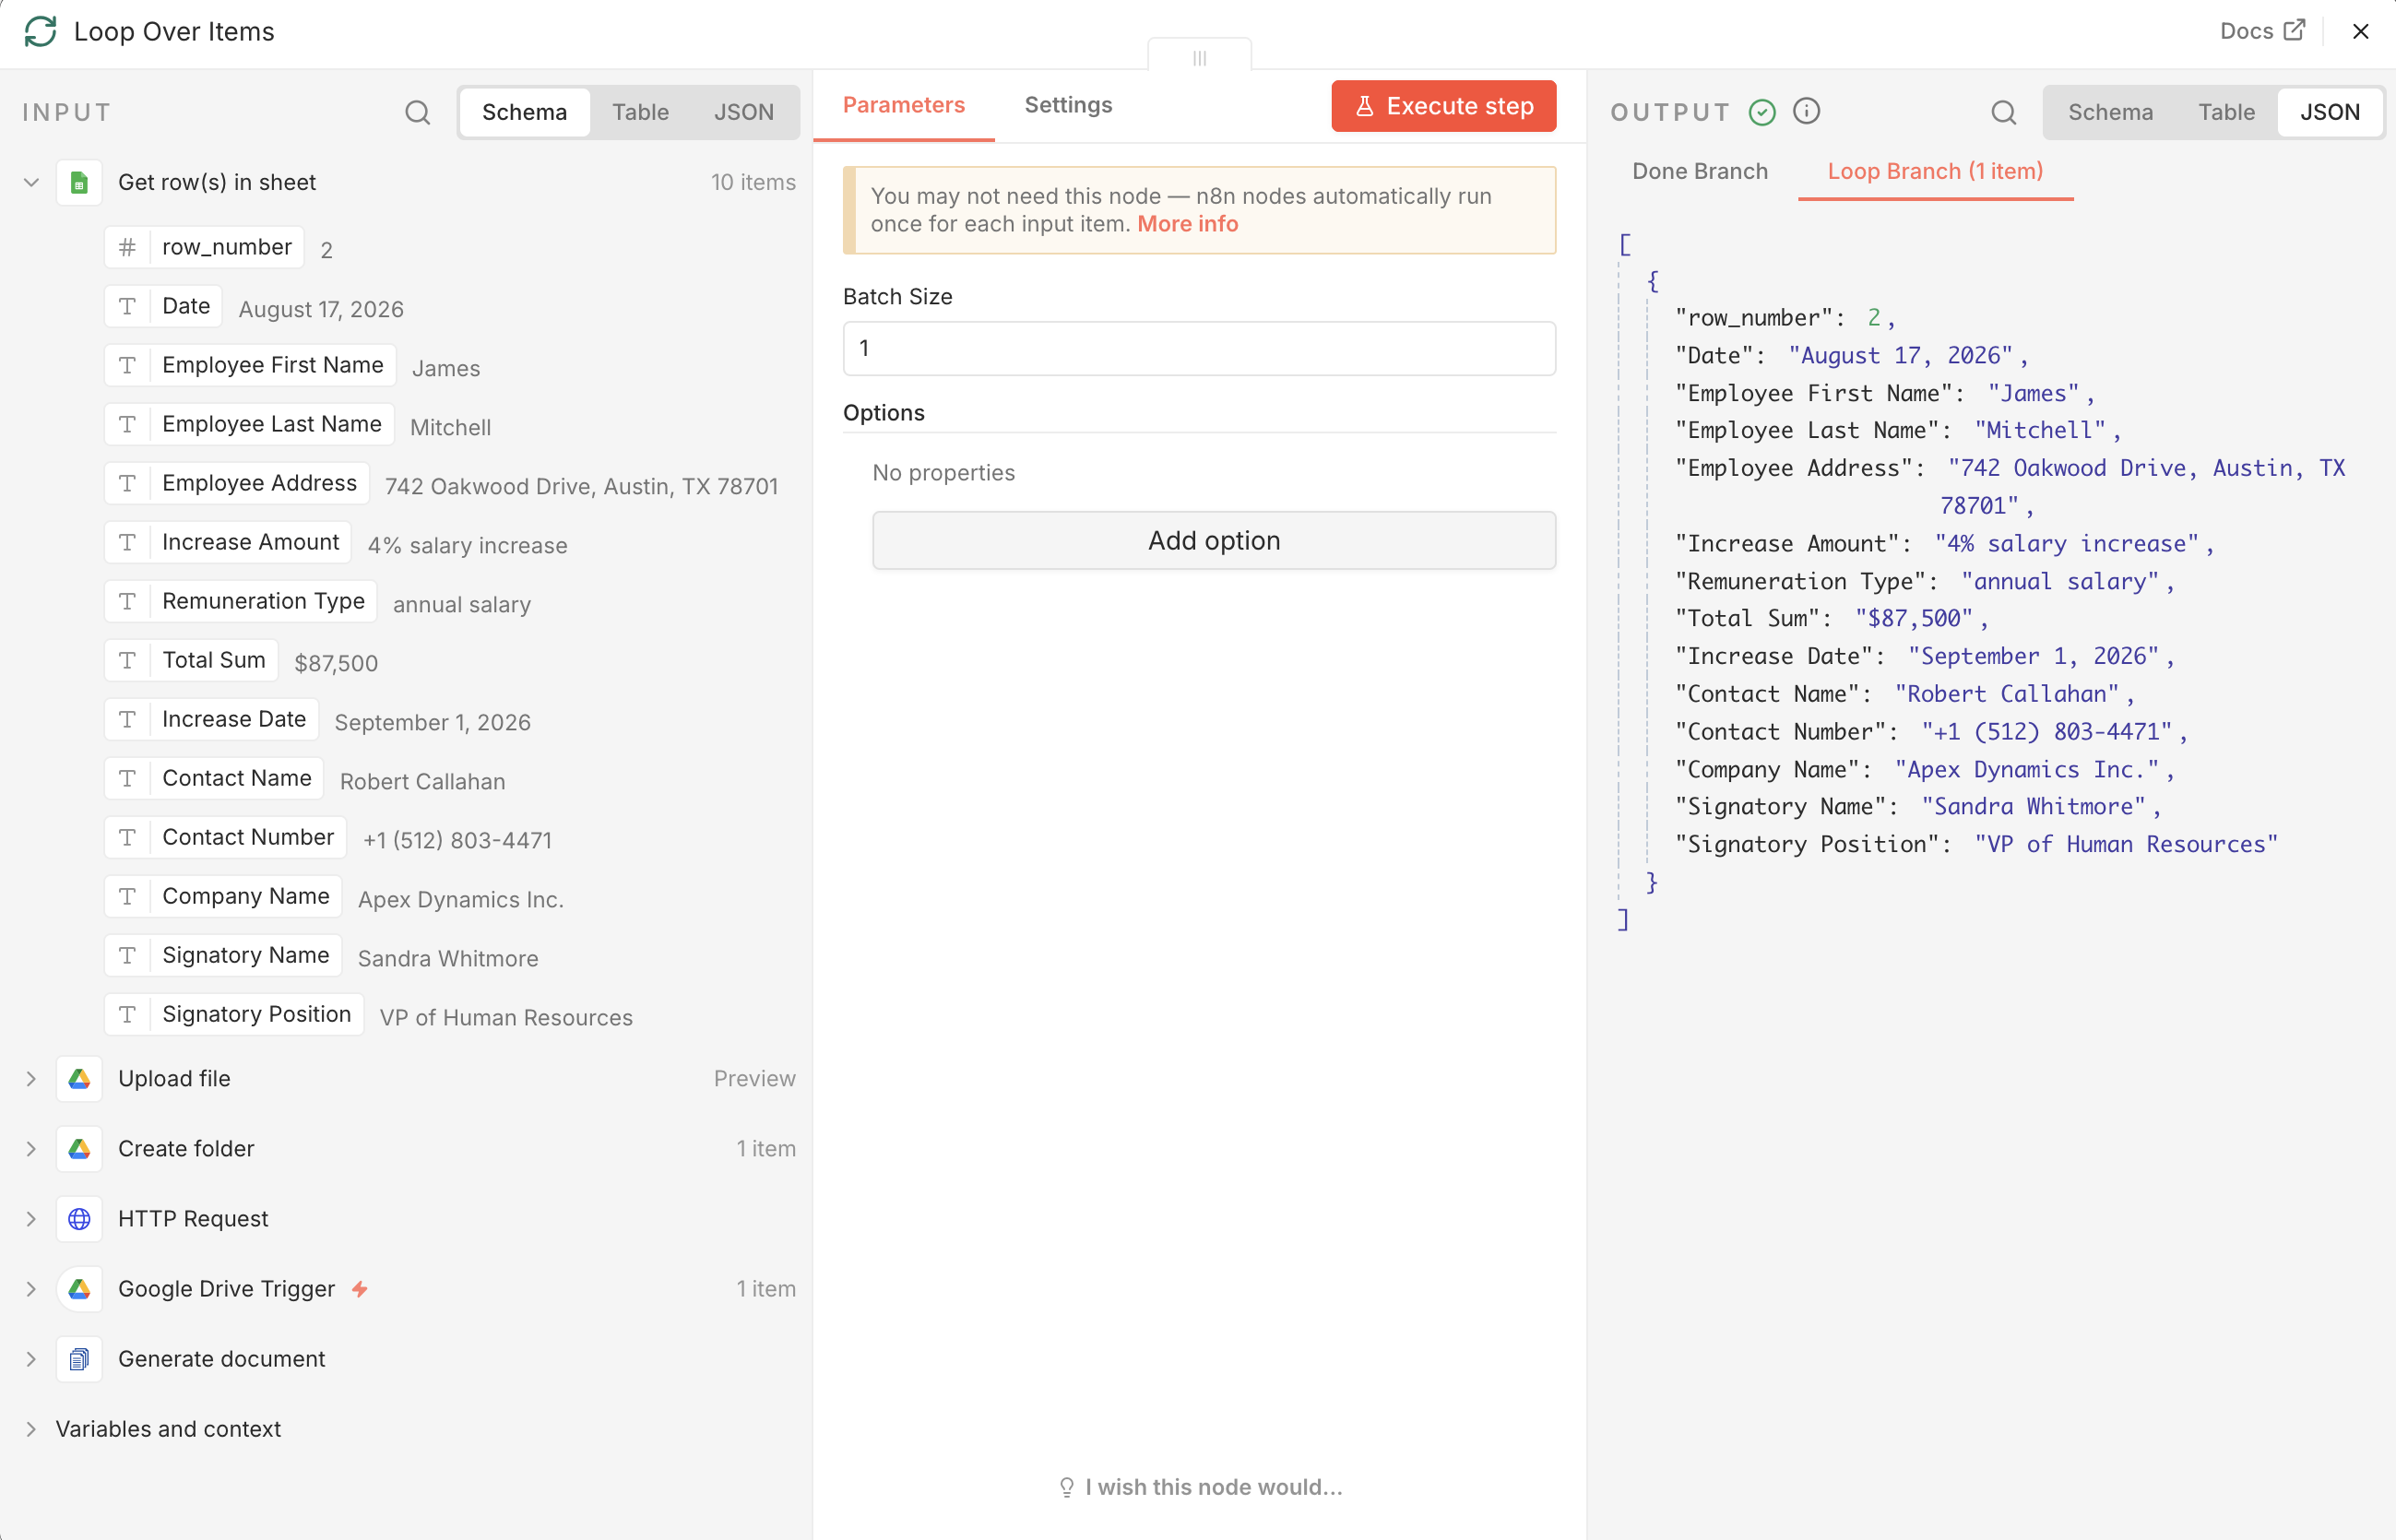
To generate one letter per employee, the workflow needs to process the 10 rows one at a time. The Loop Over Items node handles this with a batch size of 1.
Each pass through the loop carries a single employee’s row, such as the first one for James Mitchell with a 4% increase bringing his annual salary to $87,500, into the nodes that follow. The loop continues until all 10 rows have been processed, generating and saving one letter before moving on to the next.
Generating the Letter
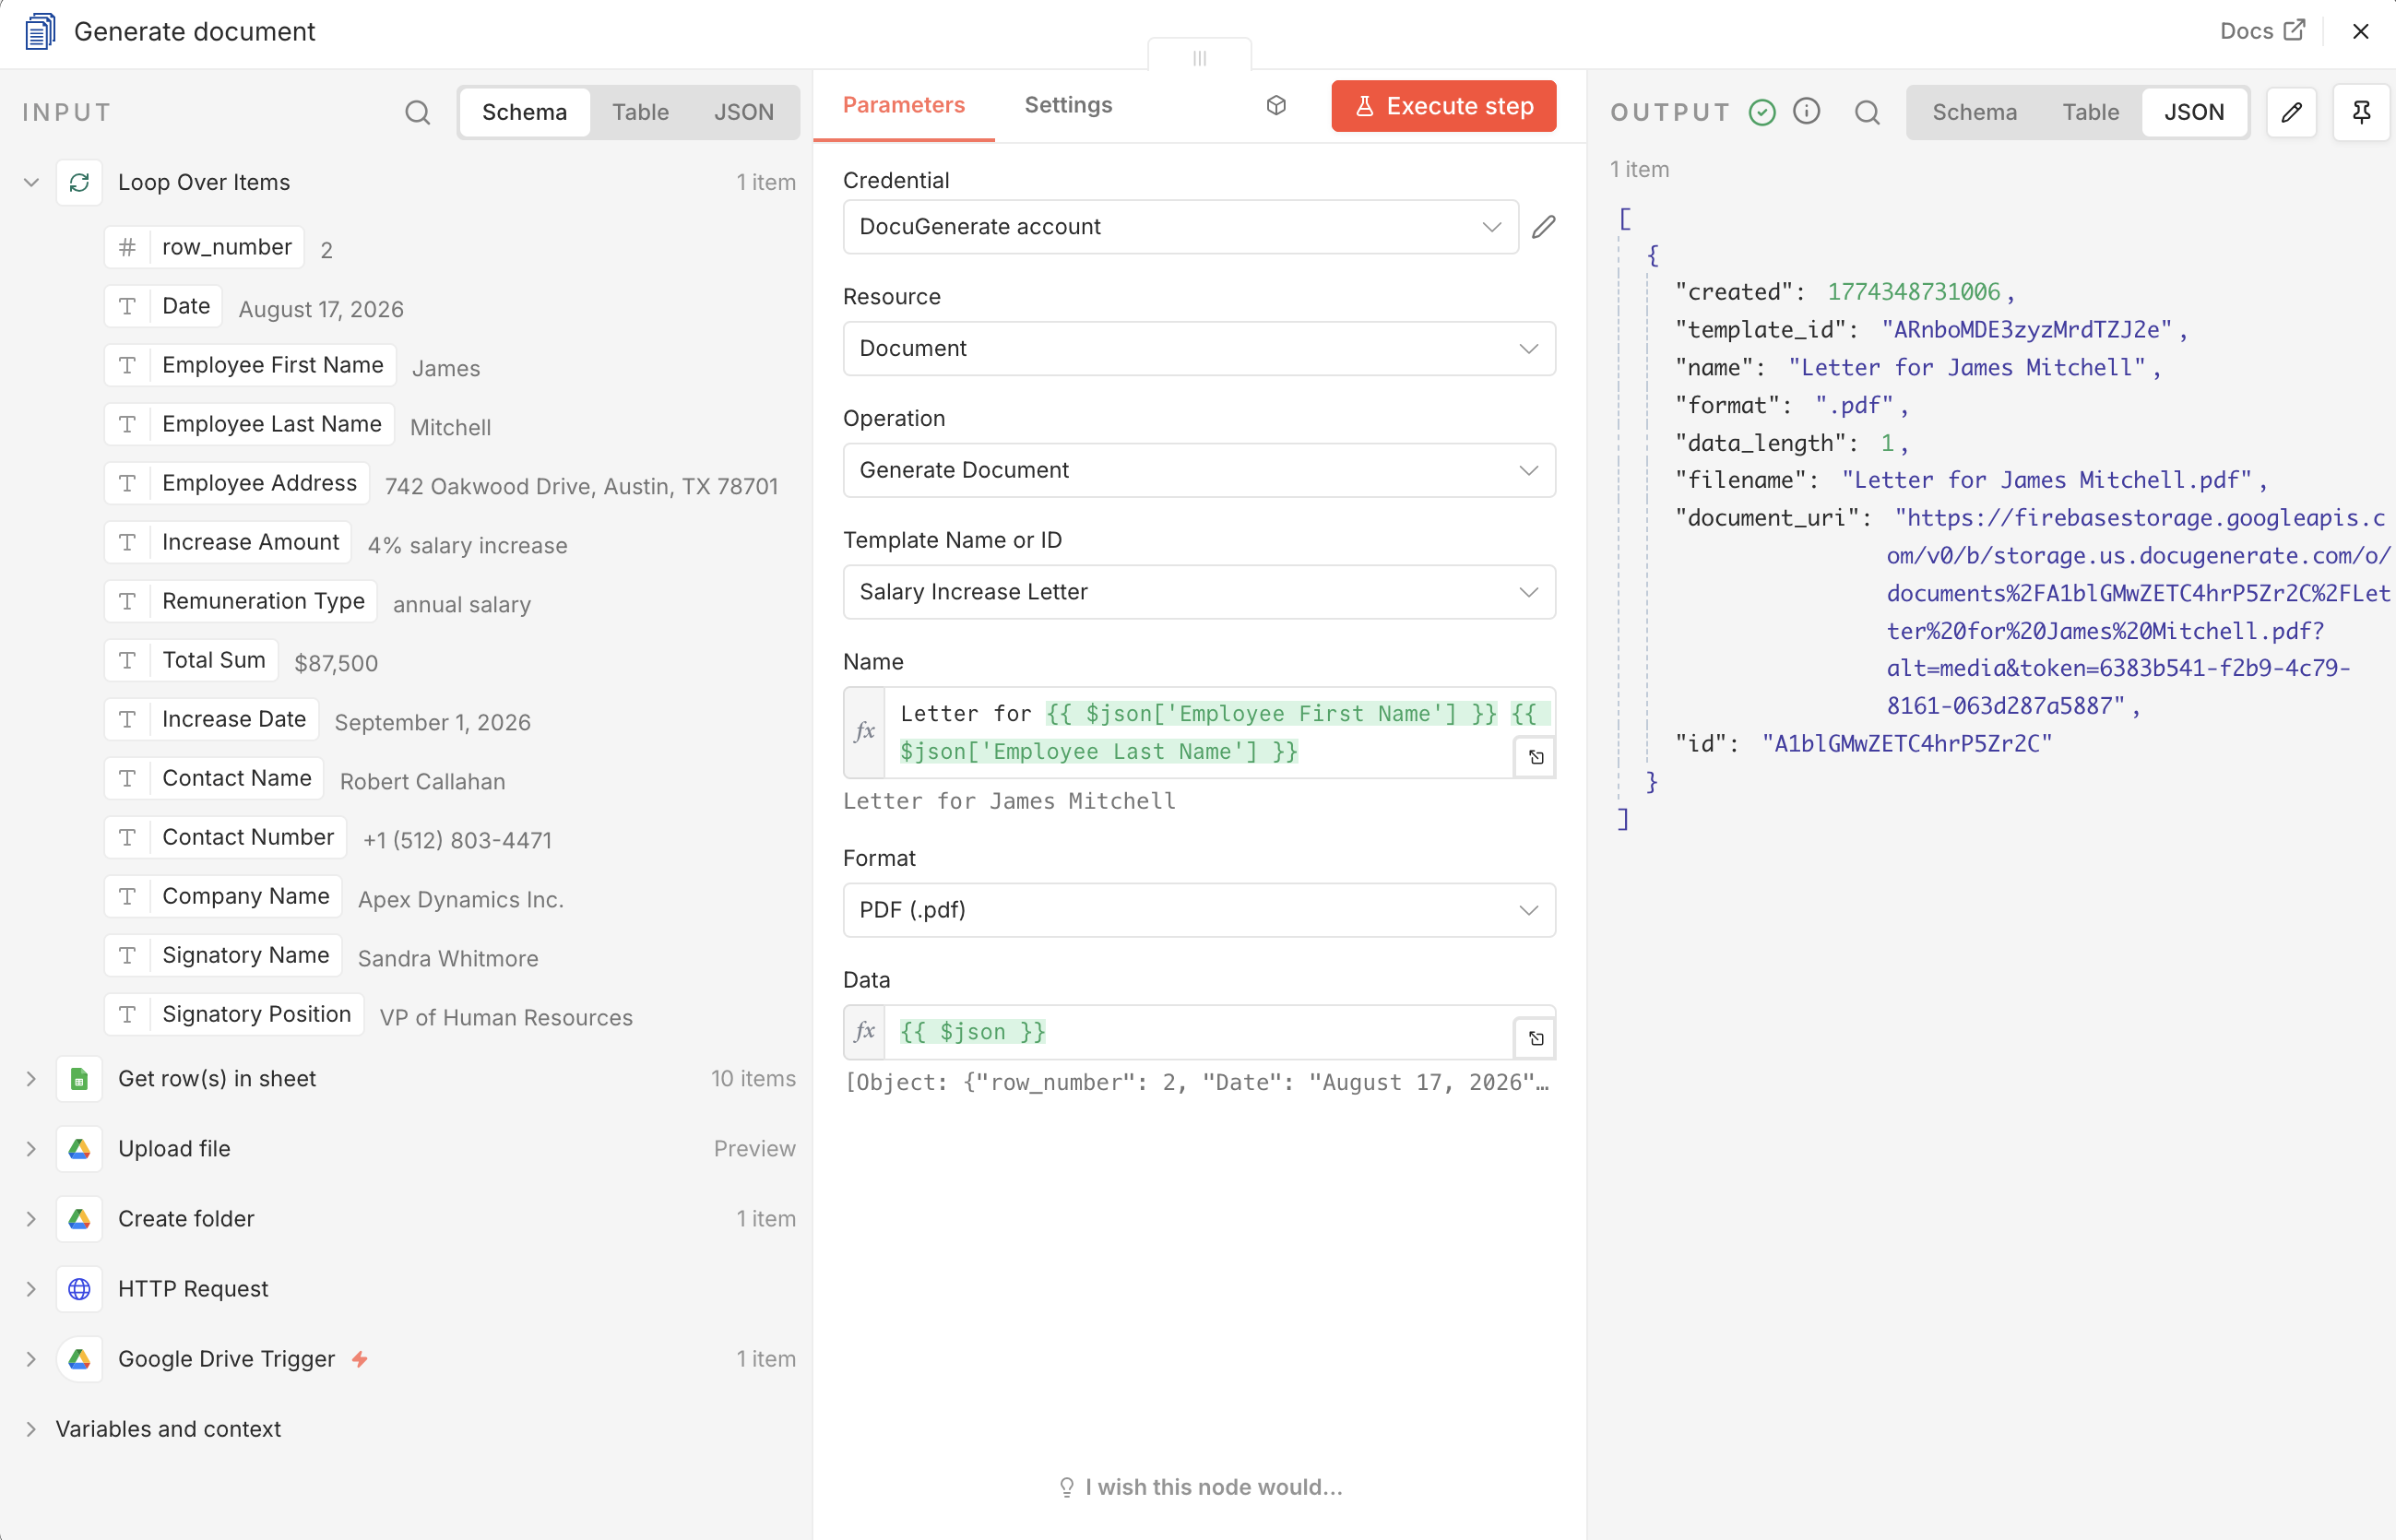
The Generate document node uses the DocuGenerate integration for n8n to merge each row’s data with the Word template. To use this node, install DocuGenerate in your n8n instance and configure it with your API Key.
The node is configured with the following parameters:
Template Name or ID: The Salary Increase Letter template uploaded earlier.
Name: An expression, Letter for {{ $json['Employee First Name'] }} {{ $json['Employee Last Name'] }}, which produces a name like Letter for James Mitchell for the first row.
Format: Set to PDF (.pdf).
Data: Set to {{ $json }}, passing the entire current row, with all 13 merge tag values, straight to the API.
For the first row, this produces the following response:
[{"created":1774348731006,"template_id":"ARnboMDE3zyzMrdTZJ2e","name":"Letter for James Mitchell","format":".pdf","data_length":1,"filename":"Letter for James Mitchell.pdf","document_uri":"https://firebasestorage.googleapis.com/v0/b/storage.us.docugenerate.com/o/documents%2FA1blGMwZETC4hrP5Zr2C%2FLetter%20for%20James%20Mitchell.pdf?alt=media&token=6383b541-f2b9-4c79-8161-063d287a5887","id":"A1blGMwZETC4hrP5Zr2C"}]
You can see the generated document below, or download the sample PDF directly.
Downloading the Generated Letter
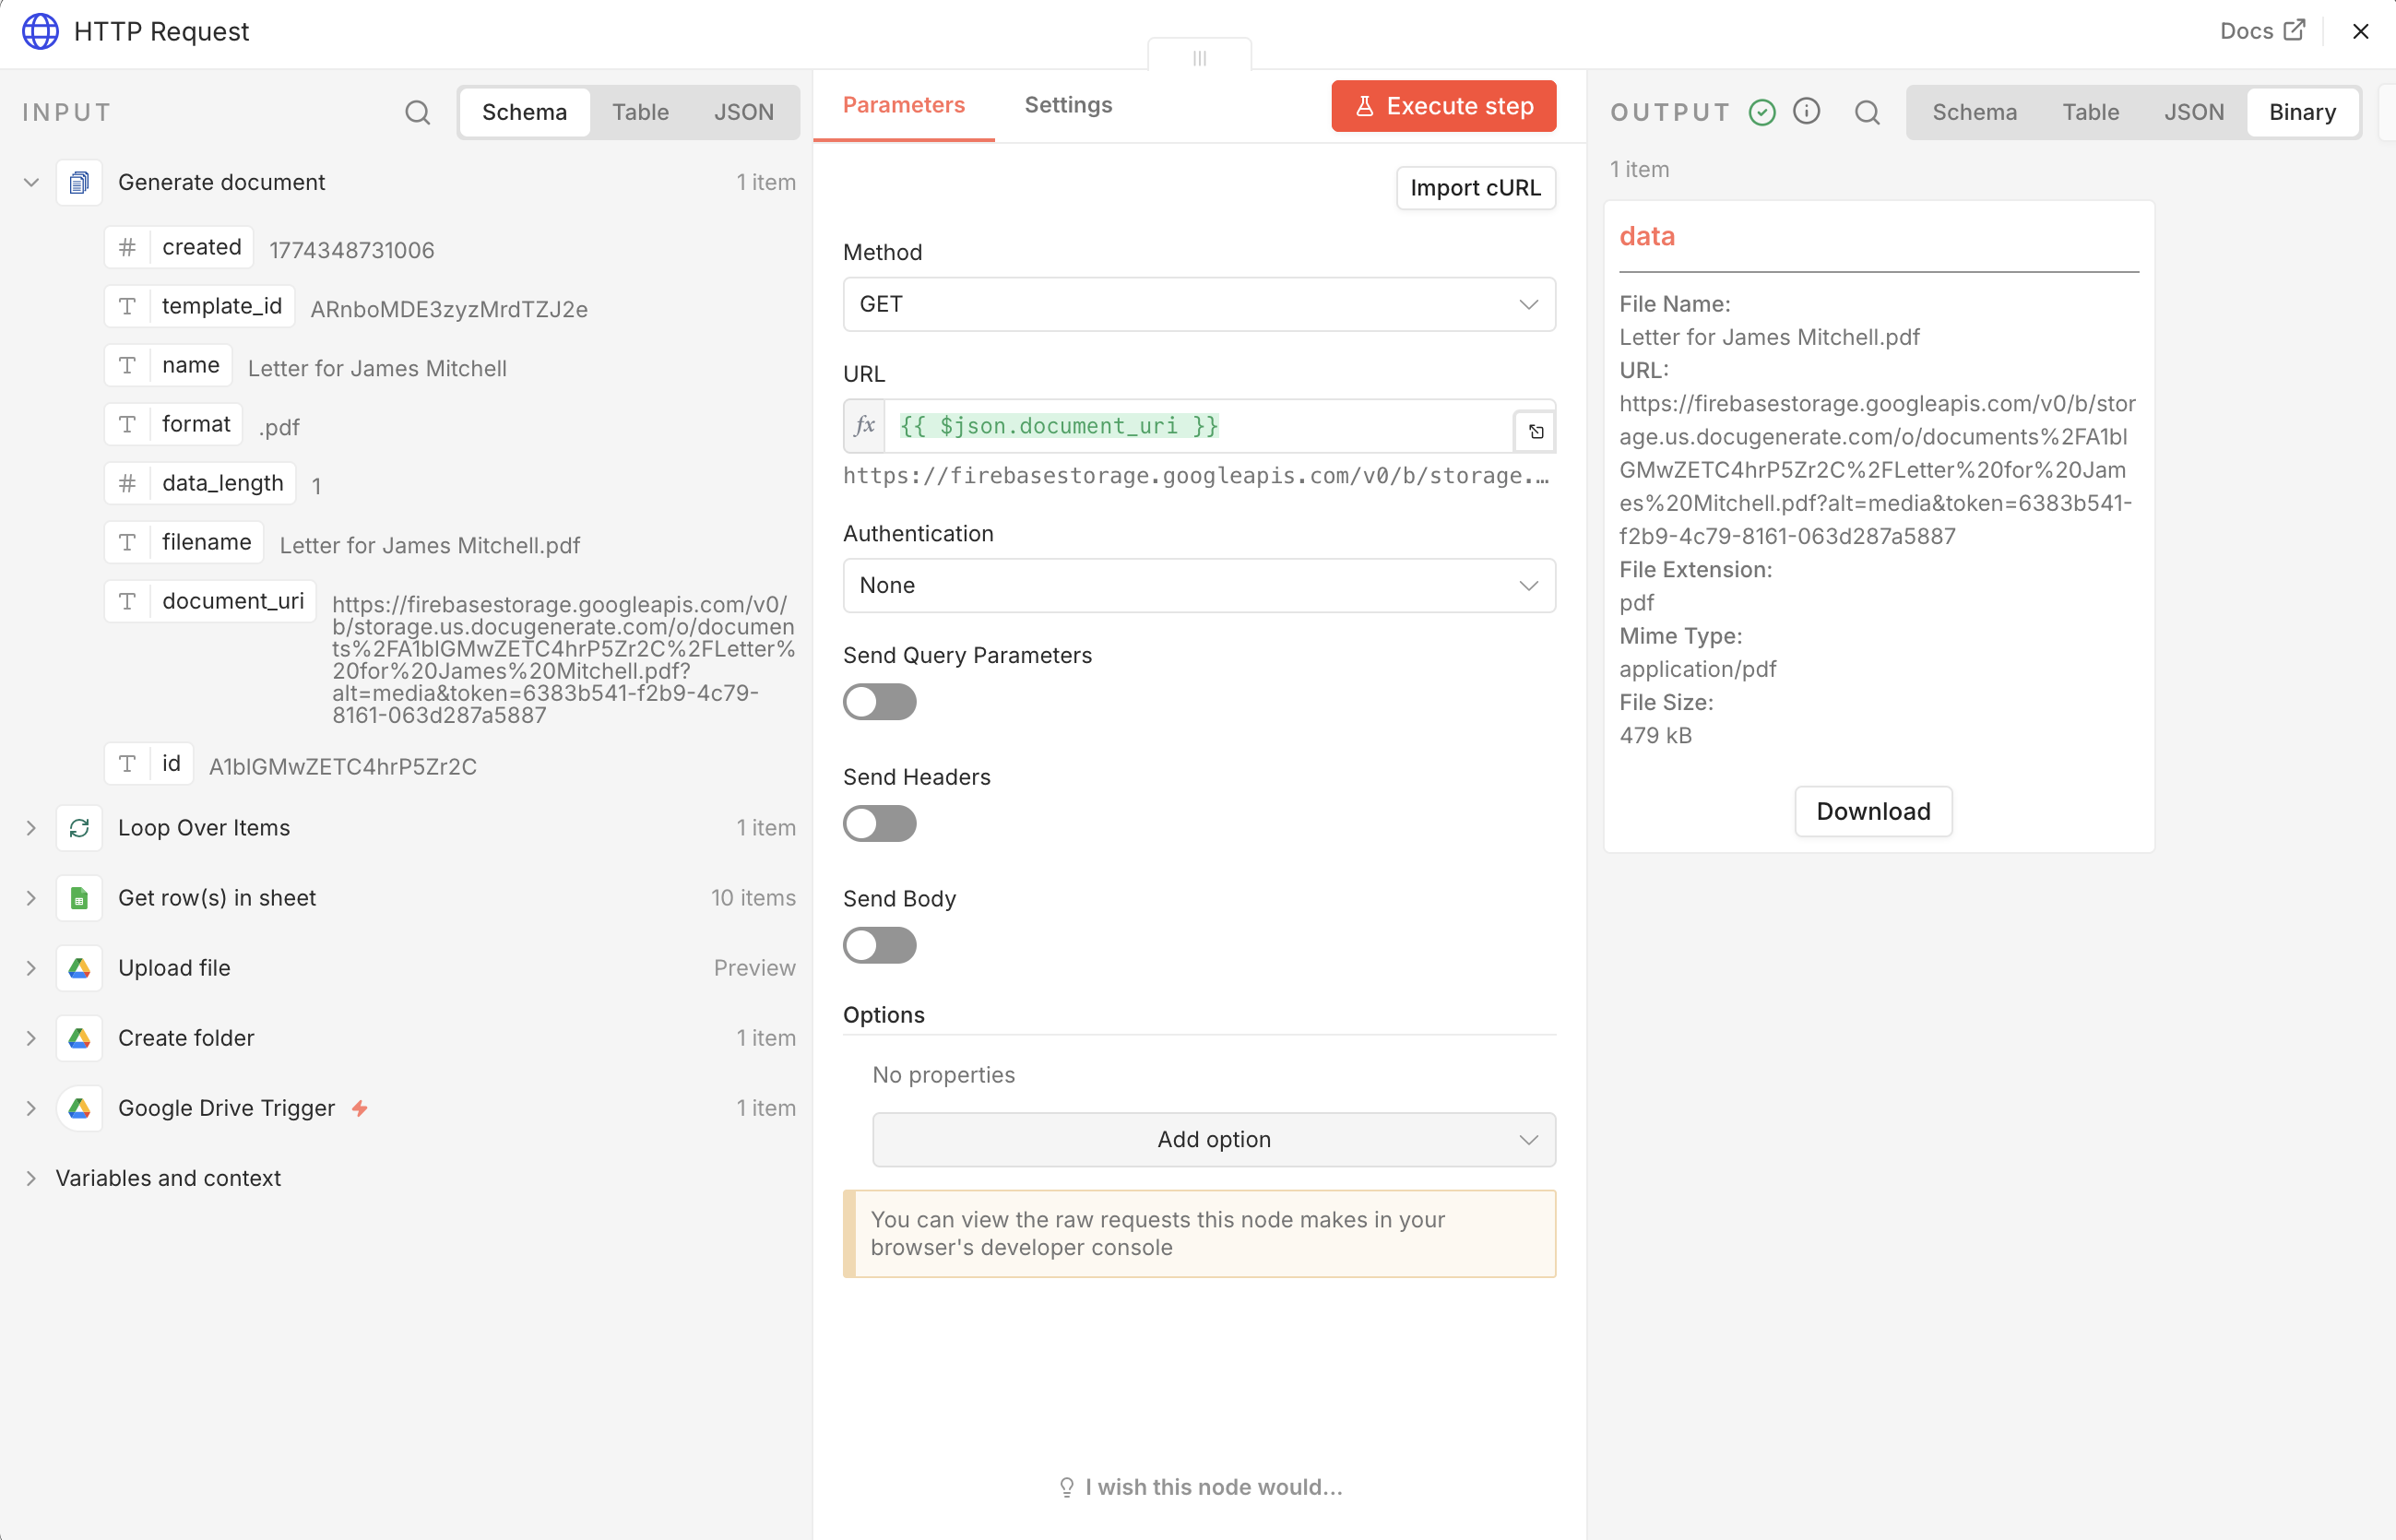
DocuGenerate returns a document_uri pointing to the generated PDF rather than the file itself, so the workflow needs to fetch it before it can be uploaded elsewhere. The HTTP Request node makes a GET request to that URL.
The URL parameter is set to {{ $json.document_uri }}, referencing the Generate document node’s response. Authentication is left as None, since the document URI already includes an access token. The node’s output holds the file’s binary content in a data field, ready for the next step.
Saving the Letter to Google Drive
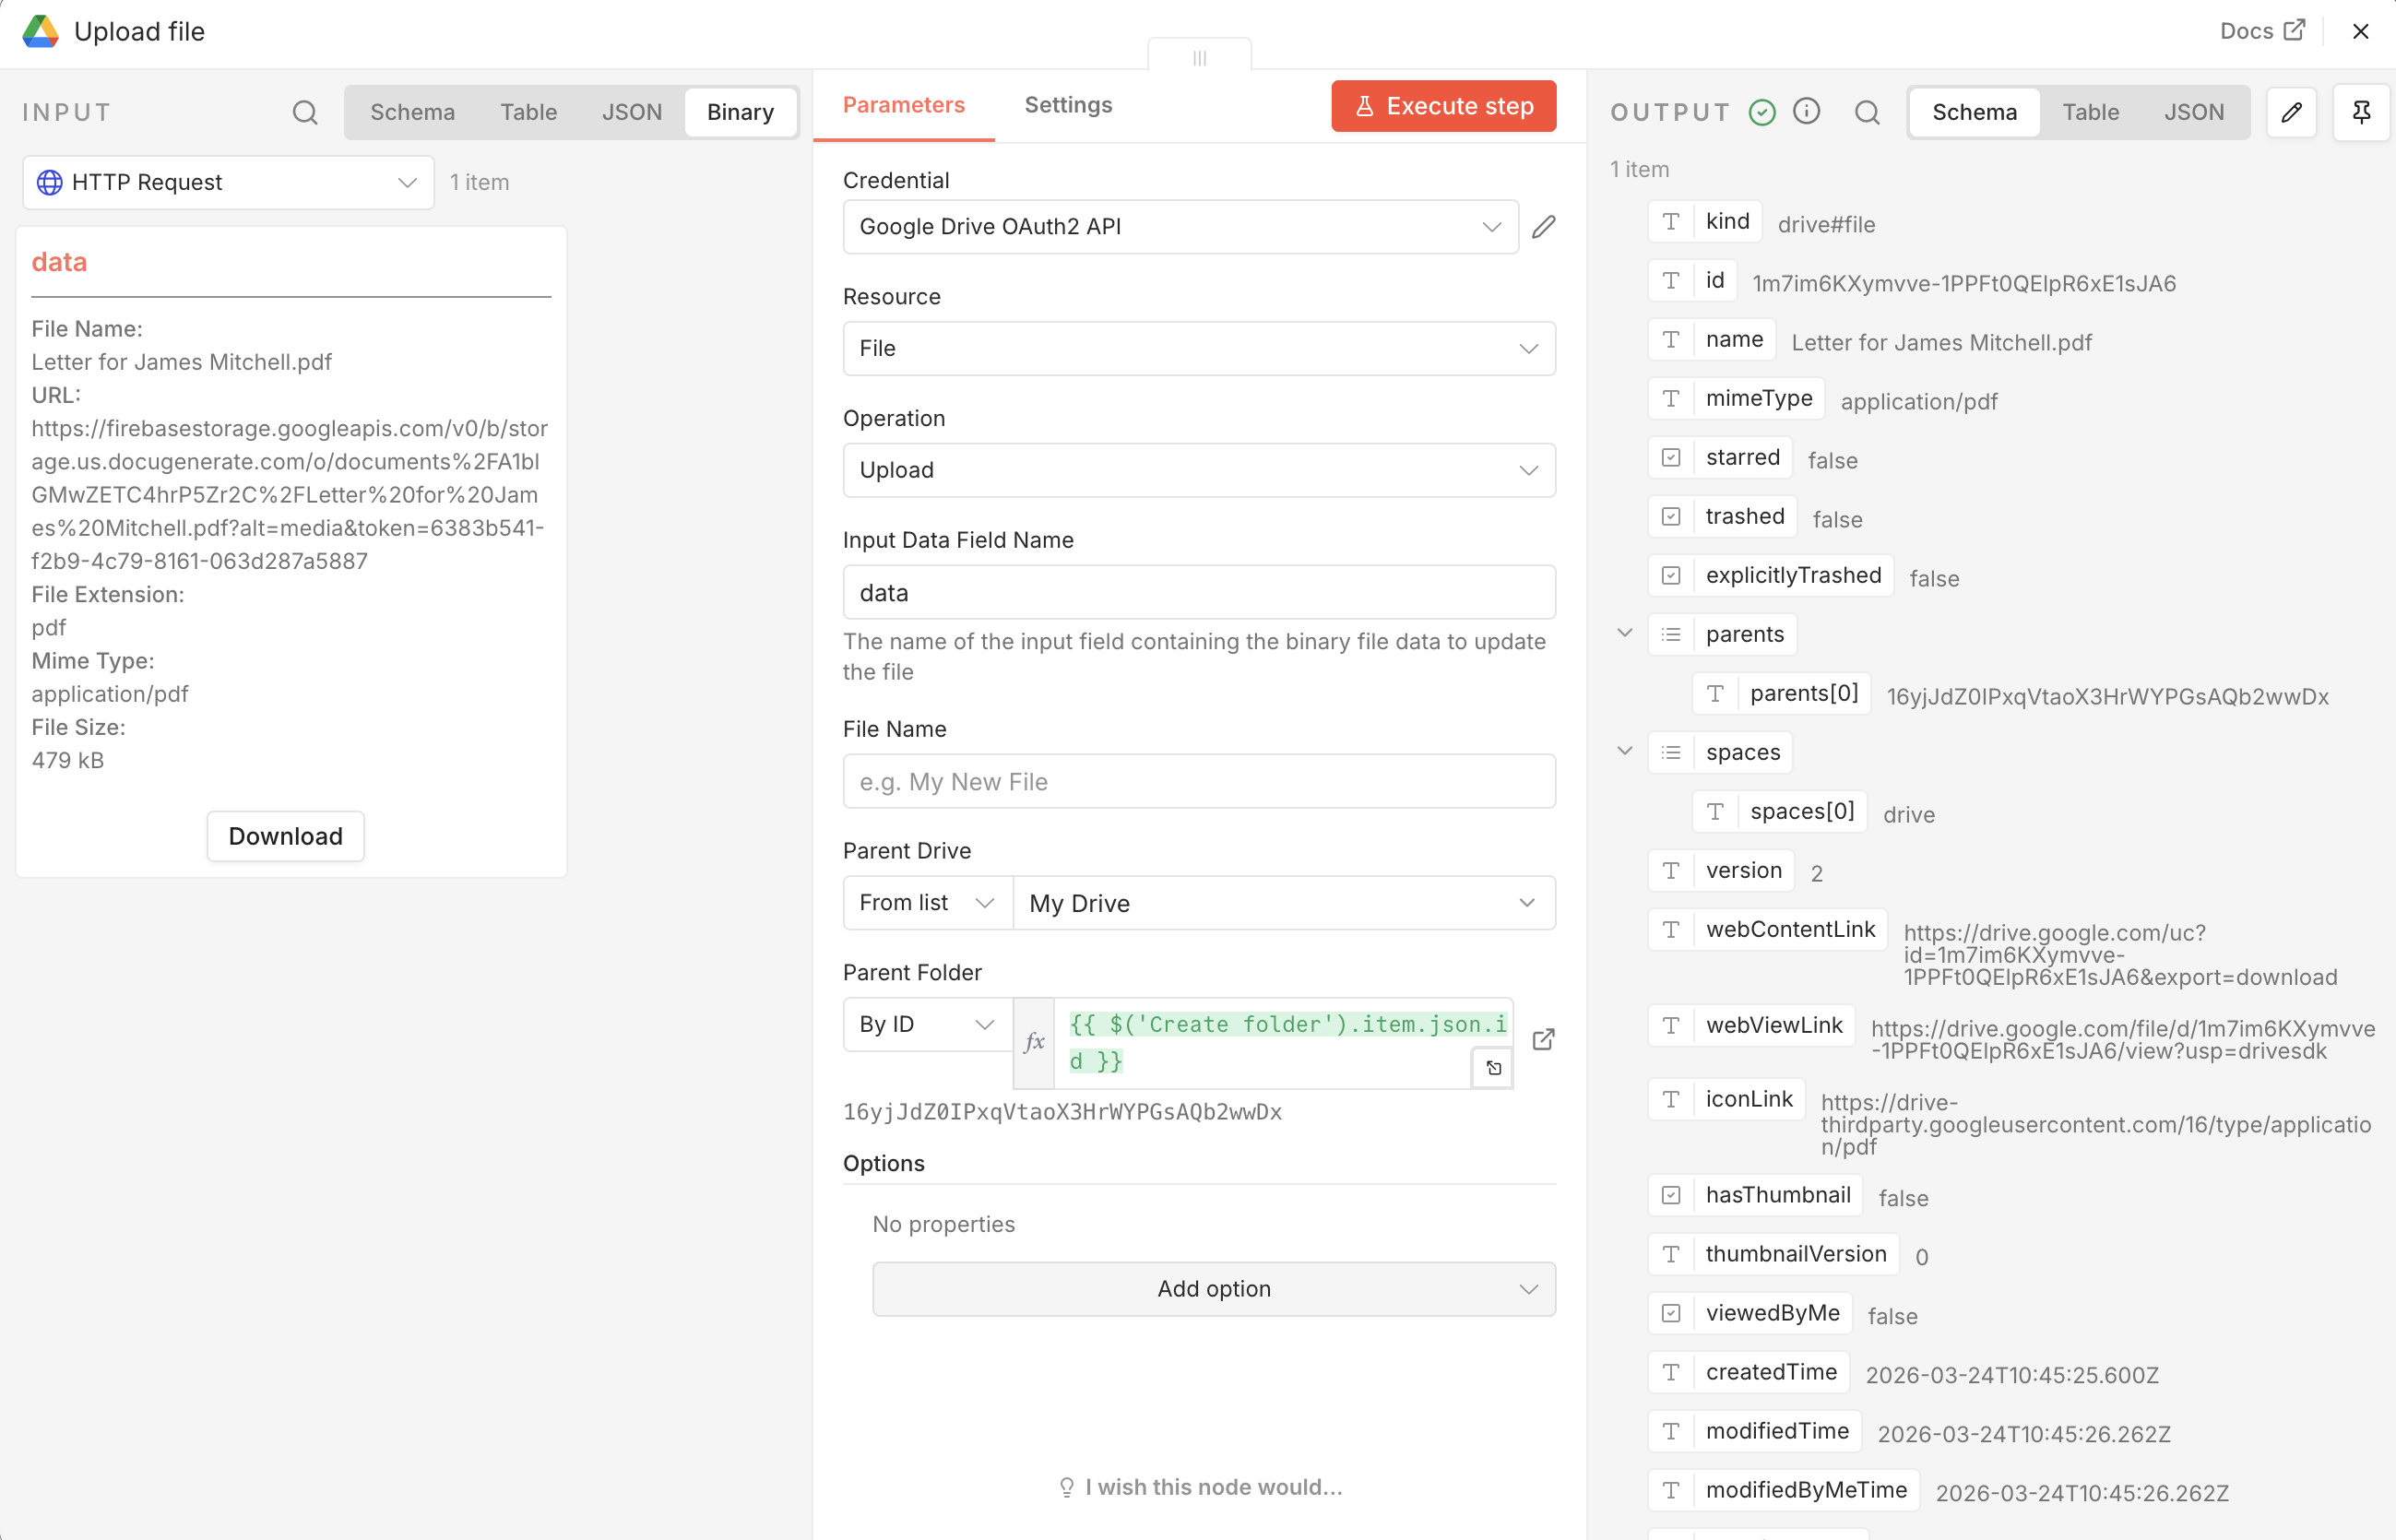
The final node uploads the PDF to the output folder created at the start of the run, using the Google Drive node’s Upload operation on the File resource.
The Input Data Field Name is set to data, matching the binary field produced by the HTTP Request node. The File Name field is left empty, so the upload keeps the original filename carried in the binary data, Letter for James Mitchell.pdf for this row. The Parent Folder uses the expression {{ $('Create folder').item.json.id }}, so every letter lands in the folder created for this review cycle rather than loose in Drive.
Running the Workflow
With every node configured, adding a new spreadsheet to the Salary Increase Letter folder is all it takes to generate a full batch of letters. The animation below shows a full run: each node turns green with a checkmark as it completes, and the Loop Over Items segment runs 10 times in a row, once for every employee in the spreadsheet.
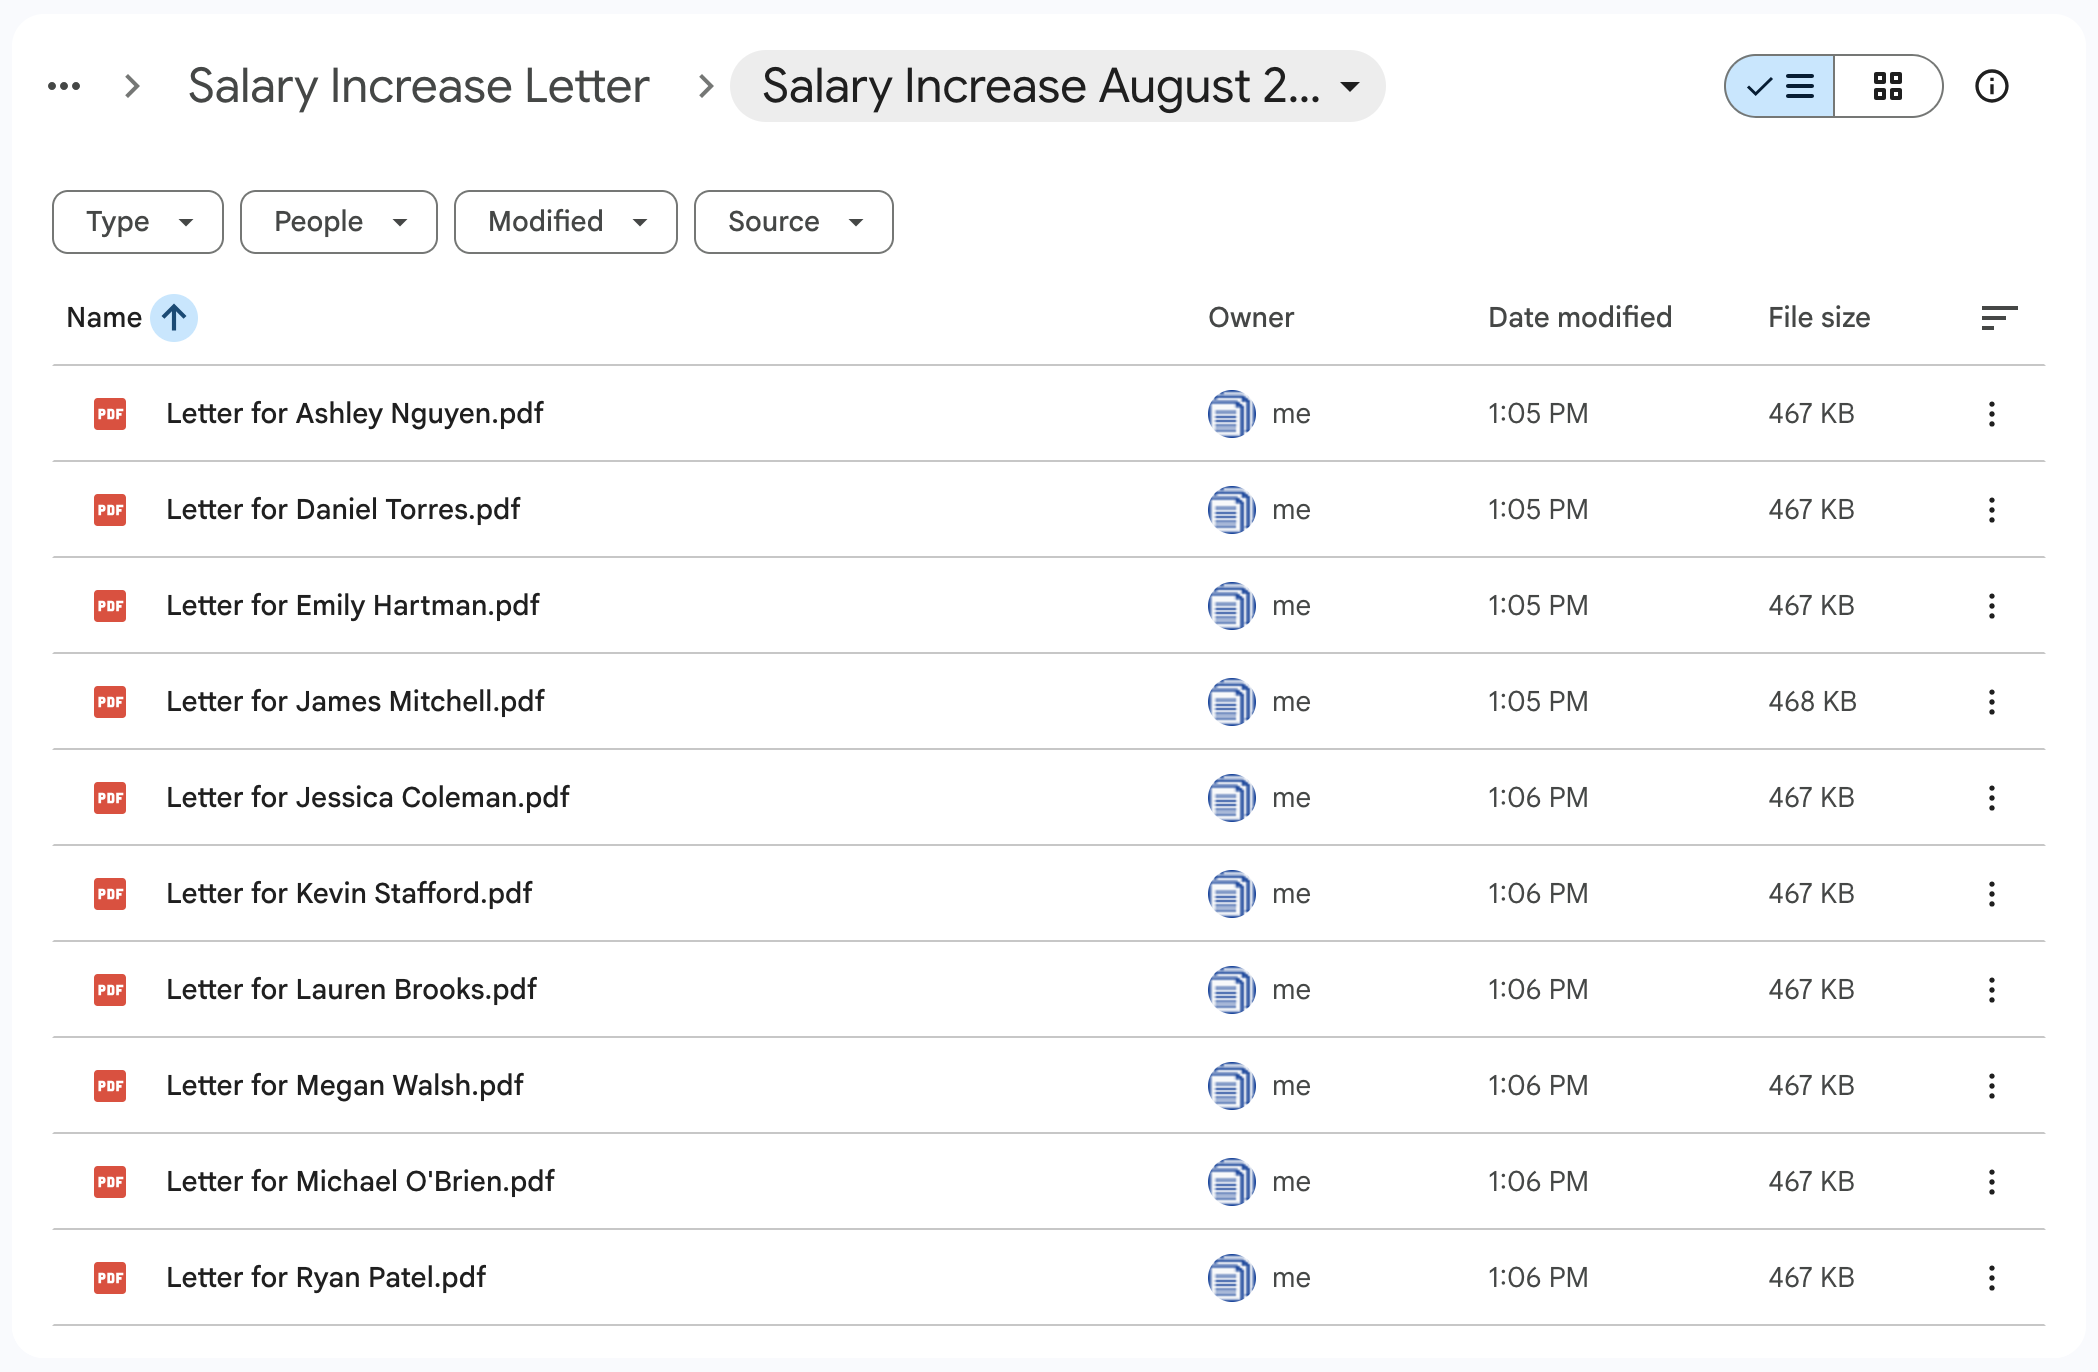
Once the run finishes, all 10 letters are sitting in the output folder in Google Drive, each named after its recipient.
Conclusion
In this tutorial, we built an n8n workflow that turns a Google Sheets spreadsheet of salary review data into a folder of personalized PDF letters, with no manual document creation involved. The workflow watches a Drive folder for a new spreadsheet, creates a matching output folder, loops through every row, and generates and files a letter for each employee, all triggered by nothing more than adding a spreadsheet to the right folder.
The same pattern applies to any HR document tied to a periodic review, from bonus letters to renewal notices. The trigger and data source could just as easily be a webhook from a Human Resources Information System (HRIS) or a query against a database instead of a Drive folder, while the generation and delivery steps stay the same.
Create a Pipedream workflow that receives participant data through a webhook, generates a personalized PDF certificate of participation with DocuGenerate, and emails it to the participant with Gmail, all within a few seconds of the request.
Learn how to automatically generate Form W-9 documents whenever a new row is added in Smartsheet. This tutorial builds a Power Automate flow that merges vendor and contractor data with a DocuGenerate template to produce the form.
Folders bring a familiar, hierarchical organization model to your DocuGenerate templates, making it easier to group related templates as your library grows. Find out how to create and manage folders to keep your workspace organized.