DocuGenerate is proud to be named a Winter 2025 Top Performer in the PDF Generators category by SourceForge, the world’s largest software review and comparison website. This award recognizes exceptional companies and products with a high volume of recent excellent user reviews that puts them in the top tenth percentile of highly reviewed products on SourceForge.
To win the Winter 2025 Top Performer award, each award recipient had to receive enough high-rated user reviews to place the winning product in the top 10% of favorably reviewed products out of the 100,000 products on SourceForge, which demonstrates the utmost quality that DocuGenerate delivers to customers.
Why Choose DocuGenerate for PDF Generation?
DocuGenerate is a powerful document generation tool designed to help businesses and professionals create high-quality PDFs with ease. Whether you need to generate contracts, invoices, agreements, or reports, DocuGenerate allows you to automate the process using Word templates and dynamic data. With a focus on reliability and scalability, DocuGenerate is ideal for teams looking to streamline their document workflows without manual editing.
DocuGenerate is built for automation, enabling users to process large volumes of documents efficiently. It also offers seamless integrations with no-code platforms like Make, Zapier, and Bubble, as well as backend services like Xano. Additionally, our product supports advanced formatting options, batch generation, and PDF/A export for long-term document preservation.
Whether you’re a startup, a legal firm, or an enterprise managing thousands of documents per month, DocuGenerate provides a flexible and cost-effective solution to meet your document generation needs.
What Our Users Are Saying
DocuGenerate has earned an overall 5-star rating from users on SourceForge:
The software is straightforward and does its job perfectly. Its fast and easy - no learning curve. Support was also fantastic when I had any questions.
Source: SourceForge
Some of the best customer service and technical support I've EVER experienced... It's great to have that 'warm fuzzy feeling' that a partner whose infrastructure you're relying on to deliver to your own customers, cares about the service they deliver.
Source: SourceForge
The interface is intuitive and user-friendly, making it easy to learn and navigate even for beginners. DocuGenerate has become a core part of our day to day work and i can't imagine what i would do without it.
Source: SourceForge
If DocuGenerate has helped streamline your document workflows, we’d love to hear your feedback! Share your experience on SourceForge here.
About SourceForge
SourceForge.net is the world’s largest software comparison directory, serving nearly 20 million users every month and featuring user reviews, product comparisons, software guides, and more. SourceForge’s mission is to help businesses find the best software to fit their needs and their budget. There are a variety of software tools available to businesses, and there are tools in almost every category and niche, each serving a slightly different purpose.
]]>Automating document generation can significantly boost your productivity, especially when managing multiple templates and datasets. While DocuGenerate’s web app provides a comprehensive solution, you might want to integrate document generation capabilities into your own Bubble application.
That’s why we’ve created a Bubble plugin that lets you harness the power of DocuGenerate’s API directly within your Bubble apps. In this tutorial, we’ll walk through how we built a simplified version of DocuGenerate using Bubble and our plugin - no coding required!
How the App Works
To get a better sense of what we’ll be building, you can check out the Bubble demo app. The animation below demonstrates a complete user journey through the application, from template creation to document generation and download.
The typical user journey follows these steps:
- Template Creation: Upload a Word template with merge tags and give it a name.
- Browsing Templates: From the dashboard, browse all available templates.
- Template Selection: Click on a template to view its details and previously generated documents.
- Document Generation: Using the “+” button, navigate to the document generation form.
- Data Entry: Provide a document name, select an output format, and enter the JSON data.
- Generation: After clicking “Generate,” the document is created using the DocuGenerate API.
- Document Access: Return to the template detail page and view the new document.
This workflow mirrors the core functionality of DocuGenerate’s web app but is implemented entirely within Bubble. The seamless integration between Bubble’s visual development platform and DocuGenerate’s API creates a powerful yet accessible document generation solution.
Setting Up Your Bubble Project
Before we start building our app, you’ll need to prepare your development environment. Bubble’s visual platform makes this process straightforward, but there are a few essential steps to complete:
- Sign up for a Bubble account if you don’t already have one.
- Create an app in Bubble and give it a name.
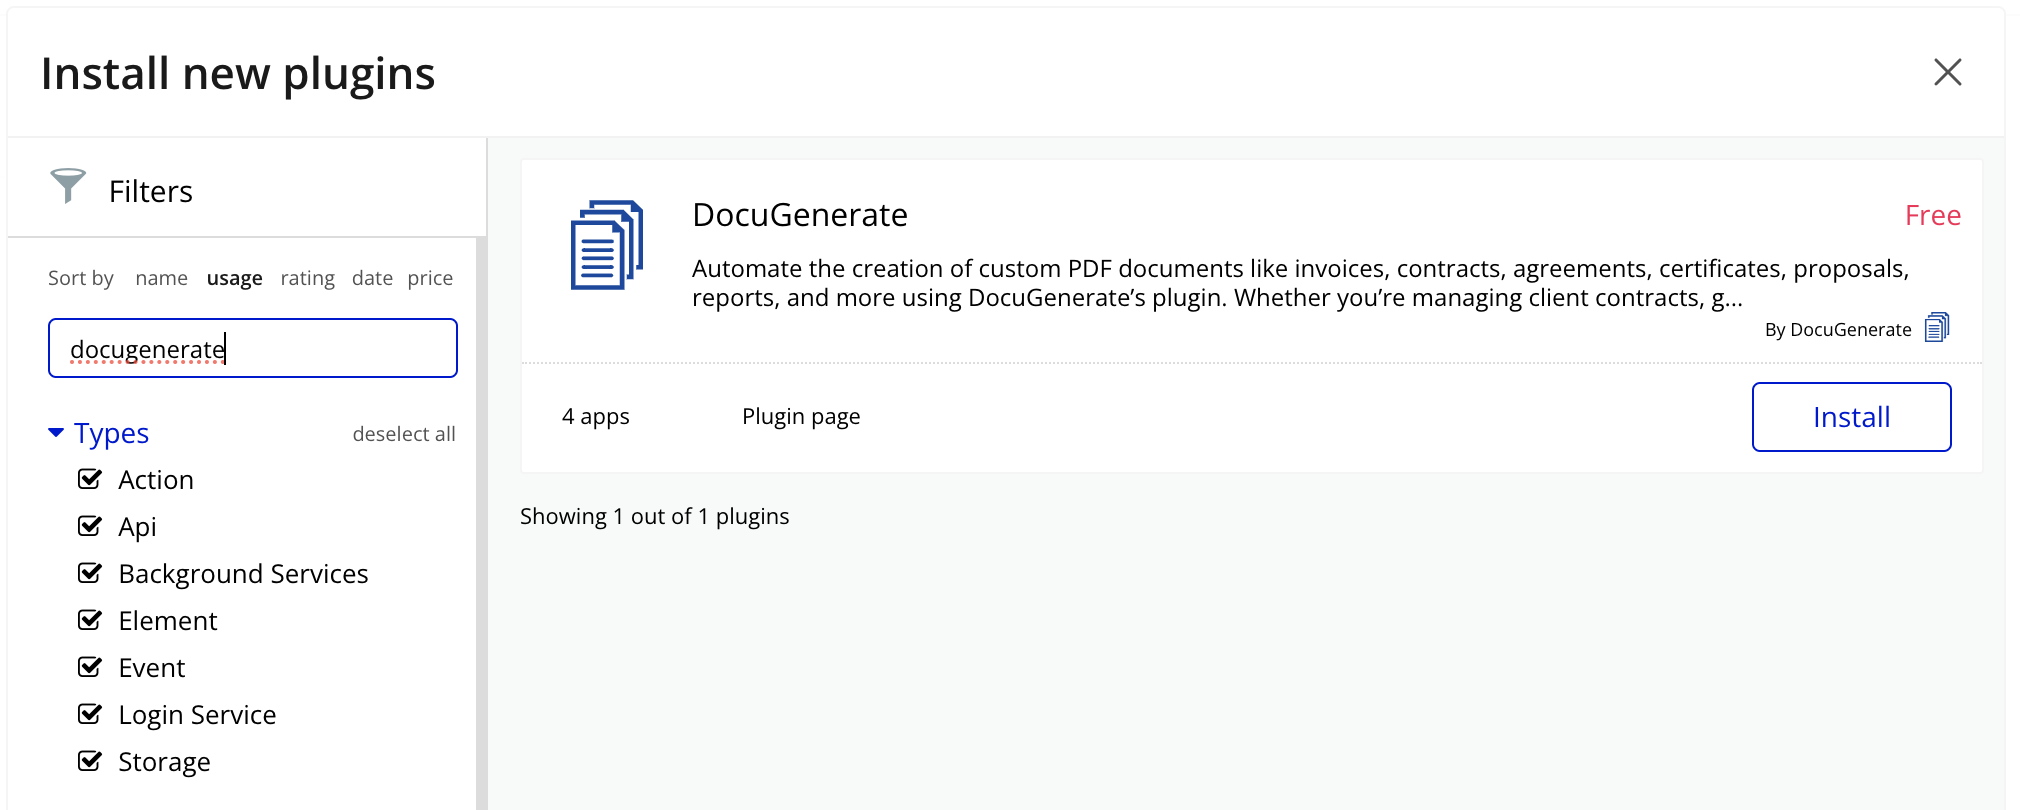
- Install the DocuGenerate plugin in your new app.
- Configure the plugin with your DocuGenerate API Key.
What’s Included in the DocuGenerate Plugin?
The DocuGenerate Bubble plugin provides a comprehensive set of API calls that mirror our REST API functionality. These are categorized into two types:
Data Calls
These are used to retrieve information from your DocuGenerate account:
- List Templates: Returns all templates available in your account.
- Get Template: Retrieves detailed information about a specific template.
- List Documents: Returns all documents generated from a specific template.
- Get Document: Retrieves detailed information about a specific document.
Actions
These are used to create, modify, or delete resources in your DocuGenerate account:
- Create Template: Uploads a new template file.
- Update Template: Modifies an existing template.
- Delete Template: Removes a template from your account.
- Generate Document: Creates a new document from a template and data.
- Update Document: Modifies document properties.
- Delete Document: Removes a document from your account.
Understanding these API calls is essential as they form the backbone of our demo application. Throughout this tutorial, we’ll be using most of these calls to create a fully functional document generation workflow.
Designing the App Navigation
Before diving into each page, let’s set up the navigation structure that will connect all parts of our application. A consistent navigation system is crucial for providing a smooth user experience across the app. We created a simple navigation bar that appears at the top of every page, which includes:
- The DocuGenerate logo on the left side, which serves as a home button pointing to the dashboard.
- A New Template button on the right side that takes users directly to the template creation page.
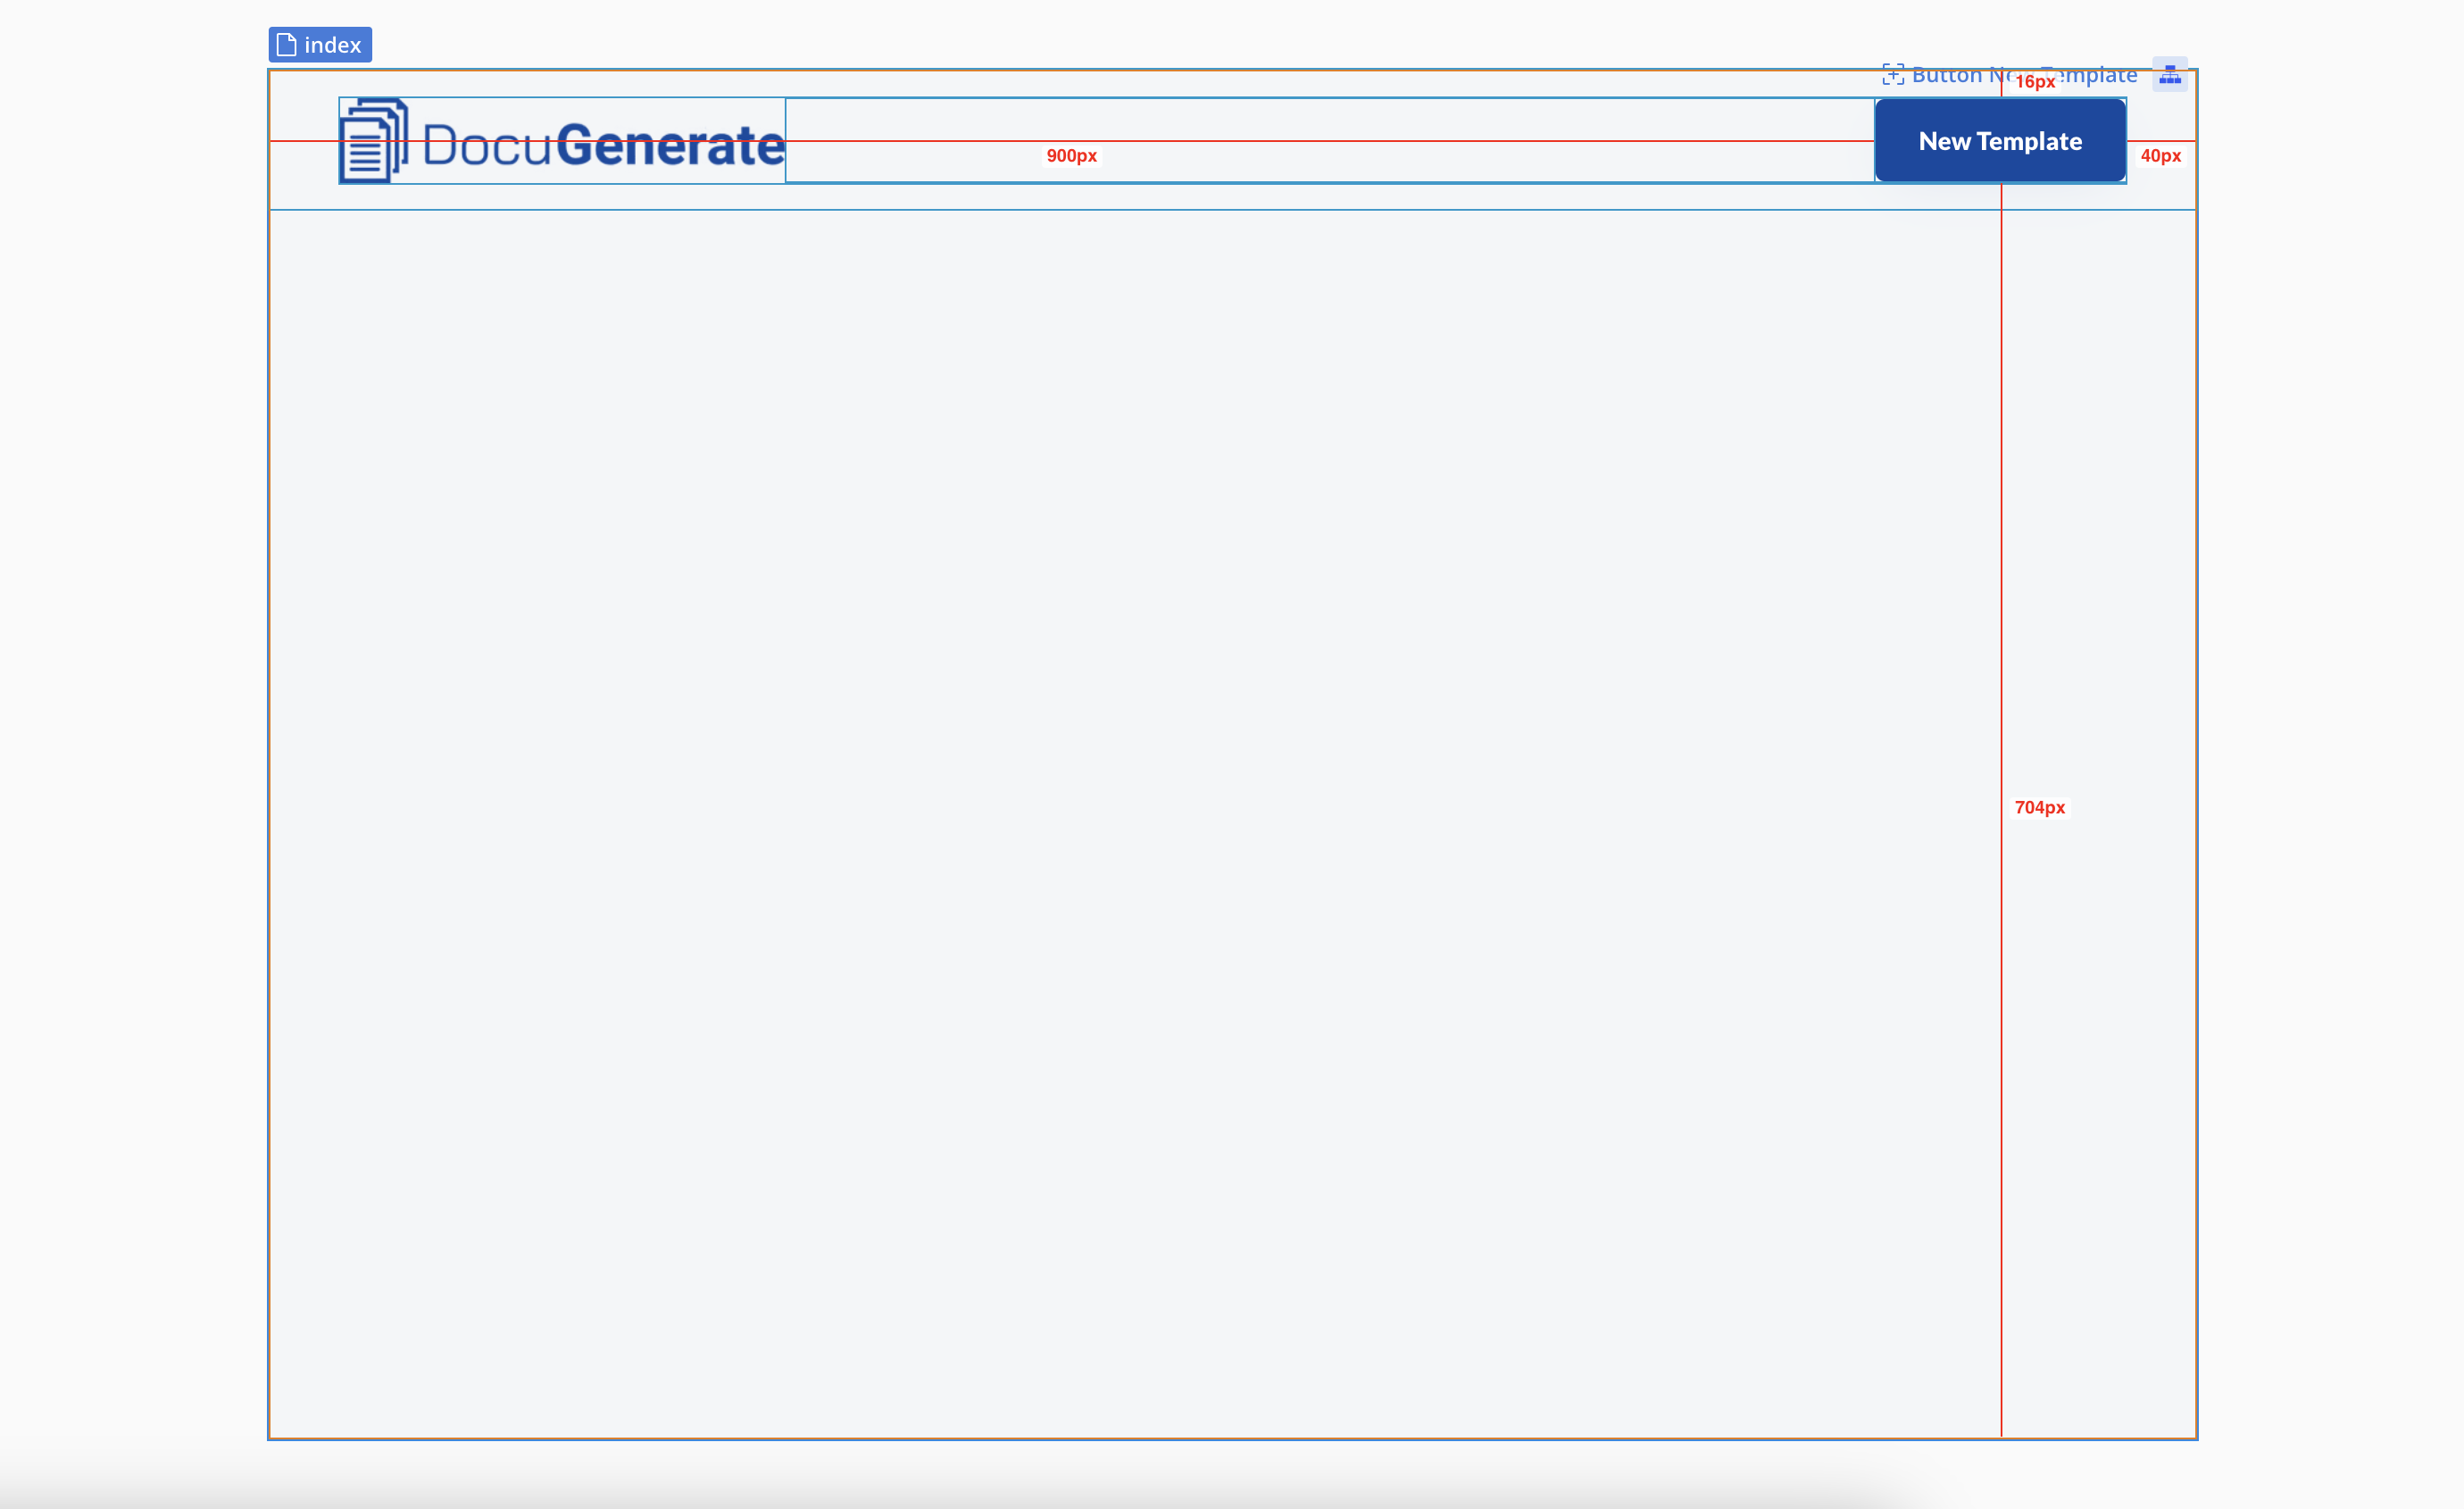
This navigation structure mirrors the approach used in the actual DocuGenerate web app, providing a familiar experience for users who have used our main platform. The familiar layout helps users intuitively understand how to navigate the application without requiring additional instructions.
The Dashboard Page
The dashboard page serves as the central hub of our application, providing users with an immediate overview of all their available templates. This is the first screen users see when they open the app, so it’s designed to be both informative and intuitive, allowing for quick access to the most important functionality.
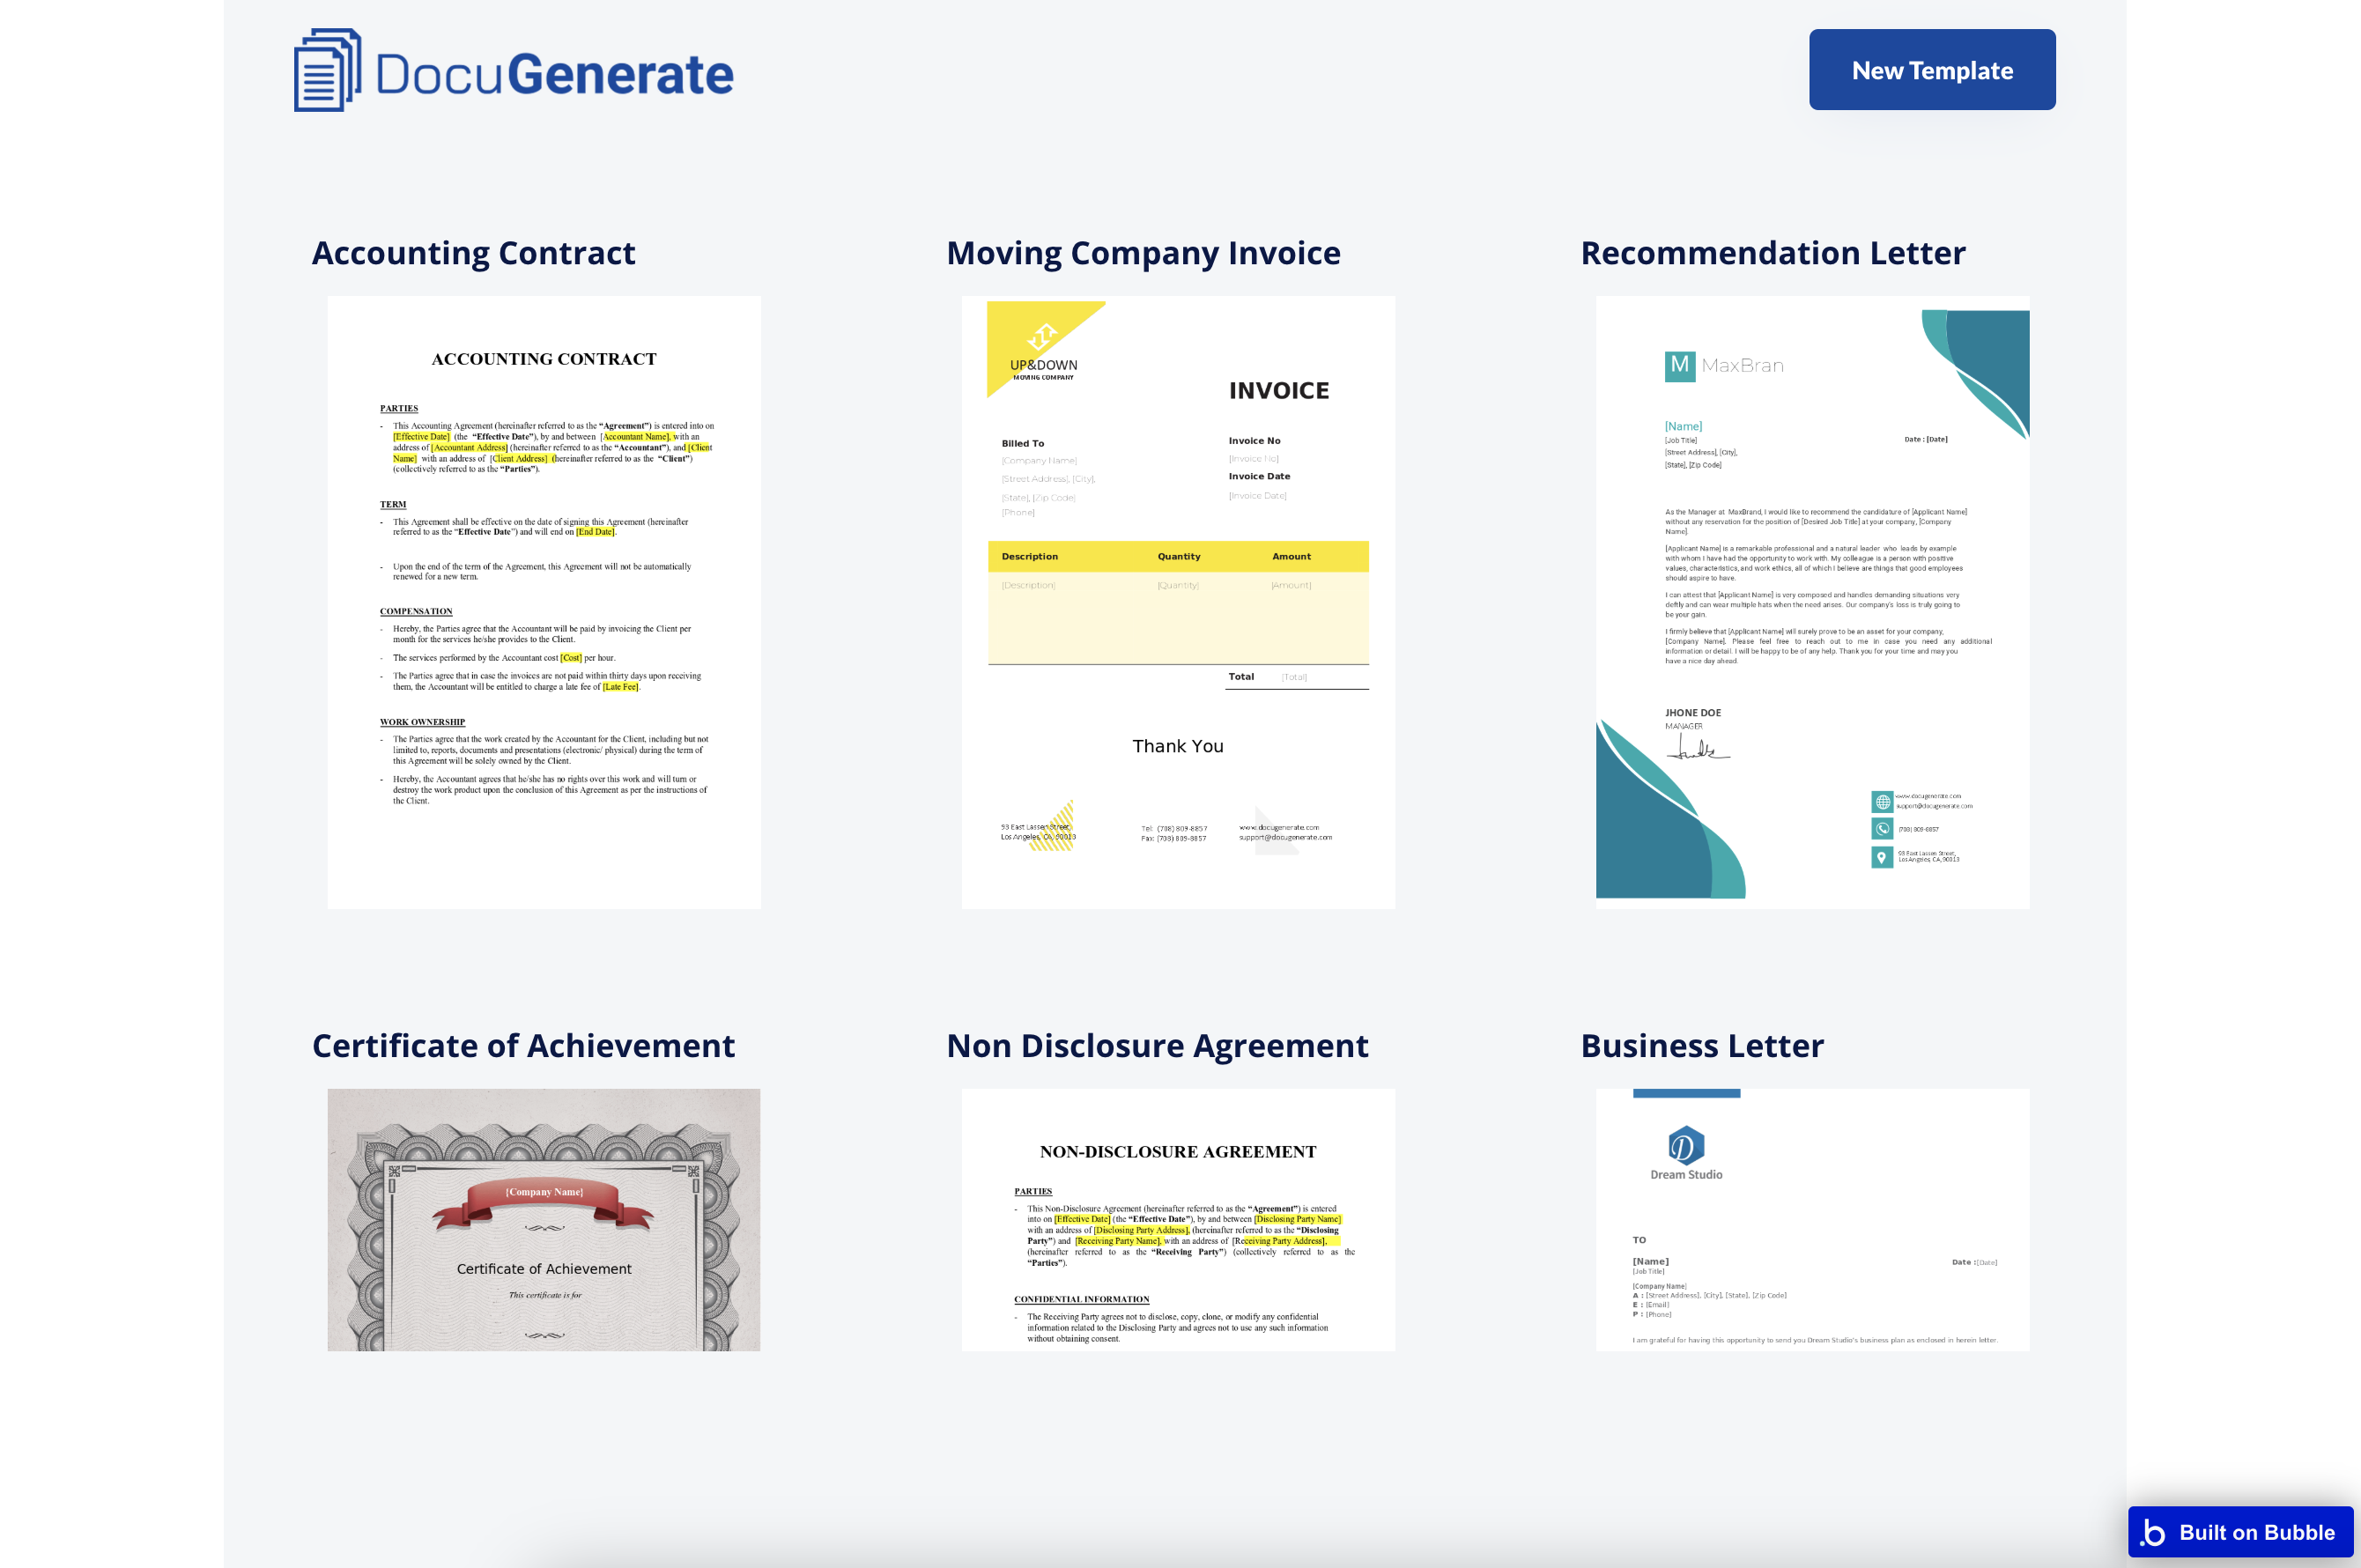
Much like DocuGenerate’s web interface, we’ve organized templates in a visually appealing grid layout that showcases template previews alongside their names. This visual approach makes it easy for users to quickly identify the template they’re looking for, even when managing dozens of different templates.
How to Build It:
- Create a RepeatingGroup element to display the templates.
- Set the Data Source to the List Templates data call from the DocuGenerate plugin.
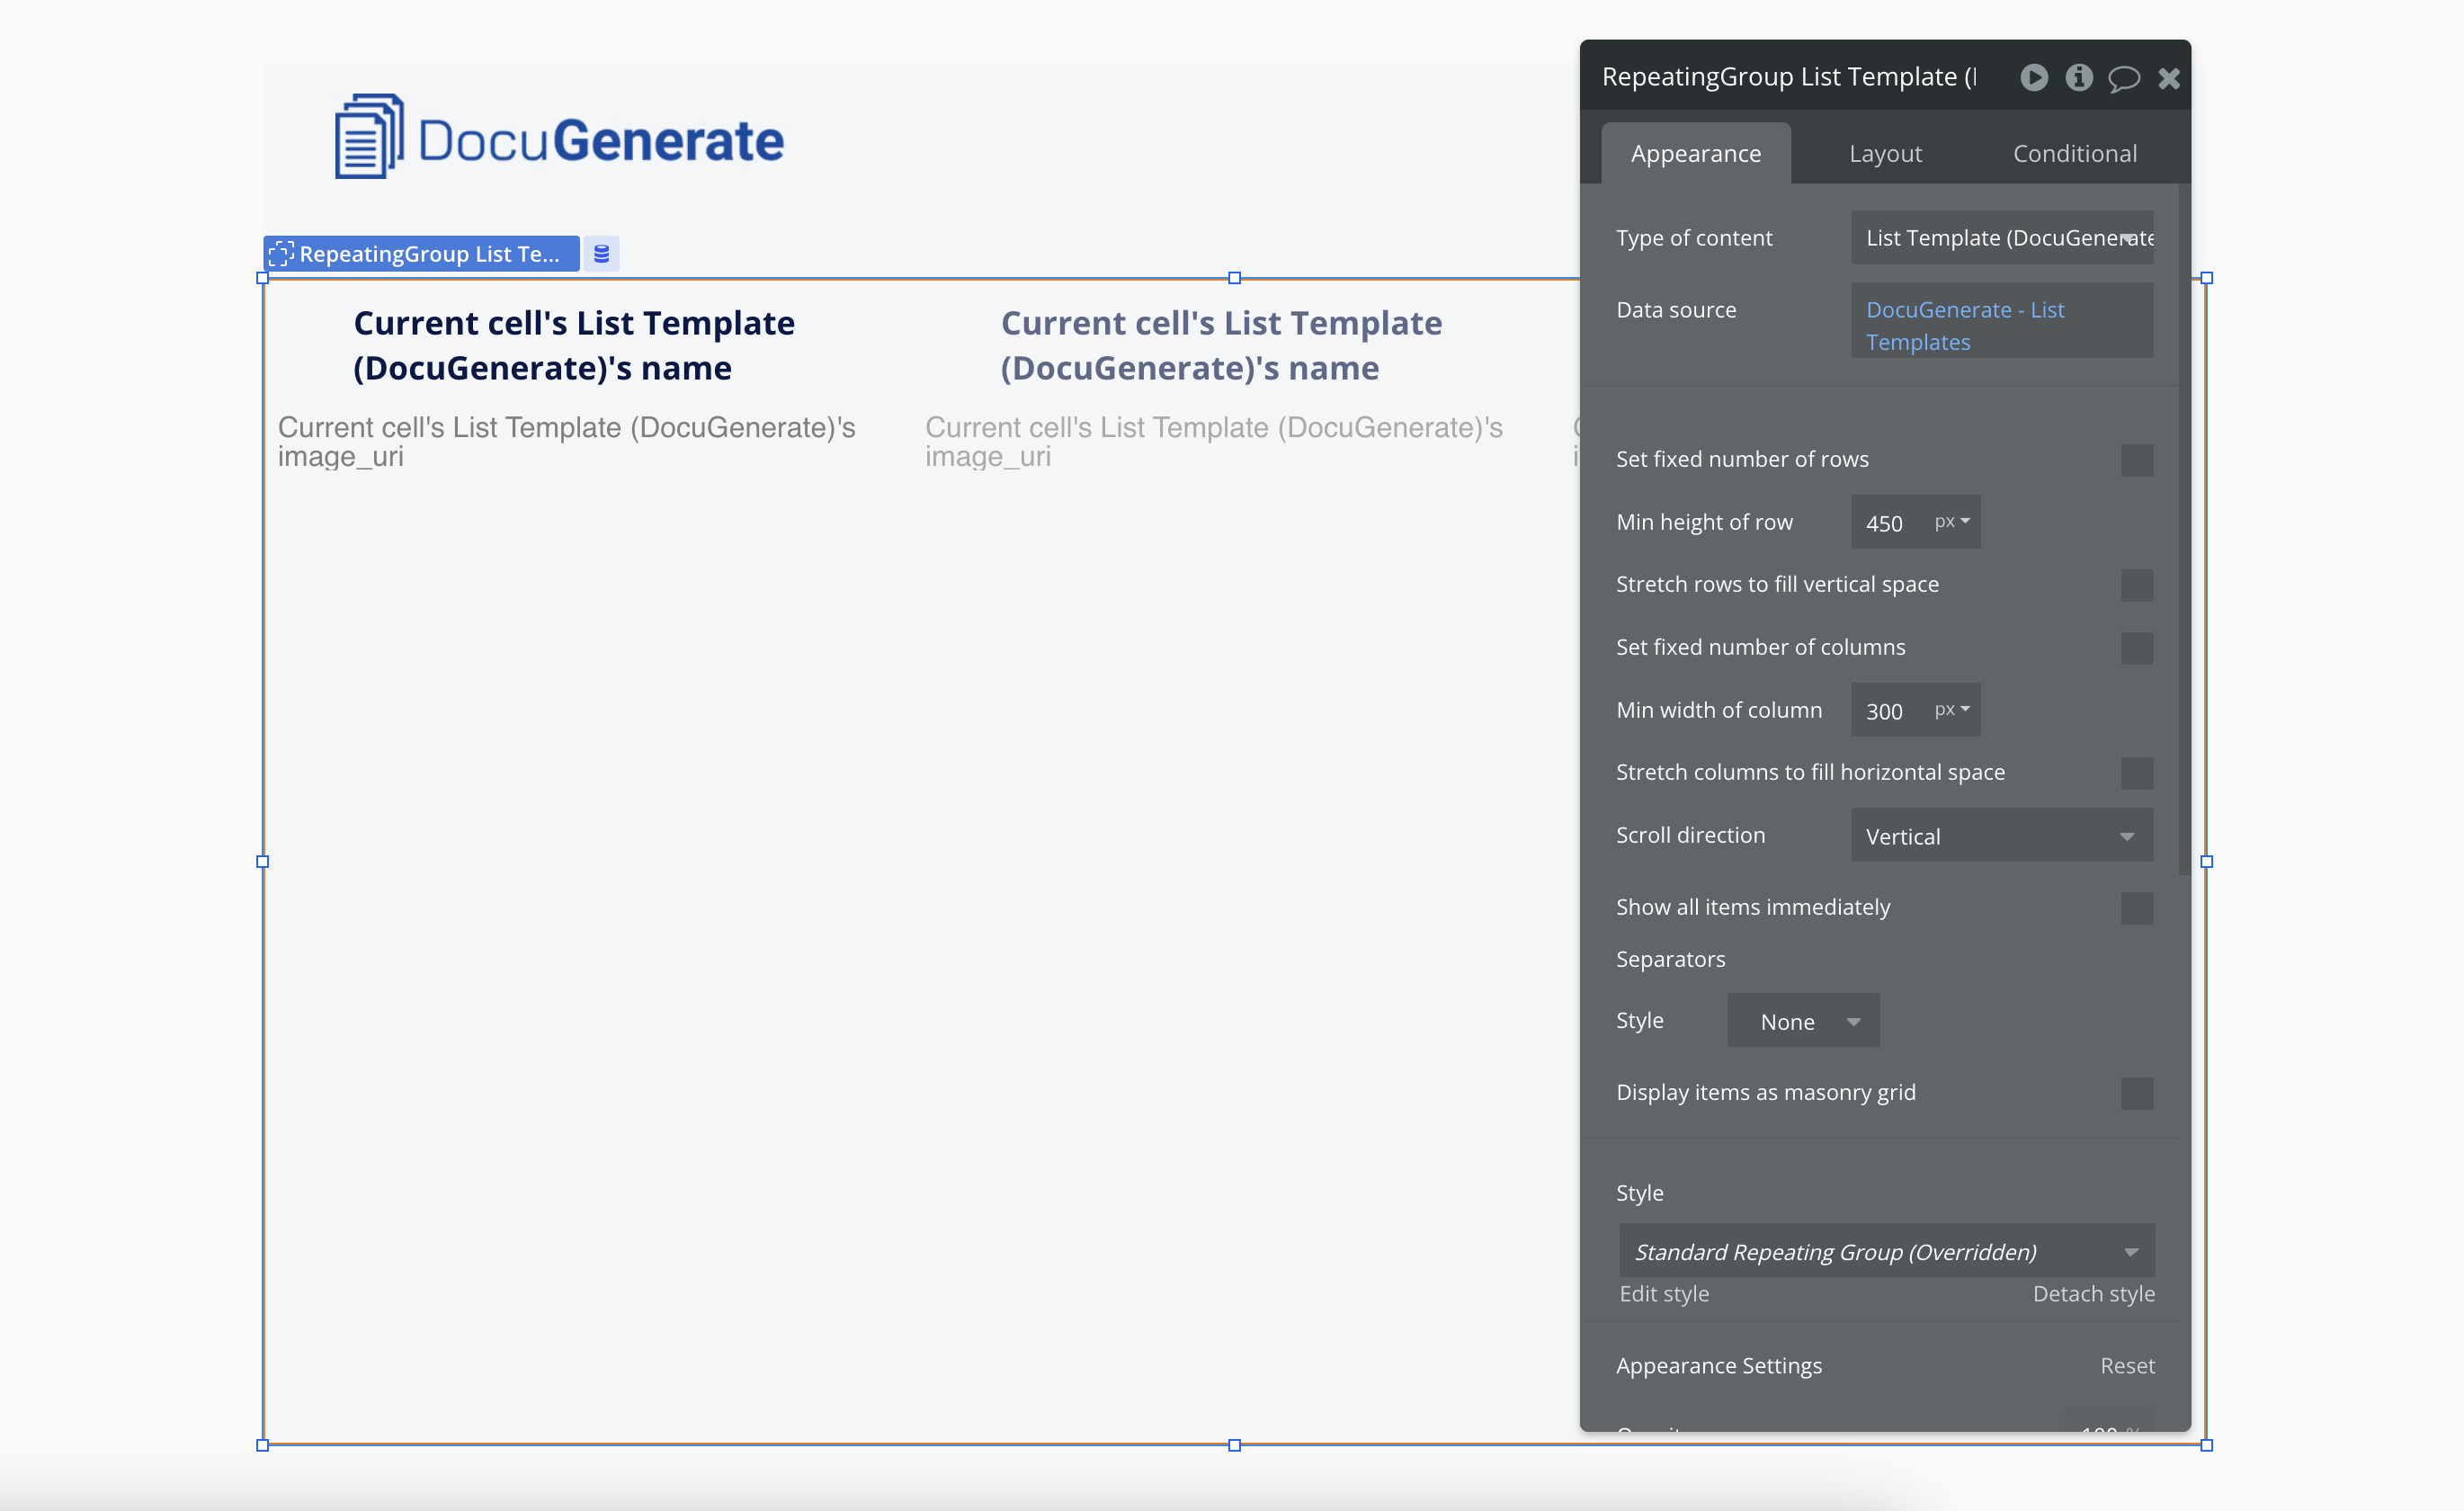
- Design each grid item to include:
- A text element for the template name
- An image element for the template preview
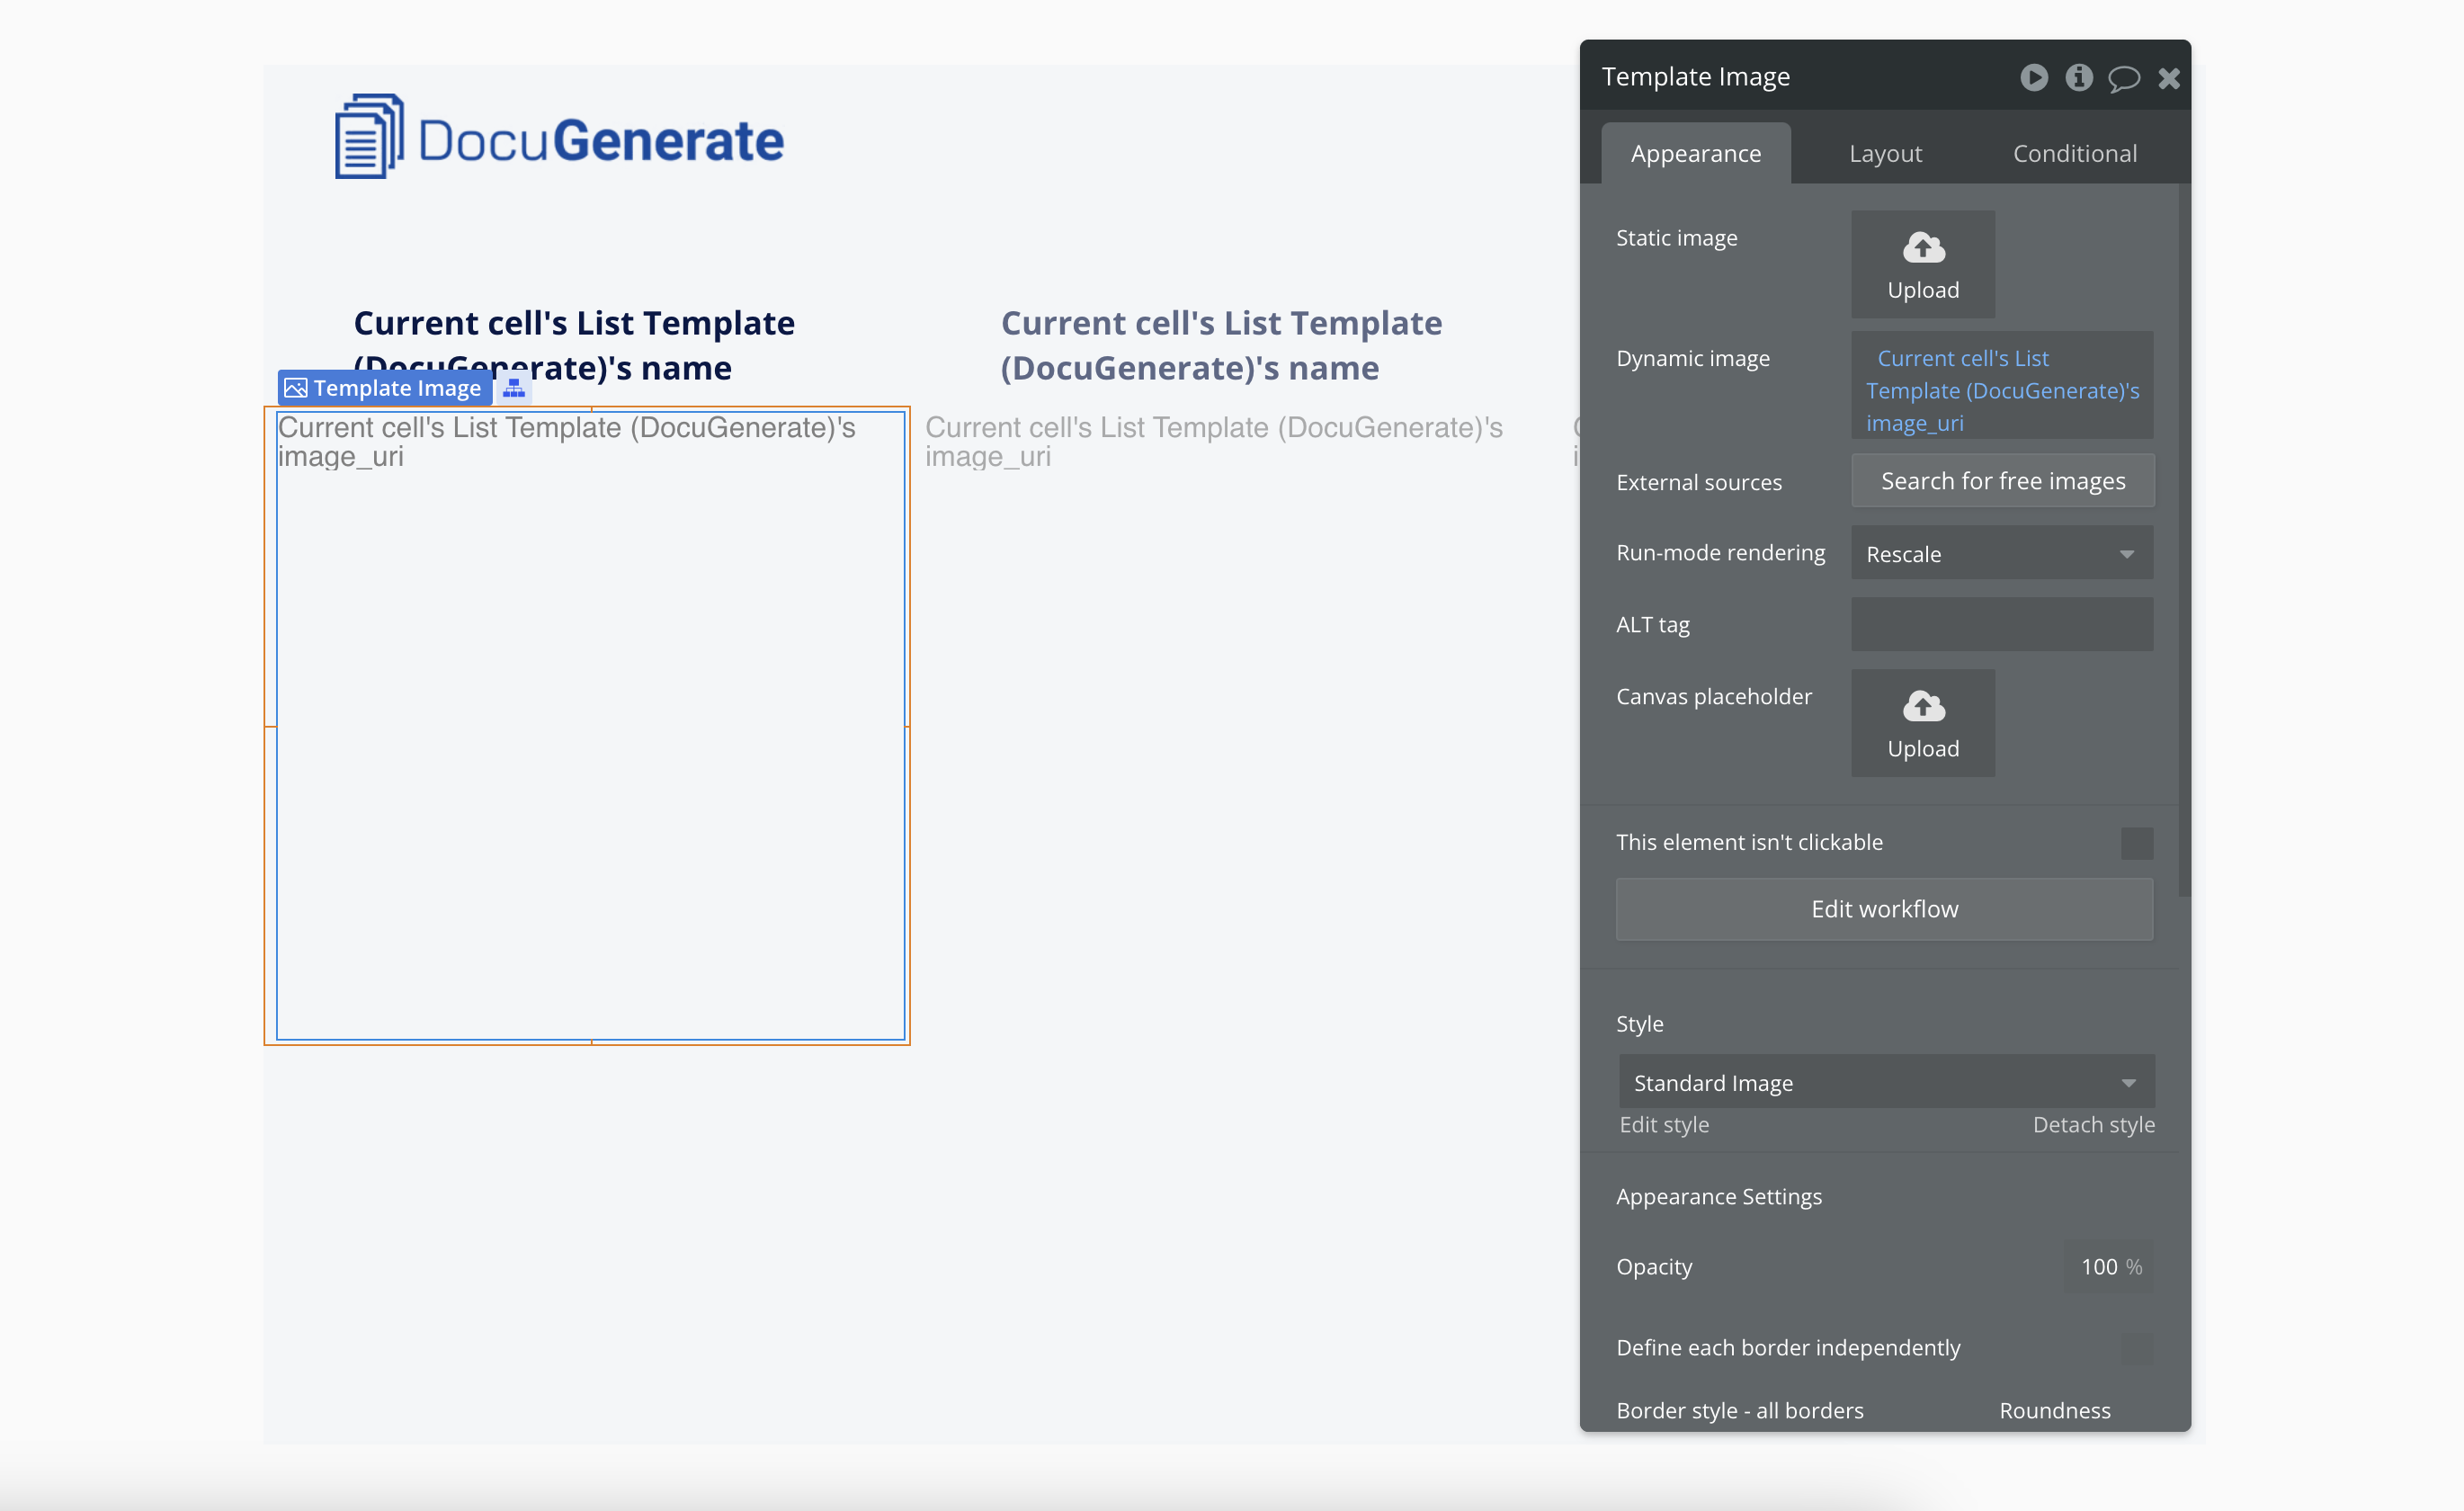
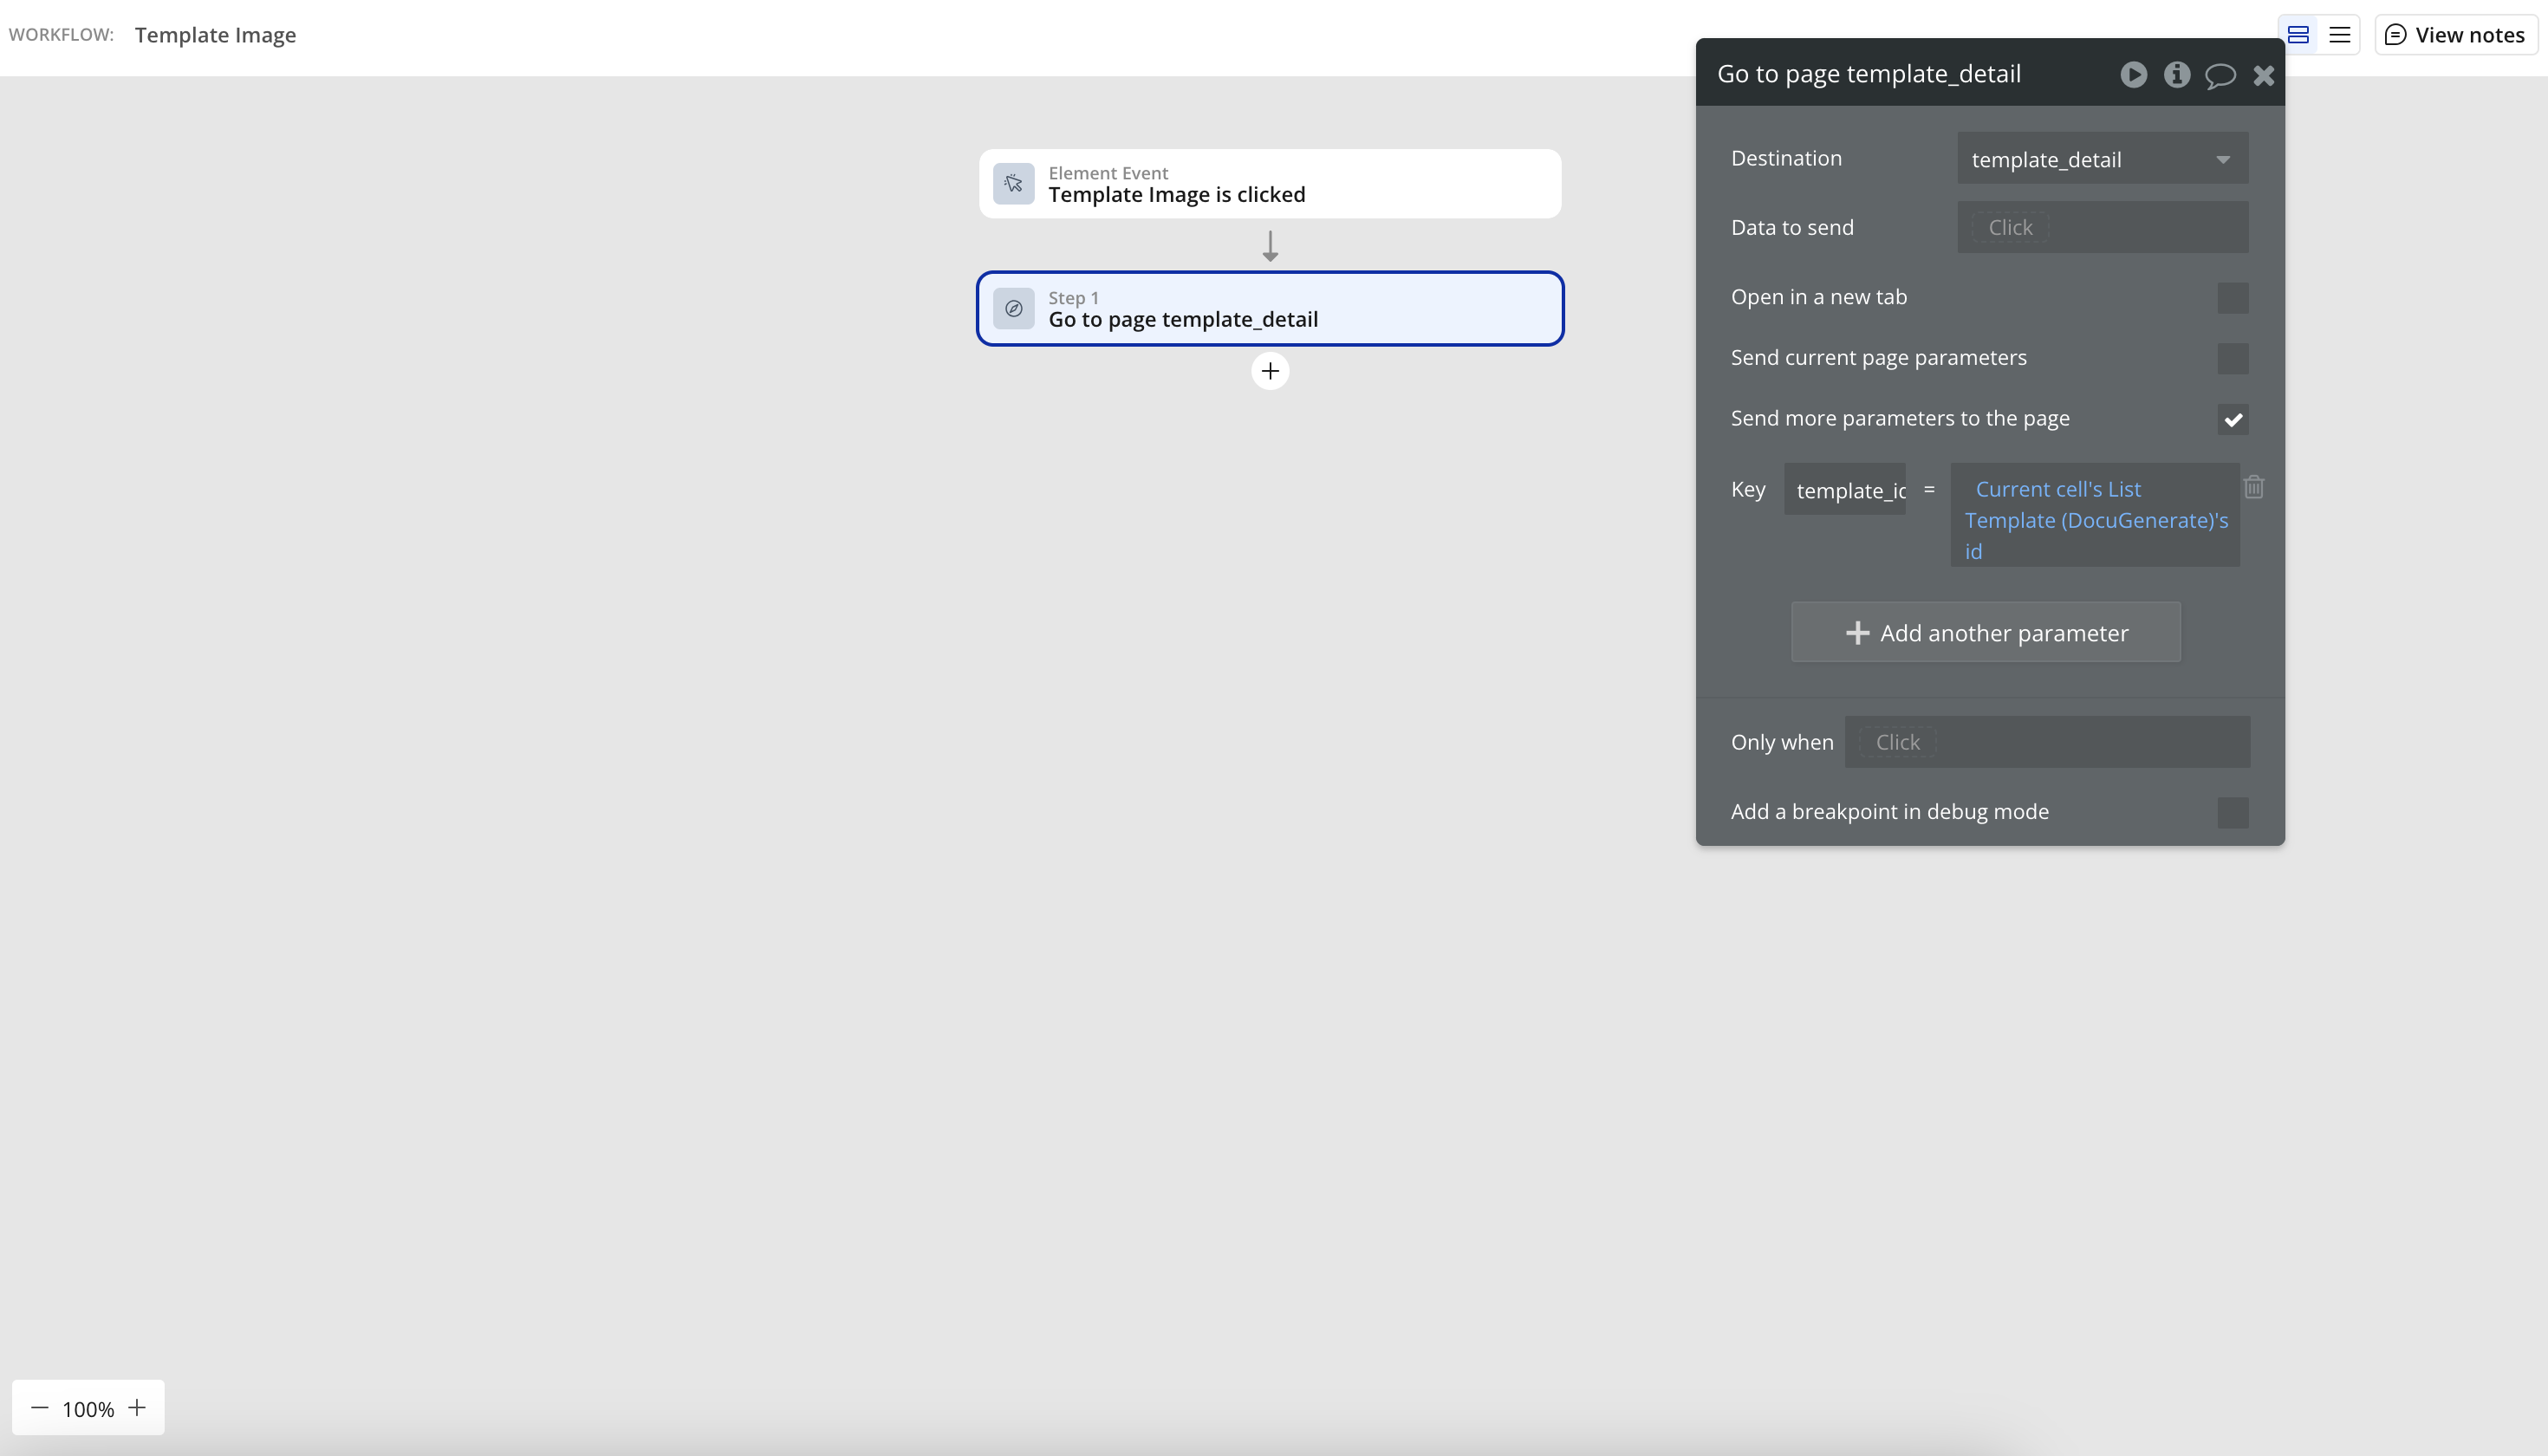
- Add a workflow to the image element so that when clicked, it navigates to the template detail page and passes the template ID as a URL parameter.
The key component here is the RepeatingGroup, which automatically populates with all templates from your DocuGenerate account. This dynamic approach ensures that the dashboard always shows the most up-to-date list of templates without requiring any manual updates.
Each template in the grid is clickable and navigates to a detailed view of that specific template. This interaction pattern creates a natural flow through the application, guiding users from the overview to more detailed information with a single click.
The dashboard also integrates seamlessly with our navigation bar, which includes the “New Template” button for quick access to template creation. This ensures that users can easily start the document generation process from this central location.
The Template Creation Page
This page is where users begin the document generation process by uploading a Word document that will serve as a template. This critical step lays the foundation for all subsequent document generation, as the uploaded template contains the structure, formatting, and merge tags that will be used when generating documents.
We’ve designed this page to be straightforward and focused, eliminating unnecessary distractions and guiding users through the template creation process. The interface clearly communicates what’s required (a Word document and a name) and provides immediate feedback when the template is successfully created.

How to Build It:
- Add a FileUploader element to let users select their Word document.

- Add an input field for entering the template name.
- Add a “Create Template” button with the following workflow:
- When clicked, call the Create Template action from the DocuGenerate plugin
- Pass the file from the FileUploader as the
fileparameter using the dynamic link option - Pass the name from the input field as the
nameparameter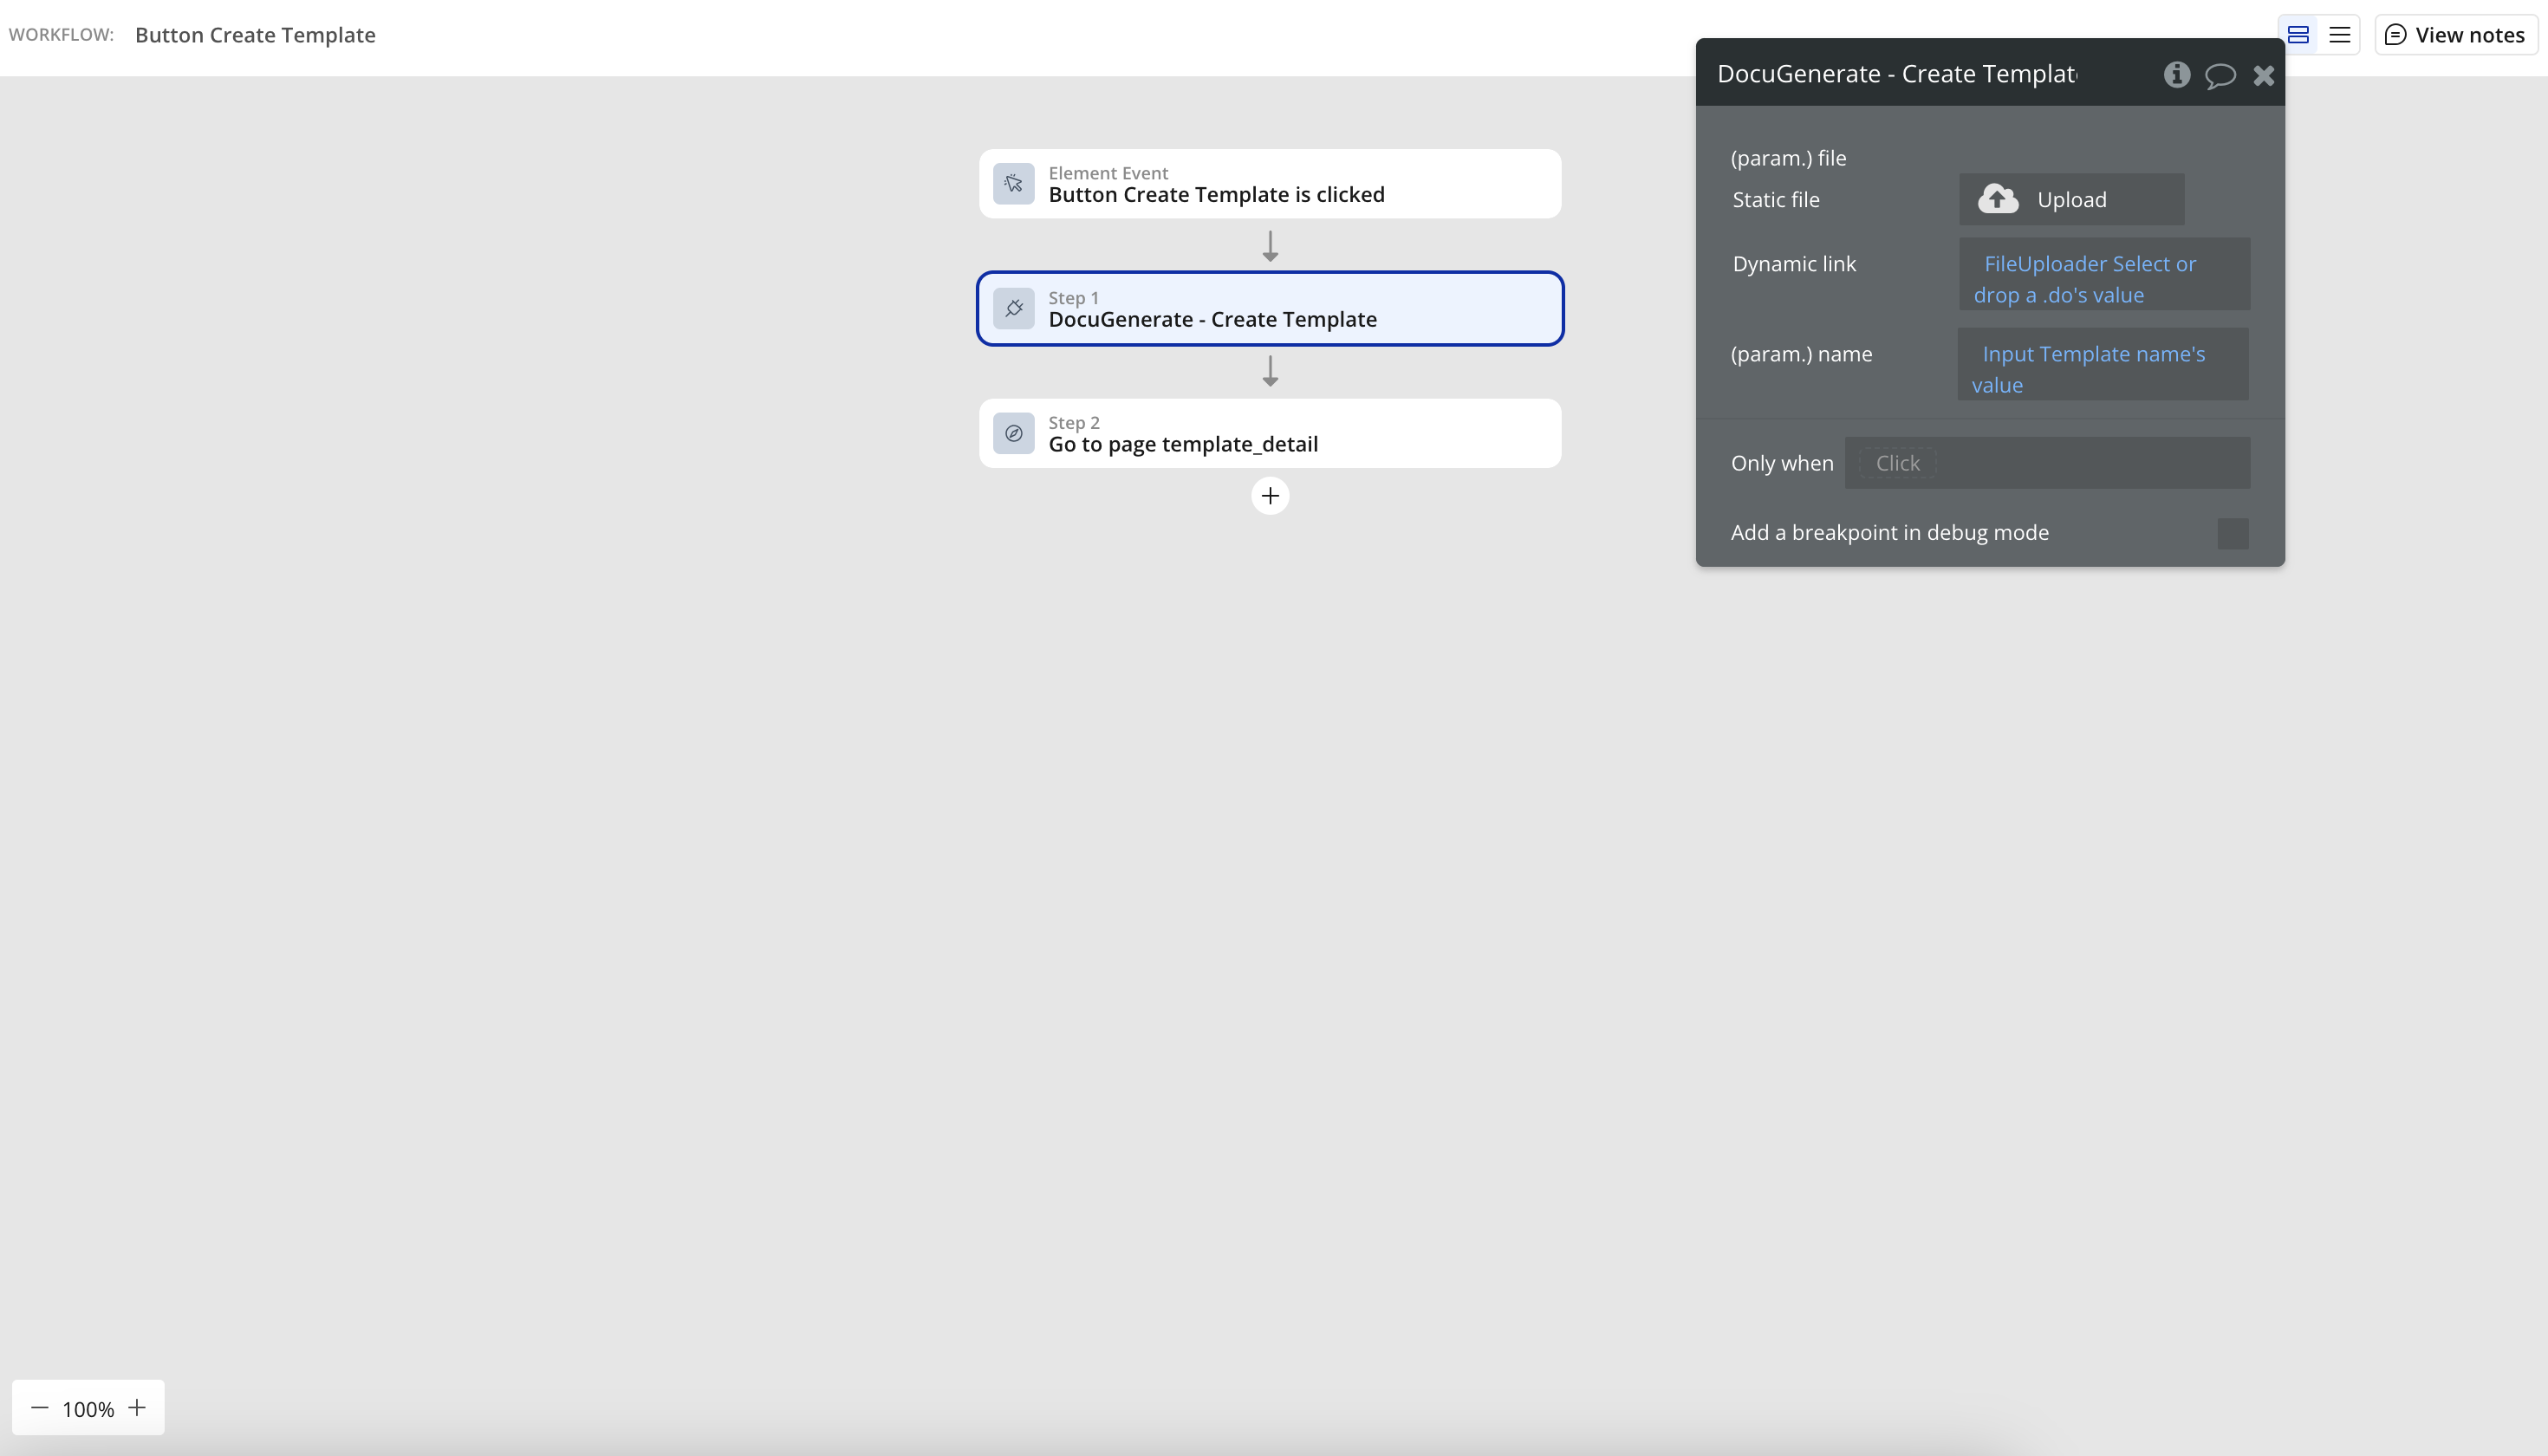
- After the template is created, navigate to the template detail page with the new template ID
This streamlined form handles everything needed to create a template in DocuGenerate. The FileUploader component provides a native way for users to select files from their device, complete with drag-and-drop support and clear visual feedback. This makes the process intuitive even for non-technical users who may be unfamiliar with document automation.
After the template is created, the automatic navigation to the template detail page creates a seamless transition to the next step in the workflow. This thoughtful user journey eliminates the need for users to manually navigate between pages, reducing friction and improving the overall experience.
The Template Detail Page
The Template Detail page serves as the central hub for managing a specific template and all documents generated from it. This page brings together essential template information with document management capabilities, providing a comprehensive view of each template’s usage and output.
Unlike the simpler pages we’ve created so far, the Template Detail page integrates multiple data sources and interactive elements to create a more complex and functional interface. We’ve carefully organized these elements to maintain clarity despite the increased complexity, ensuring that users can easily find and use the features they need.

How to Build It:
- Create a Group element as the container for the page content.
- Set the Group’s Data Source to the Get Template data call from the DocuGenerate plugin, with the
idparameter set to the template_id from the URL.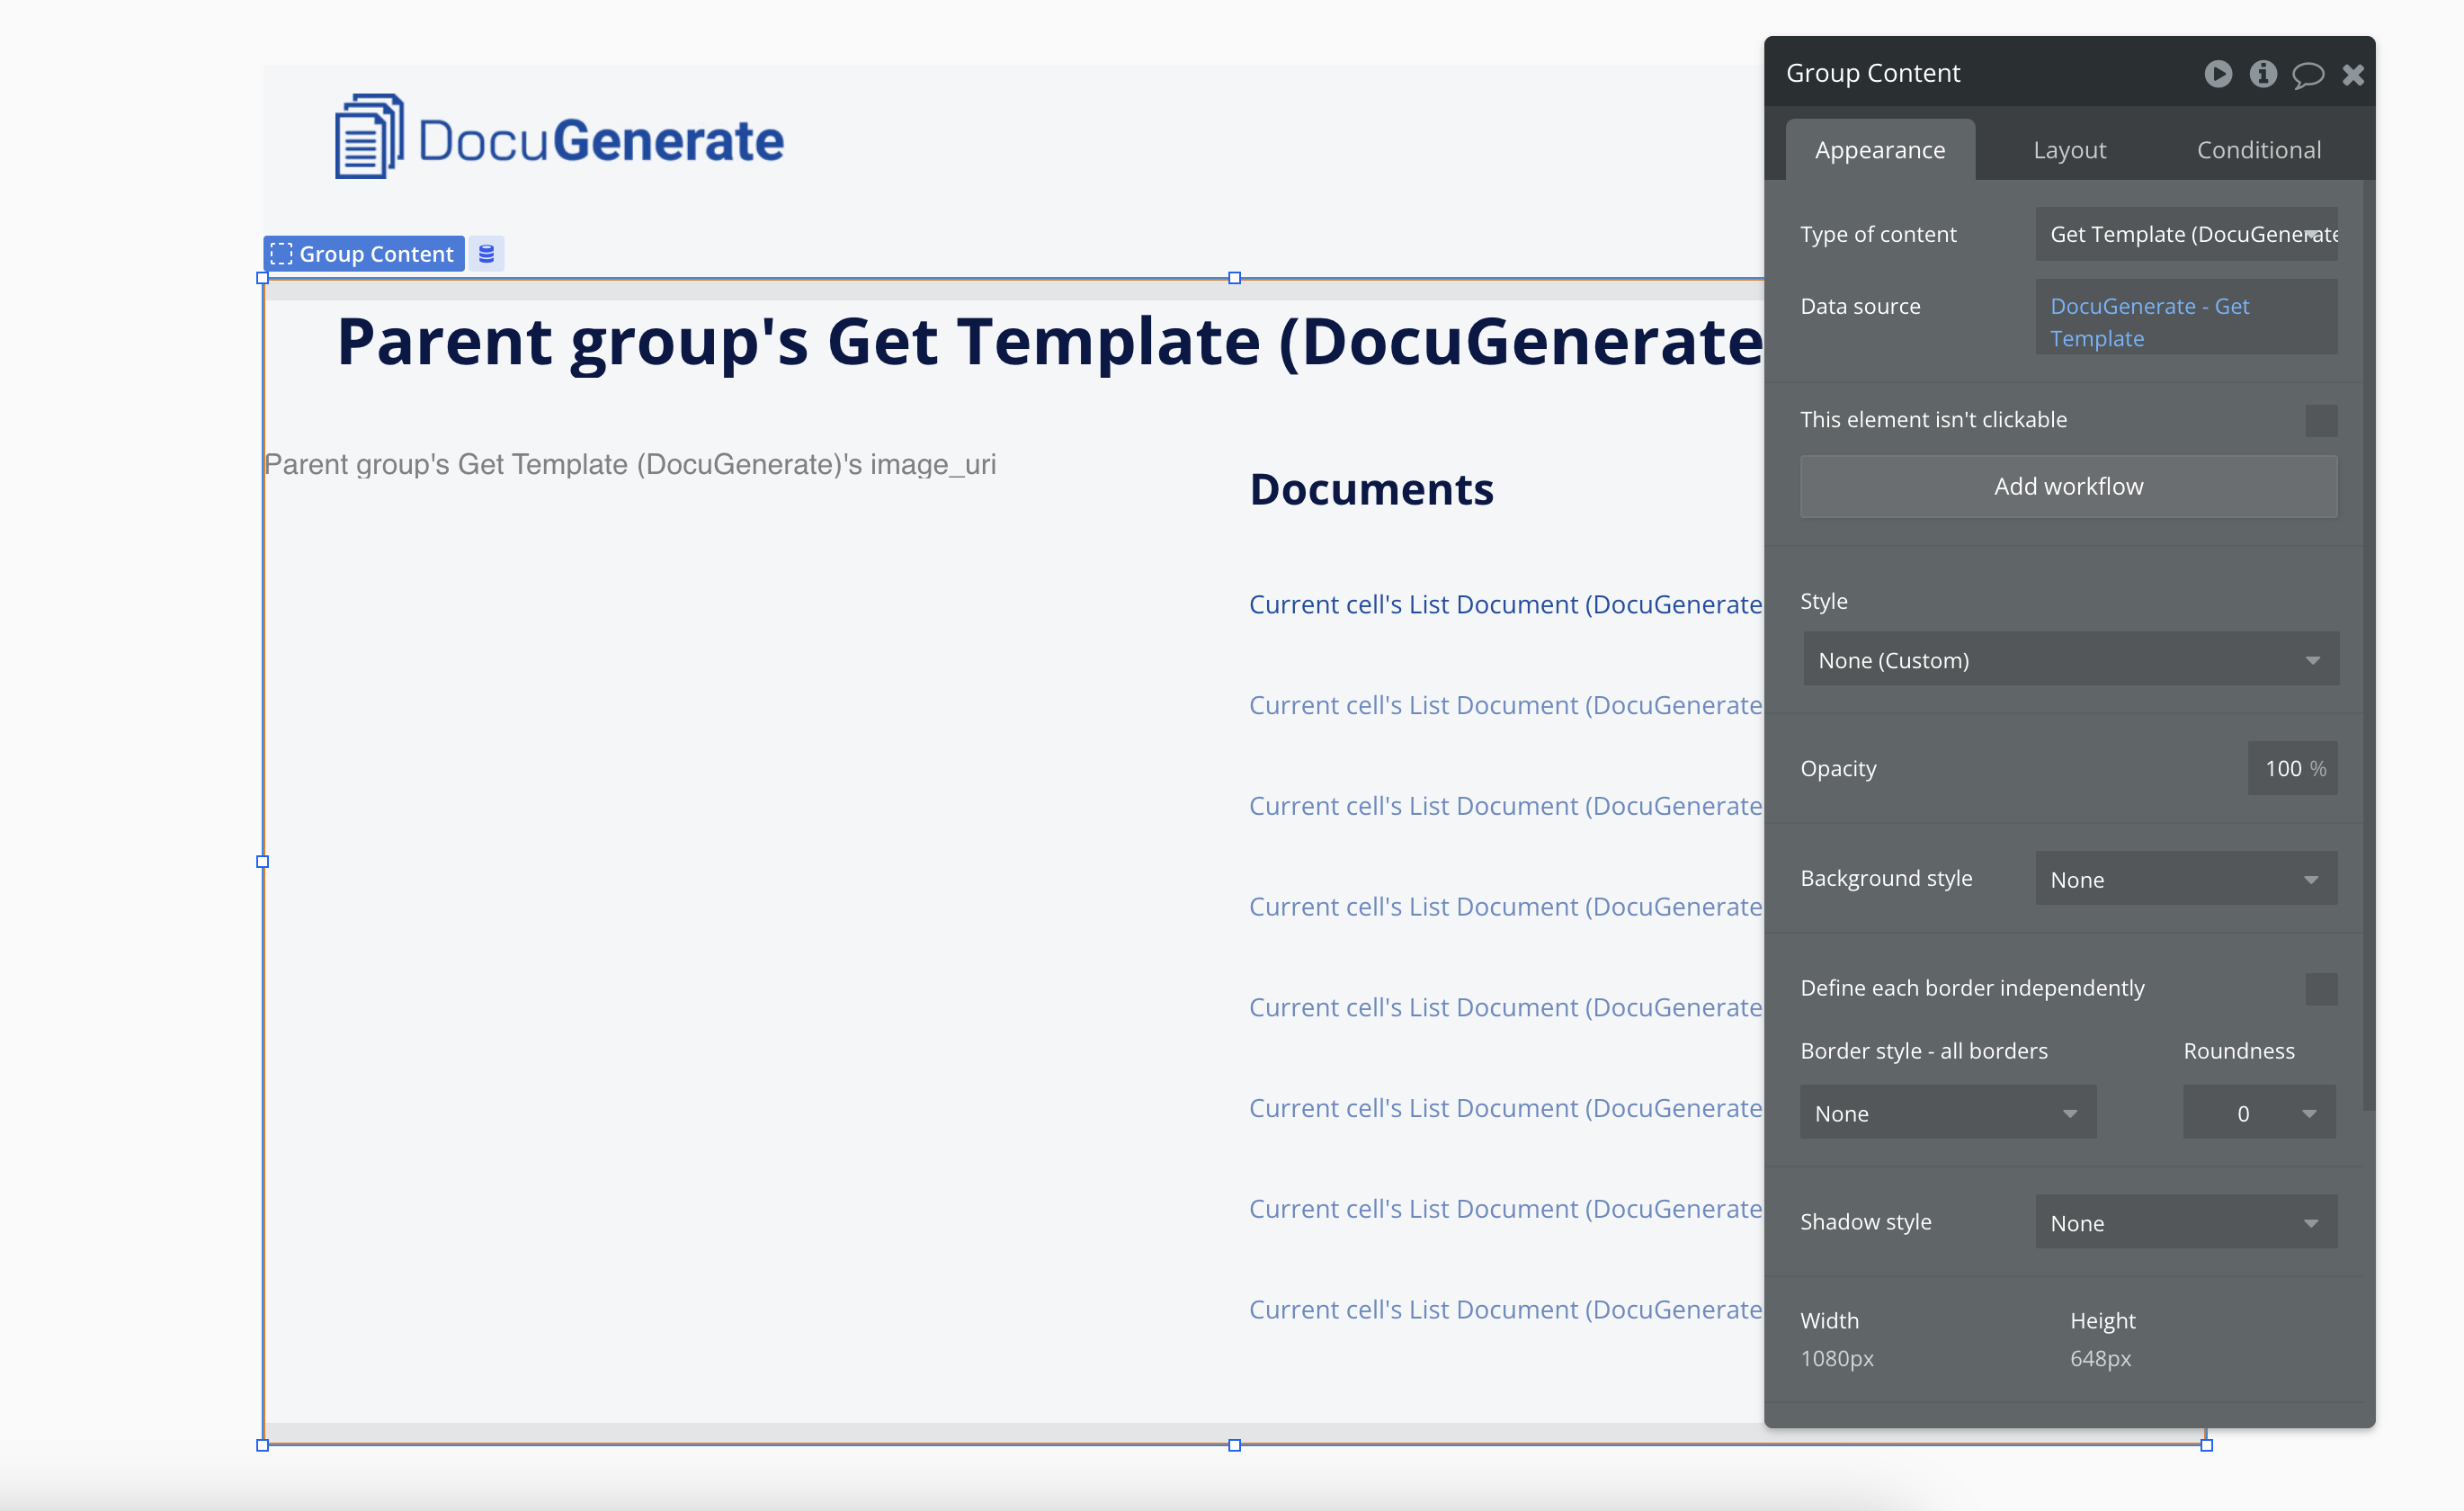
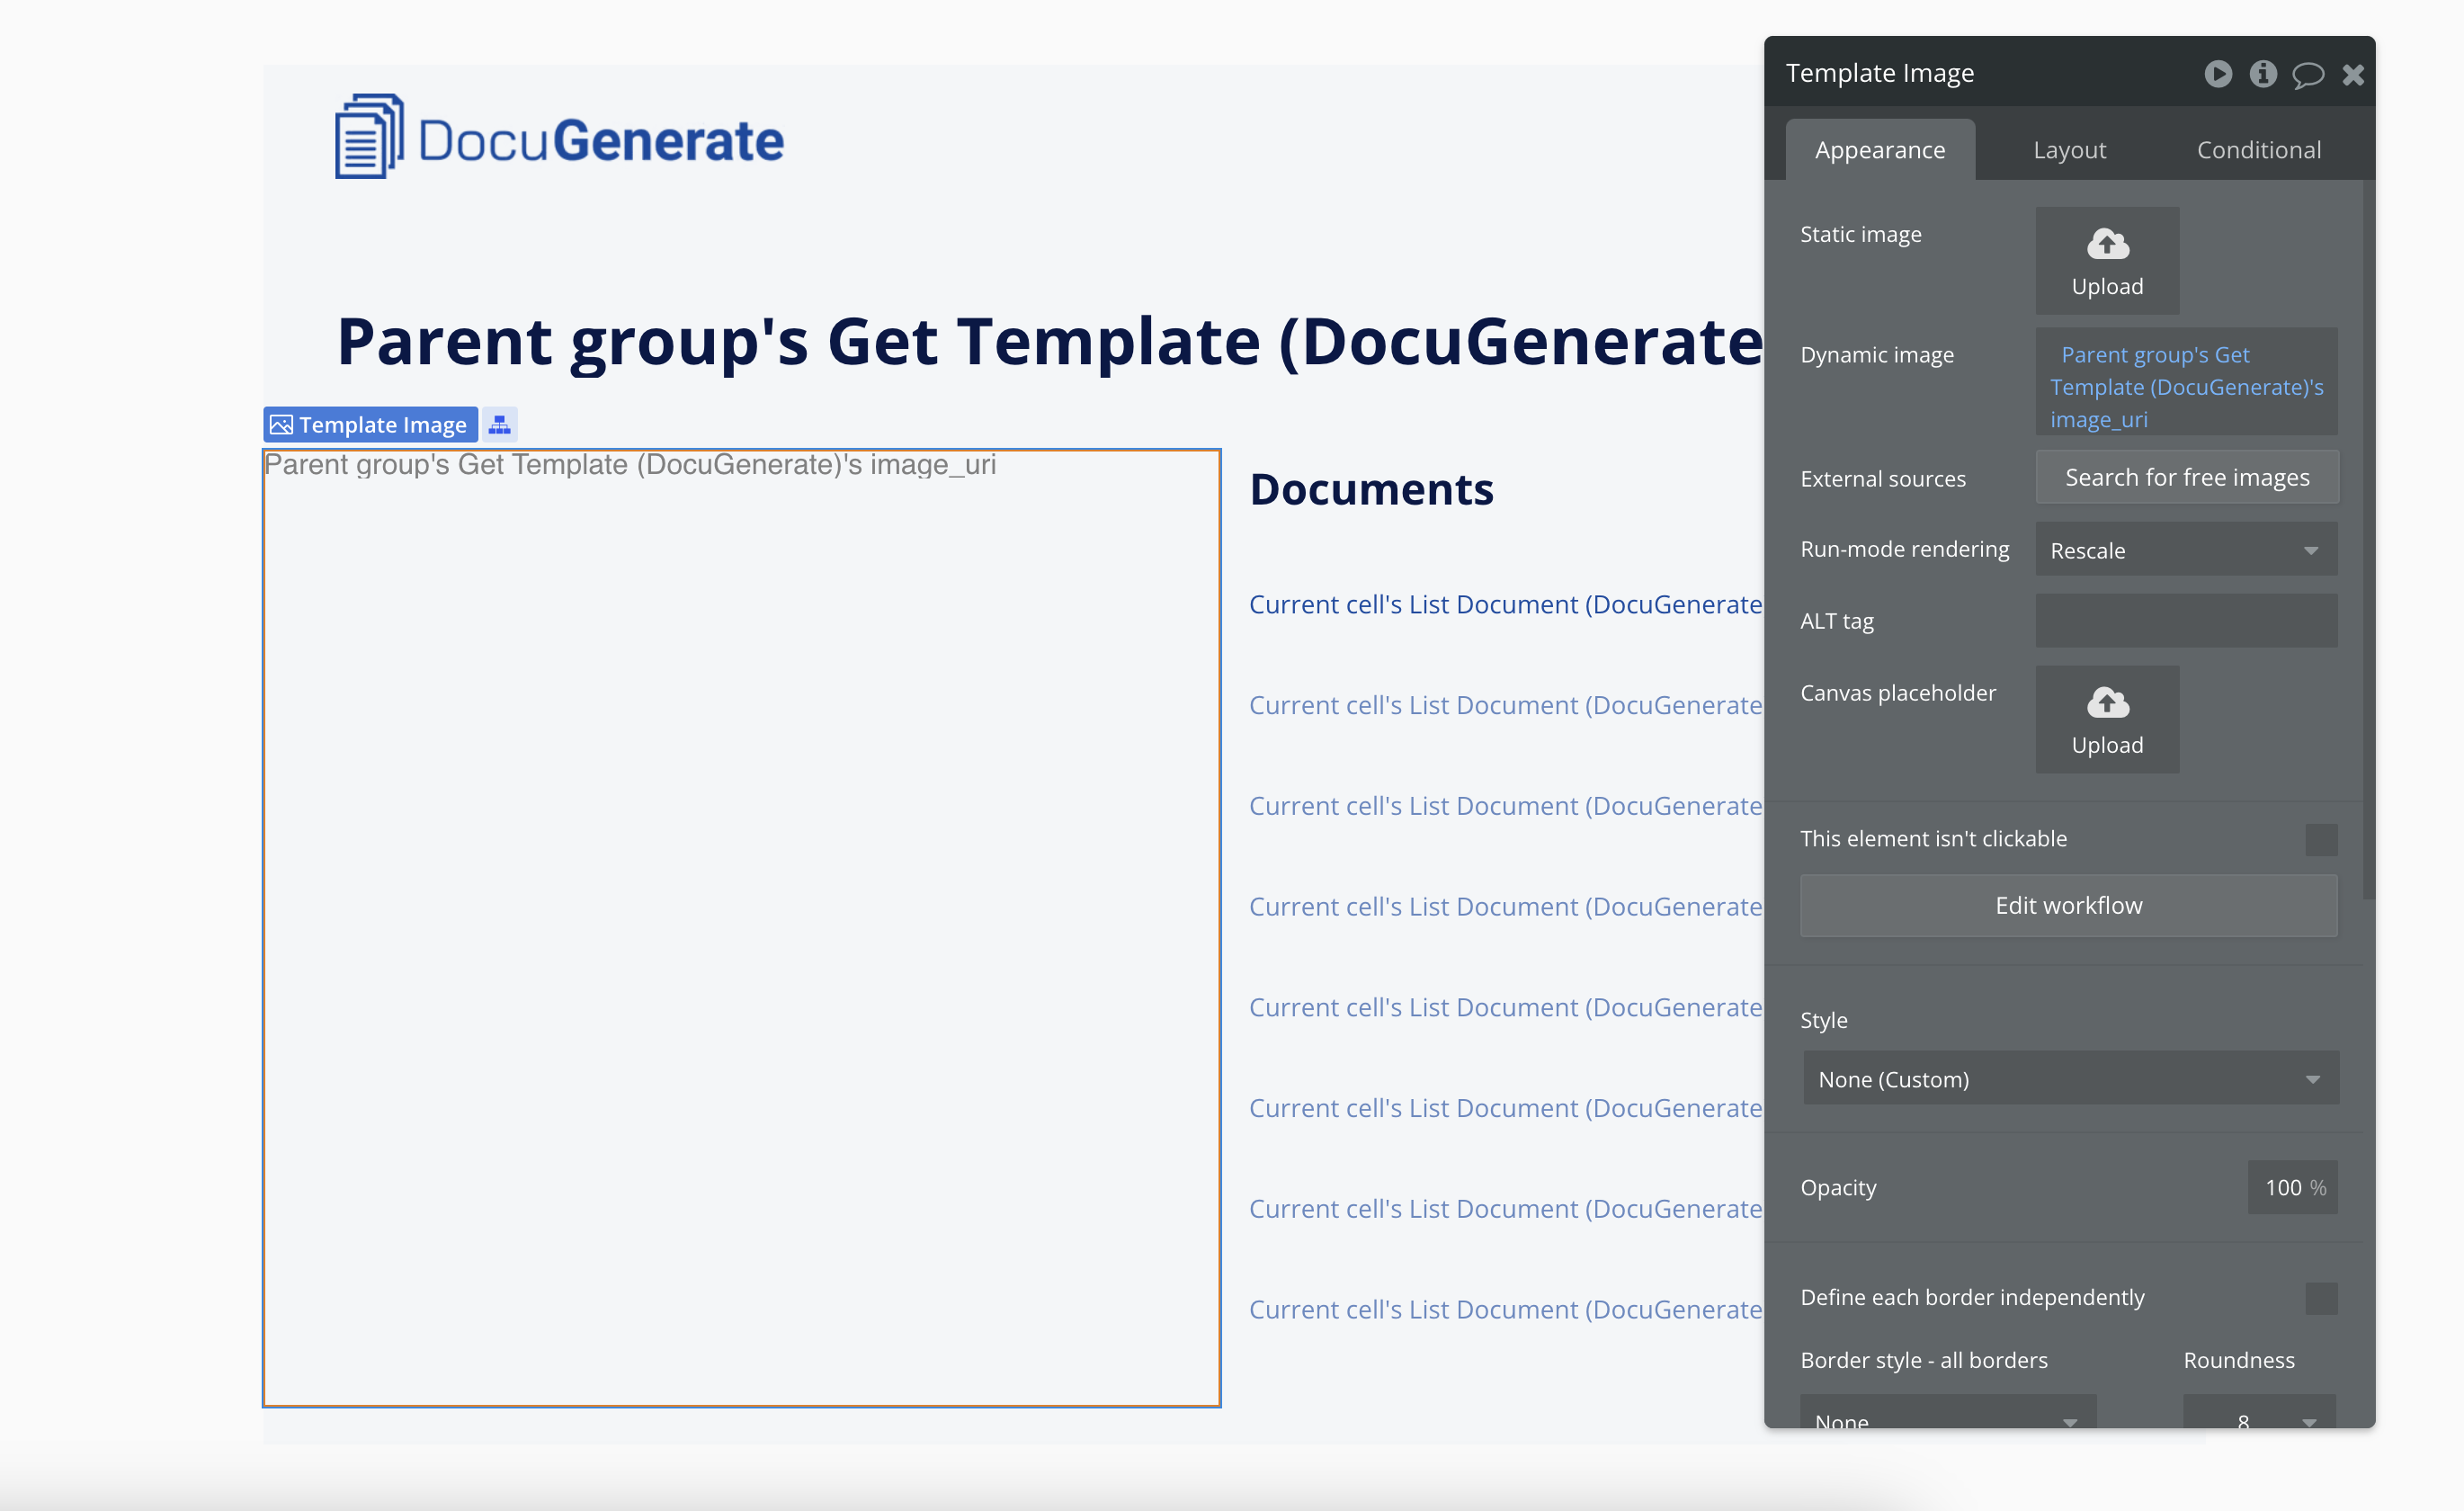
- Add a text element to display the template name.
- Add an image element to display the template preview.
- Add a RepeatingGroup for the documents list with:
- Data source set to the List Documents call with the
template_idparameter - Each item displaying the document name as a link to the
document_urifor downloading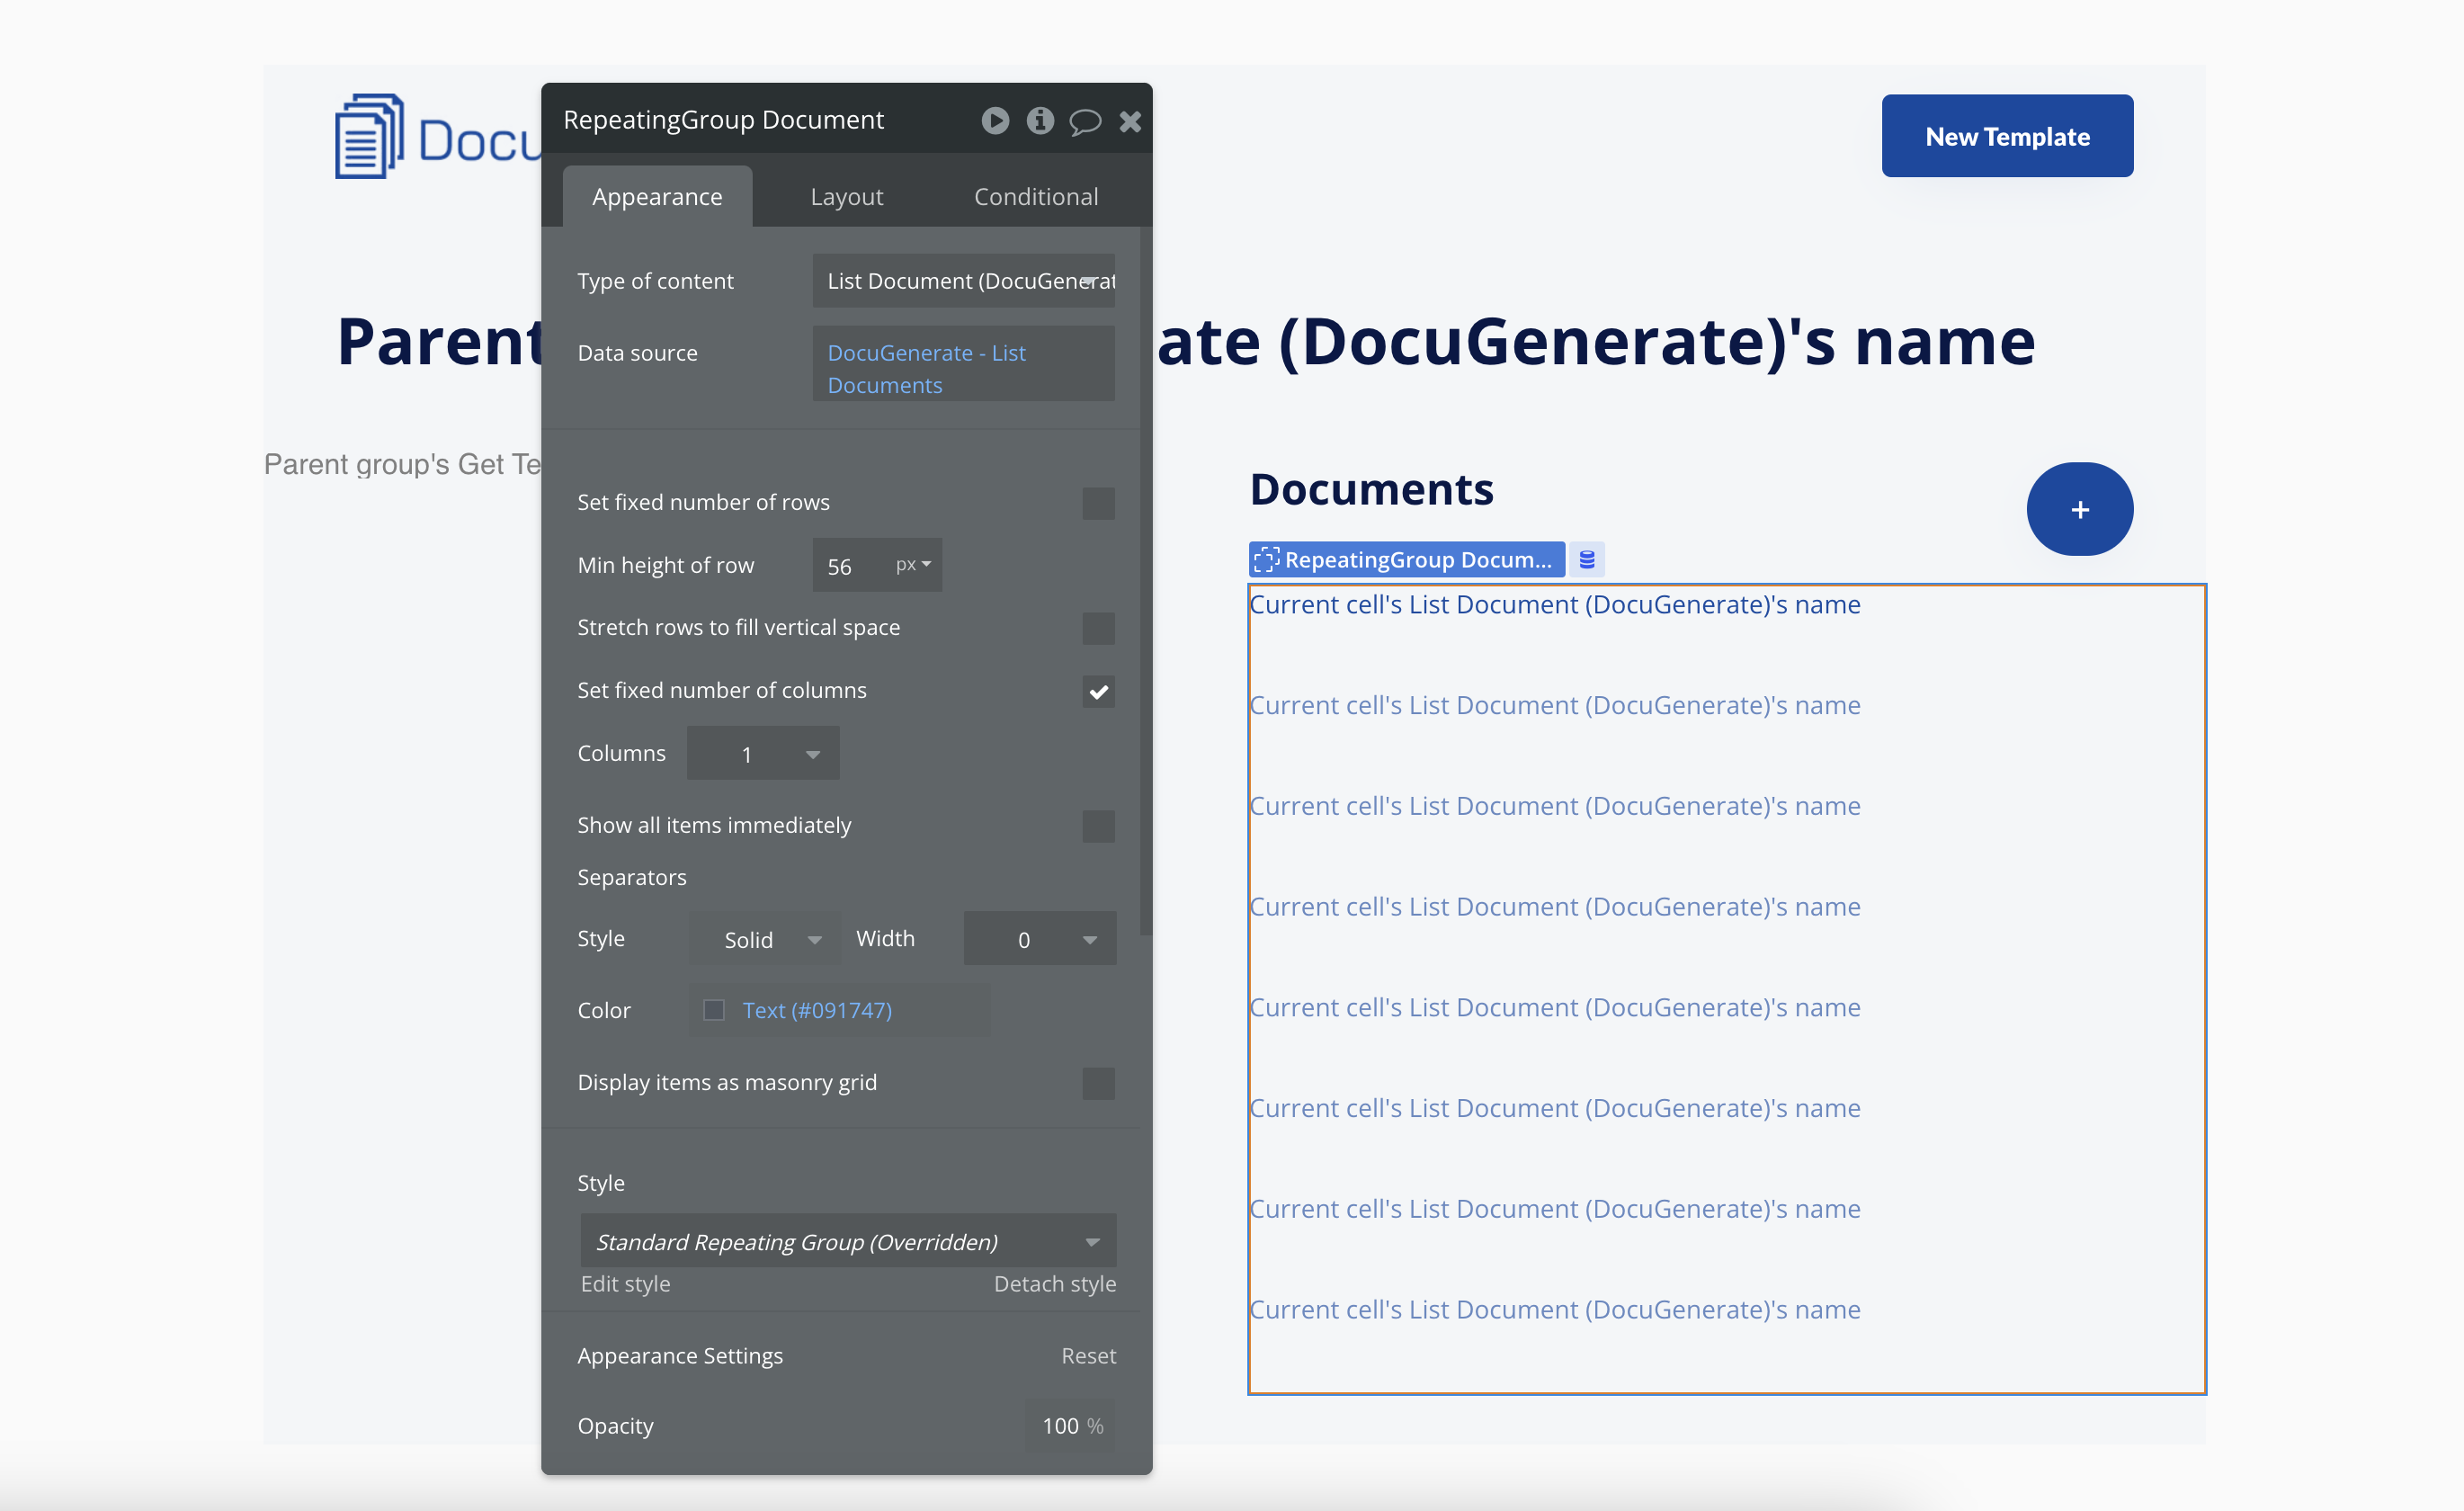
- Data source set to the List Documents call with the
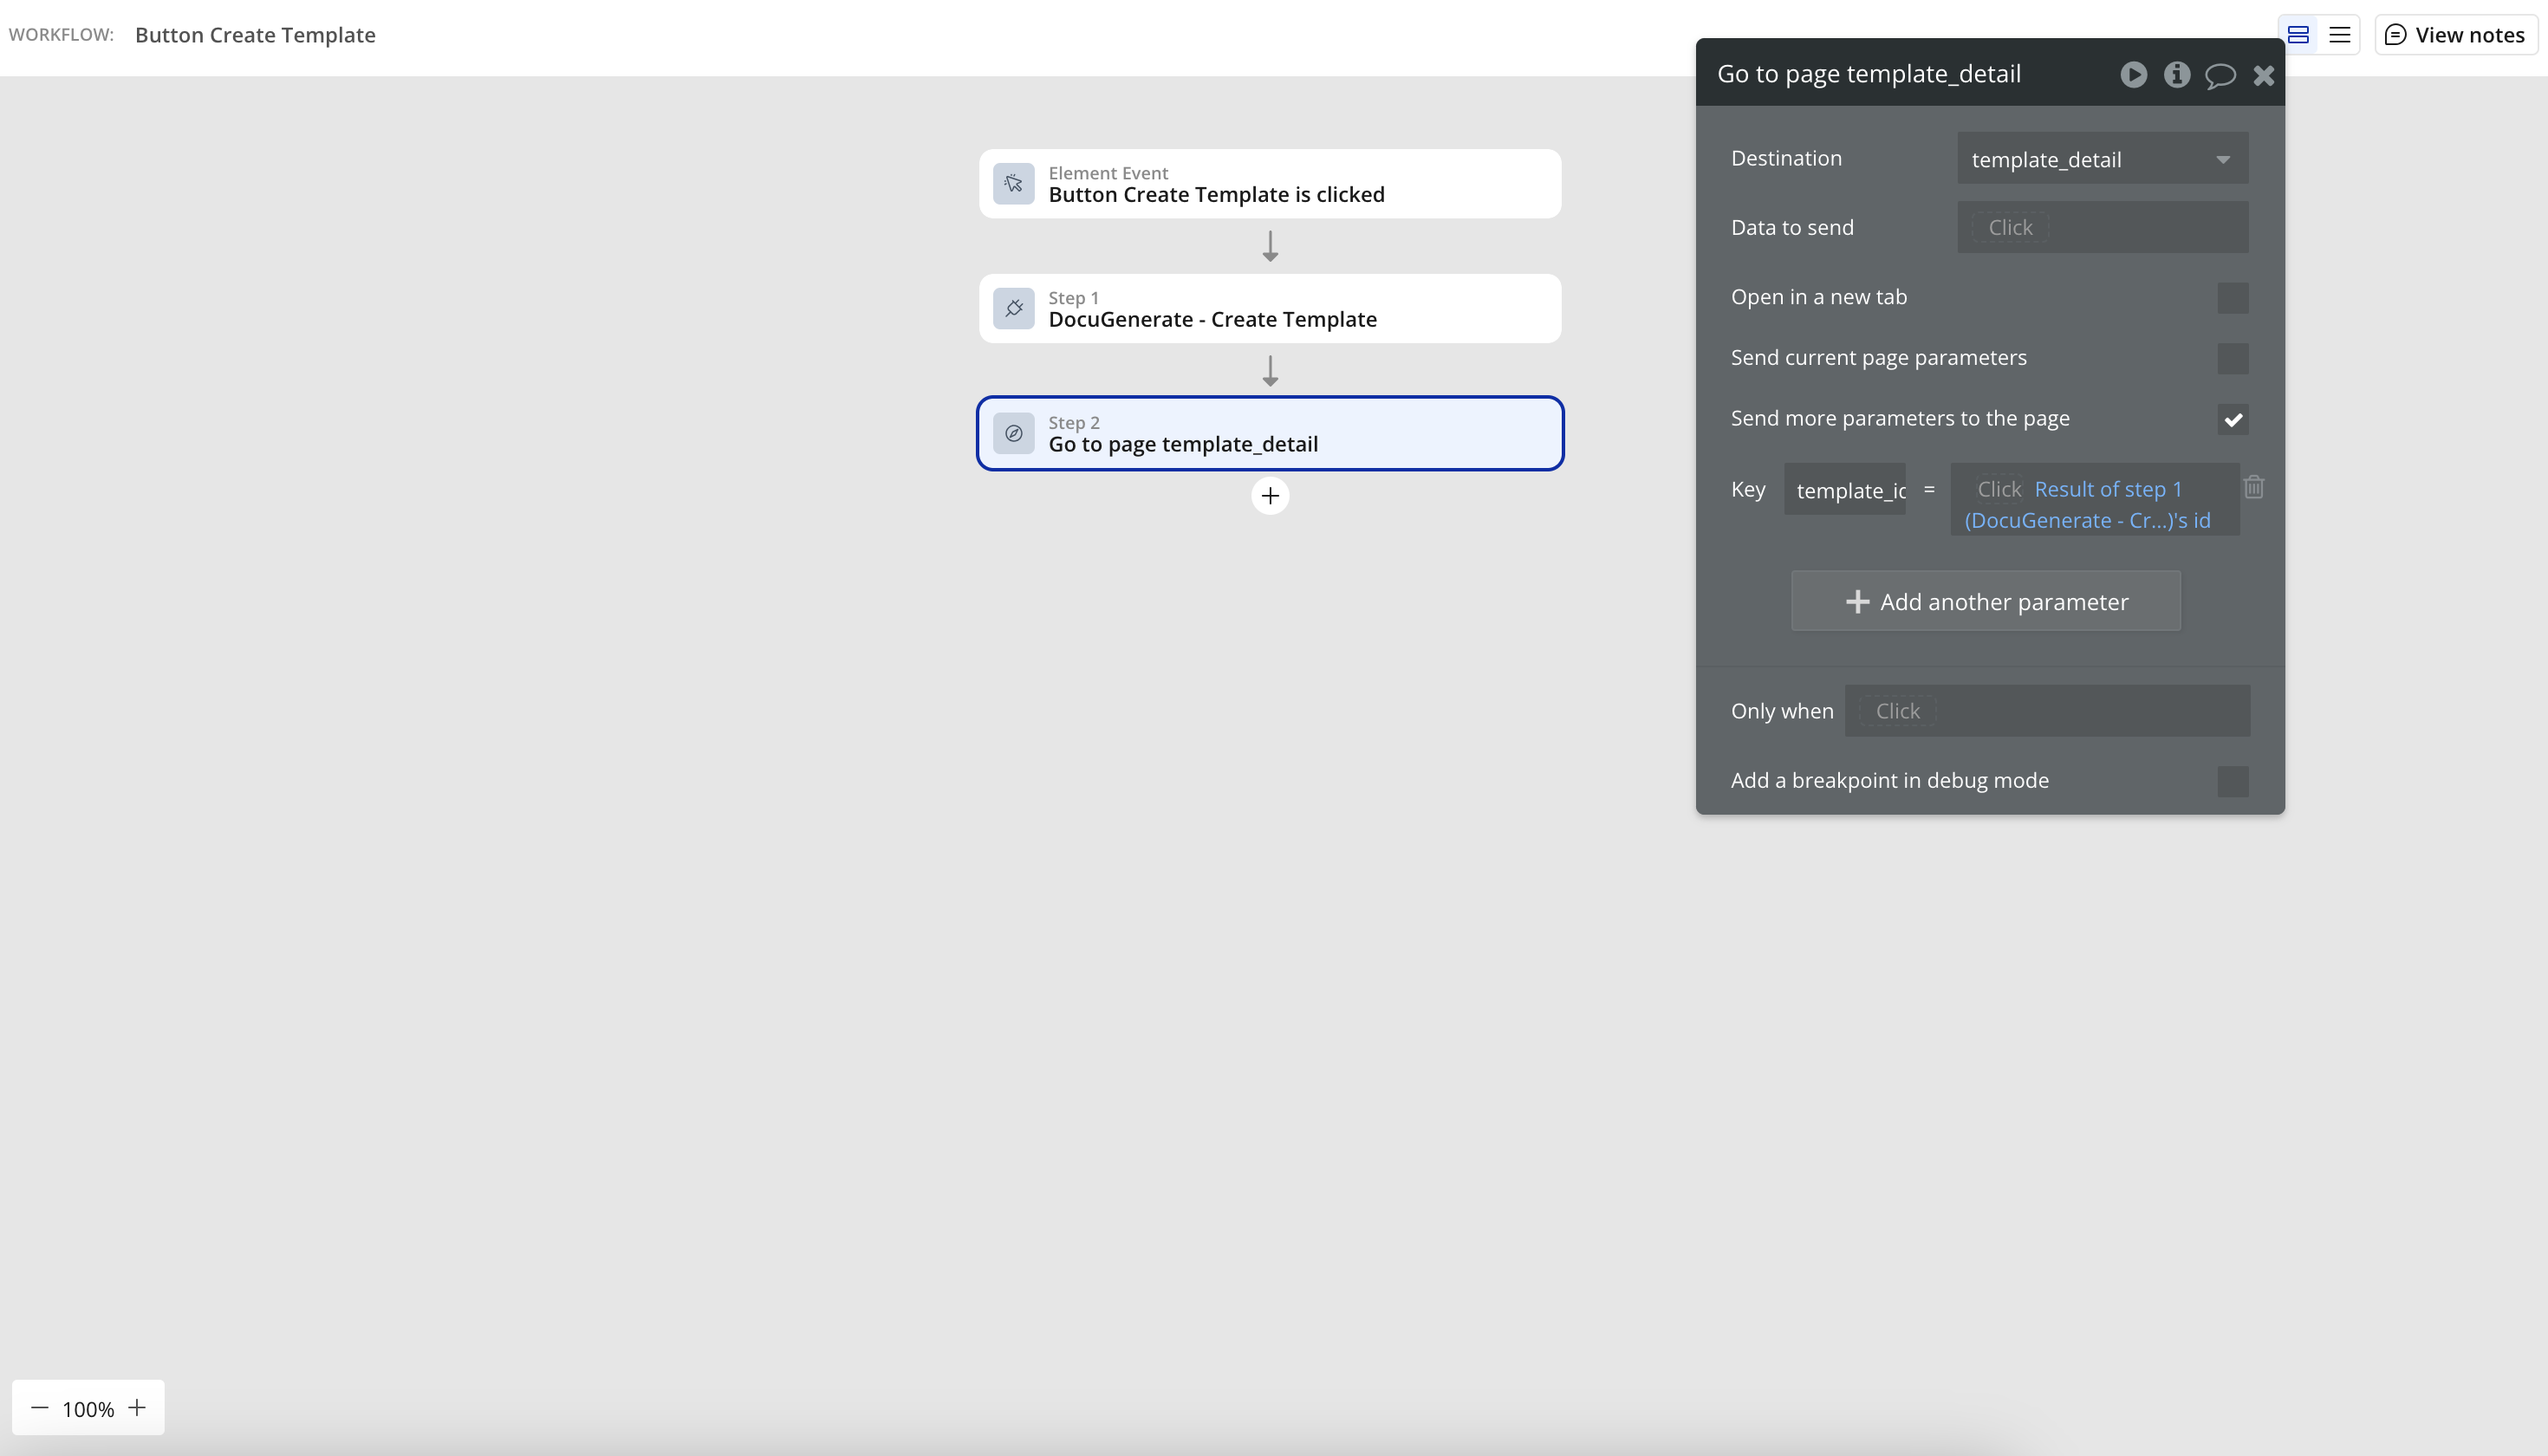
- Add a “+” button that navigates to the new document page.

The most powerful aspect of this page is how it uses the Group element’s data source to make all template data available to child elements. This pattern, sometimes called “data inheritance” in Bubble, ensures that all elements on the page automatically update when a different template is selected. This approach simplifies the page’s logic and improves performance by reducing redundant API calls.
The documents list provides a chronological view of all documents generated from this template, with the most recent documents appearing at the top. Each document entry includes a direct download link, allowing users to quickly access their generated files without navigating to additional pages.
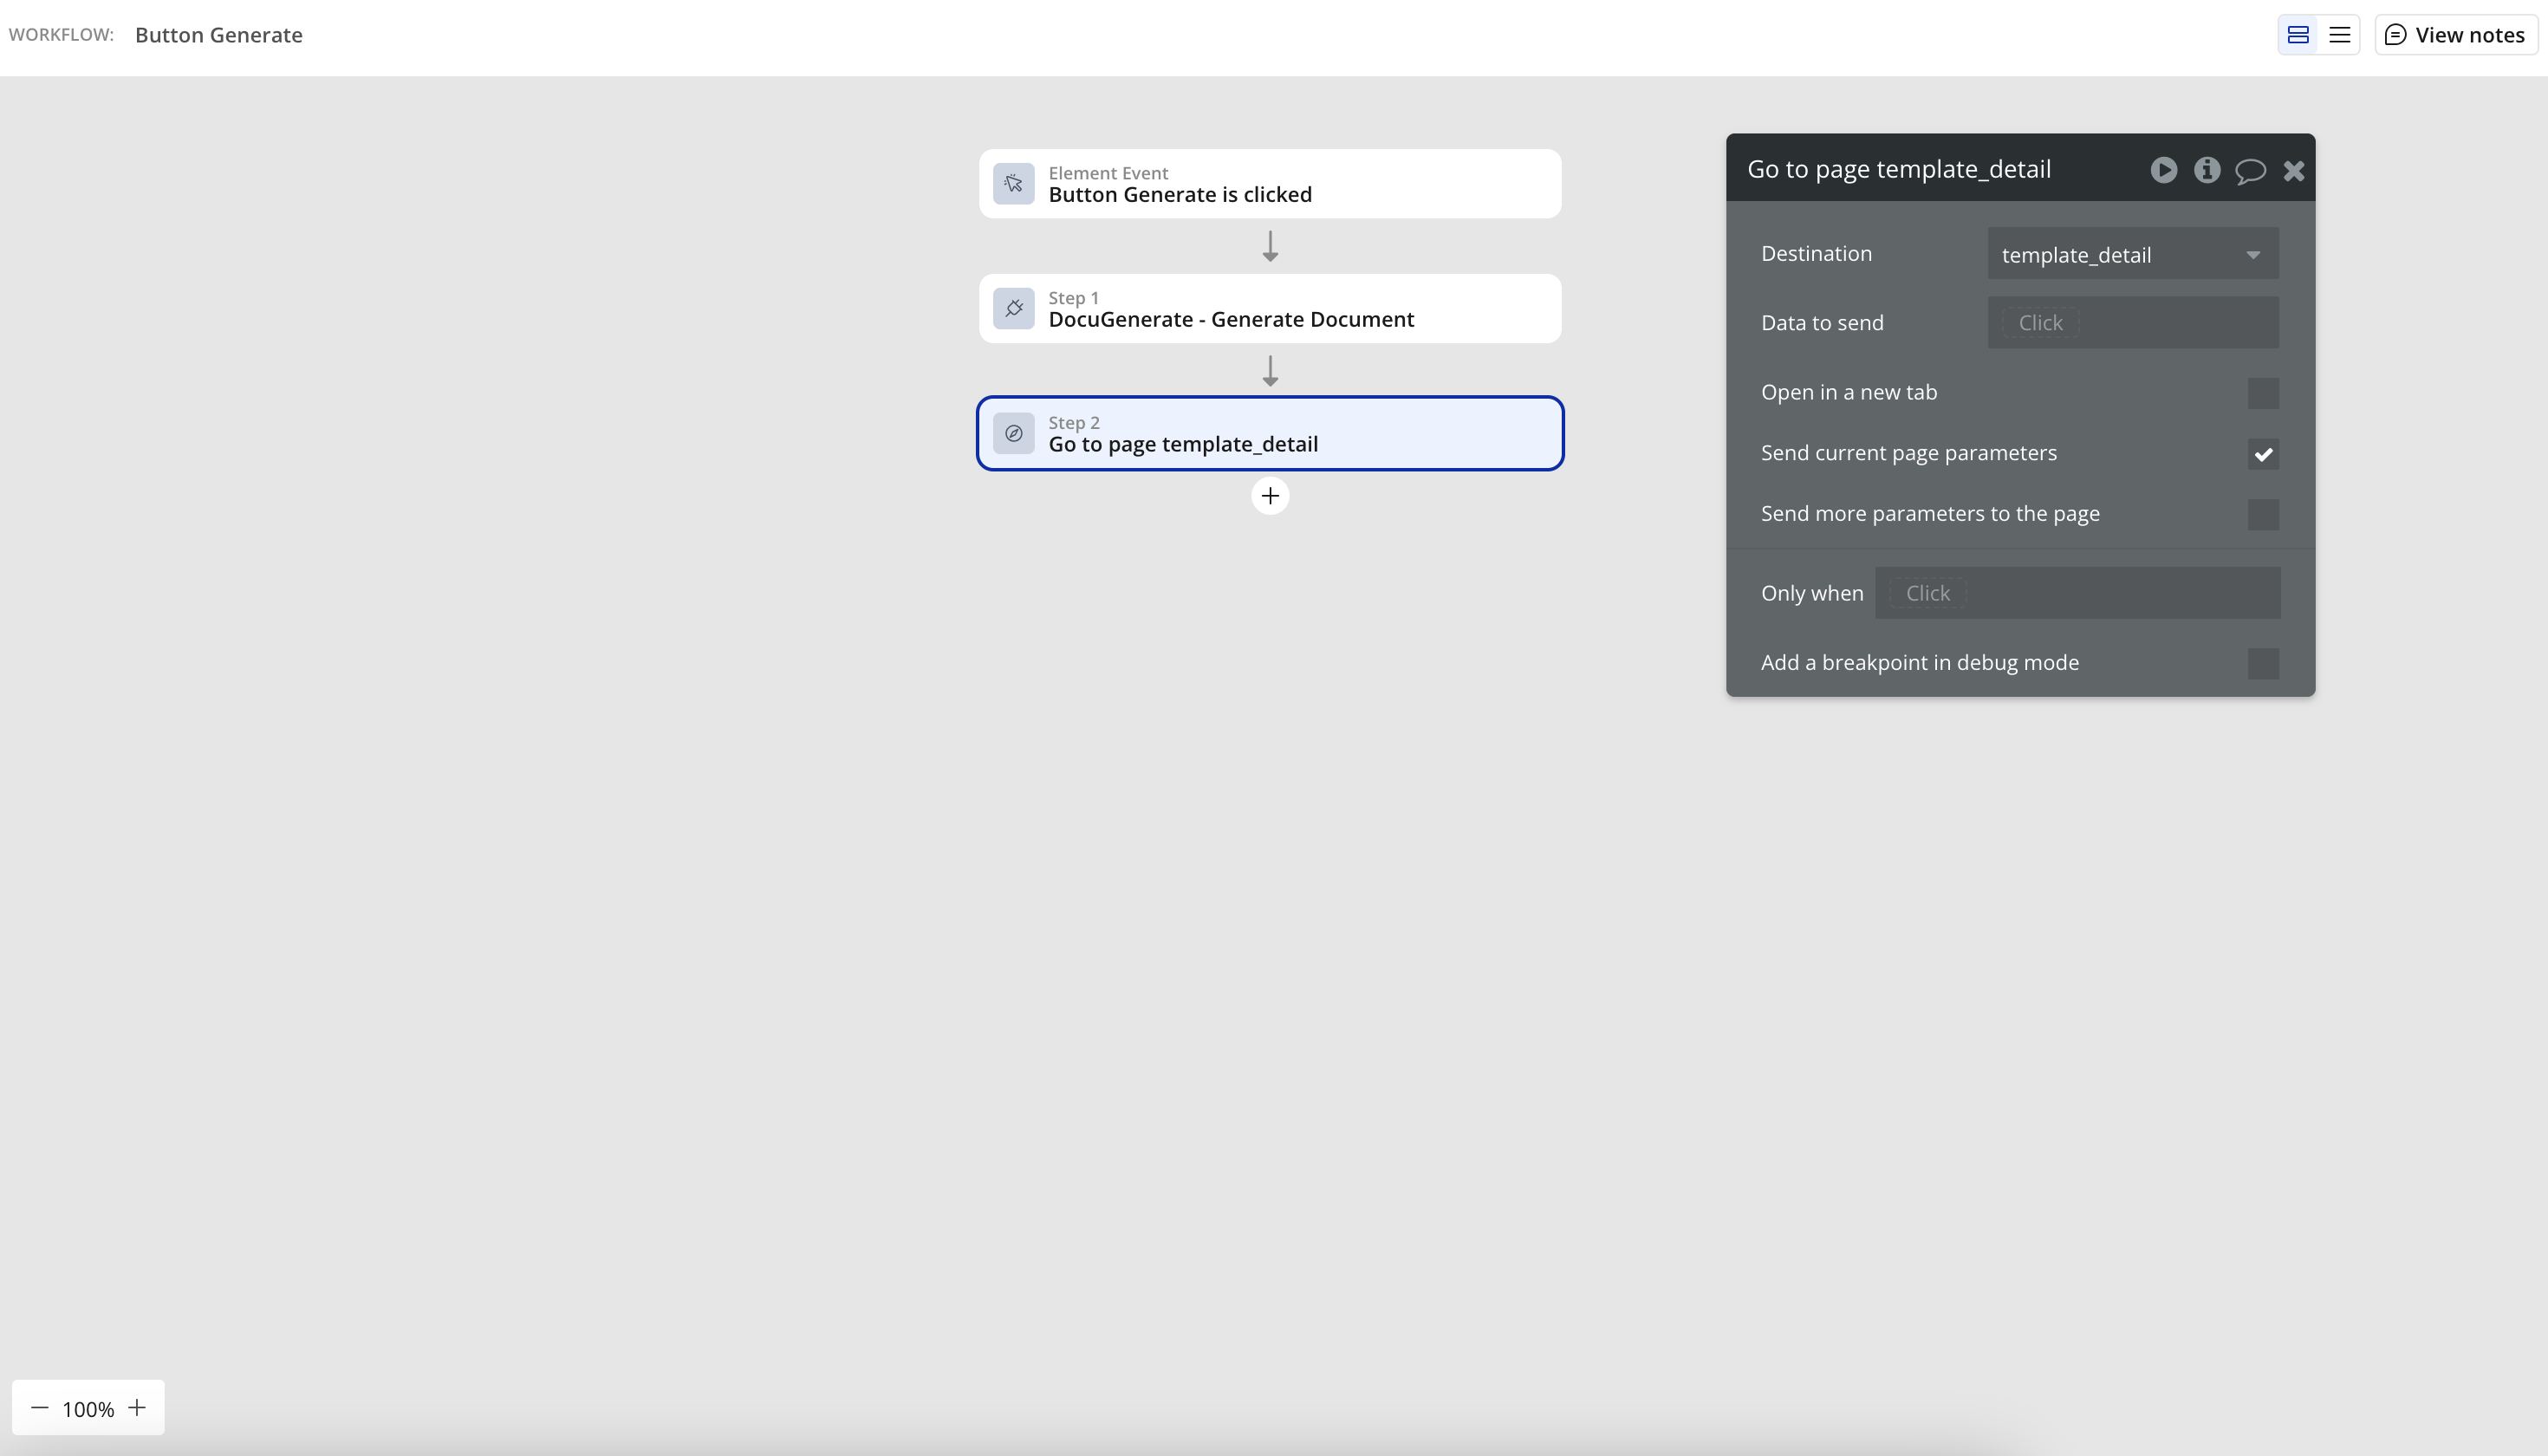
The prominent “+” button serves as a clear call-to-action, guiding users toward the document generation process. When clicked, this button navigates to the document generation page, passing along the template ID to maintain context. This thoughtful interaction design ensures that users can easily move between viewing template details and generating new documents.
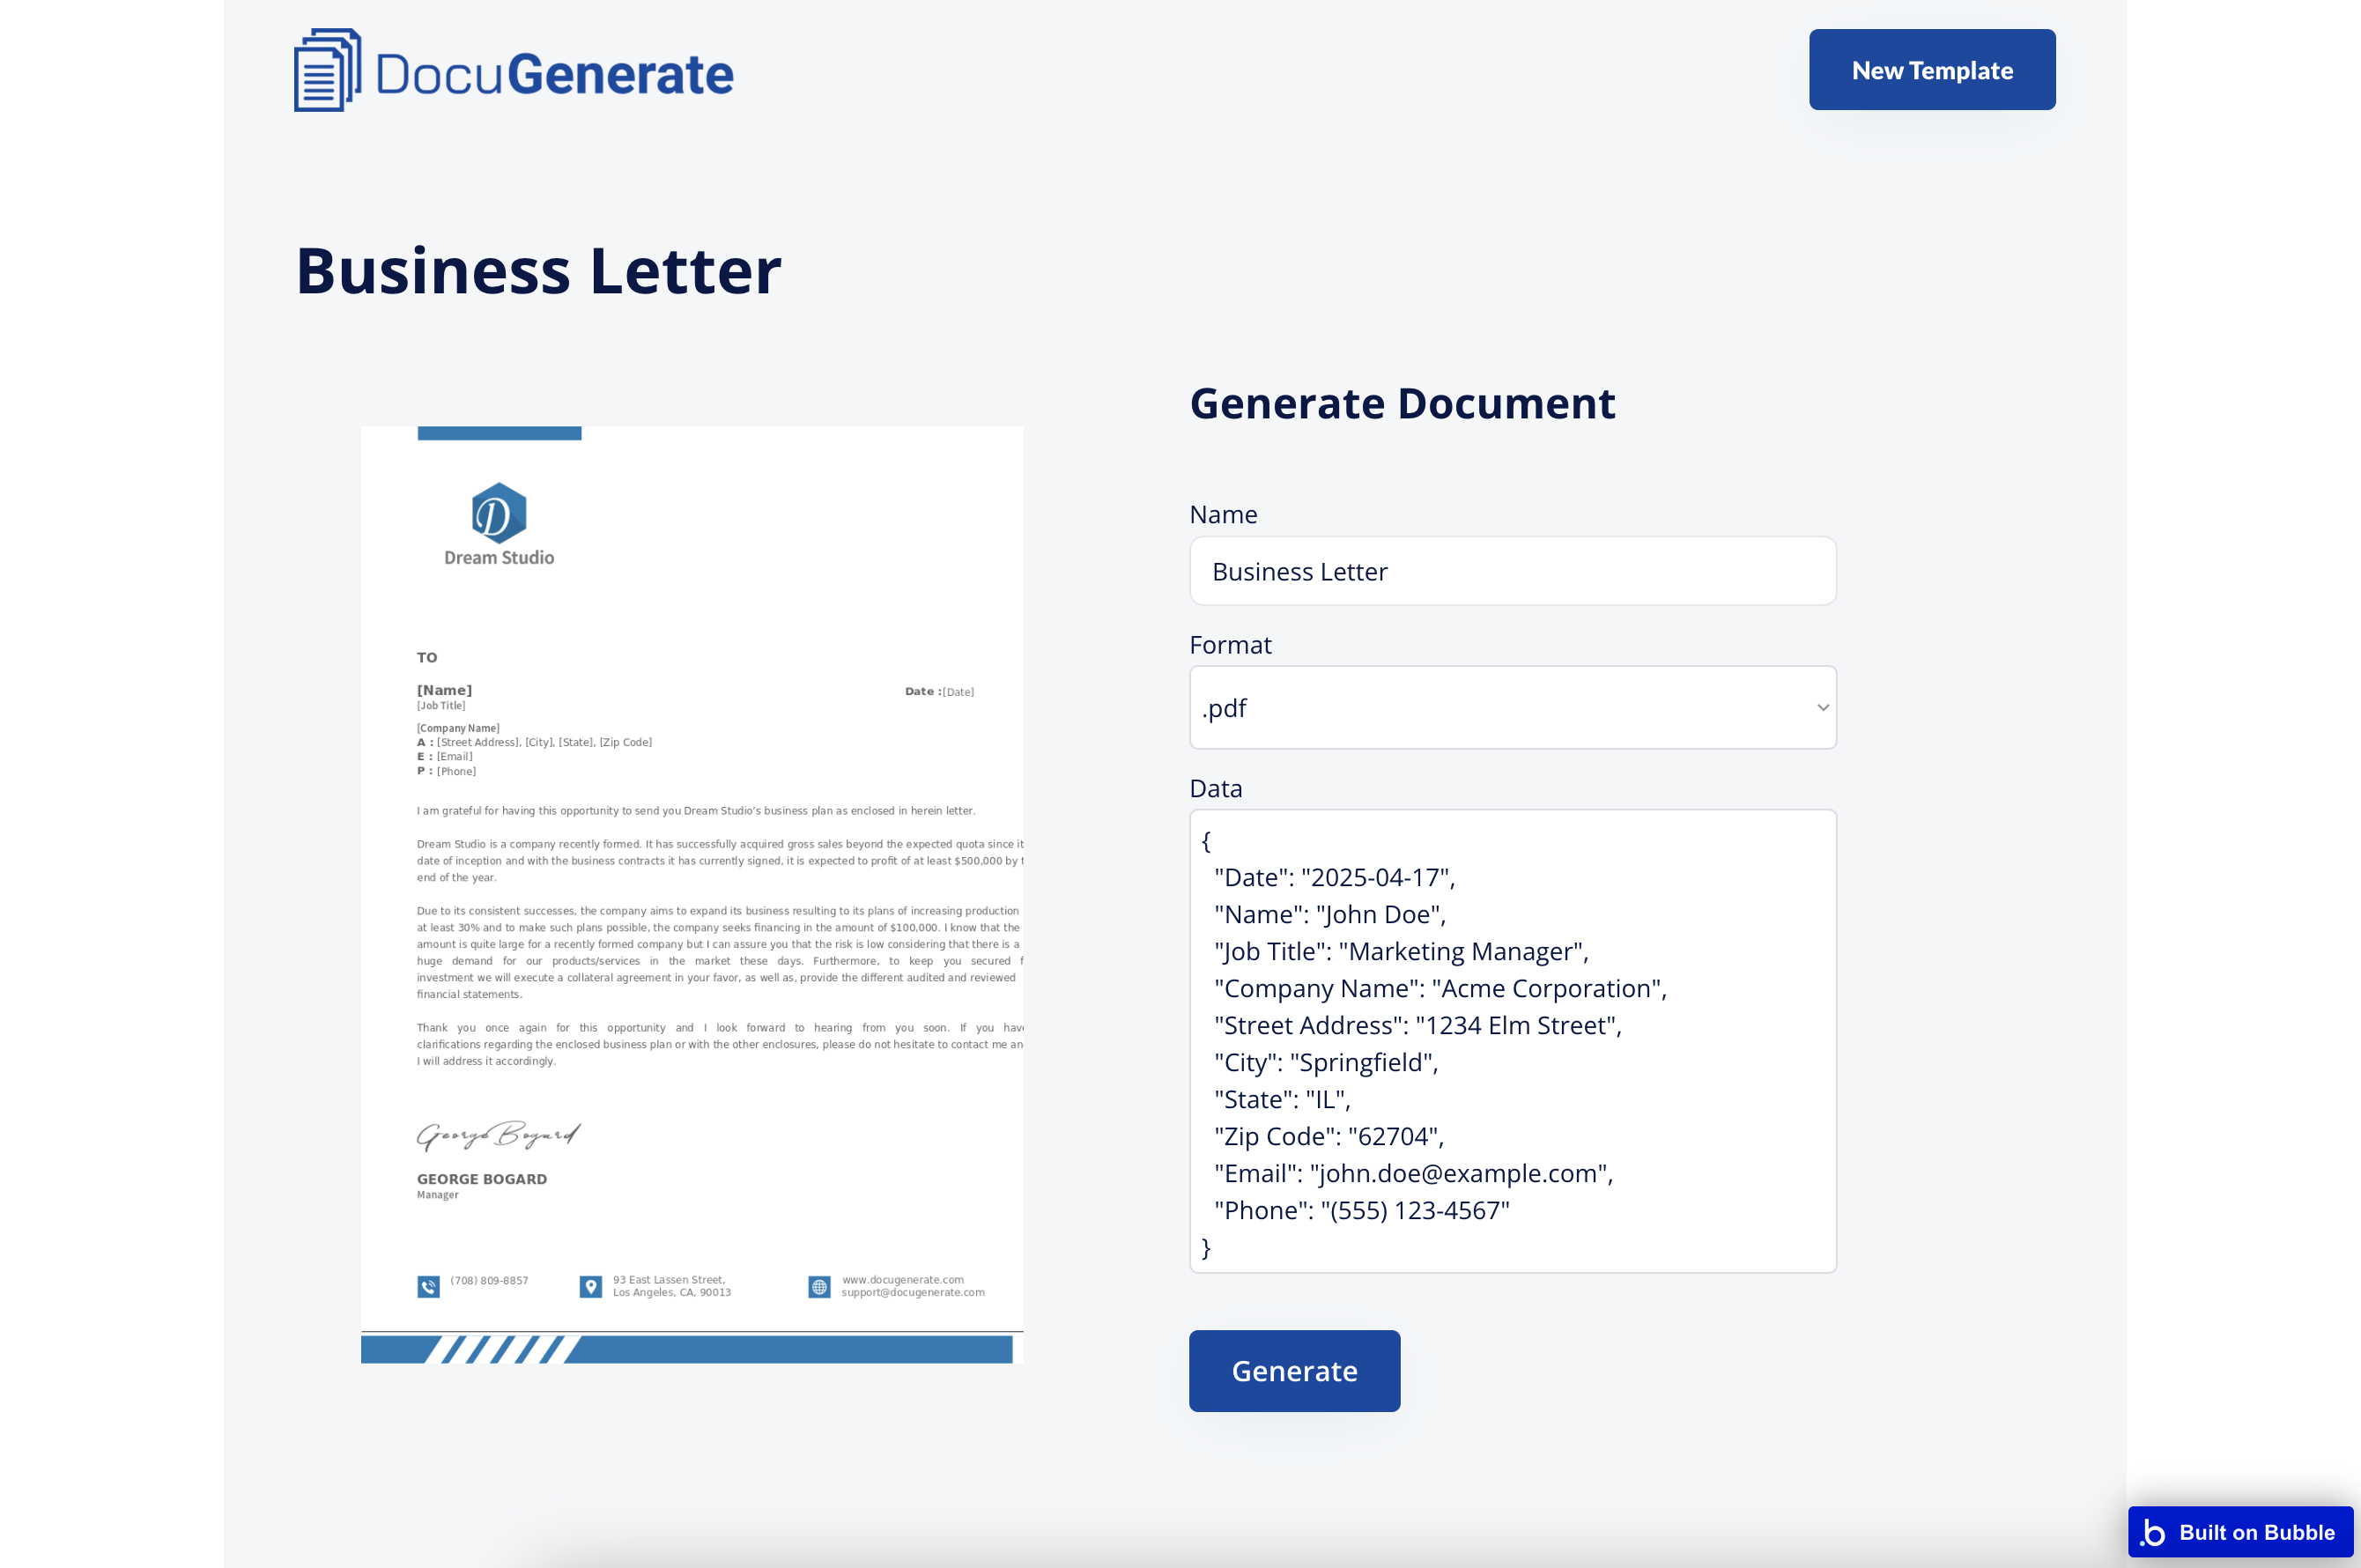
The Document Generation Page
This is where the true power of document generation comes to life, allowing users to connect their data with templates to produce customized documents. We’ve designed this page to be powerful yet approachable, balancing advanced functionality with a clear interface.
This page maintains visual consistency with the template detail page, showing the same template information at the top to provide context. This helps users confirm they’re working with the correct template before proceeding with document generation, preventing potential errors or confusion.
How to Build It:
- Display the template information (name and preview) similar to the template detail page.
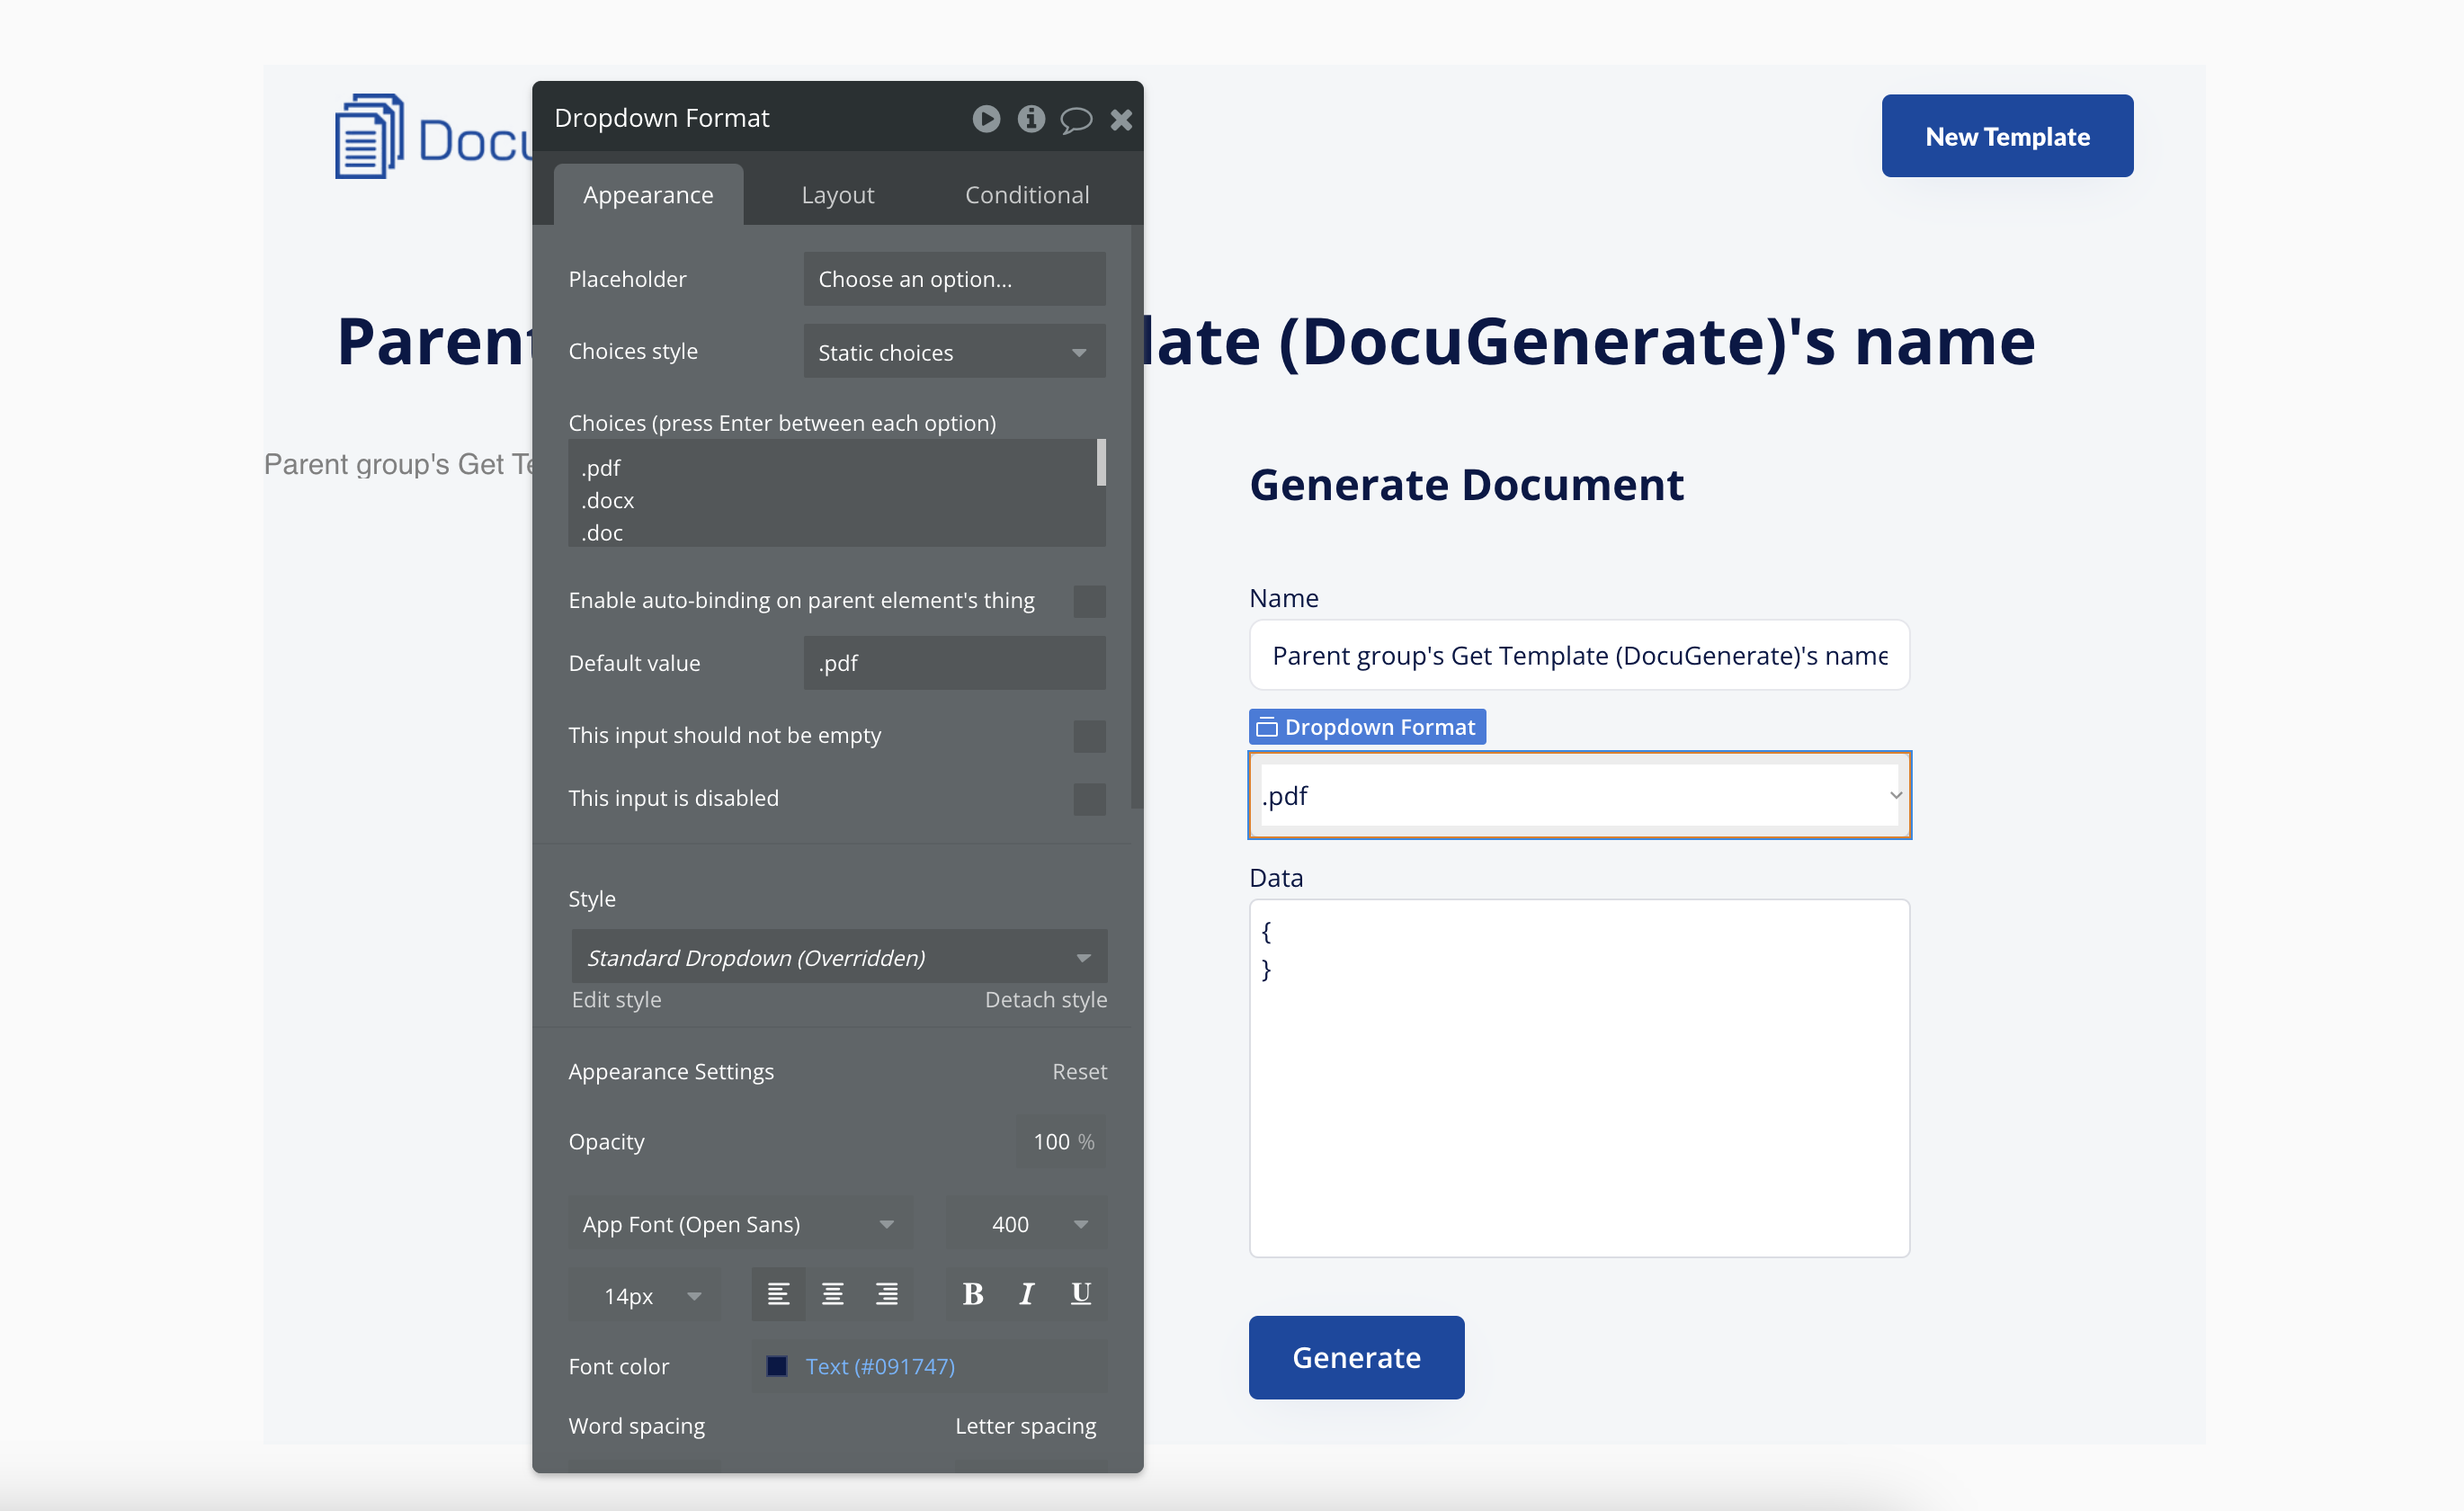
- Create a form with:
- A text input for the document name
- A dropdown for selecting the output format (PDF, DOCX, DOC, ODT, TXT, HTML, PNG)
- A MultiLine Input for entering the JSON data
- Add a “Generate” button that:
- Calls the Generate Document action from the DocuGenerate plugin
- Passes all form values as parameters, along with the
template_idfrom the URL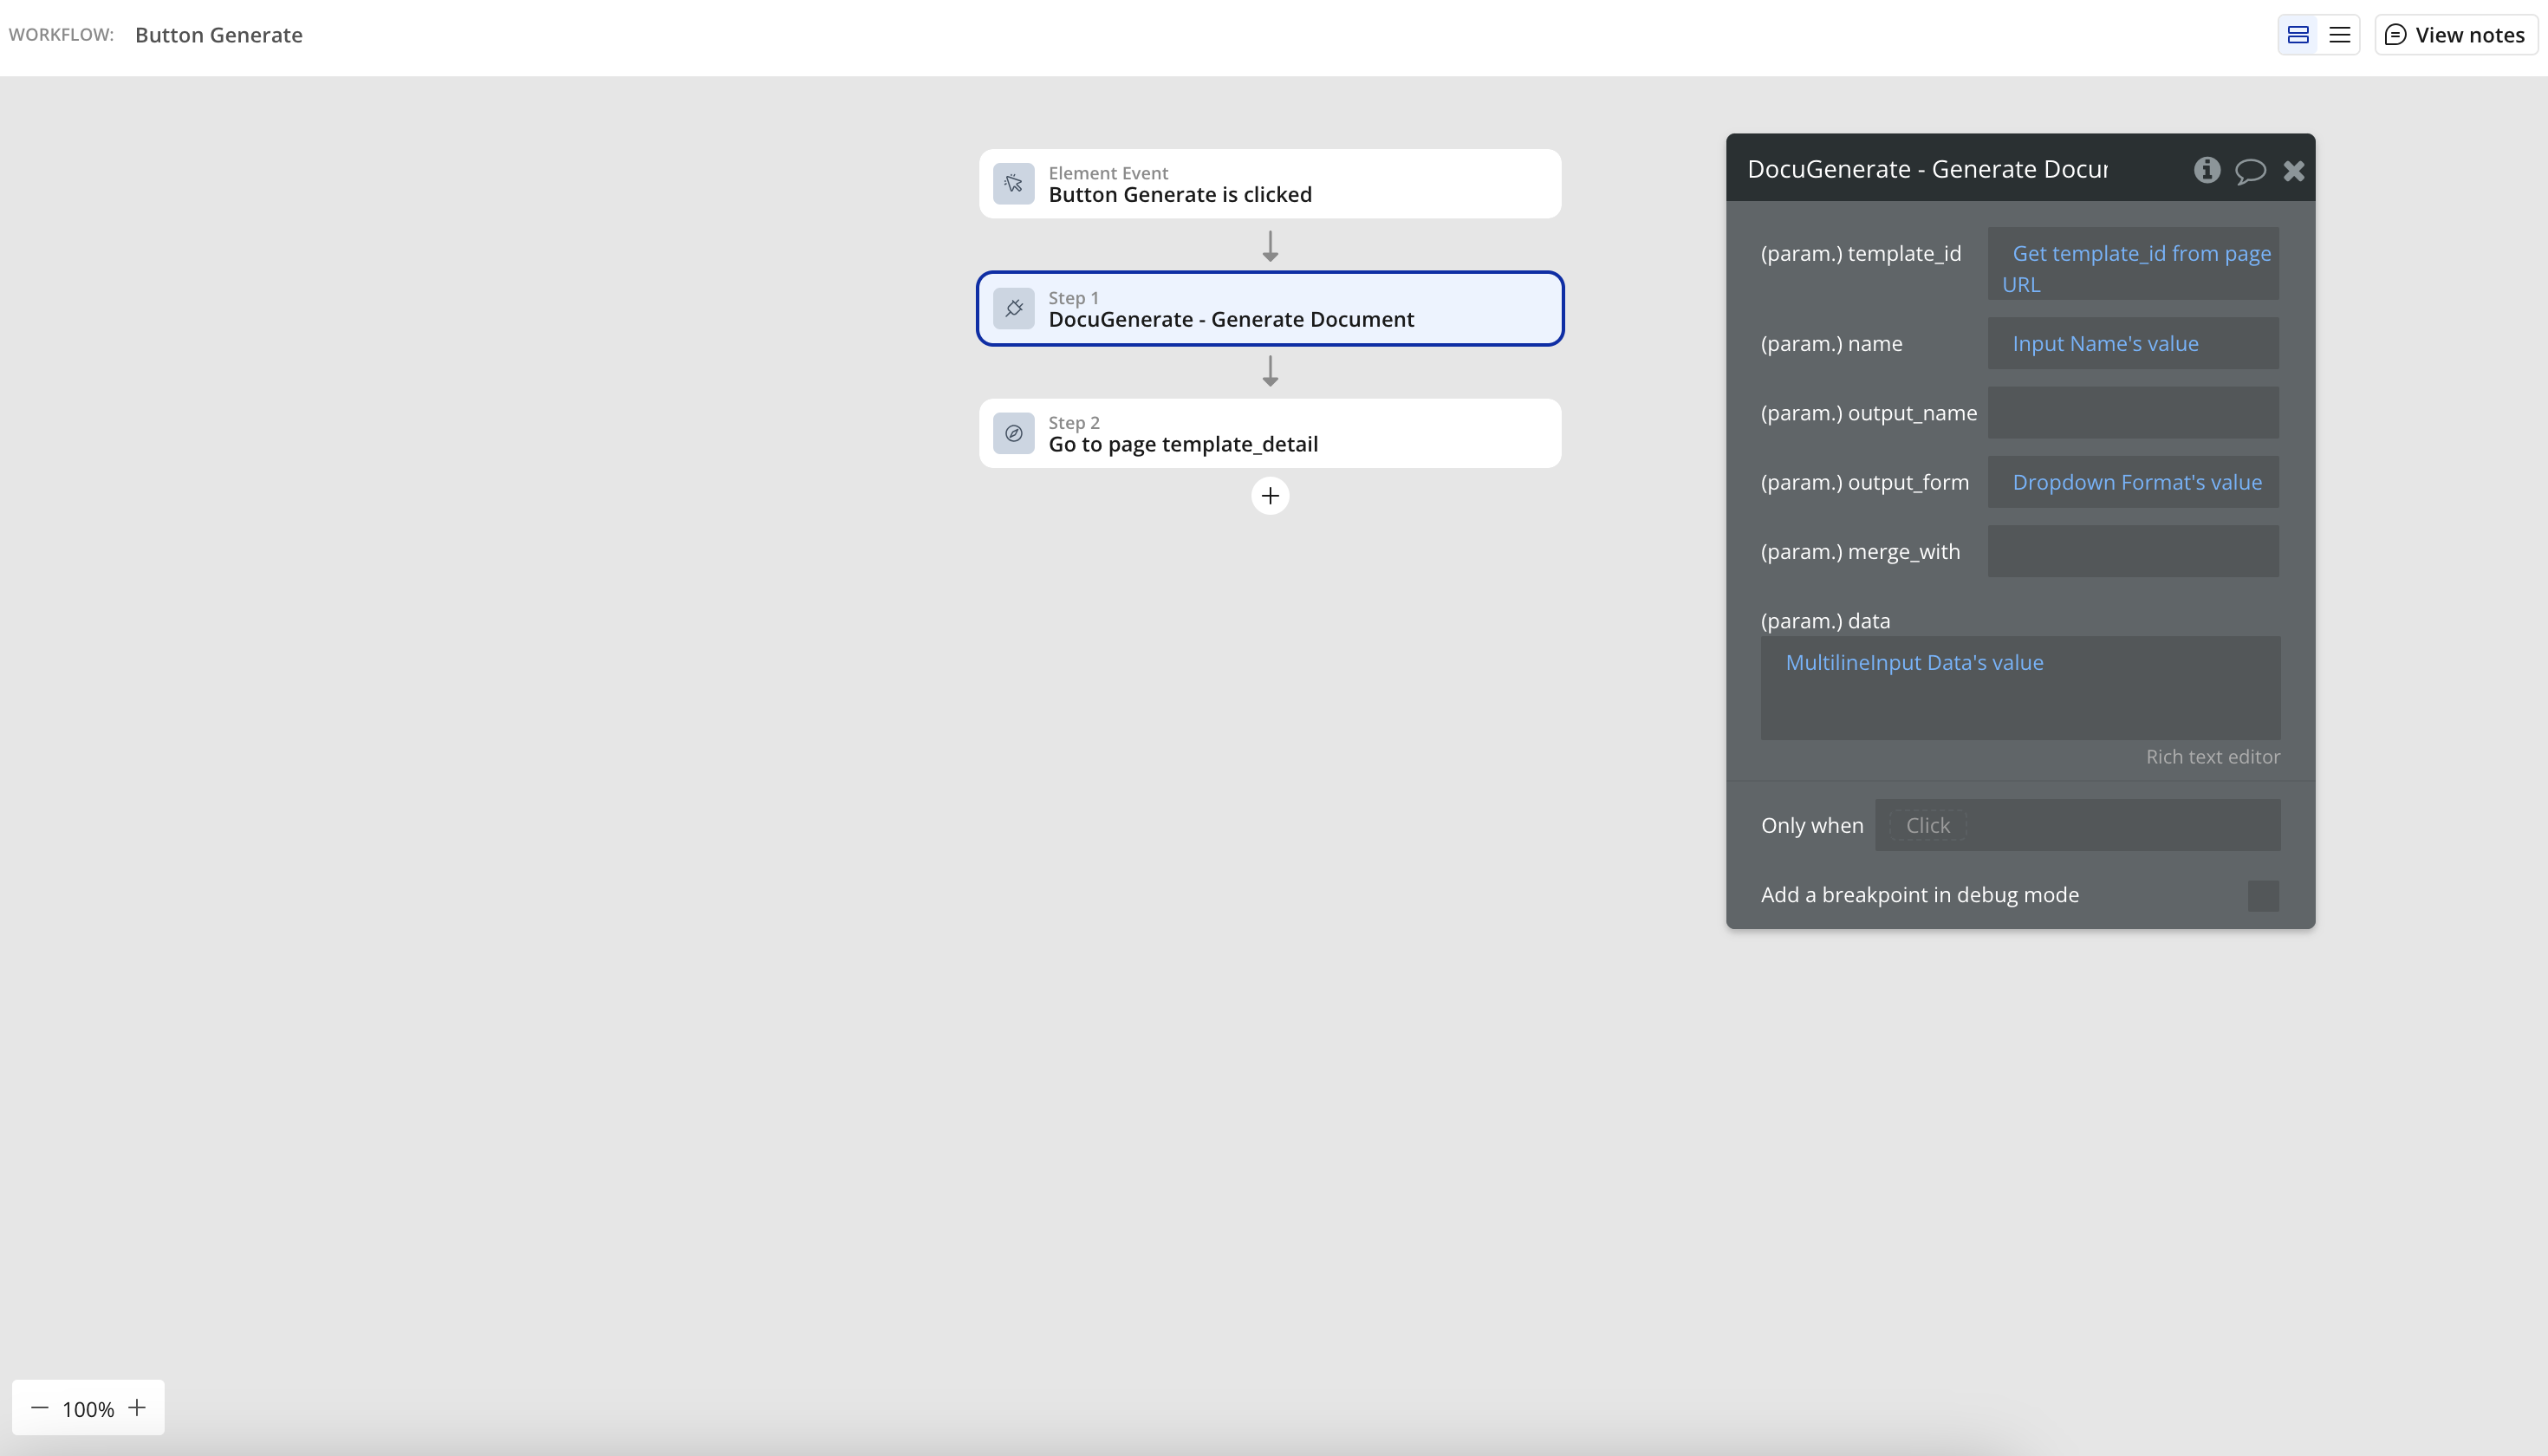
- After generation, navigates back to the template detail page
The MultiLine Input field is particularly important as it provides a flexible way for users to enter their JSON data. This approach supports both simple data structures for basic documents and complex nested objects or arrays for more sophisticated generation scenarios. For advanced users, this direct JSON editing capability offers precise control over the data being merged into their templates.
The output format dropdown demonstrates one of DocuGenerate’s key advantages: the ability to generate documents in multiple formats from a single template. Users can choose the format that best suits their needs, whether it’s a PDF for formal distribution, a DOCX for further editing, or another format for specific use cases.
After the document is generated, the page automatically navigates back to the template detail page, where the newly created document appears at the top of the list. This immediate feedback confirms that the generation was successful and provides quick access to the generated document.
Enhancement Opportunities
While our demo app provides the essential functionality for document generation, there are many ways it could be enhanced to create an even more powerful and user-friendly application:
- PDF Preview: Replace static images with embedded PDF previews of templates and documents.
- Alternative Views: Add options to view templates as a list instead of a grid.
- Template Editing: Allow users to update templates with new files or change settings.
- Template Navigation: Add a dropdown or a search bar to easily navigate between templates.
- Spreadsheet Support: Add the ability to upload Excel or CSV files for document generation.
These enhancements would transform our demo app from a proof of concept into a fully-featured document generation solution, tailored to specific business needs. The beauty of using Bubble’s visual development platform is that these features can be added incrementally, allowing the application to evolve alongside user requirements.
Conclusion
Building a document generation app with Bubble and the DocuGenerate plugin demonstrates the power of no-code development combined with specialized APIs. The demo app we’ve built serves as both a proof of concept and a starting point for your own document automation projects. By leveraging Bubble’s visual development platform and DocuGenerate’s document generation capabilities, you can create custom solutions tailored to your specific needs without writing a single line of code.
This approach is particularly valuable for businesses without dedicated development teams or those looking to quickly prototype and iterate on document generation workflows. The visual nature of Bubble makes it accessible to business analysts, operations specialists, and other non-technical team members, empowering them to create solutions that directly address their document automation challenges.
Whether you’re building internal tools for your team or customer-facing applications, this approach offers a fast and flexible way to implement document generation functionality. The combination of Bubble’s intuitive interface and DocuGenerate’s powerful API creates a synergy that brings sophisticated document automation within reach of organizations of all sizes.
Resources
- Live version of the Bubble Demo App that we built in this tutorial.
- Install link for the DocuGenerate Plugin in the Bubble marketplace.
- Step-by-step instructions from our Help Center for configuring the plugin.
When it comes to document generation solutions, businesses often face a critical choice between platforms that use Word templates and those based on HTML templates. This decision might seem trivial at first glance, but it can significantly impact your workflow efficiency, document quality, and long-term flexibility.
DocuGenerate is built around Microsoft Word templates, but there are other solutions on the market that use HTML-based approaches. While both have their merits, there are compelling reasons why Word-based templates often provide superior results for businesses of all sizes.
In this article, we’ll explore the key differences between Word and HTML templates, examine the advantages of each approach, and explain why having ownership of your templates matters for business continuity and flexibility.
Understanding the Fundamental Differences
Before diving into the advantages and disadvantages, let’s clarify the key differences between Word-based and HTML-based document generation systems:
Word-Based Templates use standard document formats (DOCX, ODT) as templates, compatible with both Microsoft Word and LibreOffice. They leverage the full formatting capabilities of these powerful word processors and allow direct editing with familiar tools most business users already know. They support complex document structures and can generate output in multiple formats (DOCX, PDF, etc.).
HTML-Based Templates use HTML and CSS for template design and often require knowledge of web development technologies. They typically include a WYSIWYG editor (stands for “What You See Is What You Get”), focus primarily on PDF output, and may use template languages like Handlebars, Mustache, or Jinja.
With these differences in mind, let’s explore why Word templates often provide a superior solution for businesses.
Template Ownership and Portability
One of the most significant advantages of Word-based templates is true ownership of your document designs. With DocuGenerate and other Word-based solutions, your templates are standard DOCX files that you can download, edit offline, and even use with different systems if needed.
This provides important benefits like avoiding vendor lock-in, future-proofing your template investment, offline access for editing, and easy sharing with colleagues or clients as standard Word documents.
HTML-based solutions often store your templates in proprietary formats that can only be edited and used within their specific platform. This creates challenges including migration difficulties (recreating all templates when switching providers), limited control (only making changes their editor allows), dependency risks (if the provider changes their system), and hidden costs when recreating templates.
Superior Formatting Capabilities
Microsoft Word has been refined over decades to provide precise document formatting control. HTML-based solutions, while improving, still can’t match Word’s comprehensive formatting capabilities.
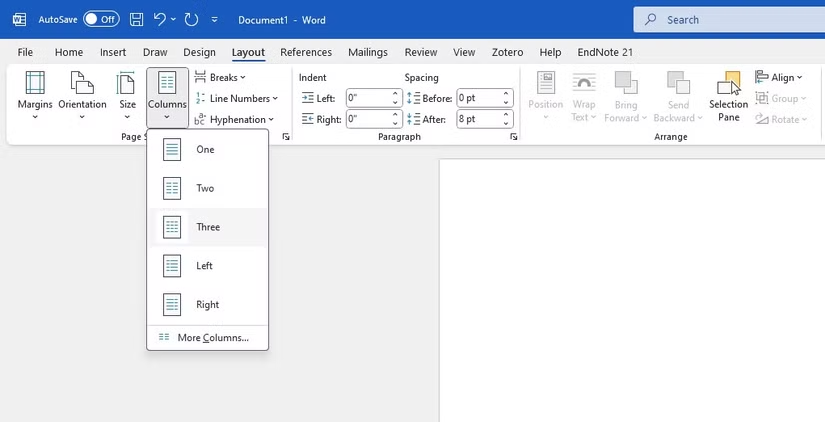
Complex Document Layouts
Word excels at handling complex document formats that are common in business settings. It provides sophisticated control over headers and footers across multiple sections, complex page numbering schemes, multi-column layouts, advanced table formatting, precise text wrapping around images, and section breaks that allow different page orientations within a single document.
Typography and Branding
Word offers superior typographic controls essential for maintaining brand consistency. These include comprehensive font management with access to any installed fonts, advanced typography features like ligatures and small caps, precise control over character spacing, and style systems that ensure consistent formatting throughout documents.
Pixel-Perfect Precision
When it comes to document generation, precision matters—especially for legal documents, contracts, and formal business correspondence. Word templates provide pixel-perfect control that HTML templates often struggle to match consistently across different output formats.
Ease of Use and Adoption
Perhaps one of the most compelling advantages of Word-based templates is familiarity and ease of use. Most business professionals are already accustomed to Microsoft Word. This existing skill set means minimal training is required, more staff can contribute to template creation and maintenance, and organizations can implement document generation solutions more quickly.
HTML-based solutions often require knowledge of web technologies that many business users don’t possess. While WYSIWYG editors attempt to bridge this gap, they typically offer limited formatting control compared to what’s available in the underlying HTML and CSS.
Consider CKEditor, one of the most popular WYSIWYG editors used by web applications. While it provides a rich and user-friendly interface, it still falls short of Word’s comprehensive functionality. Users often encounter limitations with complex formatting, table handling, and page layout control.
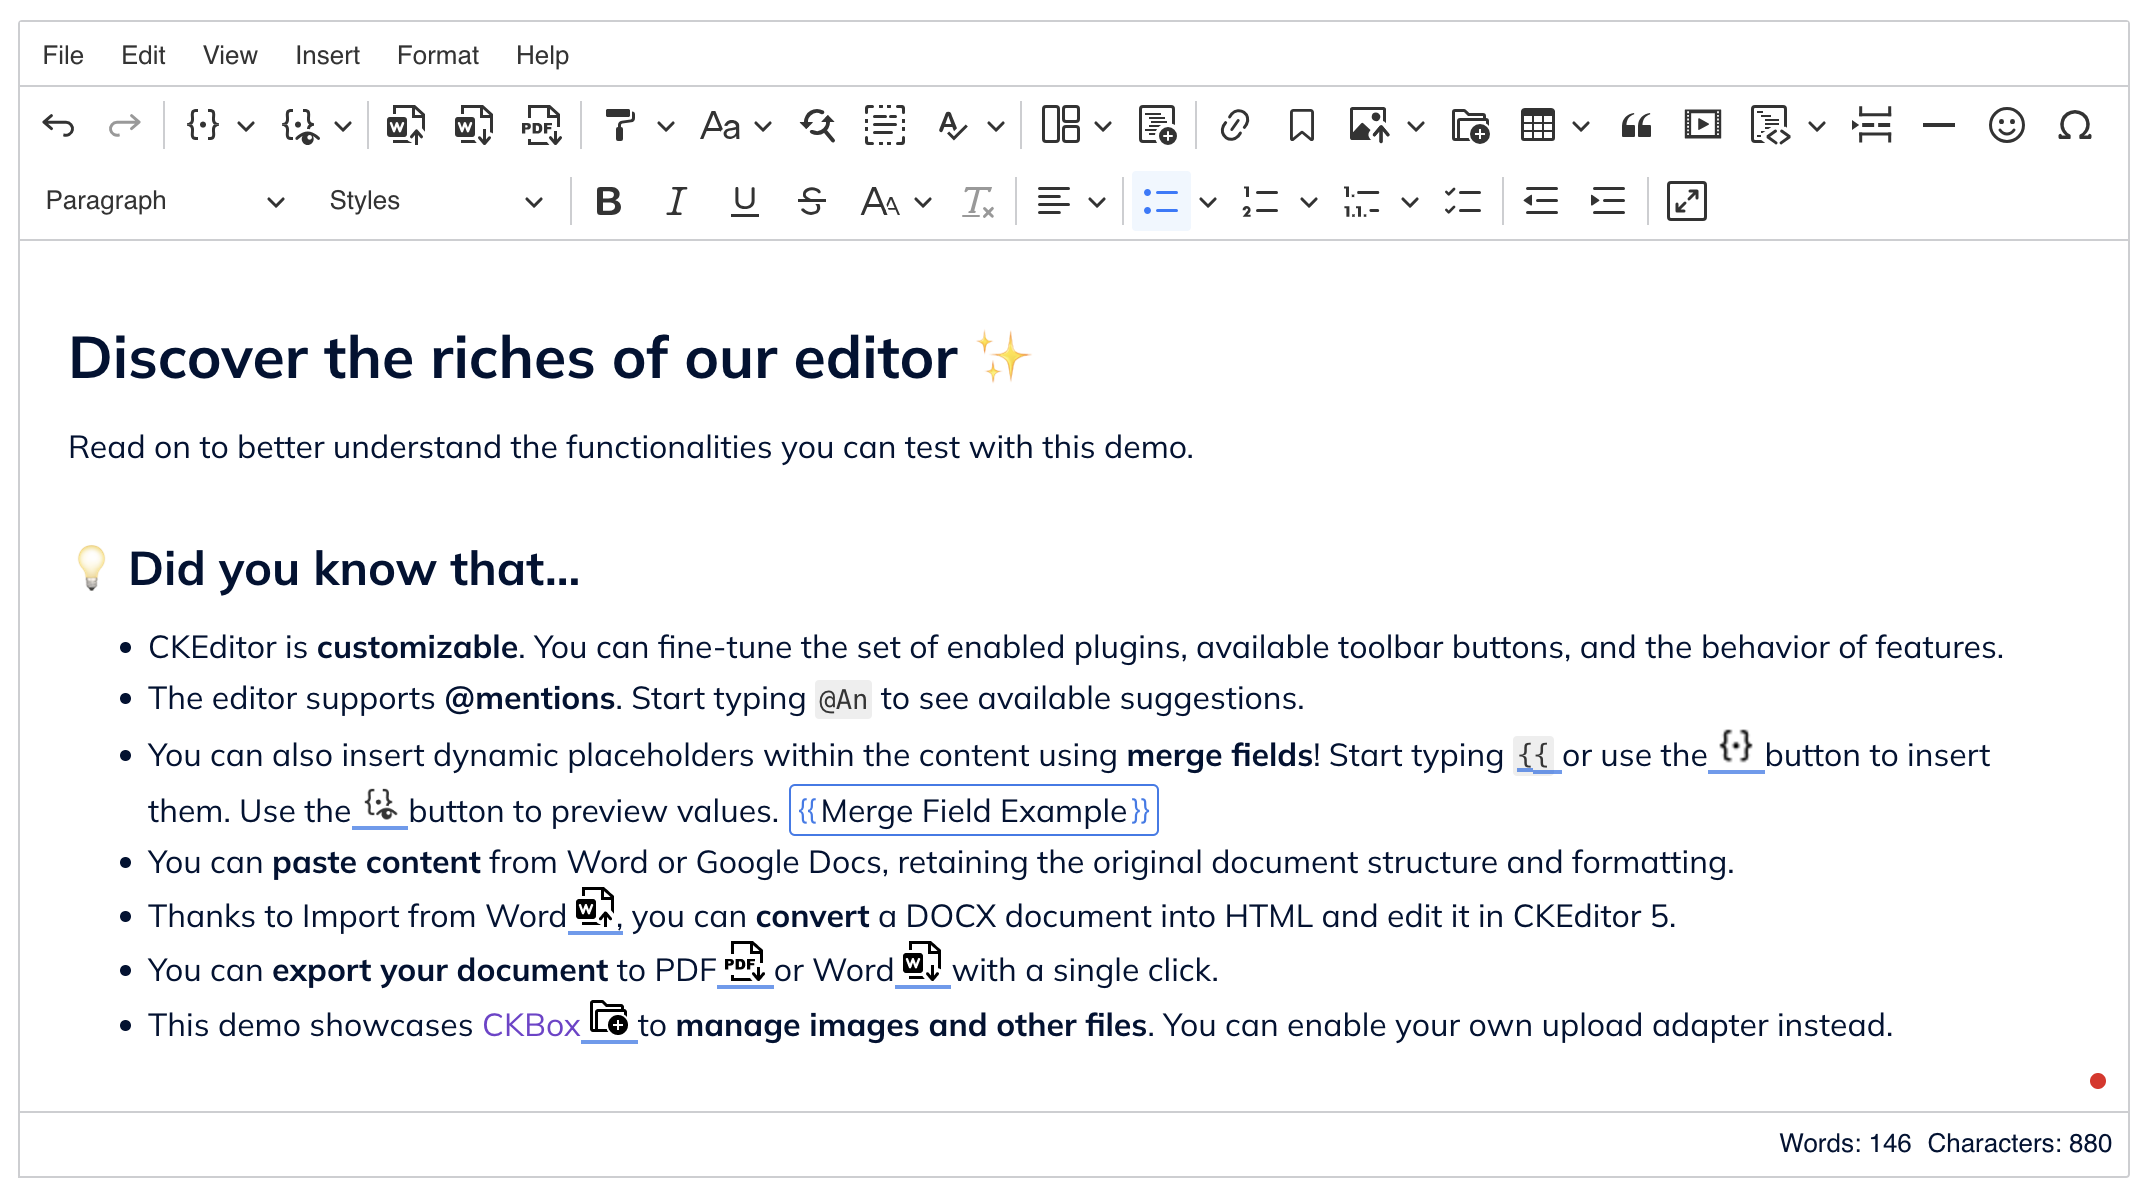
Even with advanced WYSIWYG editors like this, users typically have access to only a subset of the formatting capabilities available in Word. The editing experience feels constrained compared to a dedicated word processor, and the final output may not always match what users see in the editor.
Some Practical Examples
Different types of business documents have varying requirements for formatting and structure. Let’s examine how Word and HTML templates compare for common document types.
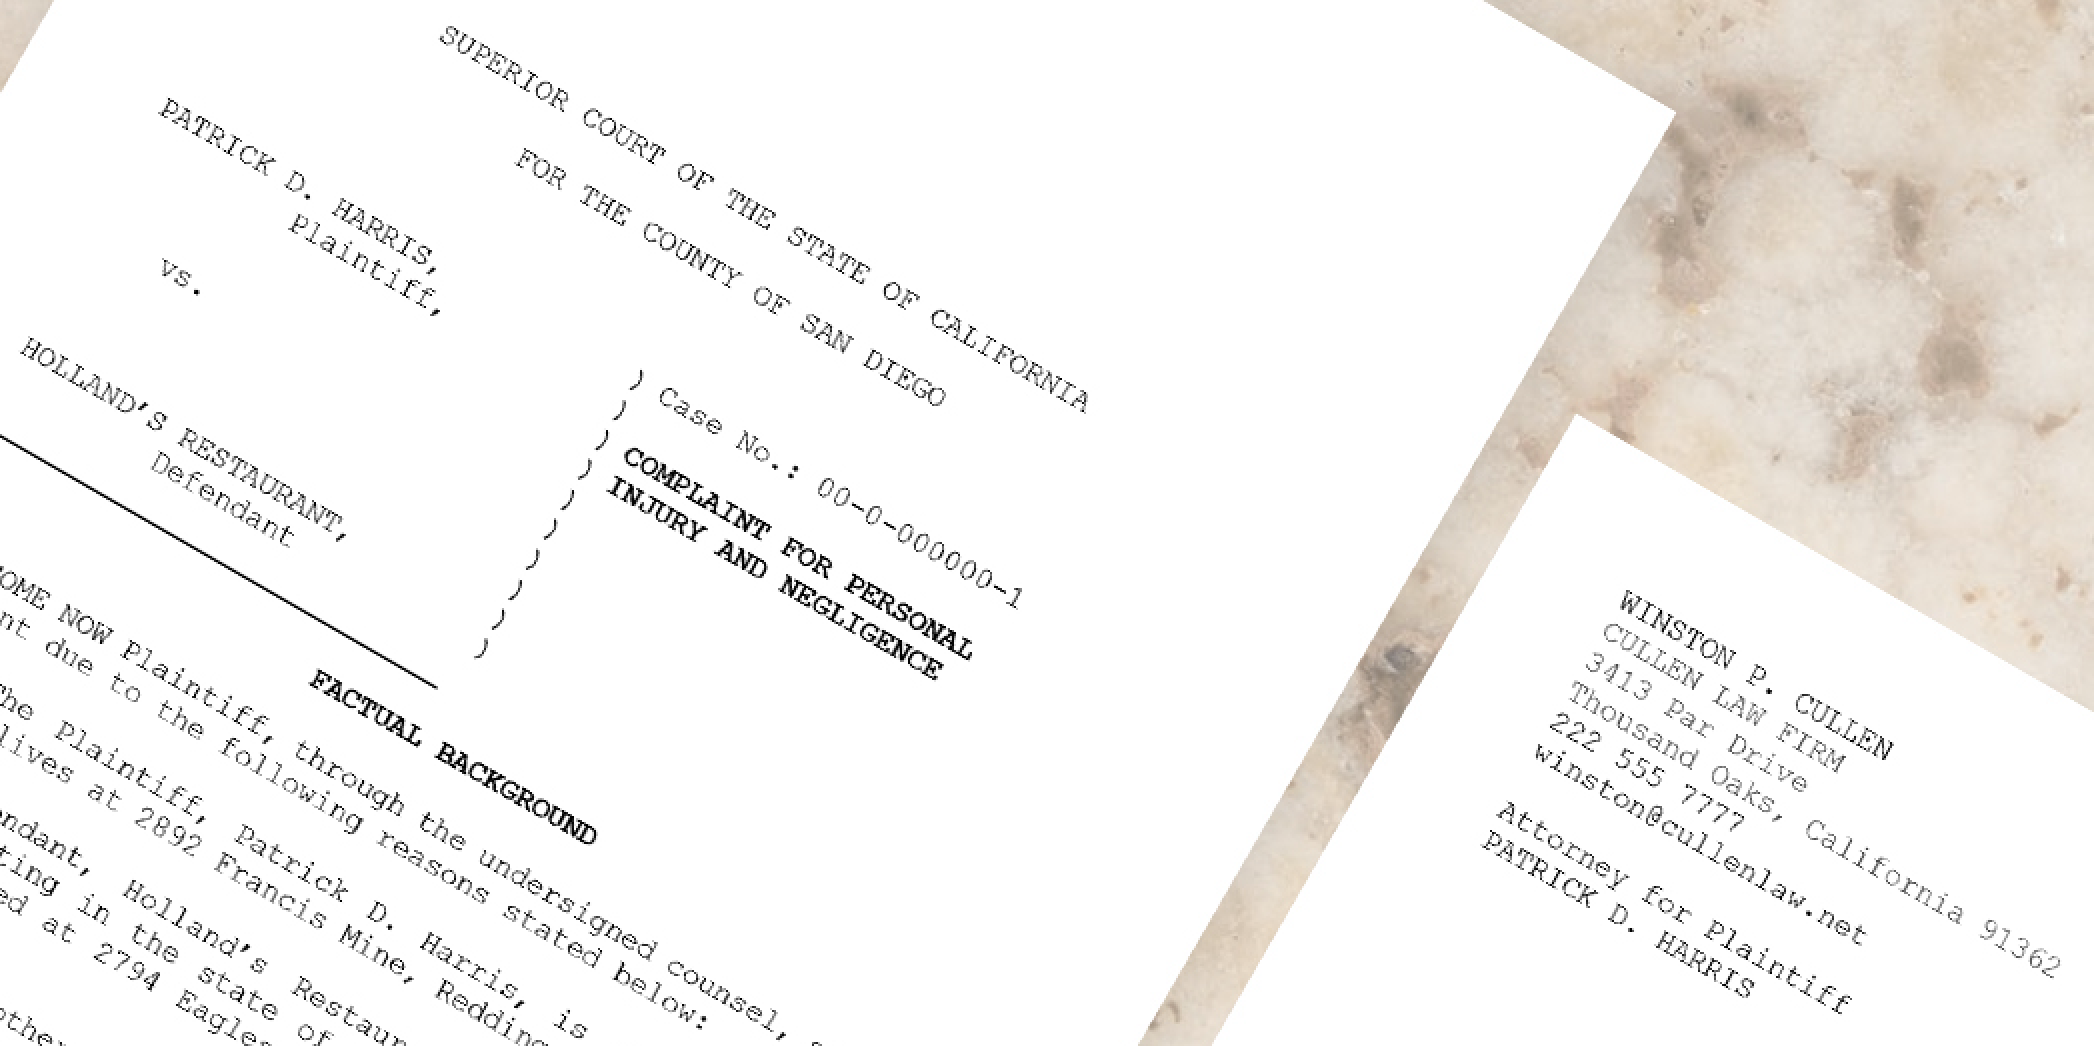
Legal Documents often have strict formatting requirements, including complex numbering schemes, precise paragraph indentation, specific line spacing, section and page numbering conventions, and careful placement of signature blocks. Word templates excel at maintaining these precise formatting requirements consistently, while HTML-based systems often struggle with the exact spacing and formatting needs of legal documents.
Invoices and Statements can be handled by both approaches, but Word templates offer advantages for complex layouts with precise positioning of elements, complex table structures for line items, conditional sections based on business rules, and consistent pagination for multi-page invoices.
Long-Form Documents like reports benefit significantly from Word’s essential features such as automatically generated and updated tables of contents, dynamic cross-references to other sections, better control over page breaks and section formatting, and the ability to have different headers and footers for different sections.
Technical Considerations
Beyond the user experience, several technical factors differentiate Word and HTML templates. While both approaches can produce professional-looking documents, the underlying technologies affect everything from output options to how content flows across pages. Understanding these differences helps you choose the solution that best aligns with your organization’s specific requirements.
Output Format Flexibility
One significant advantage of Word-based templates is the ability to generate documents in multiple formats, including editable Word documents (DOCX), PDFs for final distribution, and other formats. This versatility allows businesses to distribute content in whatever format best suits their needs while maintaining the ability to edit documents after generation.
HTML-based systems typically focus primarily on PDF output, which limits flexibility when recipients need to edit or repurpose content. When changes are required, the entire document generation process must be repeated rather than simply editing the output file. This can create inefficiencies in workflows where documents frequently need modifications or when content needs to be extracted for other purposes.
Page Breaks and Document Structure
Controlling how content flows across pages is crucial for professional documents. Word handles page breaks, section breaks, and content flow naturally, while HTML-based systems often struggle with these concepts since HTML was designed for flowing content rather than paginated documents.
This becomes particularly important when documents need specific page numbering schemes, different sections require different layouts or orientations, headers and footers need to vary throughout the document, or content needs to avoid breaking across pages.
Customizing Delimiters and Template Syntax
With HTML-based template systems, you’re typically locked into their specific template language and syntax. Most use fixed delimiters like {{ }} or {% %} for variables and logic.
DocuGenerate allows you to customize your template delimiters, which helps you avoid conflicts with other syntax in your documents, create templates that match your team’s preferences, simplify the template creation process, and support migration from other systems by matching their syntax.
Making the Right Choice for Your Business
When evaluating document generation solutions, consider these key factors:
- Template Ownership: Do you want to own your templates in a standard format?
- Formatting Requirements: How complex are your document formatting needs?
- User Skills: What is your team’s technical expertise?
- Output Flexibility: Do you need editable documents or just PDFs?
- Integration: How does the solution fit with your existing document workflows?
For many businesses, Word-based document generation offers the optimal balance of power, flexibility, and ease of use. It integrates seamlessly with existing business processes, offering features like tracked changes for collaborative editing, comments for feedback, document comparison tools, and compatibility with many e-signature platforms that work directly with Word files.
Conclusion
While both Word-based and HTML-based document generation solutions have their place, Word templates offer significant advantages for most business scenarios including true ownership of your templates, superior formatting capabilities, familiar editing experience, output format flexibility, and post-generation editing options.
DocuGenerate builds on these advantages with additional features like customizable delimiters, and an intuitive approach to template creation. As you evaluate document generation solutions for your business, consider not just the immediate functionality but also the long-term implications for template ownership, user adoption, and workflow integration. The right choice can save your team countless hours and ensure your documents always meet your exact standards.
Resources
- Template Library - Browse professionally designed templates ready for use
- Export Formats Guide - Explore the different output formats available
- Customizing Tag Delimiters - Learn how to set your own custom delimiters
At its core, multi-region processing and storage is the ability to choose where your data is handled. Whether for compliance with regulations like GDPR, improving performance for users in different regions, or simply offering greater control over data locality, this new feature is a game-changer.
Prior to this update, all templates and documents were stored and processed in a single region (the United States), which served as the default for all users. Now, you can choose the physical location where your templates and their associated documents are processed and stored, enhancing security and speed. The following regions are available:
- United States
- European Union
- United Kingdom
- Australia
You can choose a default region for your account, and also configure regions at the template level. For advanced users leveraging our API, it’s possible to specify the processing region through API calls and use regional endpoints for document generation. We’ll walk you through everything you need to know about this update and how you can migrate your existing templates to benefit from this feature.
Changes in the Web App
Our goal with this update is to make region selection as straightforward as possible for web app users. We’ve introduced a couple of key changes to streamline the process of selecting regions, both at the account level and at the template level.
Account-Level Region Defaults
To simplify the process of managing multiple templates, you can now set a default region in the account settings. This default setting applies to all newly created templates, ensuring that they are processed and stored in the region of your choice without having to select the region each time you create a new template.
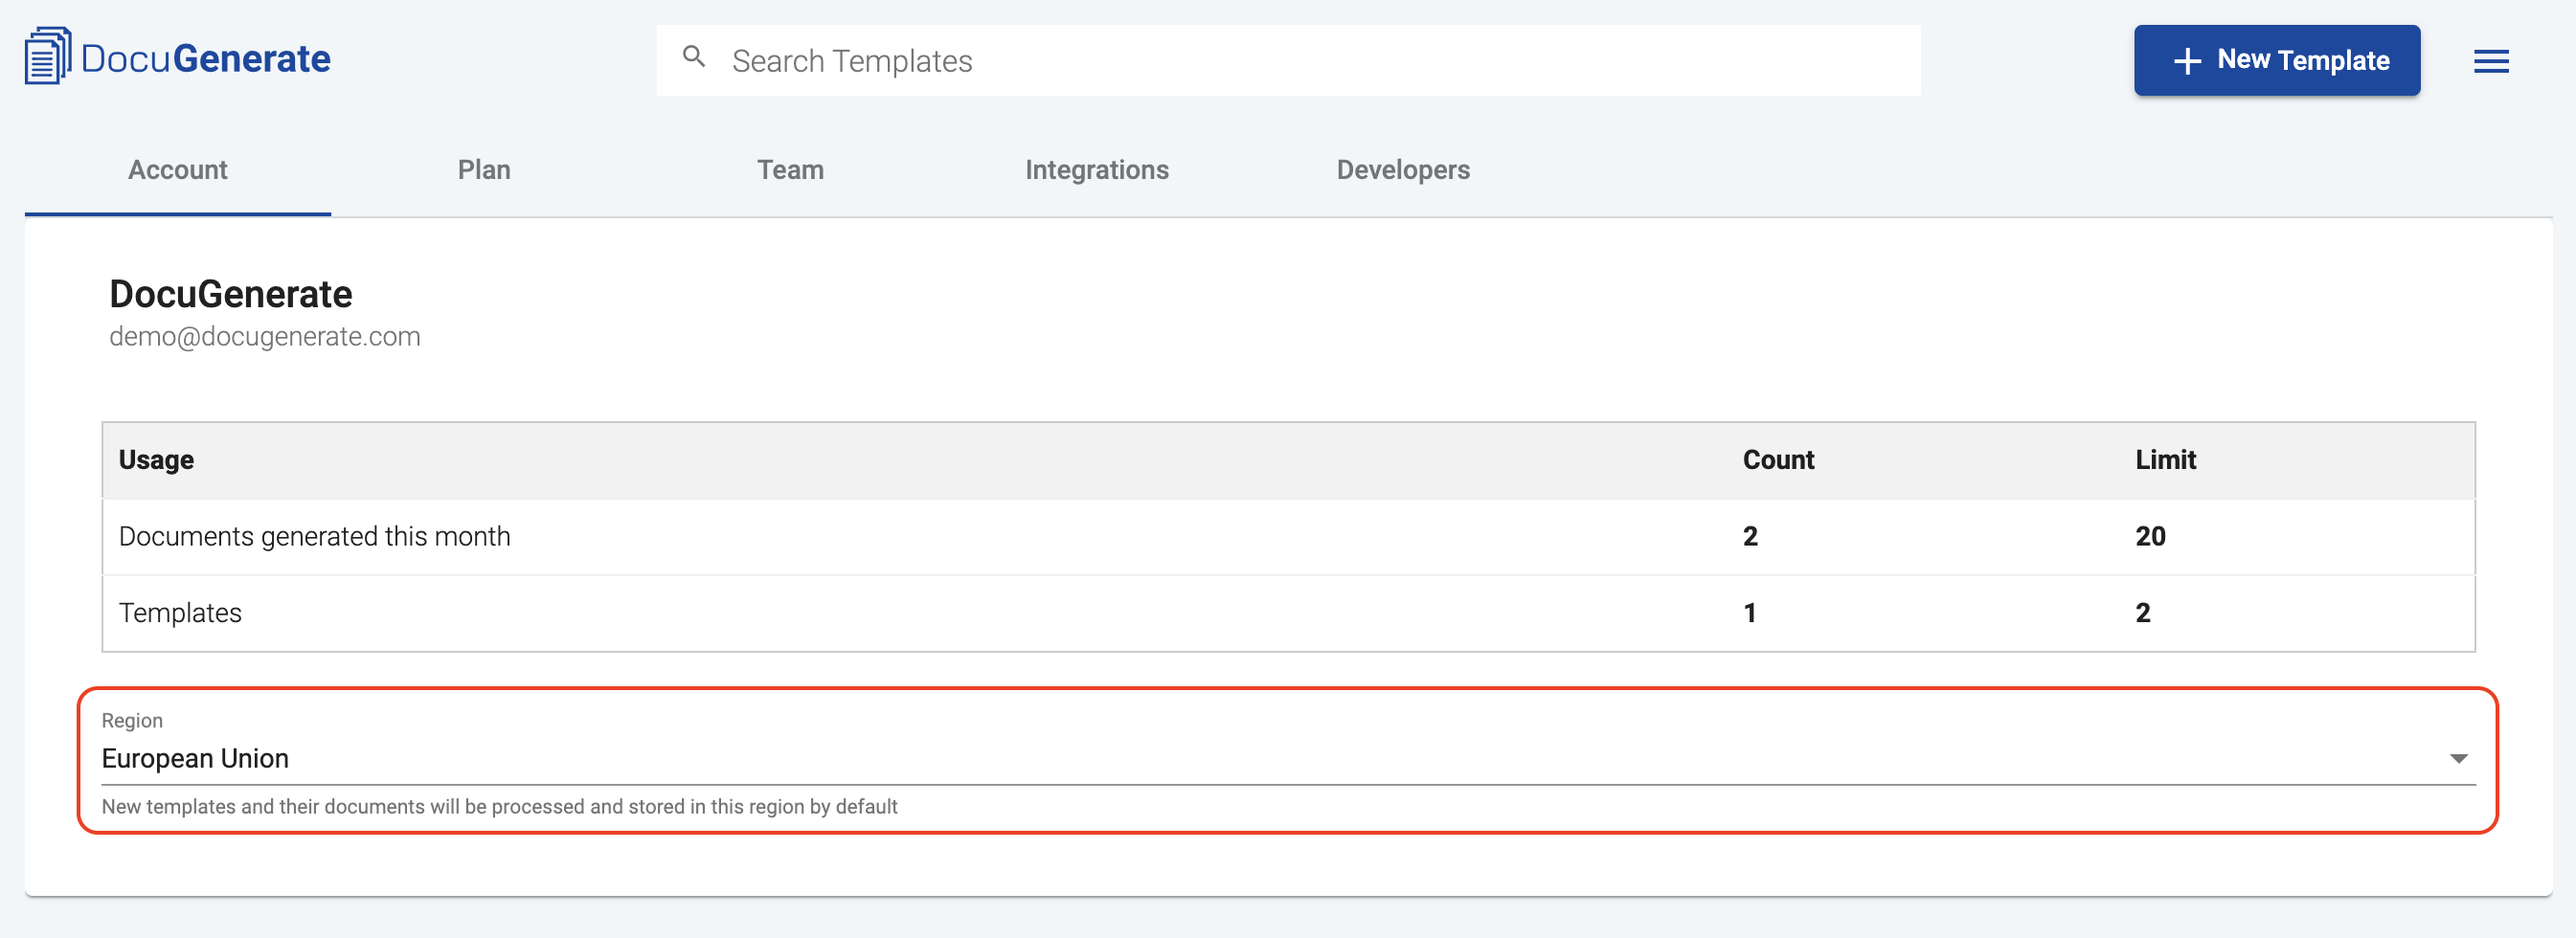
By default, the region is set to the United States, but you can change it to whatever region you prefer, depending on your needs. This feature is ideal for users who operate in a specific region and want to ensure that all their templates and documents are handled accordingly.
For example, if you operate primarily in Europe and select European Union as your default region, all new templates will automatically be processed and stored in the EU. Of course, you can still override this setting on a per-template basis, but having a default in place can save you time and streamline your workflow.
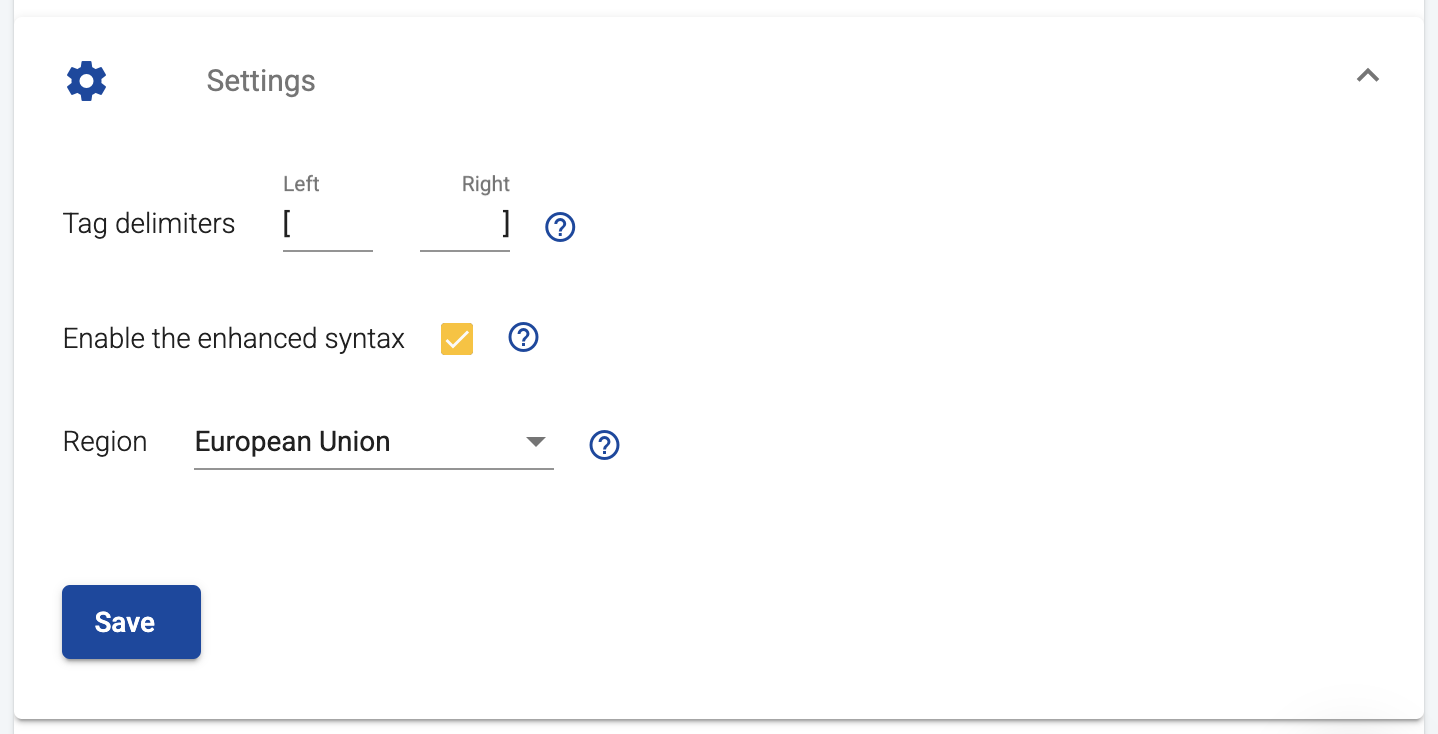
Region Selection for Templates
When you create or edit a template in the web app, you’ll now see a region dropdown that allows you to choose the physical location where your template and its documents are processed and stored. This selection ensures that all documents generated from that template will be handled within the selected region.
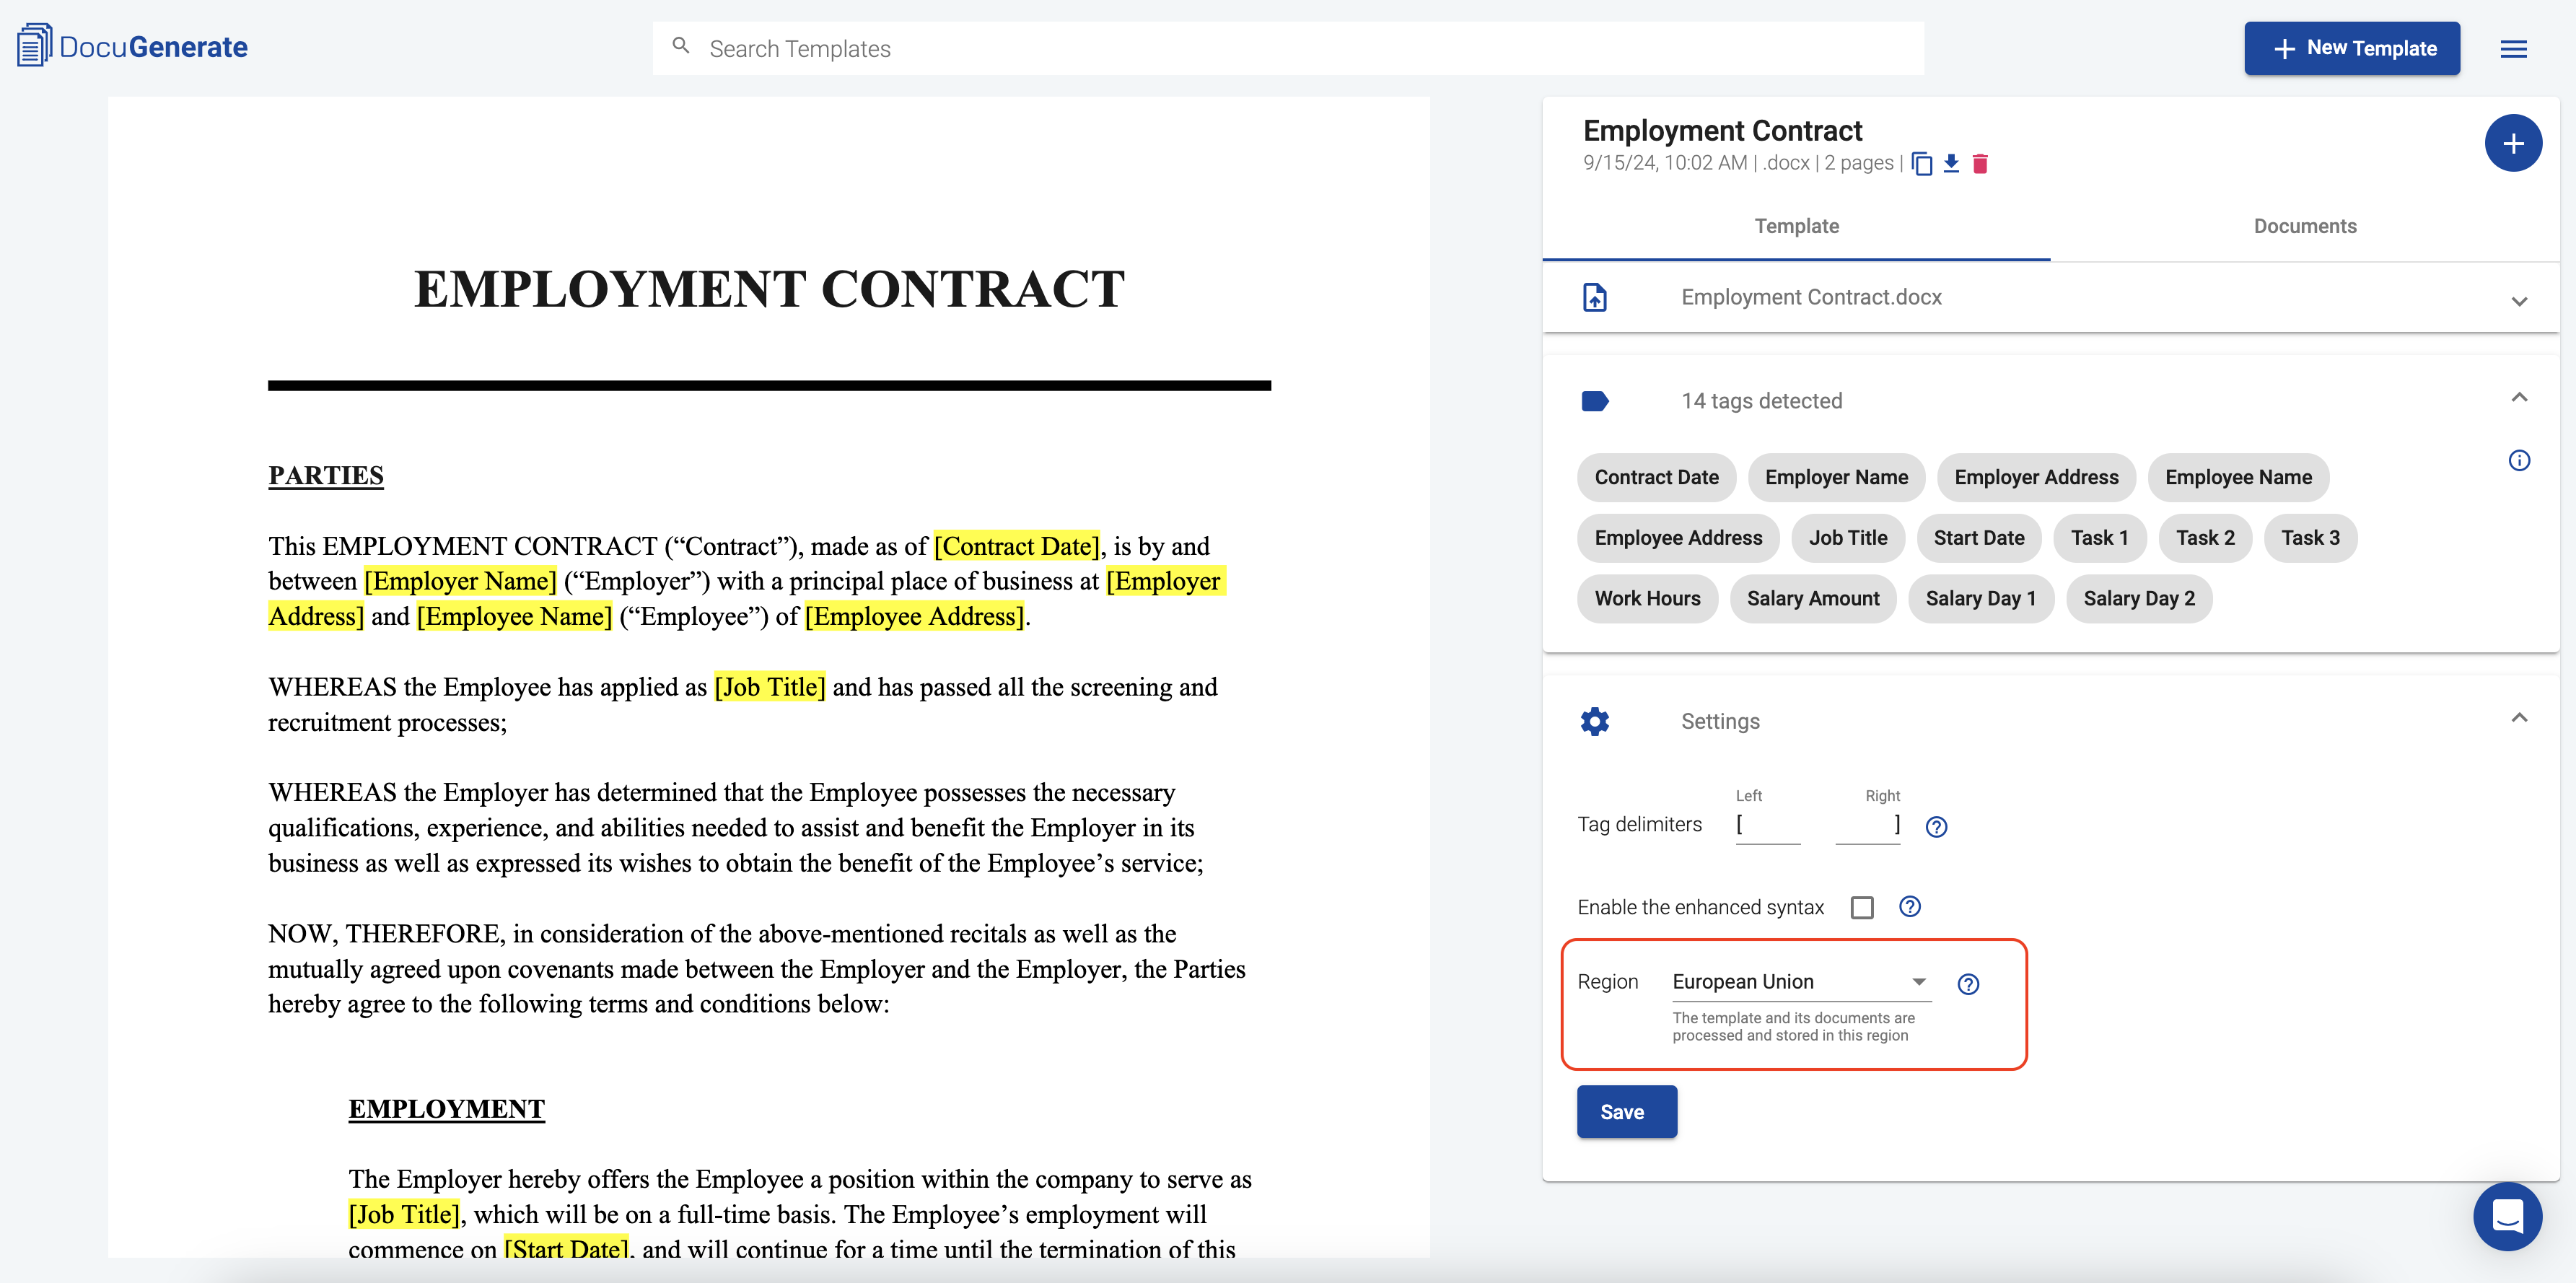
For instance, if you select the European Union, not only will the template itself be stored in our EU data center, but all documents generated from that template will also be processed and stored there. This is particularly important for users who need to comply with regional regulations, such as GDPR, which mandates that data belonging to european residents must remain within the EU.
If you decide to change the region of an existing template, rest assured that only new documents generated after the change will be affected. Your existing documents will remain in the region where they were originally stored.
Changes at the API Level
For our more advanced users who interact with DocuGenerate via the API, we’ve introduced several key updates that will give you greater control over how and where your data is processed. Whether you’re creating, updating, or generating documents, the API has been updated to support multi-region functionality.
Multi-Region API Endpoints
In addition to the main API endpoint you’ve been using, we’ve rolled out several regional API endpoints to allow you to process and store your data in specific geographic locations. These new endpoints include:
- United States (hosted in San Francisco): https://api.docugenerate.com/
- European Union (hosted in Frankfurt): https://api.eu.docugenerate.com/
- United Kingdom (hosted in London): https://api.uk.docugenerate.com/
- Australia (hosted in Sydney): https://api.au.docugenerate.com/
By using these regional endpoints, you can ensure that all document generation and template storage occurs within the region of your choice. This is particularly useful for compliance purposes, ensuring that your data is handled entirely within a specific jurisdiction.
Switching to a regional endpoint is simple—you just need to modify the base URL in your API calls to the appropriate regional endpoint. For example, if you need your documents to be processed in the EU, you would use https://api.eu.docugenerate.com/ instead of the default endpoint.
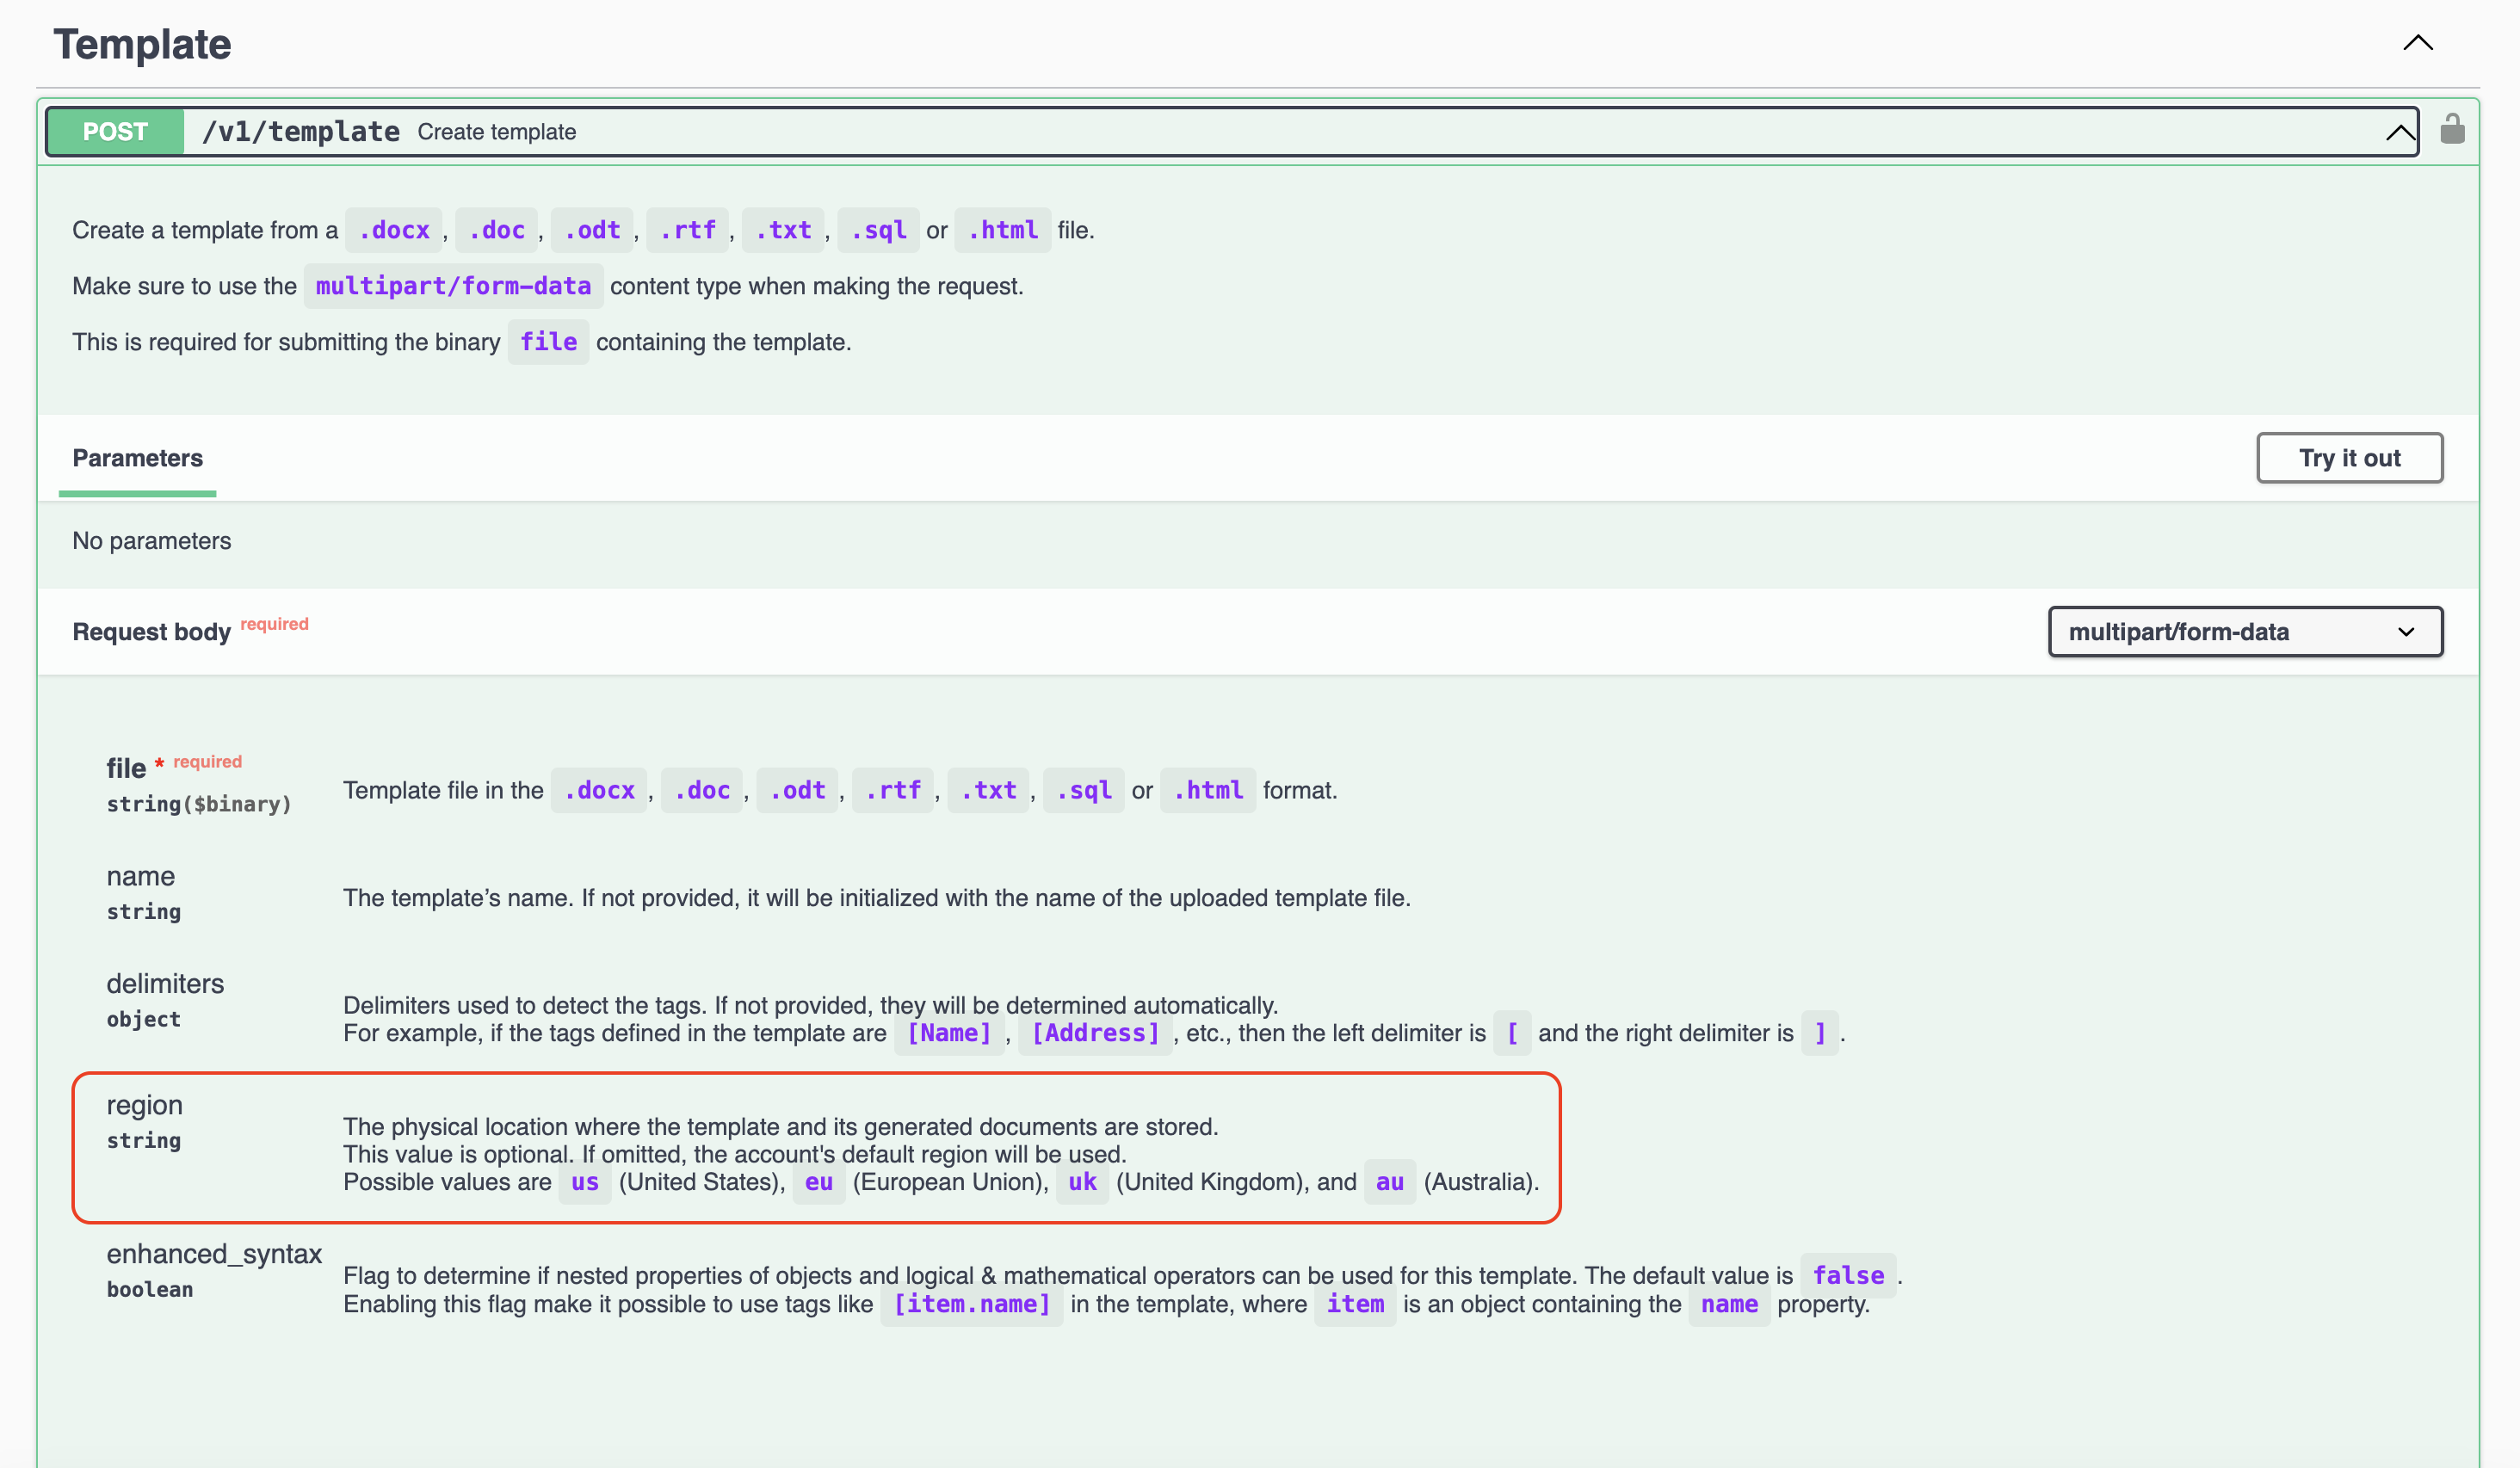
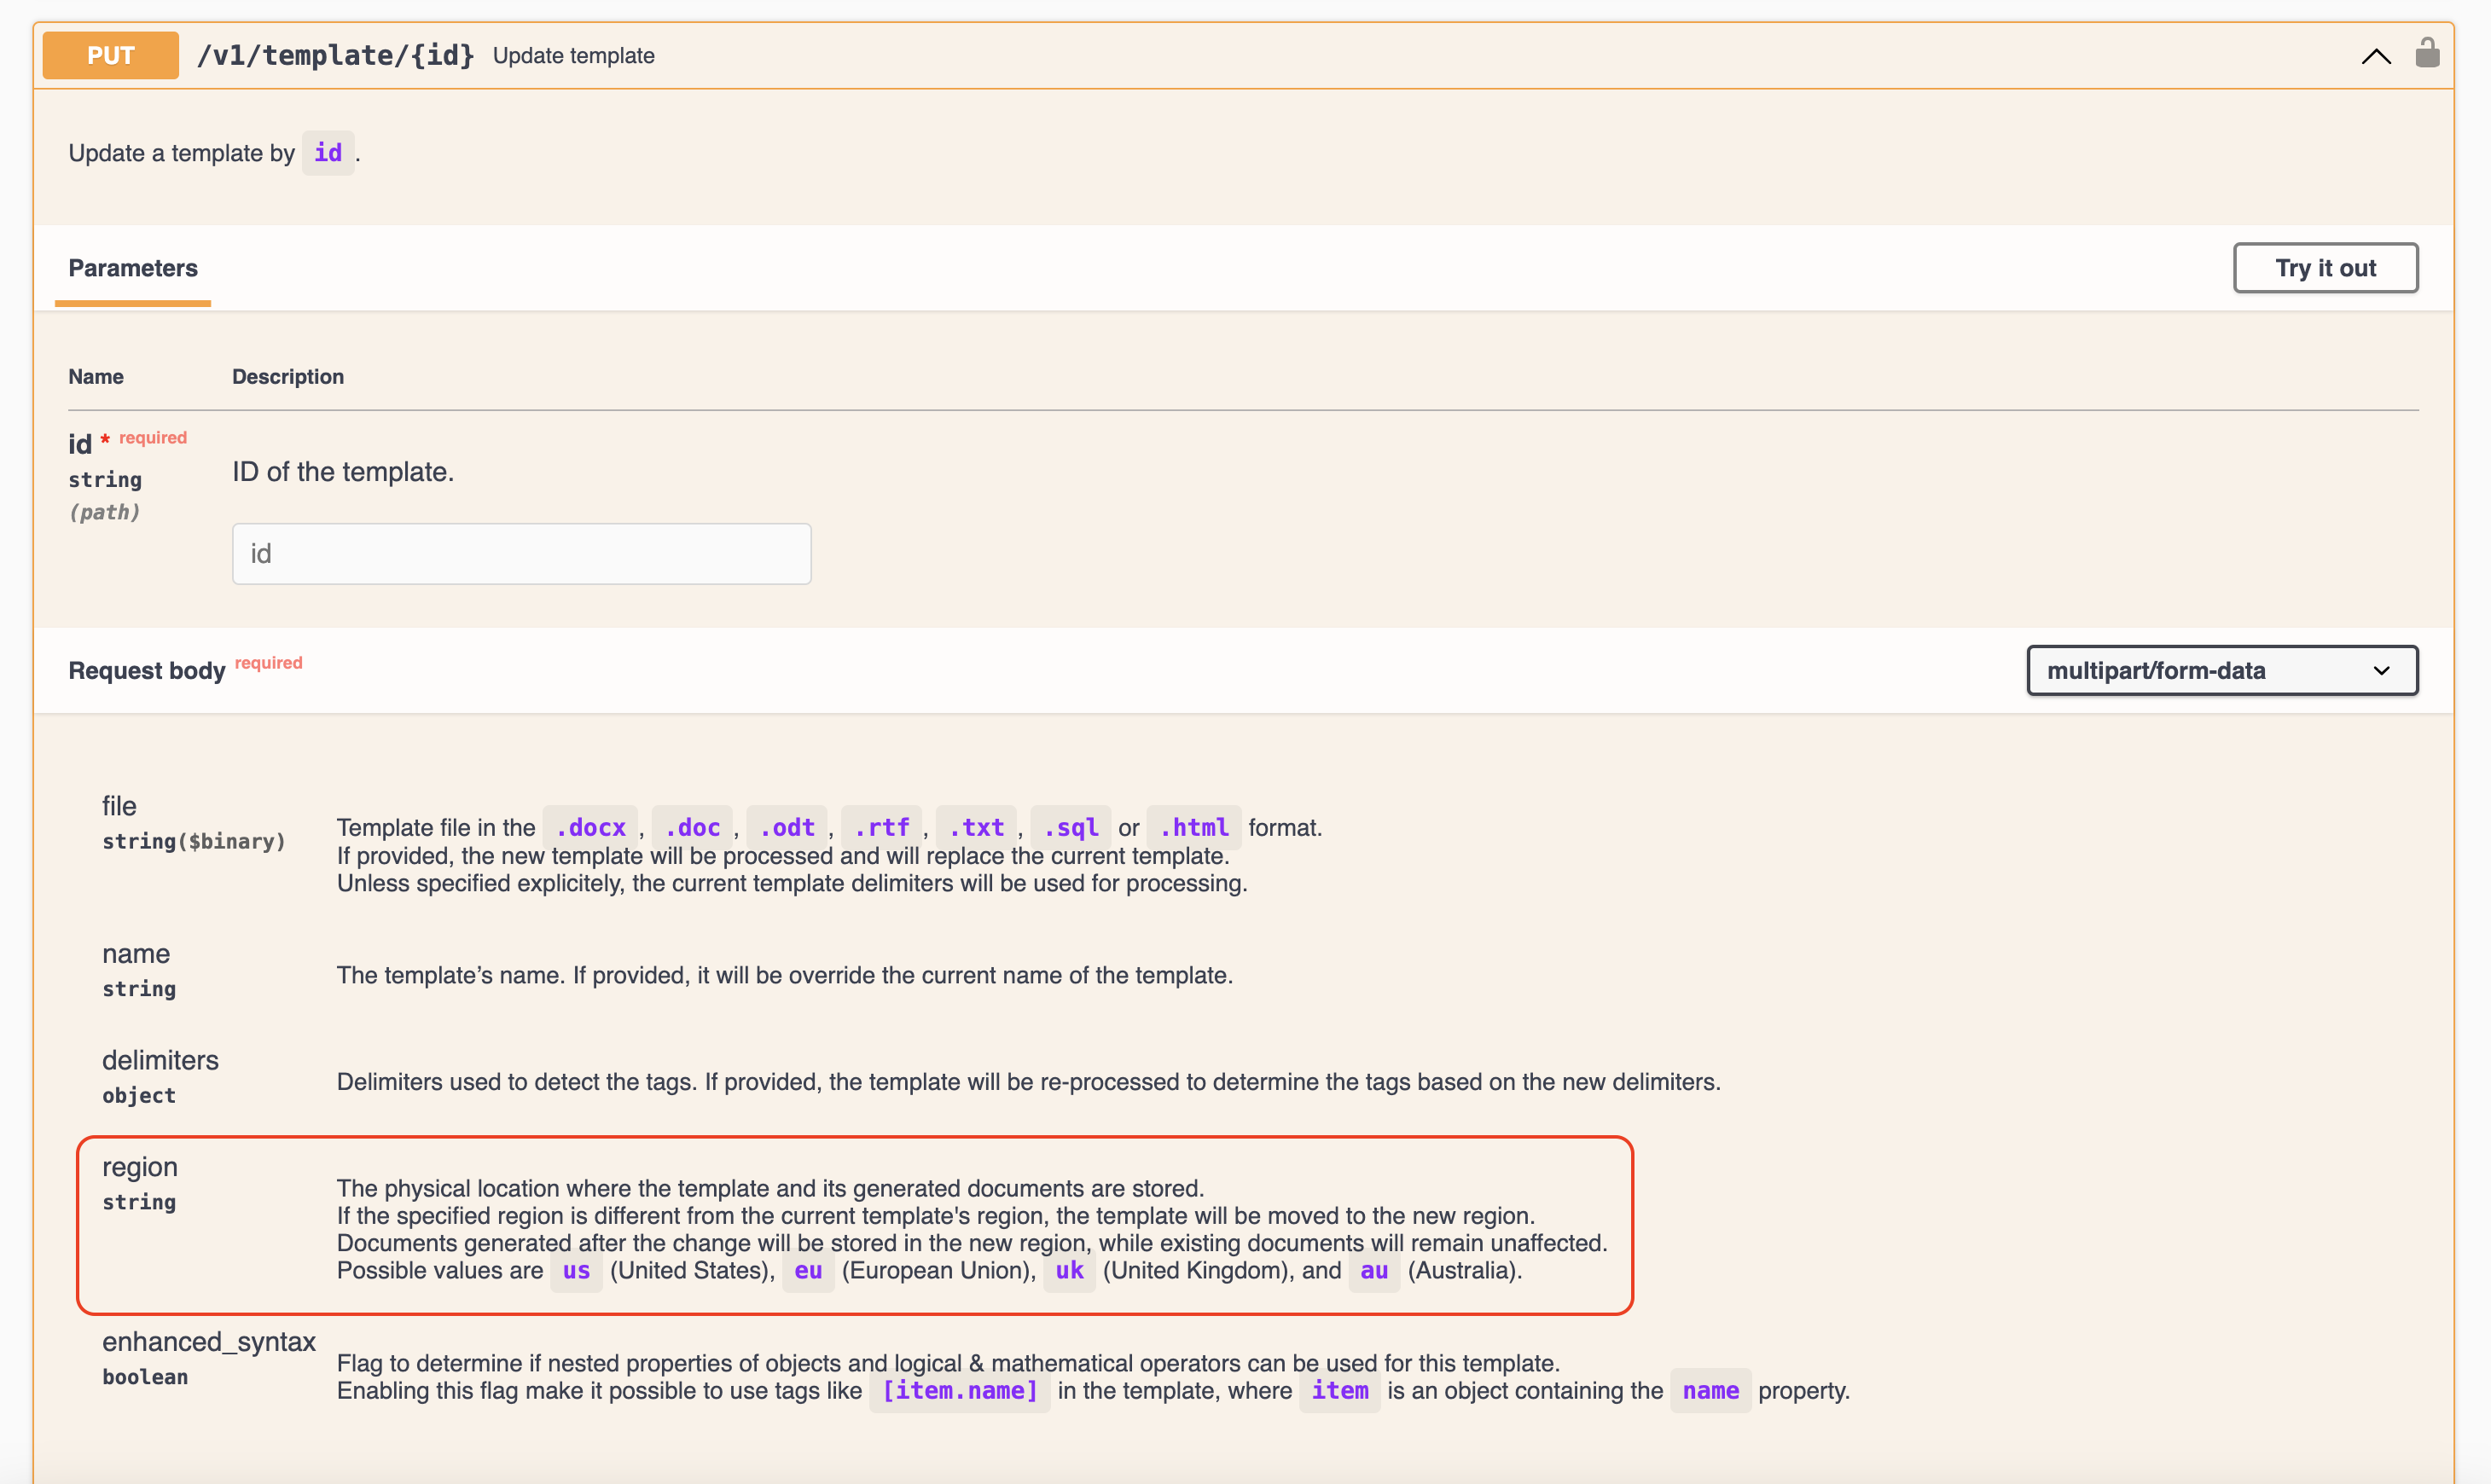
Region Specification for Templates
Another key API update allows you to specify the region when creating or updating a template. When you create a new template via the API, you can include theregion field in your request payload to determine where that template and its documents will be stored.
Similarly, you can update a template’s region using the API. Just like in the web app, changing the template’s region will only affect documents generated after the change, leaving previously generated documents in their original region.
Migration Guide
To make the transition to multi-region processing as smooth as possible, we’ve prepared a migration guide for both web app and API users. Here’s how you can ensure that your templates and documents take full advantage of this new feature.
For Web App Users
If you’re primarily using the web app, here’s what you need to do:
-
Set Your Account-Level Region:
Go to your account settings and select the default region where new templates will be stored and processed. This setting will automatically apply to all templates created after the change. -
Update Existing Templates (Optional):
If you want to move existing templates to a new region, go to the template settings and select a new region for the template. Remember, this will only impact documents generated after the change. Existing documents will remain in their original region.
For API Users
If you’re using the API, follow these steps to migrate smoothly:
-
Switch to a Regional API Endpoint:
Update your API base URL to the appropriate regional endpoint (e.g., https://api.eu.docugenerate.com/ for EU processing). This ensures that your templates and documents are processed in the region that best meets your needs. -
Update Existing Templates (Optional):
Use the API to update your template’s region by including theregionfield in your API requests. Any new documents generated after this update will be stored in the new template’s region.
Why This Matters
The introduction of multi-region processing and storage brings significant benefits to our users. Here are a few reasons why this feature is important:
1. Compliance with Local Regulations:
If you operate in regions with strict data residency laws (e.g., the European Union’s GDPR), this feature allows you to ensure that your data remains within the required jurisdiction. You now have control over where your templates and documents are processed, helping you stay compliant with local laws.
2. Improved Performance:
By processing and storing data closer to where your users are located, you can reduce latency and improve the overall performance of document generation. For example, if most of your users are in Europe, storing templates and processing documents in the EU will result in faster response times.
3. Greater Flexibility and Control:
Whether you’re a small business operating in a specific region or a global enterprise with users around the world, this feature gives you the flexibility to tailor your data storage and processing needs according to your unique circumstances.
Use Case Scenarios
1. Small Business with Local Clients:
If you’re a small business operating solely in the UK, you can now select the United Kingdom as your default region. This ensures that your templates and documents are processed and stored within the UK, providing your clients with reassurance about data residency and helping you comply with local data protection laws.
2. European Union-based Company with International Clients:
A company based in the European Union with clients around the globe can set up different templates for different regions. For instance, you may store templates and process documents for European clients in the EU, while choosing the United States region for North American clients. This flexibility not only optimizes performance but also ensures compliance with GDPR regulations for your European clients.
3. Global Enterprise with Users on Multiple Continents:
For a global company serving clients across continents, multi-region processing enables efficient document generation. You can set your default account region to Australia for Asia-Pacific operations, while utilizing European Union and United States regions for specific customer needs in those areas. This reduces latency and ensures document processing is localized for better performance.
Conclusion
Multi-region processing and storage is a powerful new feature that offers flexibility, compliance, and performance improvements for all DocuGenerate users. Whether you’re using our web app or API, we’ve made it simple to select the region that best suits your needs and ensure that your templates and documents are processed accordingly. We encourage you to explore this new feature and start taking advantage of the benefits it brings.
]]>A Non-Disclosure Agreement (NDA) is a legally binding contract that establishes a confidential relationship between parties. NDAs are essential in protecting sensitive information, ensuring that parties involved in business negotiations, partnerships, or employment relationships do not disclose proprietary information to unauthorized third parties.
Managing NDAs has been a manual, time-consuming process that involves printing, signing, scanning, and emailing documents back and forth. However, with the advent of advanced document generation and electronic signature technologies, this process can be automated and streamlined. In this blog post, we will explore how to automate NDA eSignatures using DocuGenerate and SignRequest, an electronic signature solution designed to make signing documents easy, fast, secure and legally binding.
Key Elements of an NDA
-
Definition of Confidential Information: Clearly specifies what constitutes confidential information. This includes trade secrets, business plans, financial records, customer lists, proprietary technology, and other sensitive data that is not publicly known. It should cover all forms of information, such as written documents, electronic files, and verbal communications.
-
Obligations of the Receiving Party: Outlines the responsibilities of the party receiving the confidential information. This includes using the information only for the purposes specified in the NDA, limiting access to authorized individuals, and taking reasonable steps to protect the information from unauthorized access or disclosure. Security measures like encryption and secure storage may be specified.
-
Exclusions from Confidential Information: Defines what information is not considered confidential. Common exclusions include information that is publicly known, already known to the receiving party, independently developed by the receiving party, or disclosed by a third party without confidentiality obligations.
-
Term of the Agreement: Indicates the duration for which the confidentiality obligations apply. This can vary but is often specified as a fixed period, such as one to five years, or may continue indefinitely until the confidential information no longer qualifies as such.
-
Consequences of Breach: Specifies the penalties for violating the terms of the NDA. This can include legal actions, monetary damages, and injunctions to prevent further disclosure. Clearly outlining the consequences helps deter breaches and provides a clear course of action if a breach occurs.
The Benefits of Automating NDA eSignatures
Handling NDAs manually can be cumbersome and prone to errors. The traditional process involves several steps: drafting the NDA, printing and signing it, scanning and sending it, and then storing the document. This manual process is not only time-consuming but also increases the risk of errors, such as missing signatures or lost documents.
Automating the NDA process with eSignature technology offers numerous benefits. First and foremost, it saves time by reducing the steps required to generate, sign, and store NDAs. Automation also minimizes errors, ensuring that all necessary fields are completed and signatures are obtained. This improved efficiency allows your team to focus on more strategic tasks. Additionally, electronic signatures provide a secure and tamper-evident way to sign documents, enhancing overall security. Finally, reducing the need for paper documents supports eco-friendly business practices.
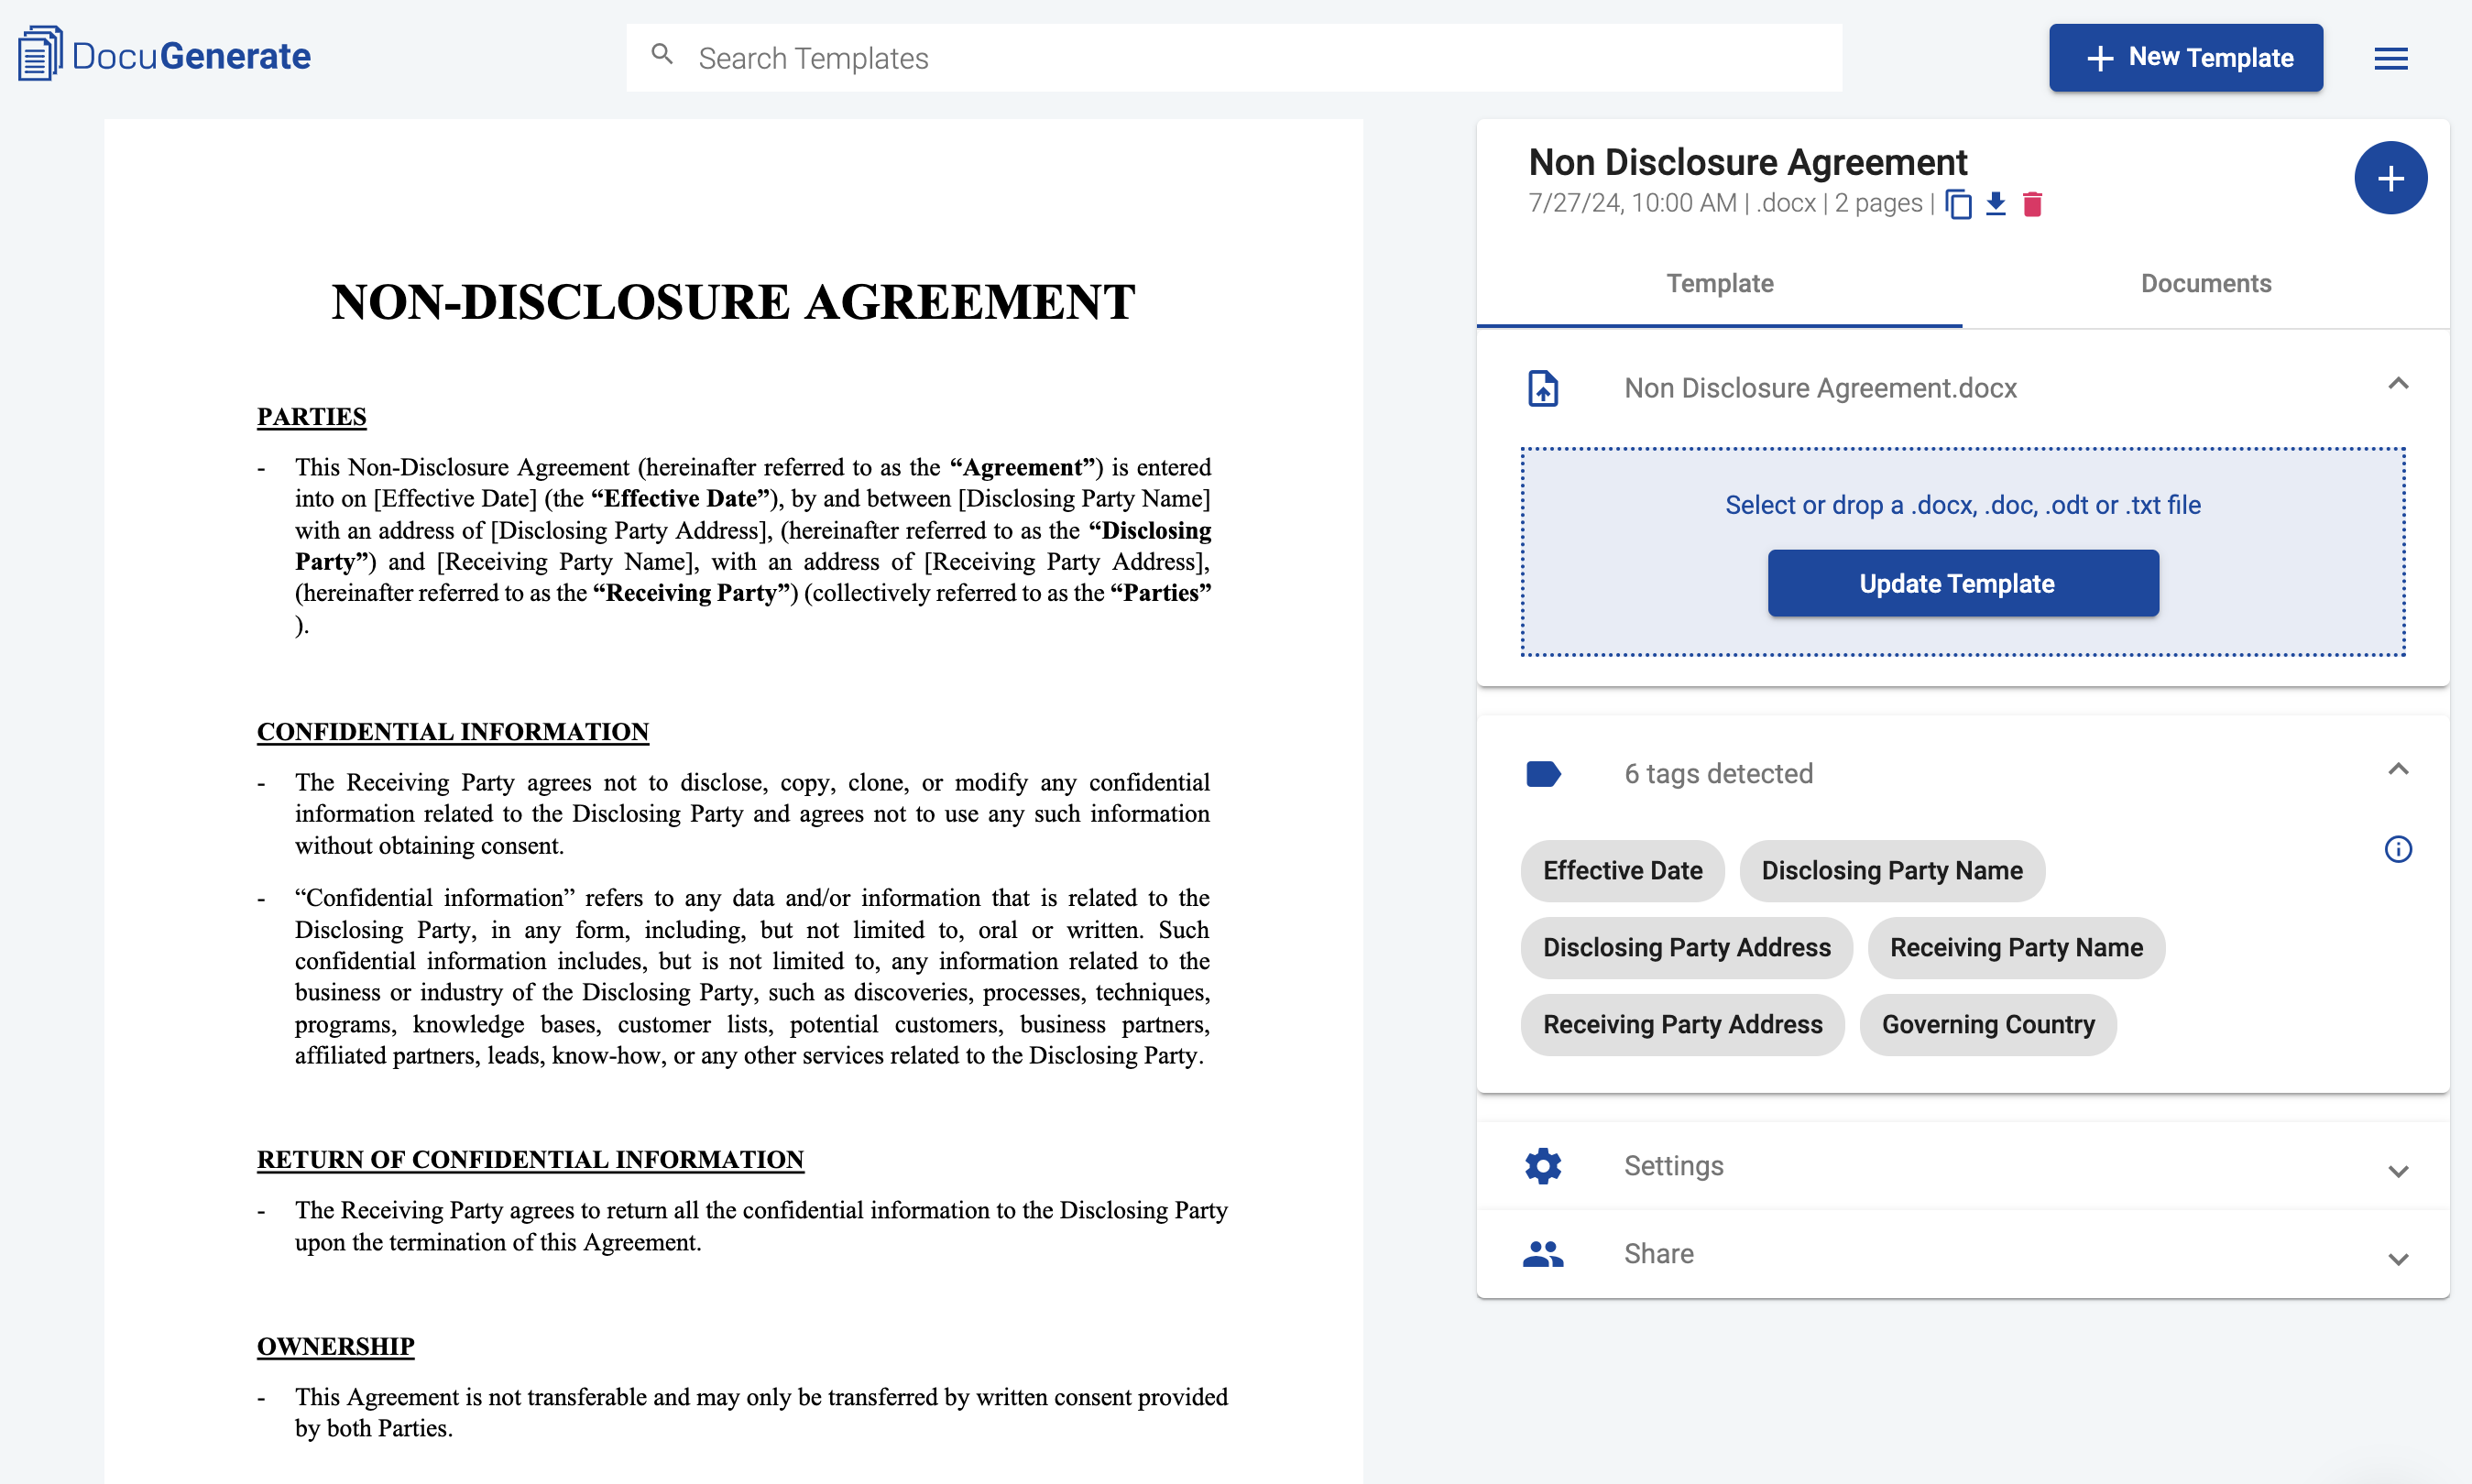
Creating the NDA Template in DocuGenerate
For the purpose of this tutorial, we’ll be using the NDA Template from theTemplate Library. This template includes all the necessary sections and placeholders for dynamic information, ensuring each generated NDA is complete and accurate.
Integrating DocuGenerate with SignRequest via Zapier
To automate the NDA signing process, we’ll use Zapier, a no-code automation tool that will allow us to integrate DocuGenerate with SignRequest seamlessly. Its Zapier app offers flexibility in sending documents for eSignature, which makes it a great fit for our use case. While other eSignature apps require creating a template and generating a document based on that template, SignRequest allows to specify the document to be signed as a URL, which is very convenient.
This integration automates the entire NDA signing process without needing to write any code. We’ll set up a Zap with the following steps:
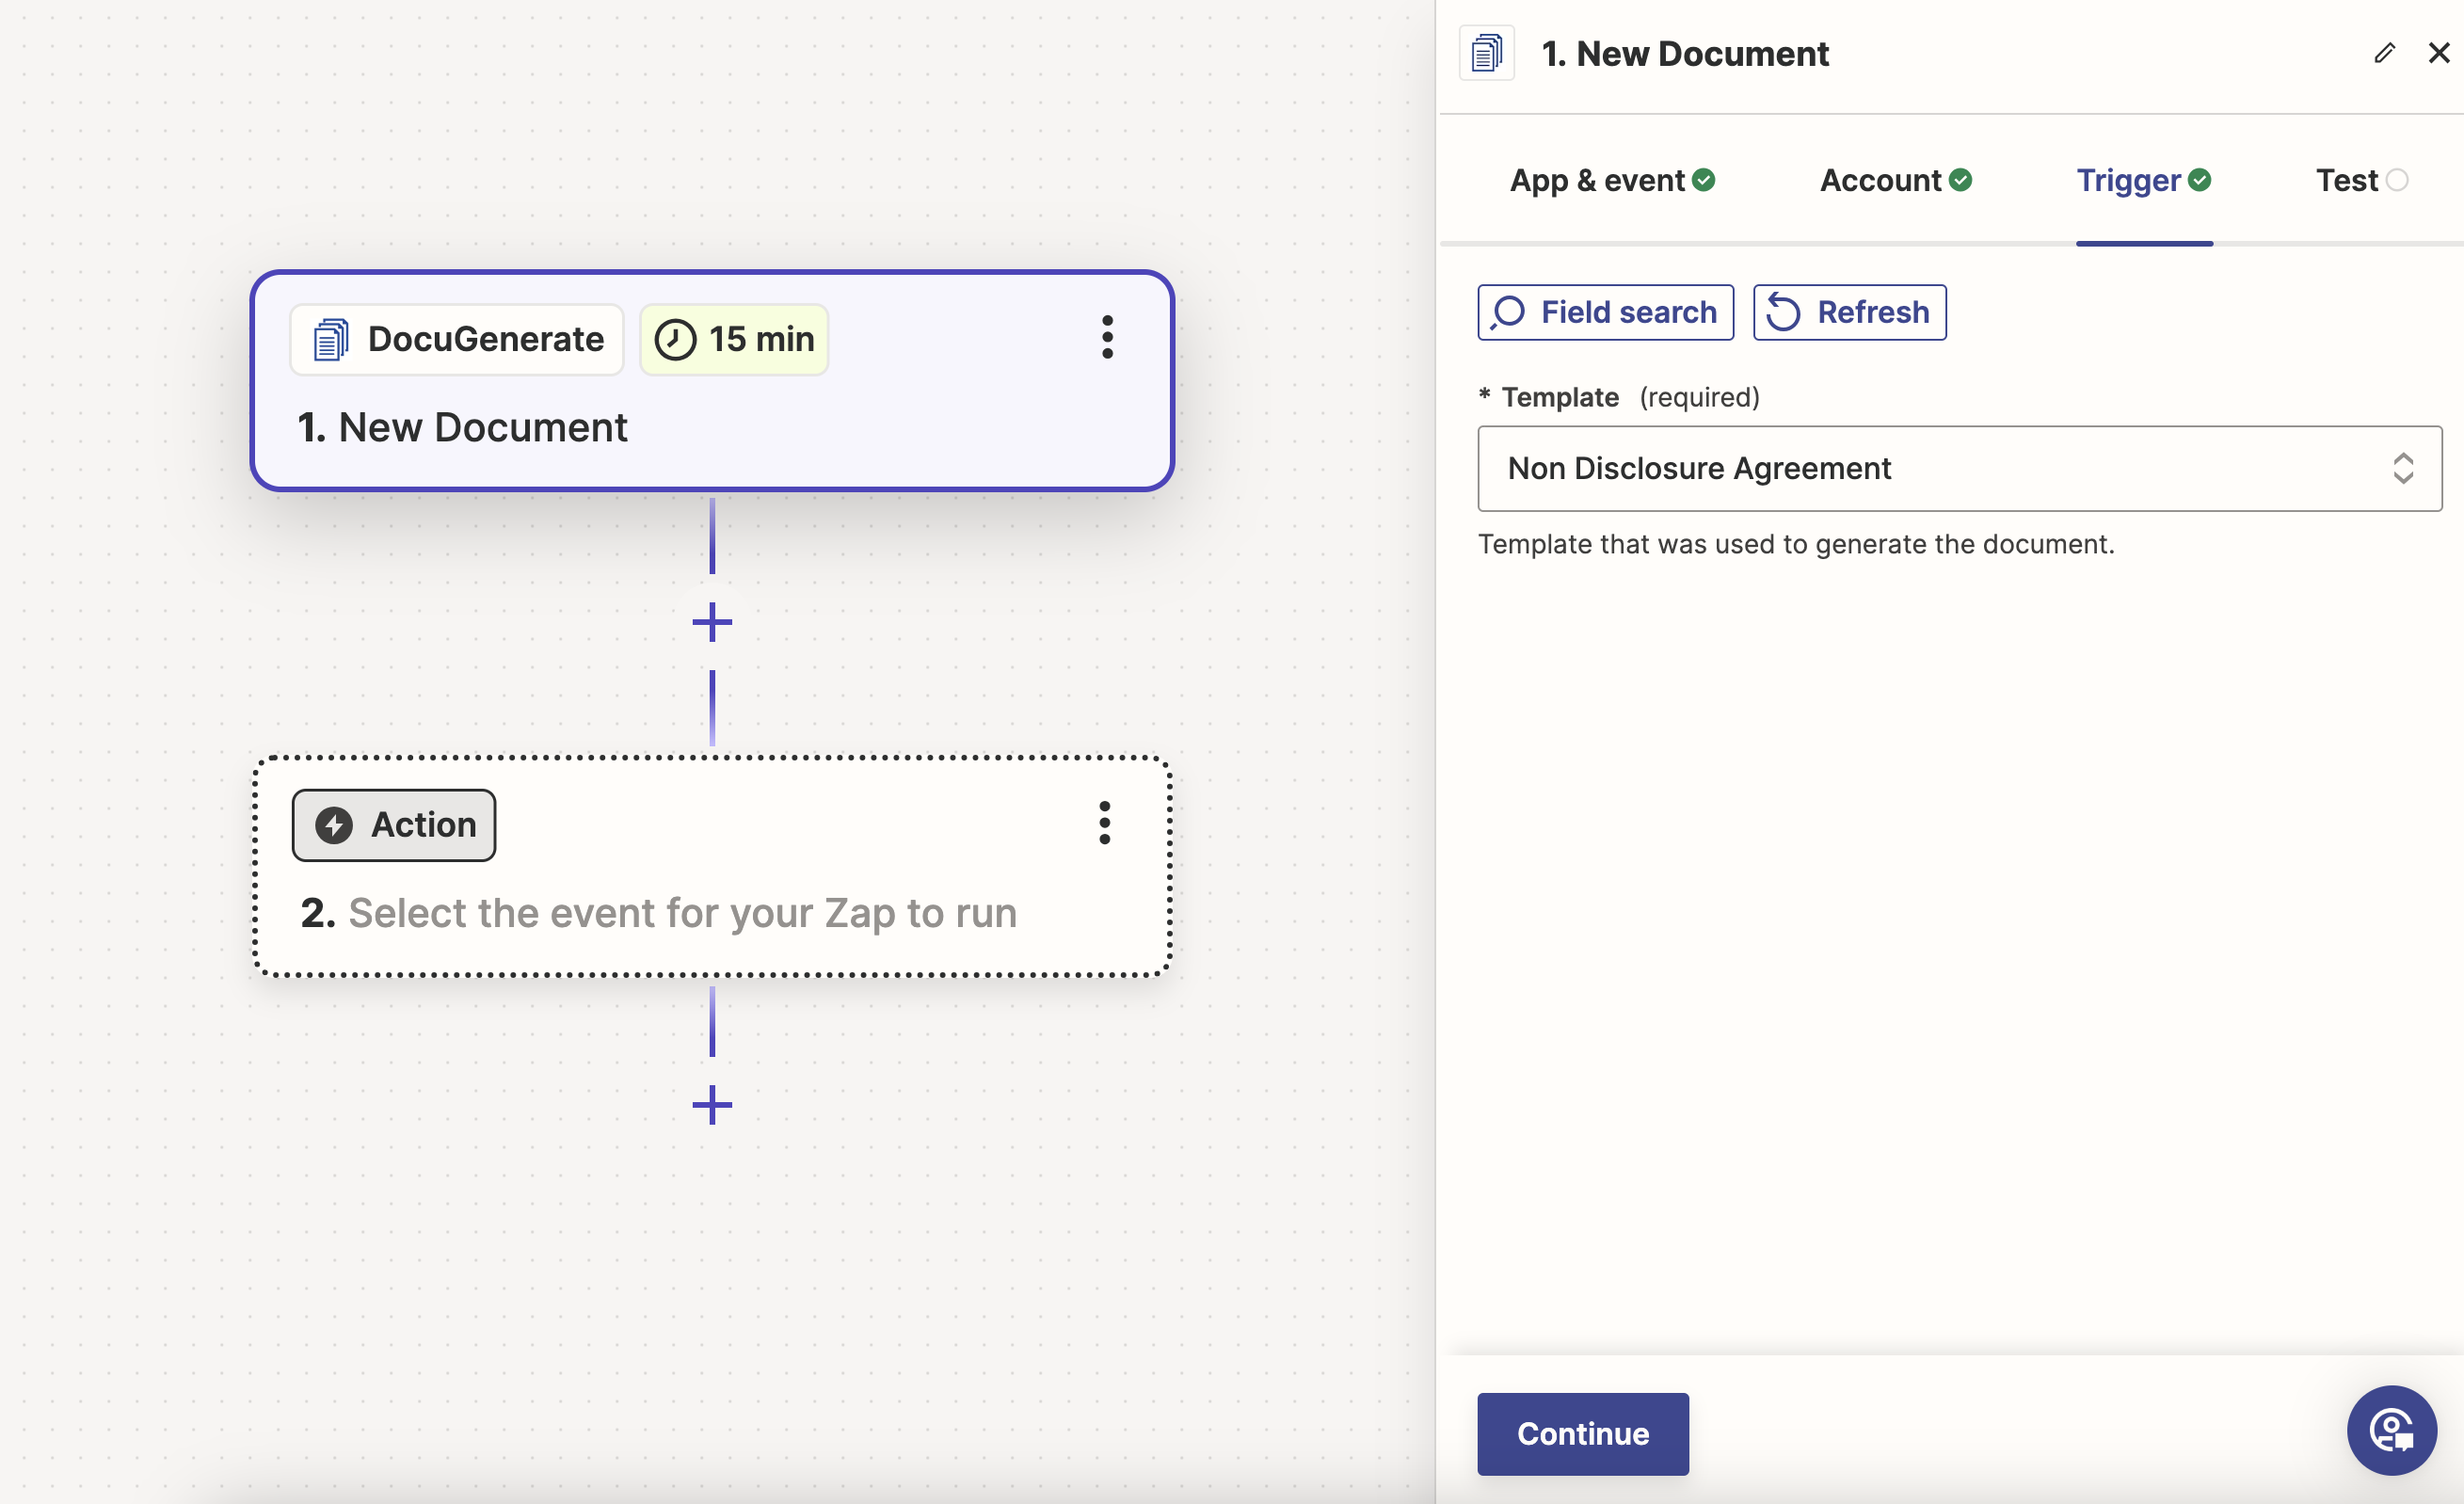
1. New Document (Trigger)
The workflow begins with the New Document trigger in DocuGenerate, which activates whenever a new document is generated from the NDA template. This ensures the process starts as soon as the NDA is ready.
While this tutorial focuses on a simple workflow, you can enhance it further by adding steps to fetch form responses, generate the document, and send the sign request within the same flow. Instead of using the New Document trigger in DocuGenerate, you could use the Generate Document action for a more integrated automation.
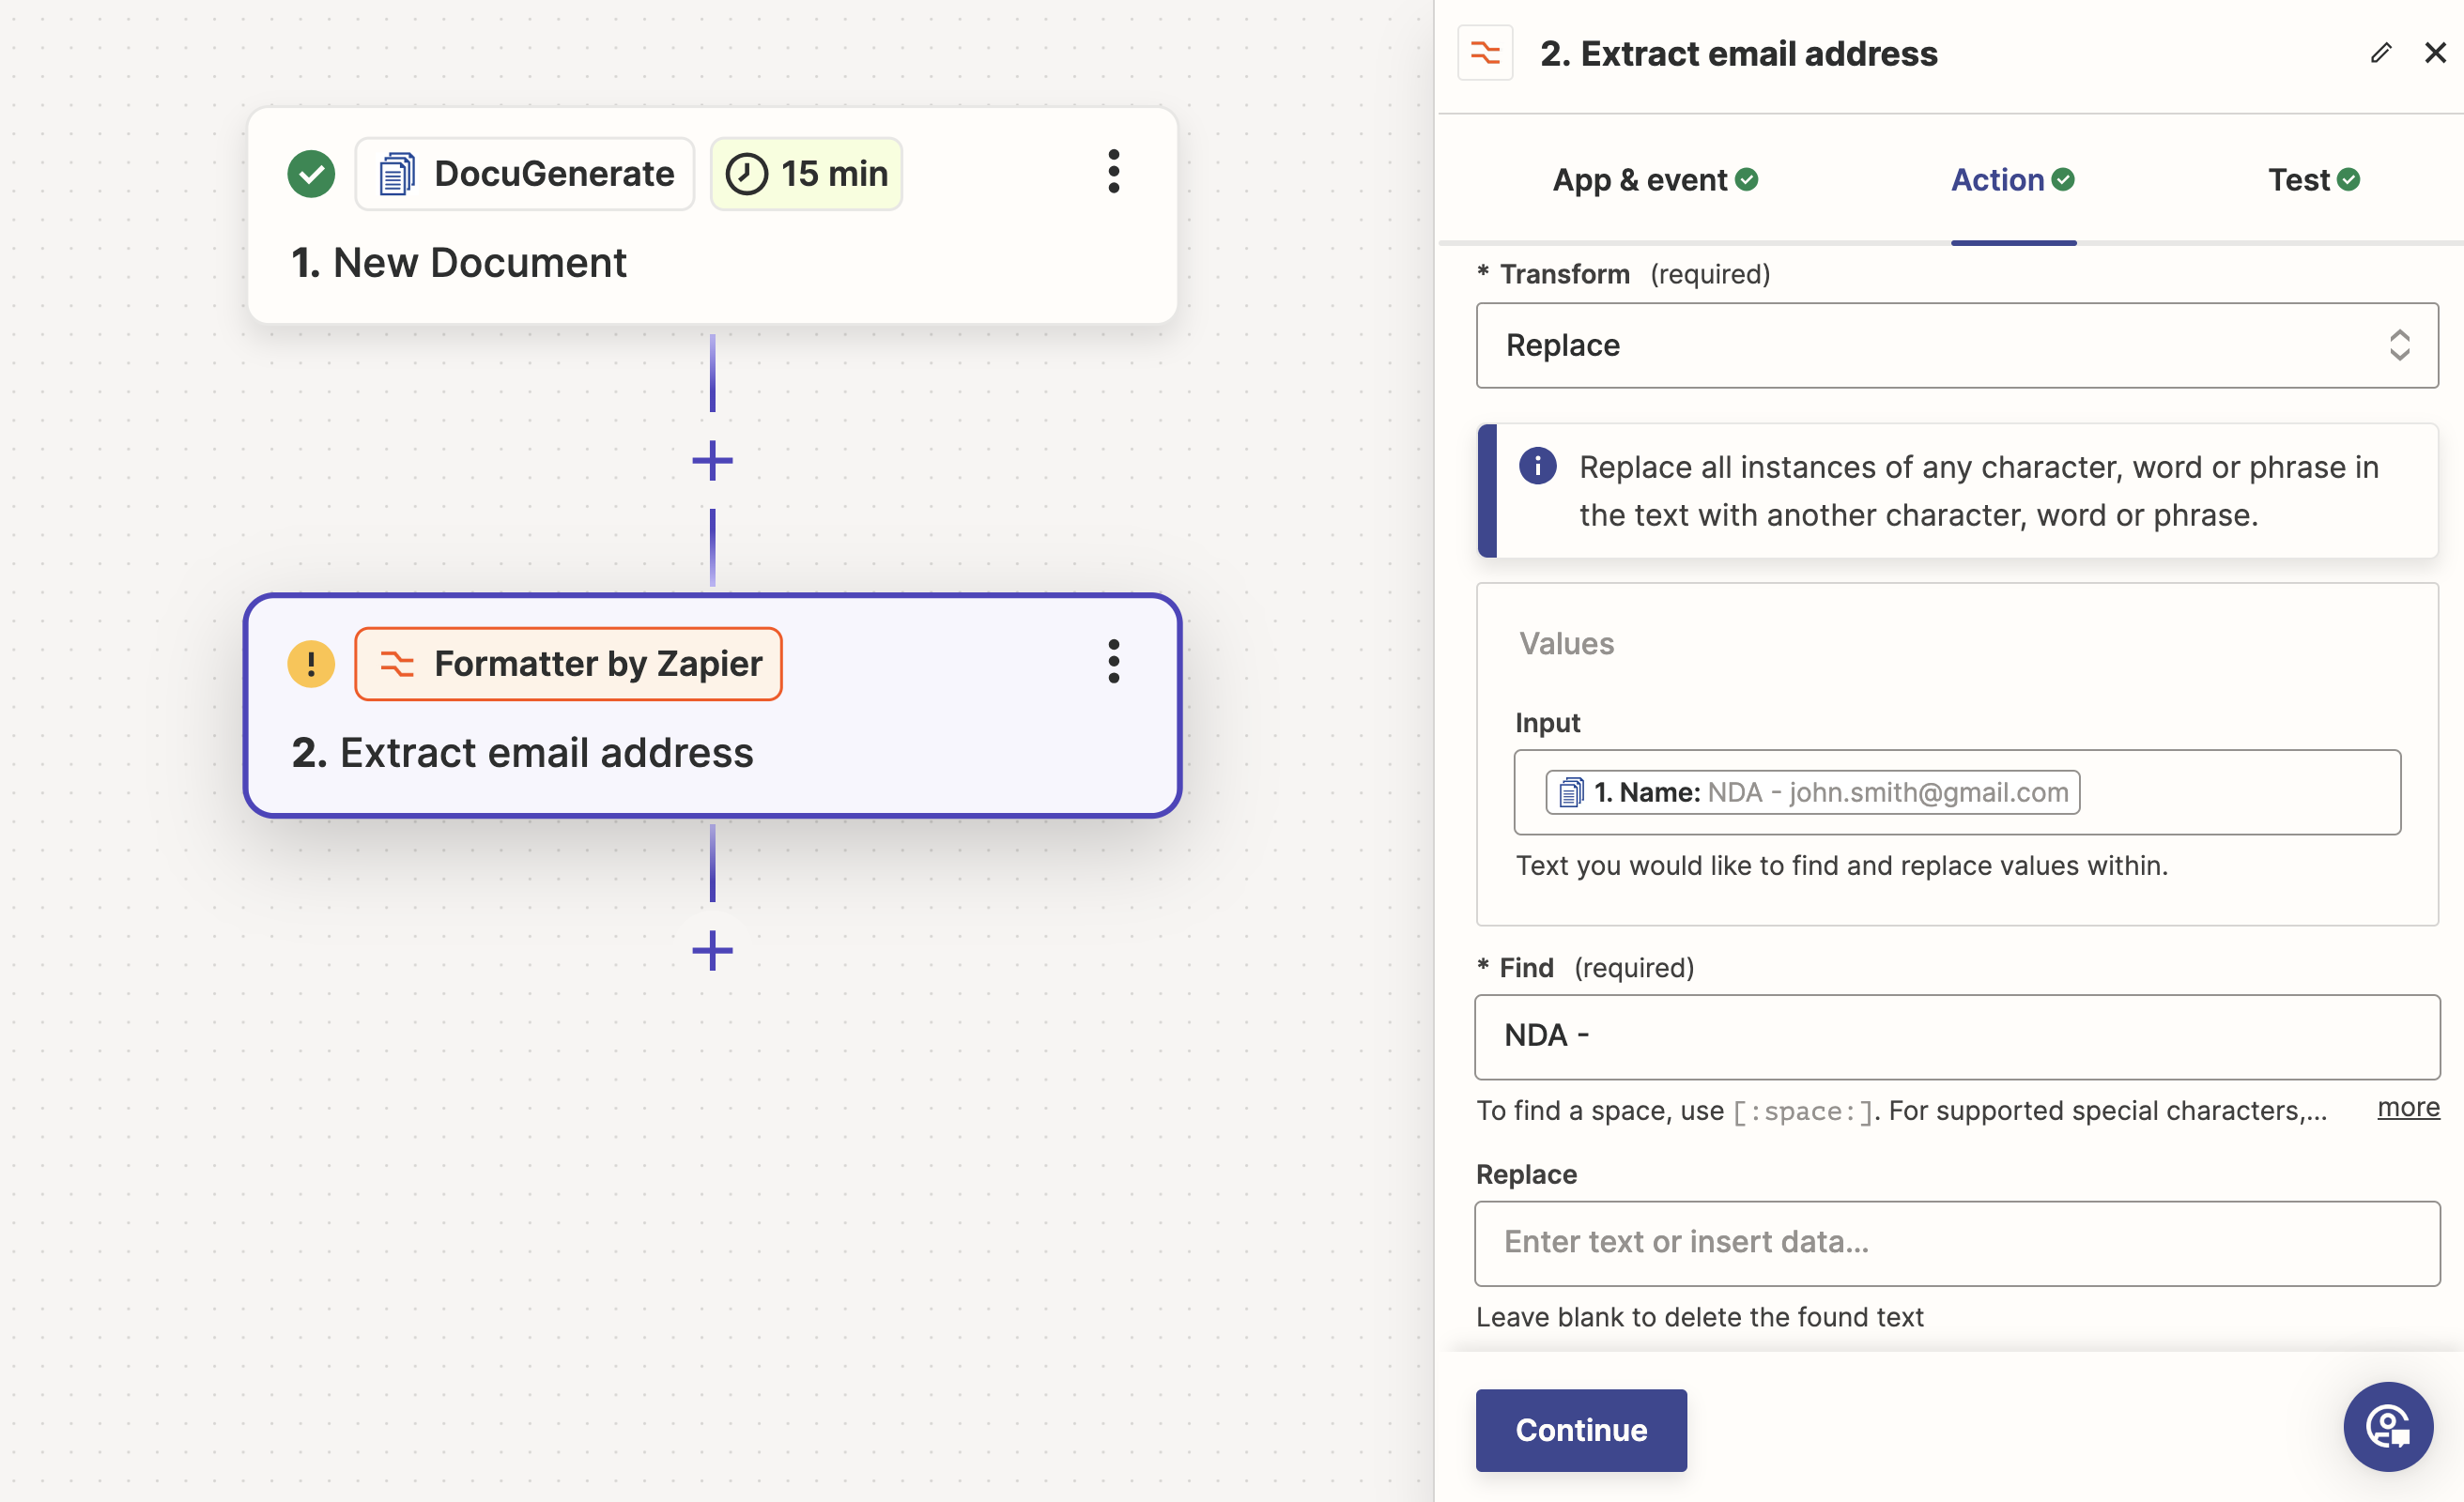
2. Text Formatter (Action)
Since we’re simplifying the workflow by skipping the initial form submission and document generation steps, we need a way to get the email address of the NDA recipient. One method is to include the email address in the document name, such as “NDA - john.smith@gmail.com”. The Text Formatter action by Zapier can then extract the email address from the document name by removing the “NDA - “ part. We can name this action Extract email address for example:
3. Send SignRequest (Action)
Use the Send SignRequest action in SignRequest to send the NDA for eSignature. Set up the parameters as follows:
File From URLreceives theDocument URLfrom DocuGenerate.SignRequest Namereceives theFile Namefrom DocuGenerate.Signer Emailreceives theOutputfrom the Text Formatter.
This setup ensures that as soon as an NDA is generated, it is automatically sent for eSignature, streamlining the process and reducing manual intervention.
Email and Signing Process
Once the workflow is activated, the recipient will receive an email with the NDA ready for eSignature. Let’s walk through how the document appears on the SignRequest dashboard, the email received by the recipient, and the signing process itself.
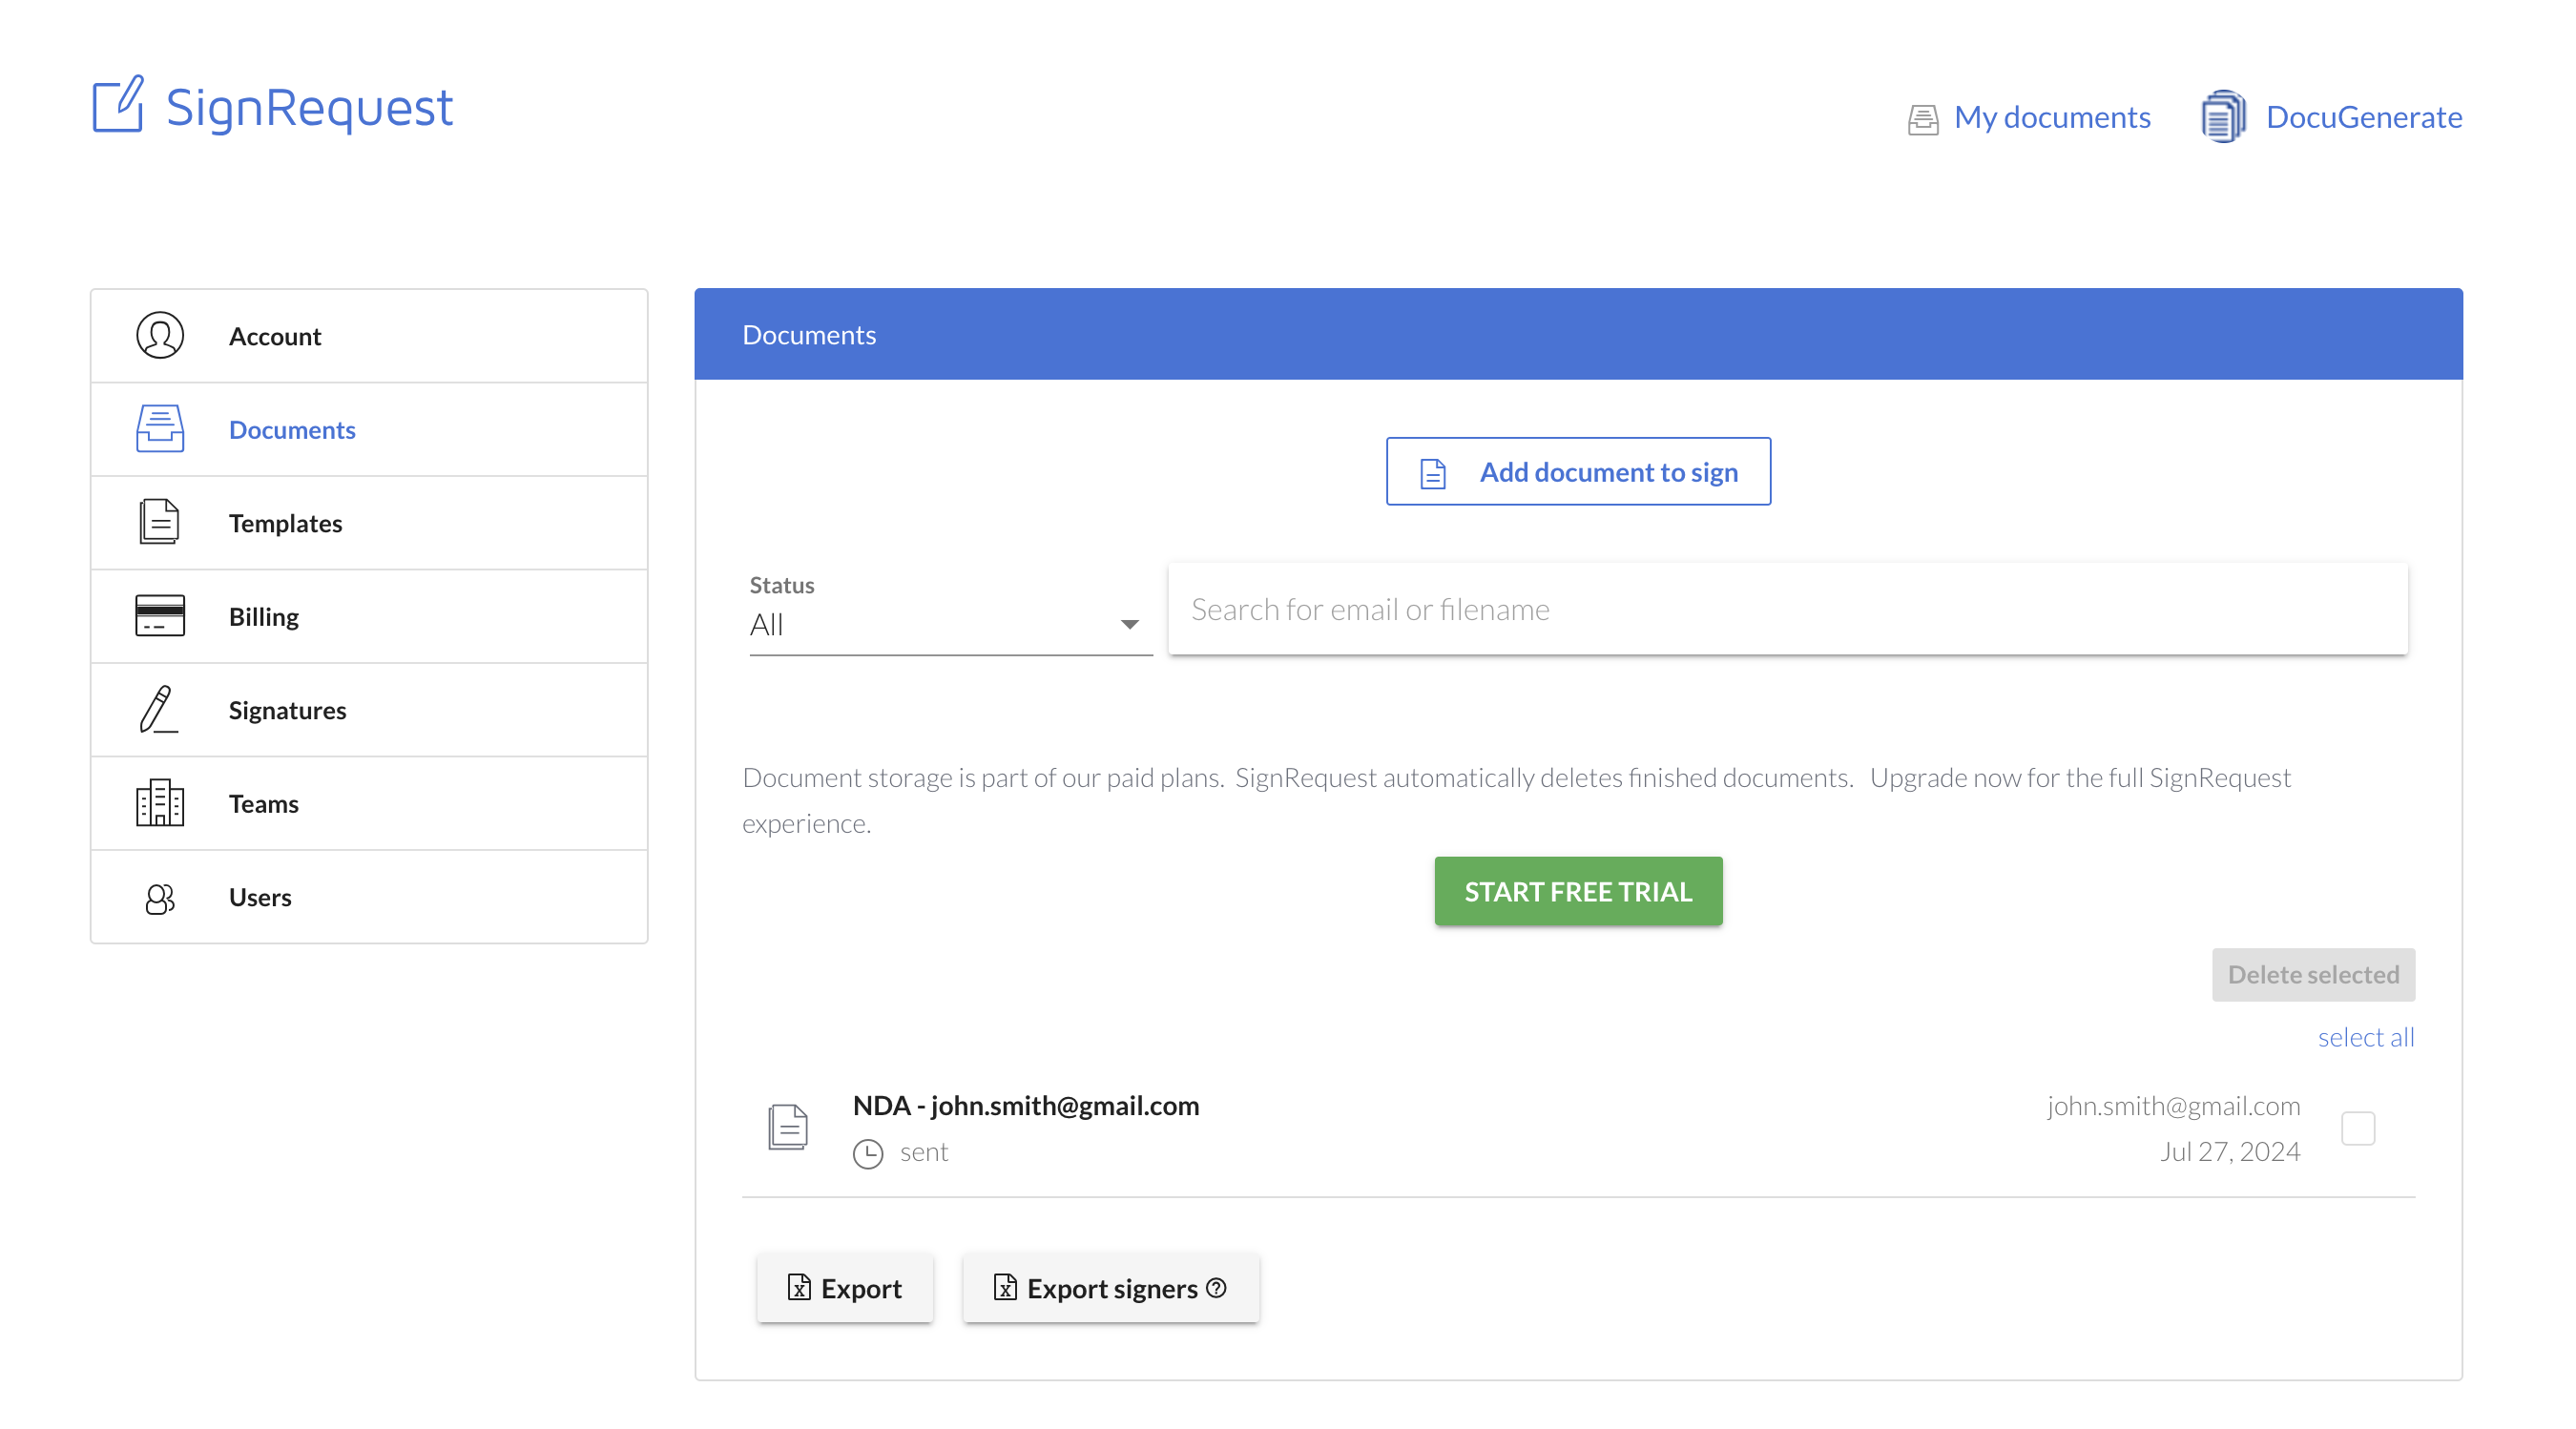
1. SignRequest Dashboard View
After the document is generated and sent for signature, it will appear on your SignRequest dashboard . Here, you can easily track the status of all your documents, see who has signed, and who still needs to sign. This dashboard provides a centralized view, making it easy to manage all your signed documents.
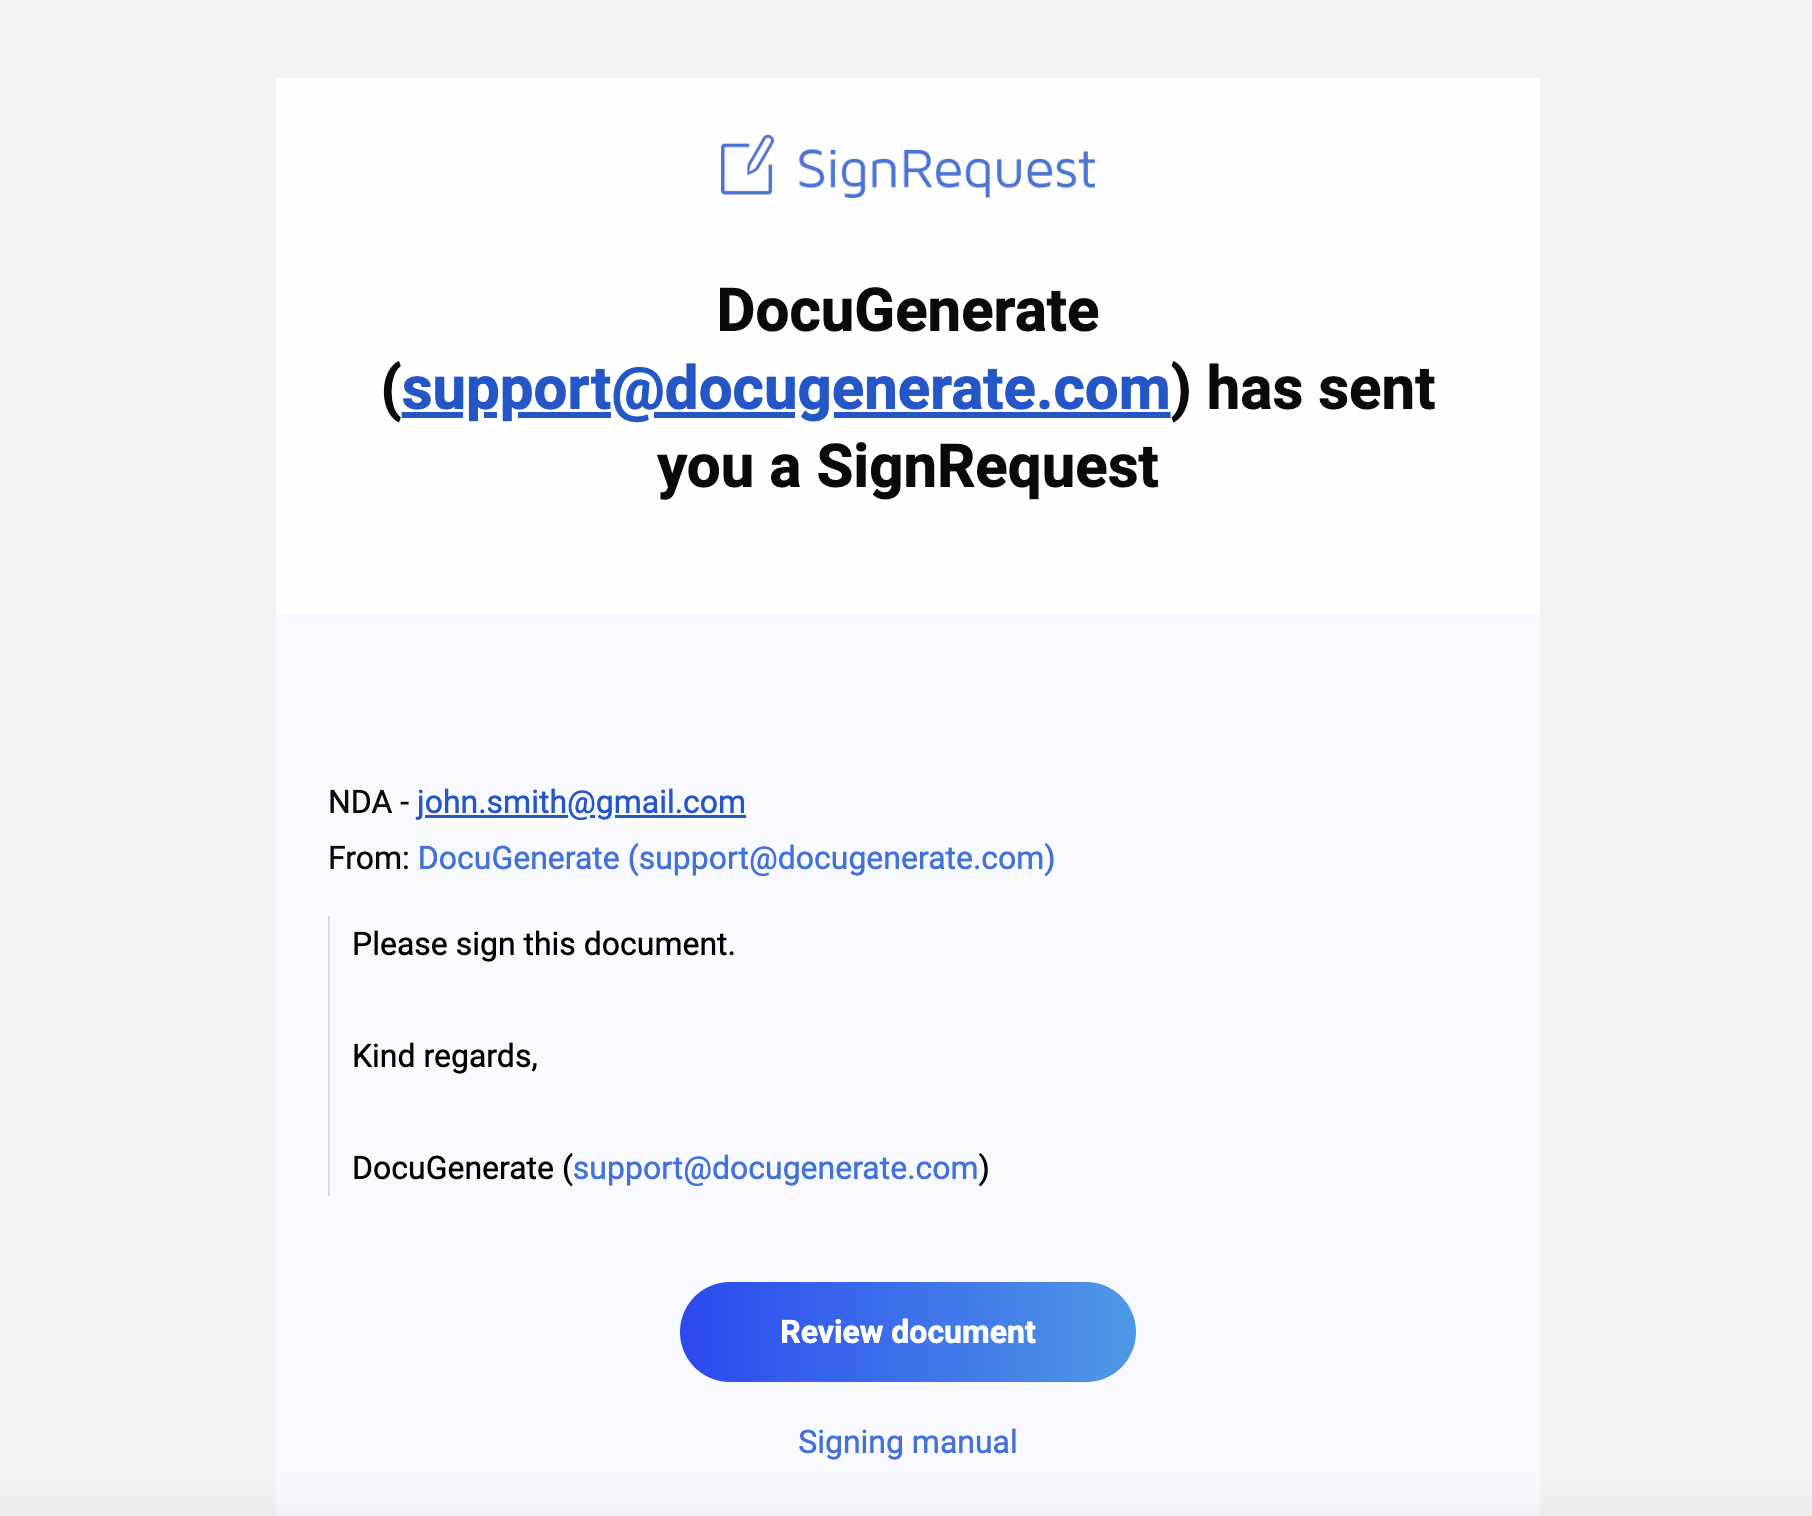
2. Recipient Email Notification
The recipient will receive an email notification from SignRequest, informing them that they have a document waiting for their signature. This email includes a secure link to the document, ensuring that only the intended recipient can access and sign the NDA.
3. Signing Process
Clicking the link in the email will take the recipient to the SignRequest platform, where they can review and sign the NDA. The signing process is intuitive and straightforward, requiring only a few clicks. The recipient can sign the document electronically, and once signed, both parties will receive a copy of the signed NDA.
This seamless experience ensures that the NDA is signed quickly and securely, without the need for printing, scanning, or mailing physical documents.
Example Use Cases
Automating NDA generation and eSignatures can be highly beneficial across various scenarios. Here are some examples:
-
Sales Process
In a sales process, before booking a call with a potential client, you might need them to sign an NDA to protect sensitive business information. You can create a form for the client to fill out with basic information needed to populate the NDA. This form submission triggers the generation of the NDA using DocuGenerate, and it is then sent for eSignature via SignRequest. For more detailed instructions on creating such a form, refer to our blog article about Generating Reports based on Form Submission (while that tutorial uses Make instead of Zapier, the principle remains the same). -
Employee Onboarding
During the onboarding of new employees, companies often require signing an NDA to protect proprietary information. Automating this process ensures that every new hire receives and signs the NDA promptly. New employees can fill out their details through an online form, triggering the generation and sending of the NDA, streamlining the HR workflow and ensuring compliance. -
Partnership Agreements
When entering into partnerships with other businesses or freelancers, it’s crucial to have an NDA in place to protect shared information. Automating the NDA generation and signing process ensures that these agreements are handled efficiently and securely. Partners can easily sign the NDA electronically, which speeds up the process and reduces administrative overhead. -
Consultant Engagements
Companies often engage consultants to work on sensitive projects. An NDA is essential to protect intellectual property and confidential data. Automating the NDA process allows companies to quickly generate and send NDAs to consultants, ensuring that all necessary legal protections are in place before any work begins. -
Mergers and Acquisitions
In mergers and acquisitions, NDAs are critical to protect sensitive financial and strategic information during negotiations. Automating the generation and eSignature process of NDAs ensures that all parties involved can quickly sign and access the necessary agreements, facilitating smoother and faster transactions.
Conclusion
Automating NDA eSignatures with DocuGenerate and SignRequest offers significant benefits, including time savings, error reduction, improved efficiency, enhanced security, and environmental benefits. By following the steps outlined in this guide, you can streamline your NDA workflow, allowing you to focus on more strategic tasks and improve overall productivity.
Incorporating DocuGenerate and SignRequest into your document management process is a smart move for any business looking to modernize its operations and stay ahead in today’s competitive landscape. Start automating your NDA eSignatures today and experience the transformative impact of these powerful tools.
Resources
- The NDA Template used in this tutorial.
- The SignRequest app on Zapier.
Generating SQL scripts often requires either in-depth coding knowledge or meticulous manual data entry. However, with the right tools, this process can be simplified and made accessible to everyone. DocuGenerate offers a powerful solution that automates the creation of SQL scripts from Excel or CSV files, eliminating the need for manual coding.
This blog post will guide you through the process of creating a parameterized SQL script, preparing your data source, and using DocuGenerate to automate script generation. We’ll also explore practical use cases to demonstrate the versatility and efficiency of this approach.
What You’ll Learn
- Creating a Parameterized SQL Script
Learn how to write an SQL script with placeholders instead of hardcoded values. - Preparing Your Data Source
Understand how to structure your data in an Excel or CSV file. - Using DocuGenerate for Automation
See how DocuGenerate can automate the process, making it easy for non-technical users. - Practical Use Cases
Discover how this technique can be applied in various scenarios, from data migration to report generation.
Creating a Parameterized SQL Script
Before we dive into creating parameterized SQL scripts, let’s first understand what they are and how they are used.
SQL (Structured Query Language) is a standardized language used to manage and manipulate relational databases. SQL commands allow users to perform tasks such as querying data, updating records, inserting new records, and deleting records from a database. SQL is essential for interacting with the database to retrieve and manage data efficiently.
An SQL script is a file containing a sequence of SQL commands. These scripts are used to execute multiple SQL commands in a batch, allowing for automation of database operations. SQL scripts can be used for various tasks, including data manipulation, database schema creation, and data migration.
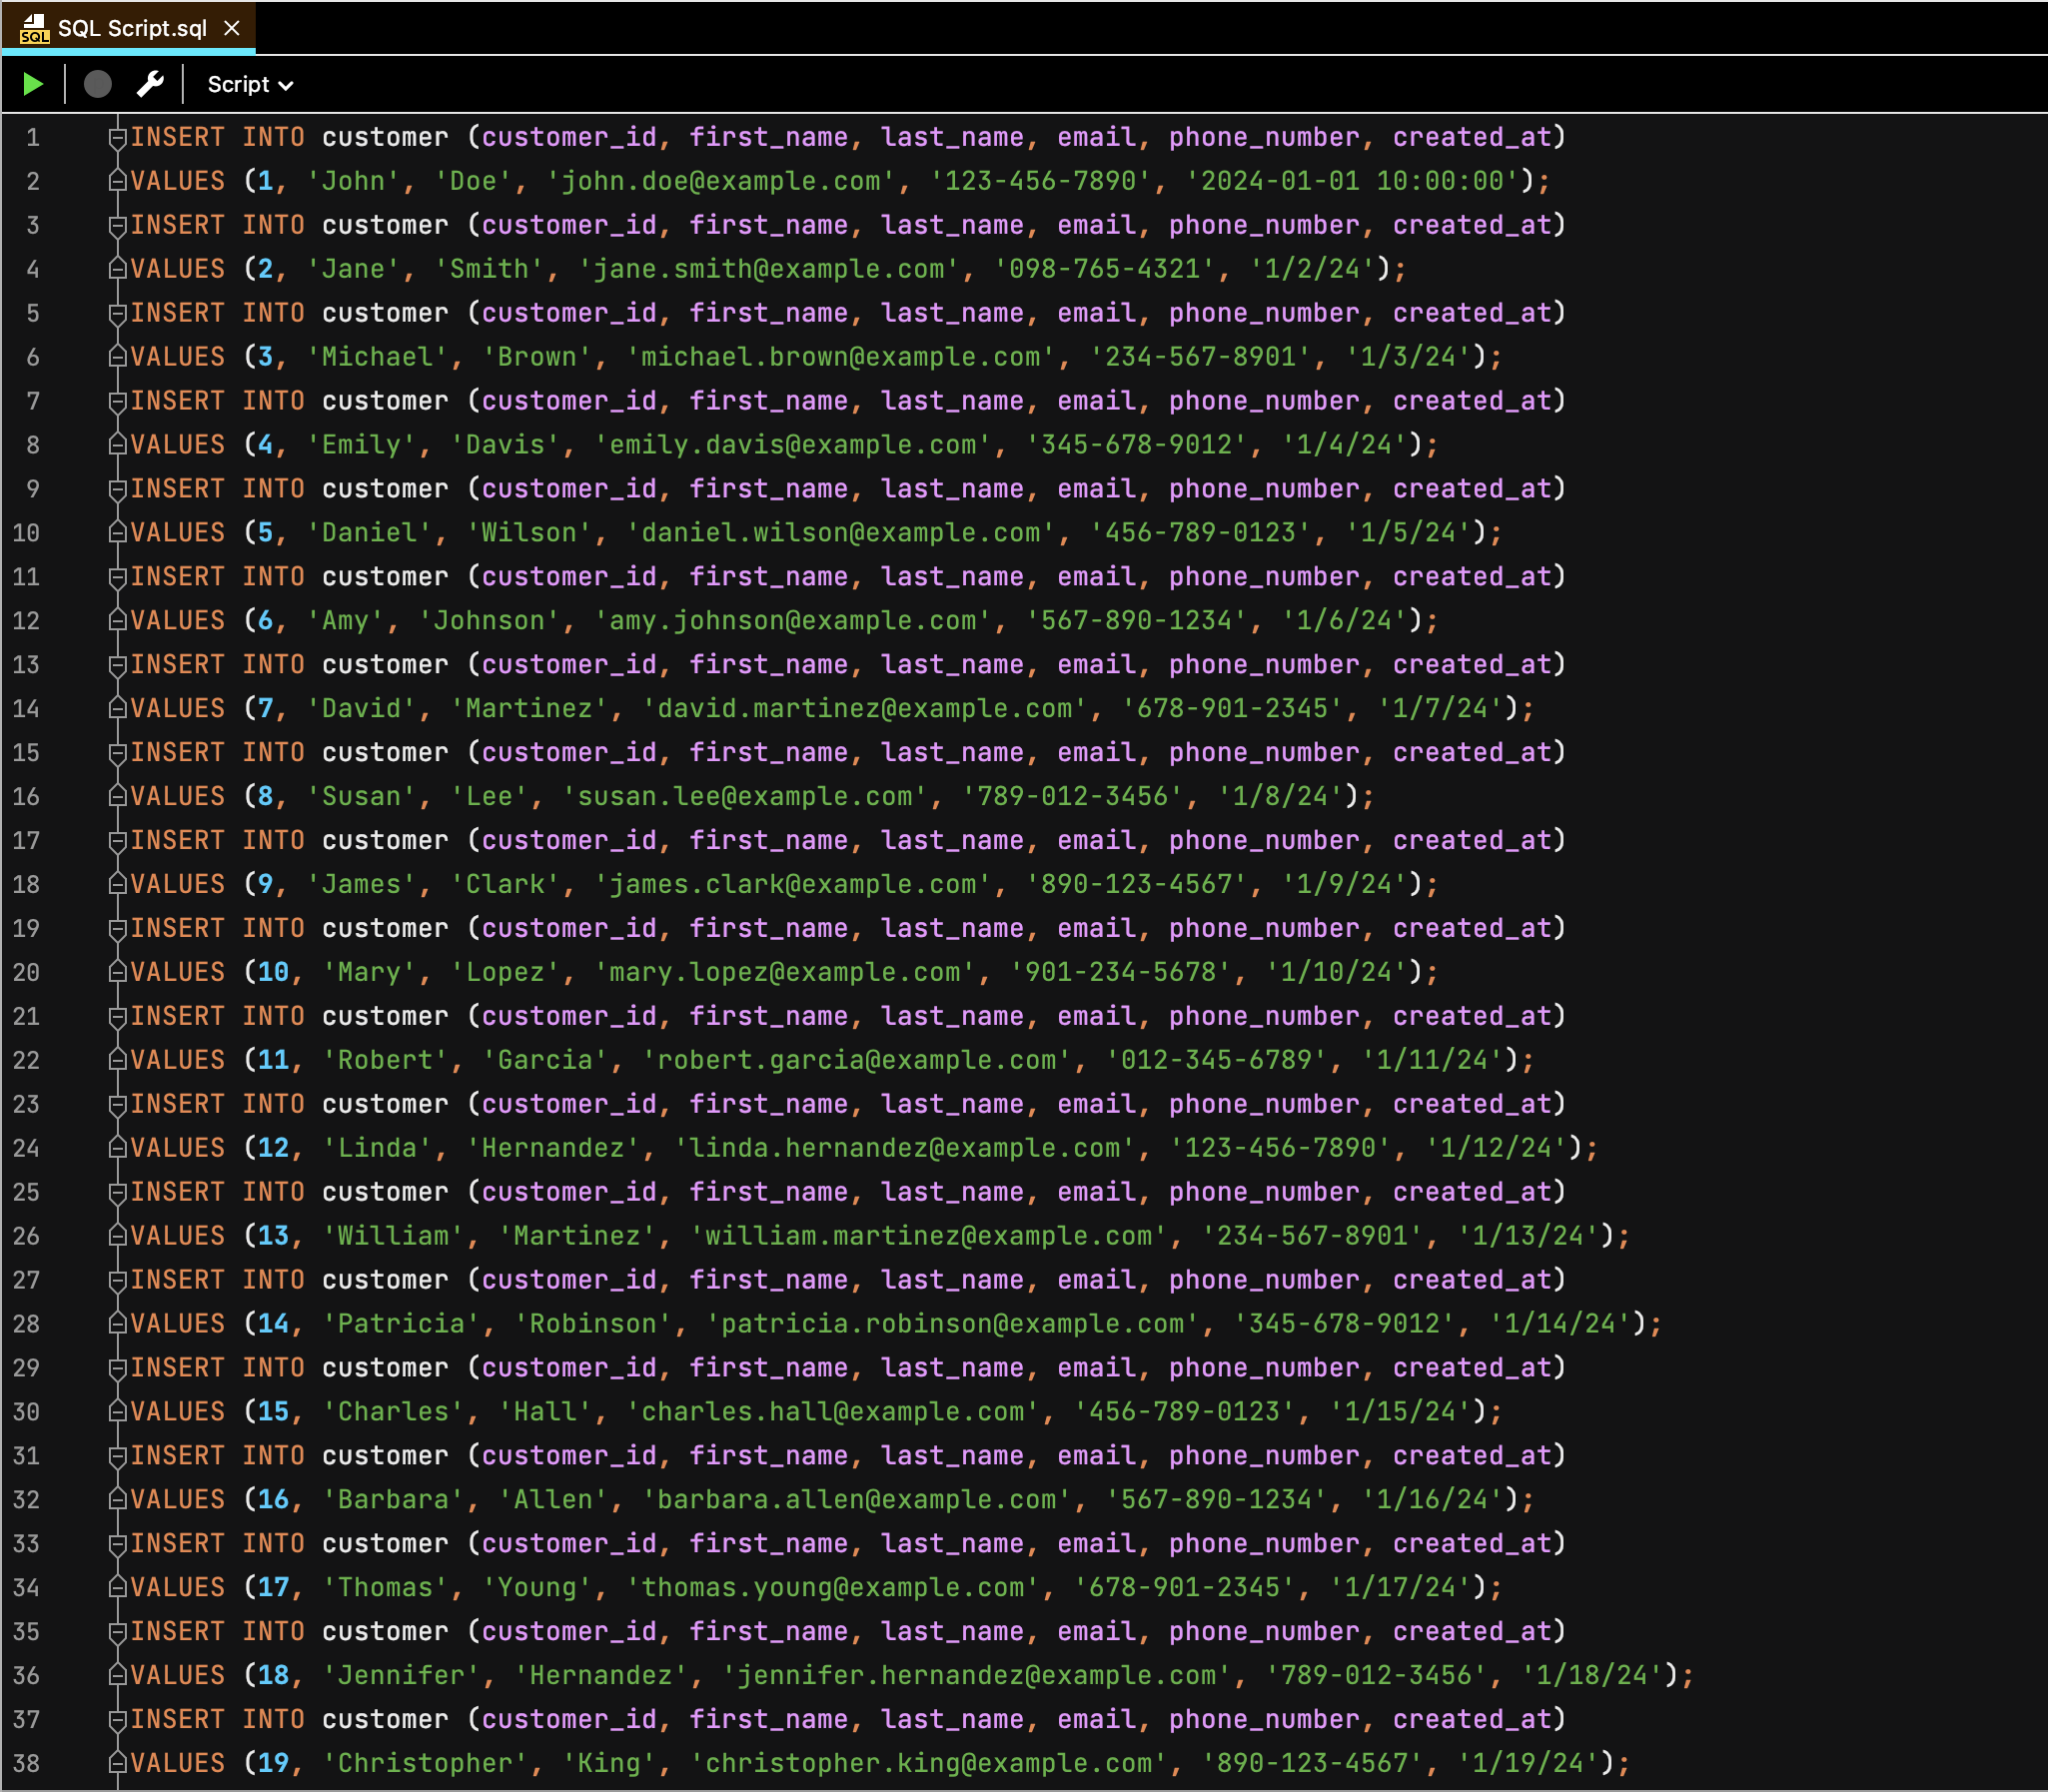
Creating an SQL script often involves writing repetitive statements with different values. To illustrate this, consider the following non-parameterized SQL script for inserting data into a customer table:
INSERT INTO customer (customer_id, first_name, last_name, email, phone_number, created_at)
VALUES (1, 'John', 'Doe', 'john.doe@example.com', '123-456-7890', '2024-01-01 10:00:00');

INSERT INTO customer (customer_id, first_name, last_name, email, phone_number, created_at)
VALUES (2, 'Jane', 'Smith', 'jane.smith@example.com', '098-765-4321', '2024-01-02 11:00:00');

INSERT INTO customer (customer_id, first_name, last_name, email, phone_number, created_at)
VALUES (3, 'Michael', 'Brown', 'michael.brown@example.com', '234-567-8901', '2024-01-03 12:00:00');
This script inserts a new record into the customer table with specific values for each column. When dealing with multiple records, SQL scripts can contain multiple INSERT statements to add several records to the database.
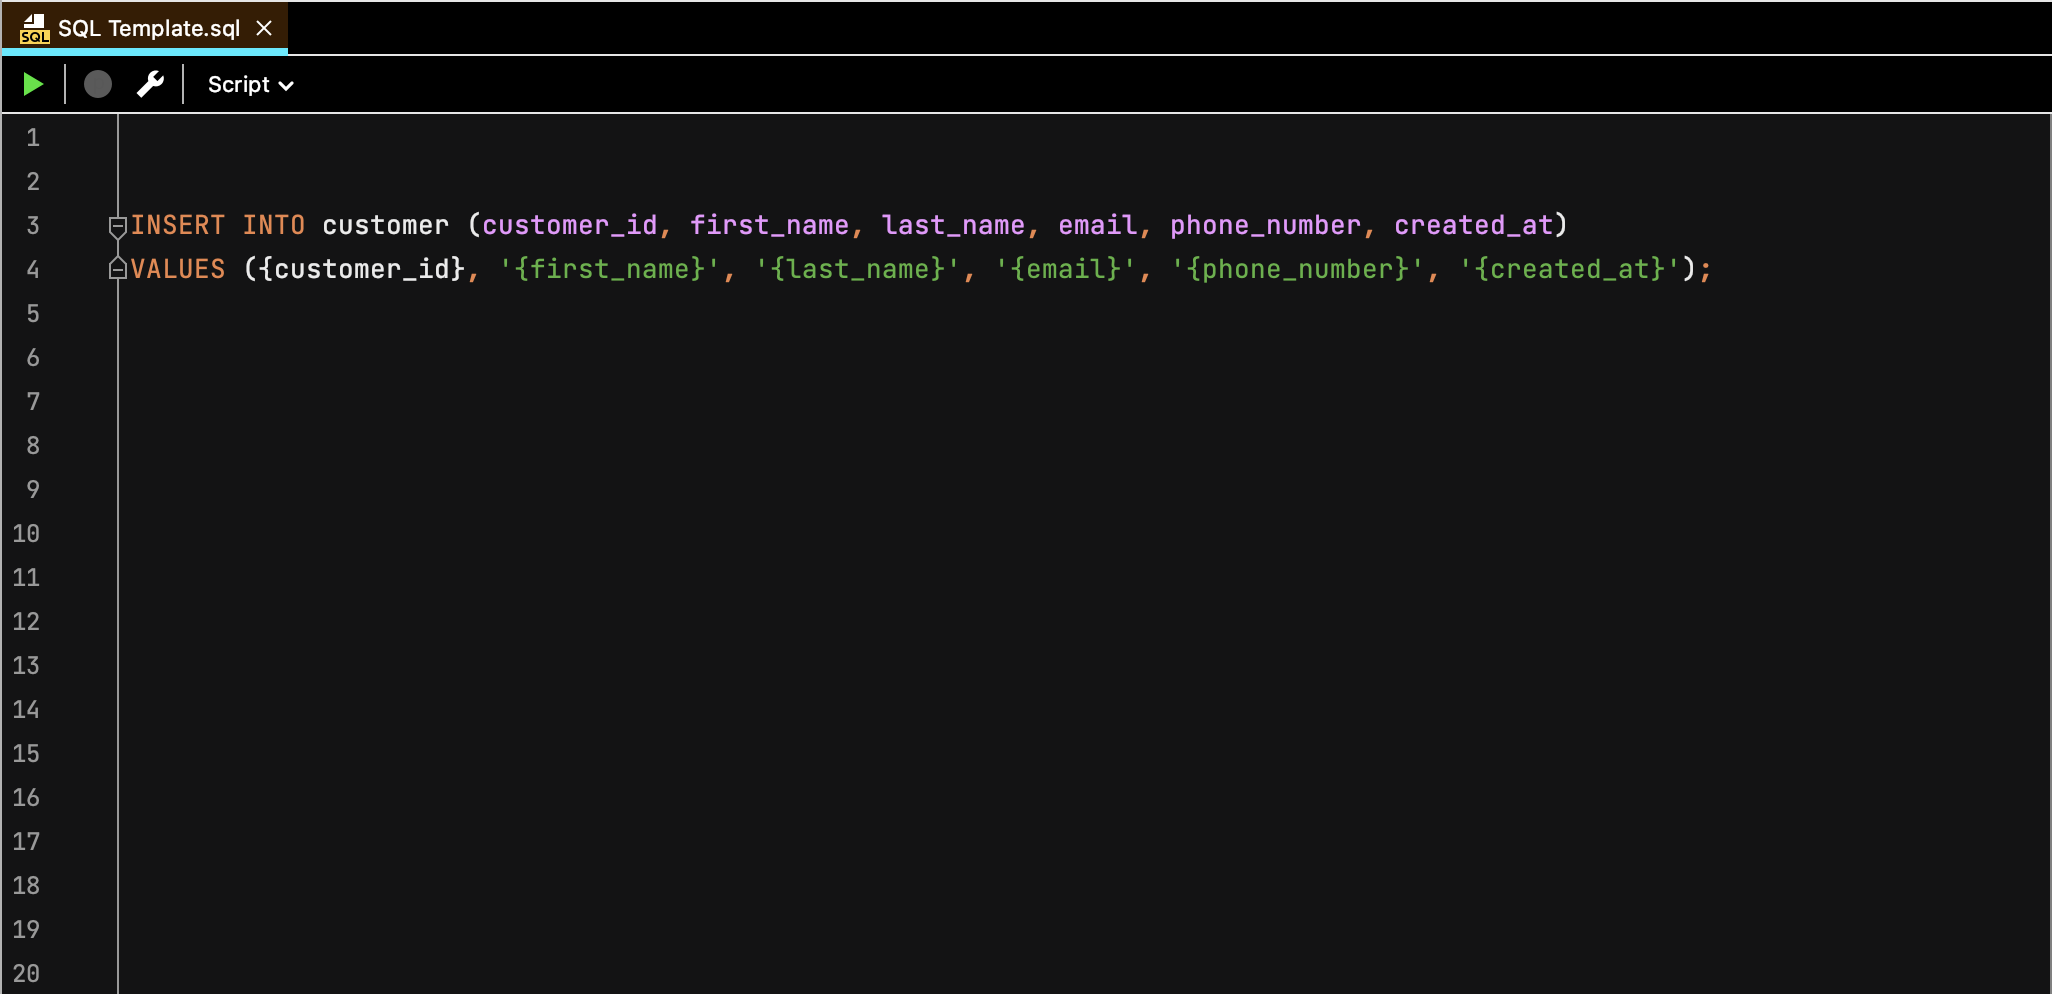
As you can see, each row is similar but with different values. This process can become tedious and error-prone when dealing with large datasets. To address this, we use placeholders for the values, making the script parameterized:
INSERT INTO customer (customer_id, first_name, last_name, email, phone_number, created_at)
VALUES ({customer_id}, '{first_name}', '{last_name}', '{email}', '{phone_number}', '{created_at}');
In this script, the placeholders {customer_id}, {first_name}, {last_name}, {email}, {phone_number}, and {created_at} will be replaced with actual values from our data source.
Preparing Your Data Source
Next, we need to prepare an Excel or CSV file with the data that will be used to populate our SQL script. Below is an example of a CSV file structure that matches our placeholders:
customer_id,first_name,last_name,email,phone_number,created_at
1,John,Doe,john.doe@example.com,123-456-7890,2024-01-01 10:00:00
2,Jane,Smith,jane.smith@example.com,098-765-4321,2024-01-02 11:00:00
3,Michael,Brown,michael.brown@example.com,234-567-8901,2024-01-03 12:00:00
4,Emily,Davis,emily.davis@example.com,345-678-9012,2024-01-04 13:00:00
5,Daniel,Wilson,daniel.wilson@example.com,456-789-0123,2024-01-05 14:00:00
6,Amy,Johnson,amy.johnson@example.com,567-890-1234,2024-01-06 15:00:00
7,David,Martinez,david.martinez@example.com,678-901-2345,2024-01-07 16:00:00
8,Susan,Lee,susan.lee@example.com,789-012-3456,2024-01-08 17:00:00
9,James,Clark,james.clark@example.com,890-123-4567,2024-01-09 18:00:00
10,Mary,Lopez,mary.lopez@example.com,901-234-5678,2024-01-10 19:00:00
11,Robert,Garcia,robert.garcia@example.com,012-345-6789,2024-01-11 20:00:00
12,Linda,Hernandez,linda.hernandez@example.com,123-456-7890,2024-01-12 21:00:00
13,William,Martinez,william.martinez@example.com,234-567-8901,2024-01-13 22:00:00
14,Patricia,Robinson,patricia.robinson@example.com,345-678-9012,2024-01-14 23:00:00
15,Charles,Hall,charles.hall@example.com,456-789-0123,2024-01-15 08:00:00
16,Barbara,Allen,barbara.allen@example.com,567-890-1234,2024-01-16 09:00:00
17,Thomas,Young,thomas.young@example.com,678-901-2345,2024-01-17 10:00:00
18,Jennifer,Hernandez,jennifer.hernandez@example.com,789-012-3456,2024-01-18 11:00:00
19,Christopher,King,christopher.king@example.com,890-123-4567,2024-01-19 12:00:00
20,Karen,Wright,karen.wright@example.com,901-234-5678,2024-01-20 13:00:00
Alternatively, you can prepare your data in an Excel file with the same structure:
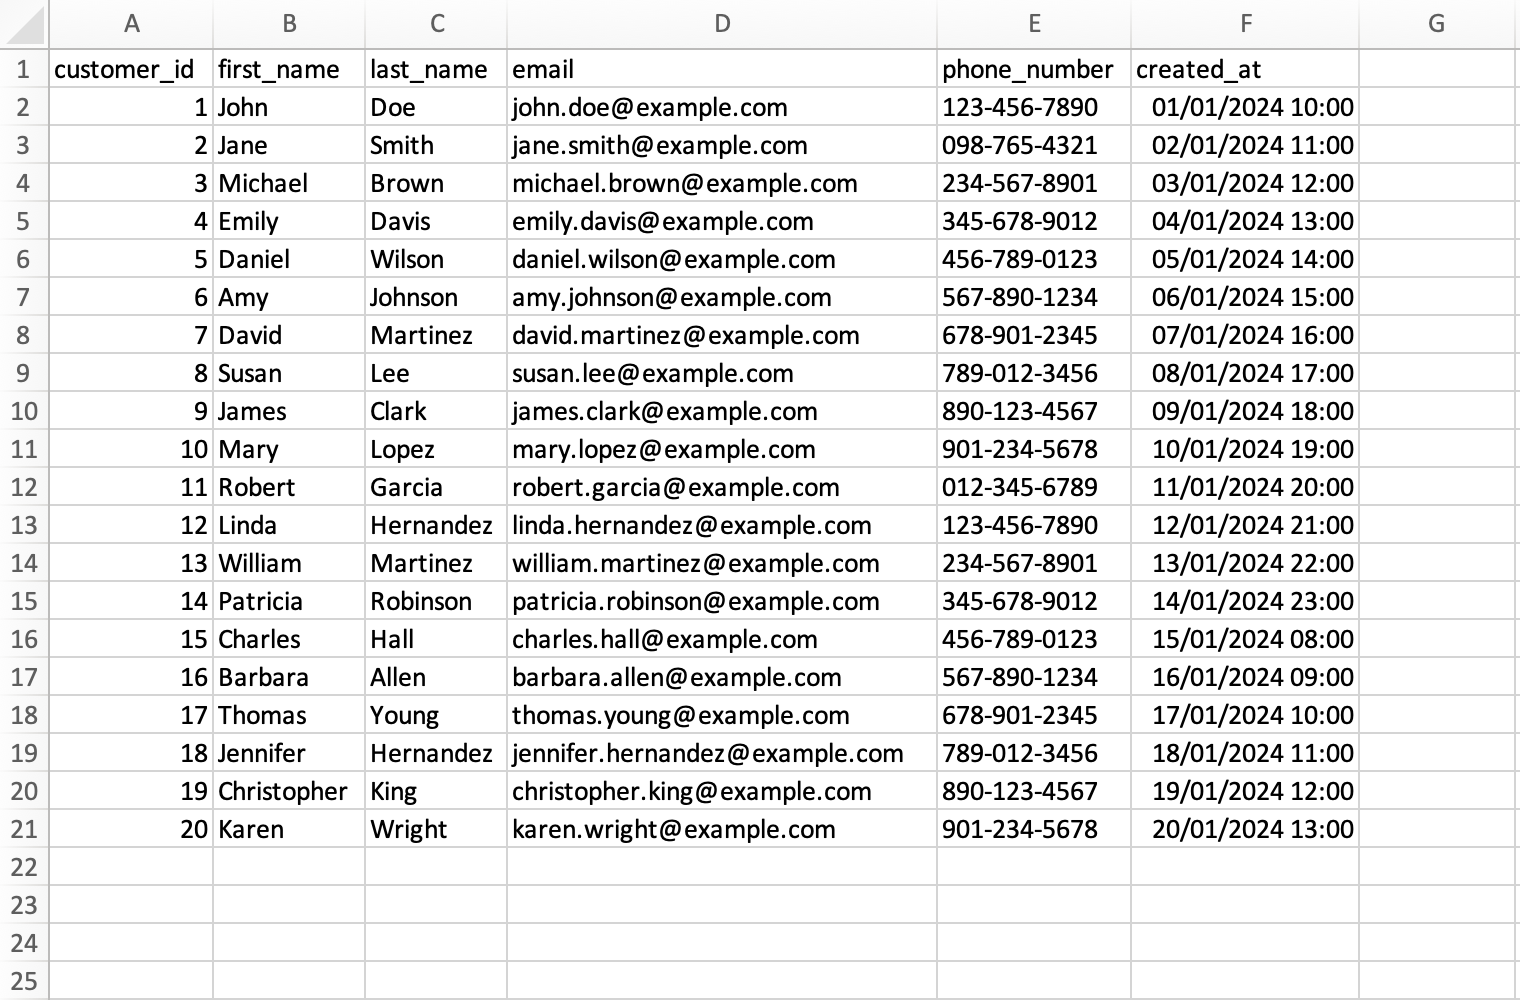
Each row in the CSV or Excel file corresponds to a new record that will be inserted into the customer table. This structure ensures that our data is organized and ready to be merged with the SQL script template.
Using DocuGenerate for Automation
DocuGenerate allows you to automate the process of generating SQL scripts by using a template and a data source. Here’s a step-by-step guide to achieving this:
1. Create a Template
First, save your parameterized SQL script as a template file. For example, the SQL Template.sql file contains the script used in this article.
2. Upload the Template
Then, log into your DocuGenerate account and upload your SQL file to create a new template.
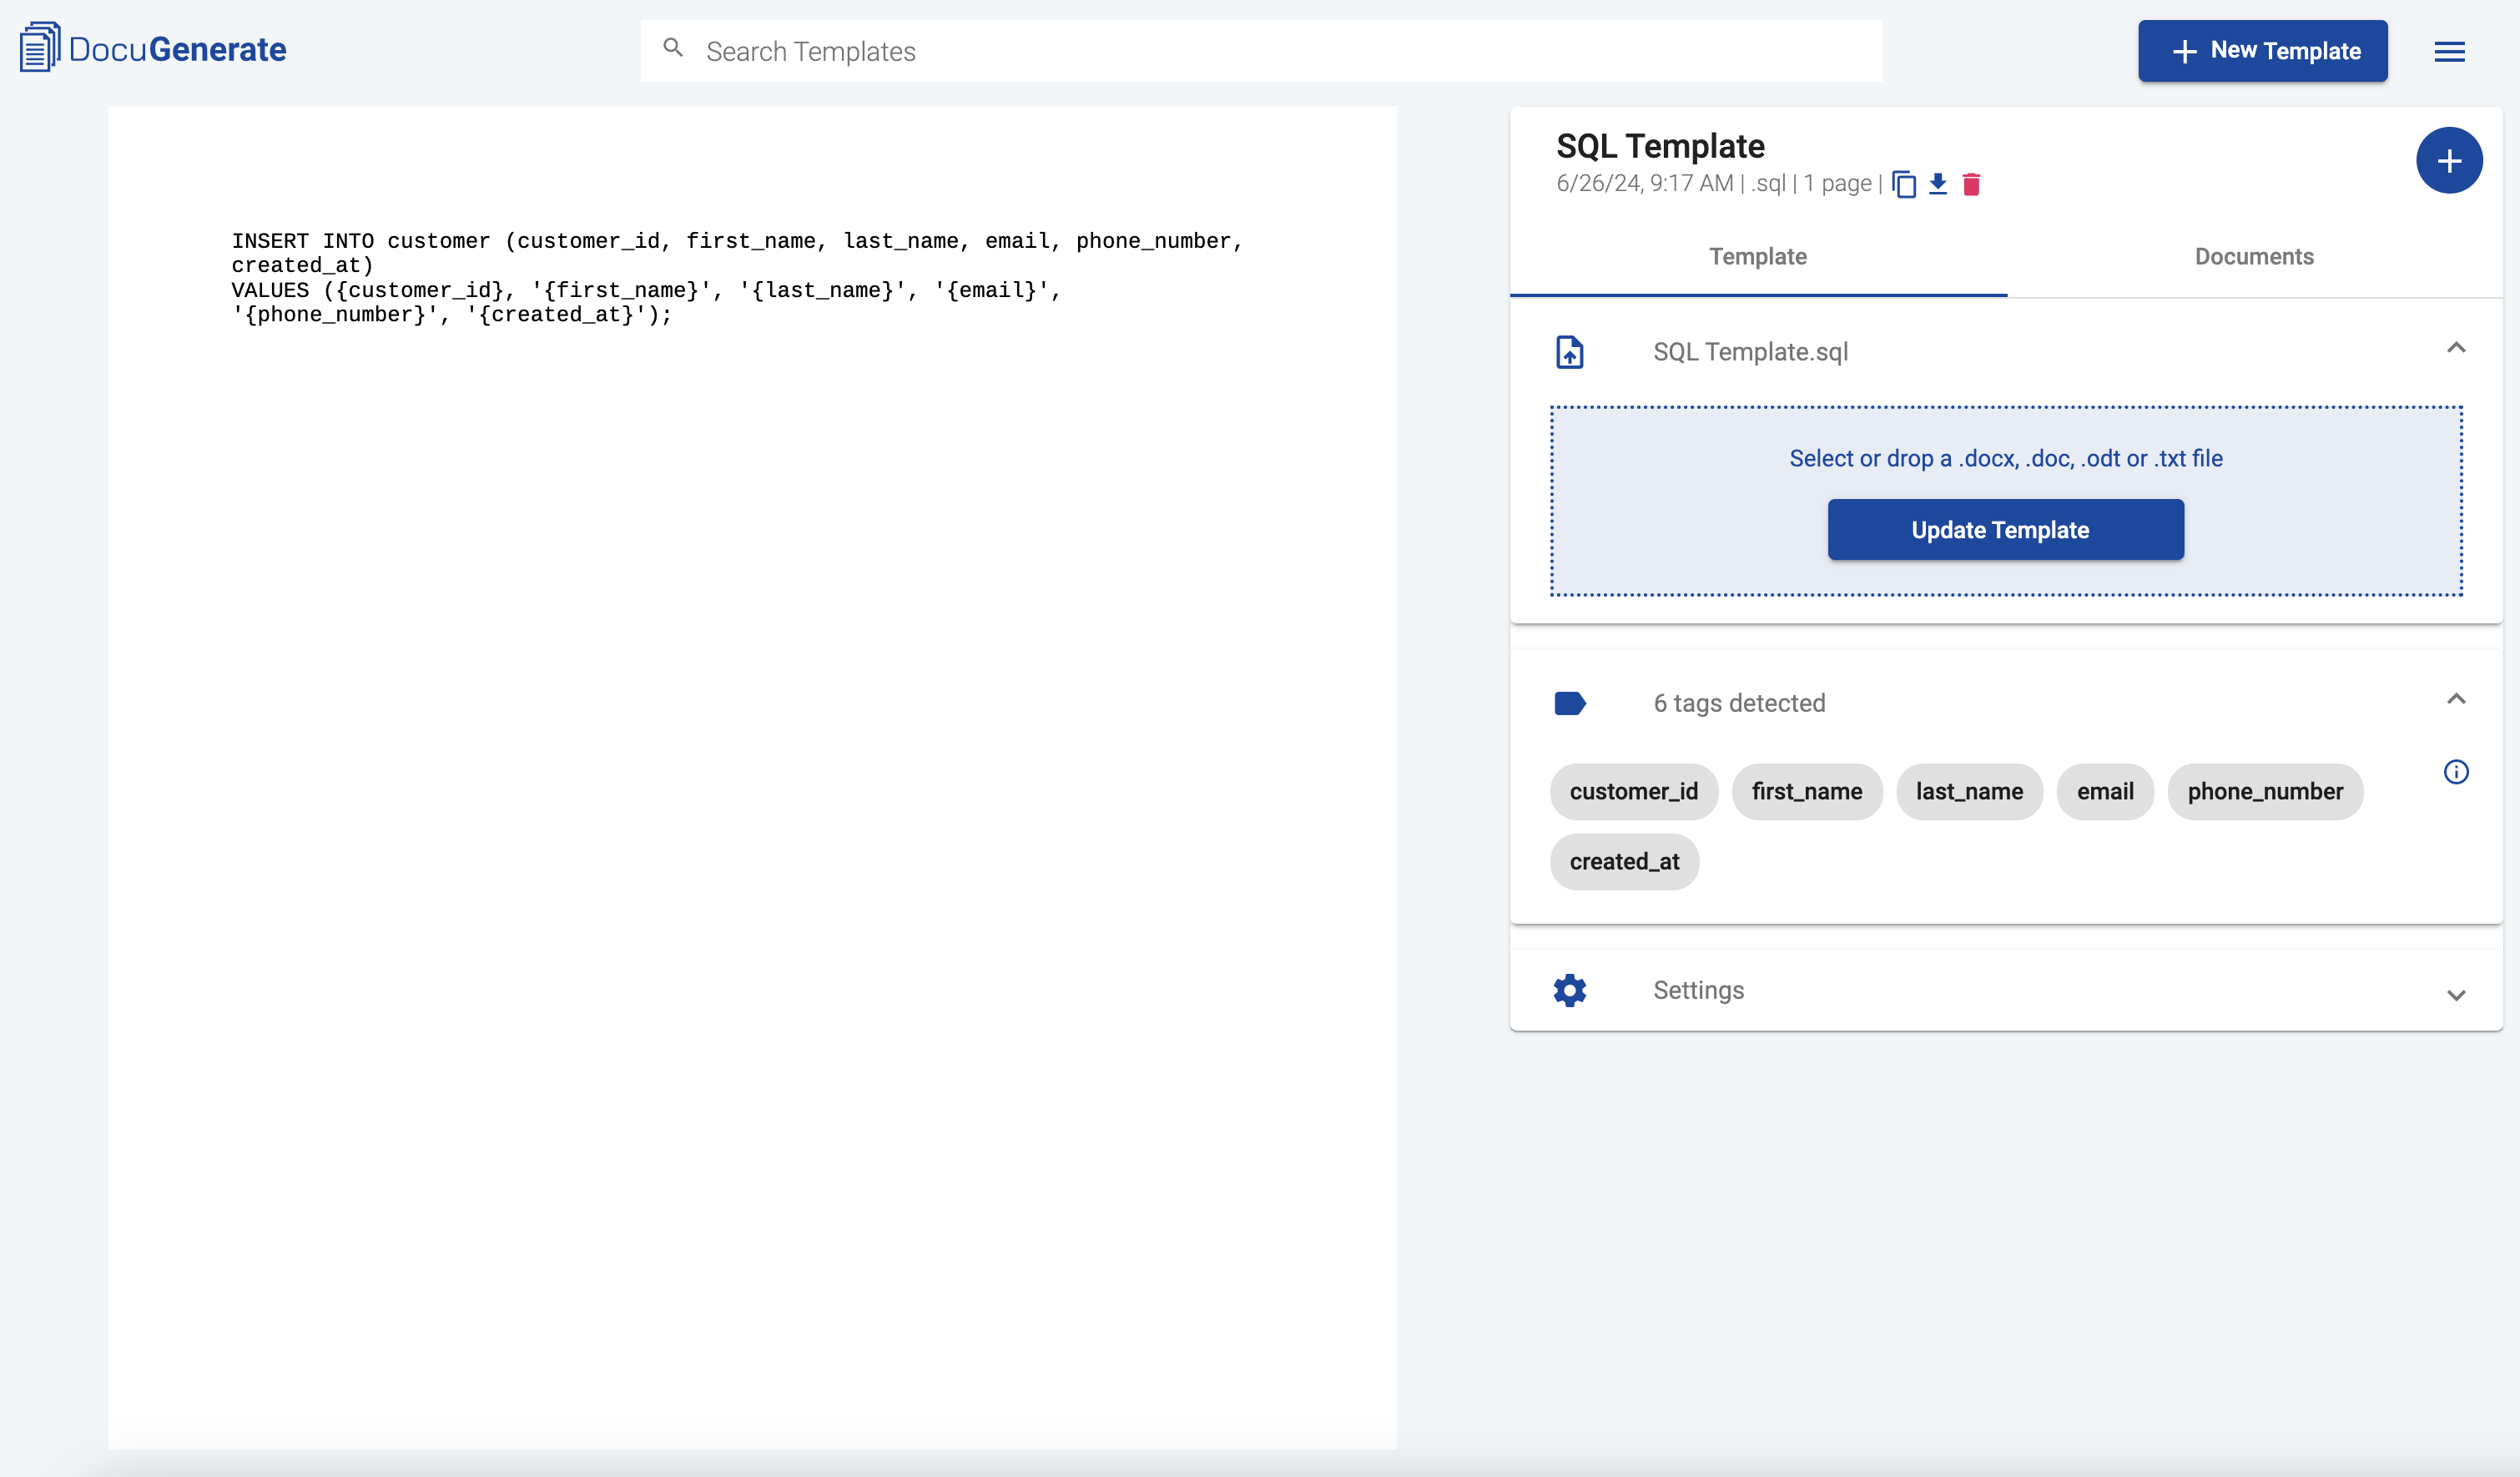
3. Upload the Data Source
Next, upload your CSV or Excel file containing the customer data. Use DocuGenerate’s intuitive interface to generate the SQL script.
Make sure to select the option to combine the generated documents into a single file and not insert page breaks after each document. This way, the generated documents, in this case the SQL instructions, will be combined consecutively, with no page breaks in between.
4. Generate the SQL Script
When generating the document, the placeholders in the template will be replaced with actual values from the CSV or Excel file.
Export the generated document as a Plain text (.txt) file, then rename the exported file to have a .sql extension instead of .txt. This way, the SQL script will be recognized by database management systems that can execute the SQL instructions in bulk.
By following these steps, you can quickly generate multiple SQL instructions without manual intervention. You can download the resulting file here. This not only saves time but also reduces the likelihood of errors that can occur with manual data entry.
Practical Use Cases
This technique can be extremely useful in various scenarios:
-
Data Migration: When migrating data from one system to another, you can generate SQL scripts to insert large volumes of data accurately and efficiently. For example, if you’re moving customer data from an old CRM system to a new CRM with email marketing software, generating the necessary SQL scripts can ensure that the data transfer is seamless and accurate.
-
Report Generation: Automate the creation of SQL queries for report generation based on dynamic data inputs. This can be particularly useful for generating monthly or quarterly reports where the data changes regularly. By updating the data source file, you can generate up-to-date SQL scripts without rewriting the queries manually.
-
Database Seeding: For development and testing environments, generate SQL scripts to seed databases with sample data. This allows developers to test their applications with realistic data sets, ensuring that the application behaves as expected in a production environment.
-
Mass Updates: Perform mass updates on database records by generating SQL update scripts from a CSV or Excel file. This can be particularly useful for applying bulk changes, such as updating pricing information for a large inventory of products.
-
Personalized SQL Scripts: Create personalized SQL scripts for different clients or use cases by simply changing the data source file. This flexibility allows businesses to tailor their database operations to meet specific client needs without extensive manual coding.
Conclusion
With DocuGenerate, generating SQL scripts from an Excel or CSV file becomes a straightforward and accessible process. This powerful tool extends beyond traditional document generation tasks, offering versatile solutions for data management and automation.
Whether you’re a developer looking to streamline your workflow or a non-technical user aiming to automate repetitive tasks, DocuGenerate provides an easy-to-use platform to meet your needs. Start leveraging the power of DocuGenerate today and transform how you handle SQL script generation and other document automation tasks.
Resources
- The SQL Template used in this tutorial.
- The Excel and CSV sample files used in this tutorial.
- The SQL Script generated containing the SQL instructions.
Creating event tickets with barcodes can be a game-changer for streamlining entry management and enhancing customer experience. Automation not only saves time but also reduces errors and ensures a professional touch. In this guide, we will use Make (formerly Integromat) to automate the entire process. We’ll integrate Stripe to handle payments, generate tickets using DocuGenerate, and send them to your customers via email. Here’s what you will learn:
- Setting Up Stripe: How to configure Stripe for payment processing.
- Setting Up DocuGenerate: Designing and uploading a ticket template.
- Creating the Make Scenario: Automating ticket generation and email delivery.
Let’s dive into the step-by-step process.
Setting Up Stripe
Stripe is a powerful payment processing platform that allows you to easily accept payments online. For our event ticketing system, Stripe will handle the payments for the Event Admission product that we’ll create below. Here’s how to set it up:
1. Create a Stripe Connection in Make
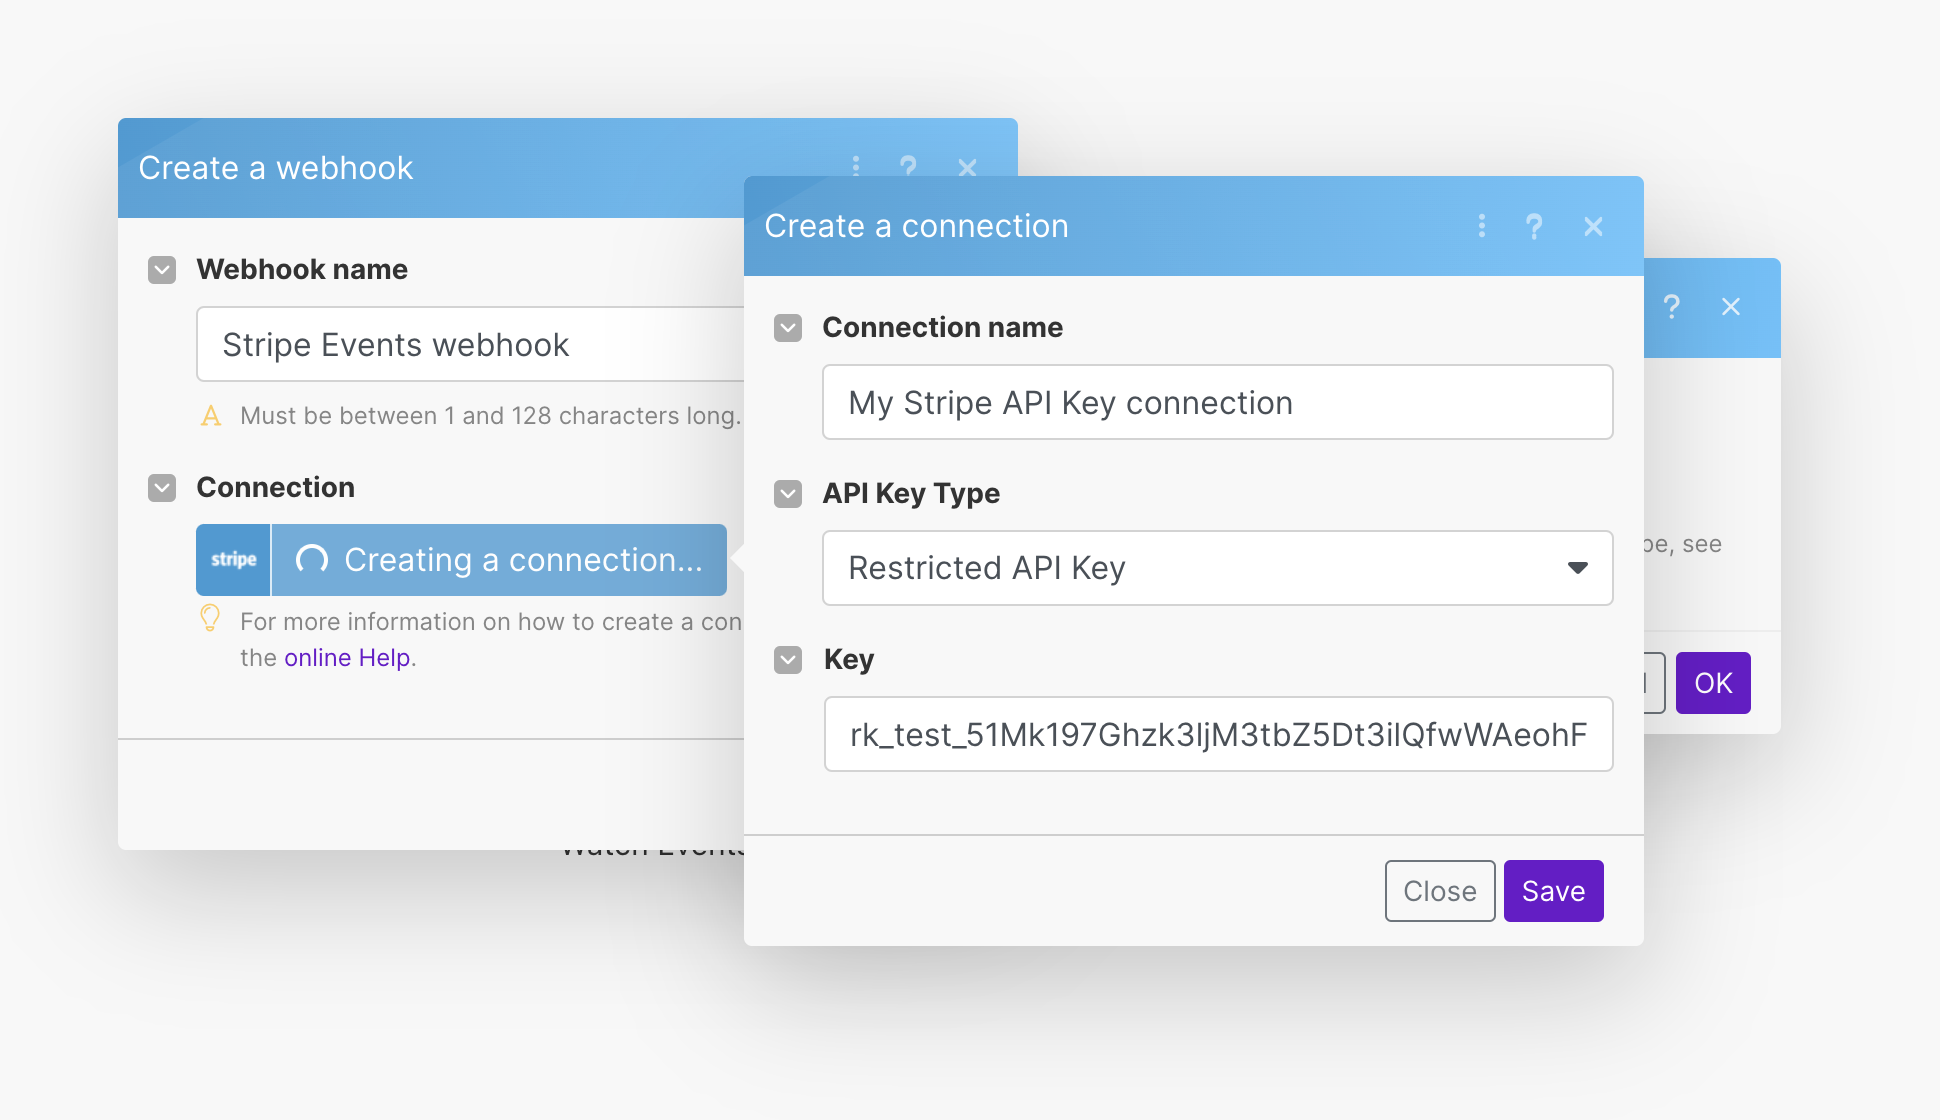
First, you need to add the Stripe app to your scenario and use the Watch Events trigger, which is activated when a given event occurs. To create a Stripe connection in Make, you also need to generate a restricted API key. Go to the Developers page in Stripe, click on Create restricted key and configure the following permissions:
- Balance:
Read - Checkout Sessions:
Read - Webhook Endpoints:
Write
This API key will allow Make to interact with your Stripe account securely, fetching necessary information about the transactions and ensuring that the correct data is used for ticket generation.
For detailed instructions on setting up the Stripe connection, refer to the Stripe integration documentation. This guide provides a step-by-step walkthrough on connecting Stripe with Make.
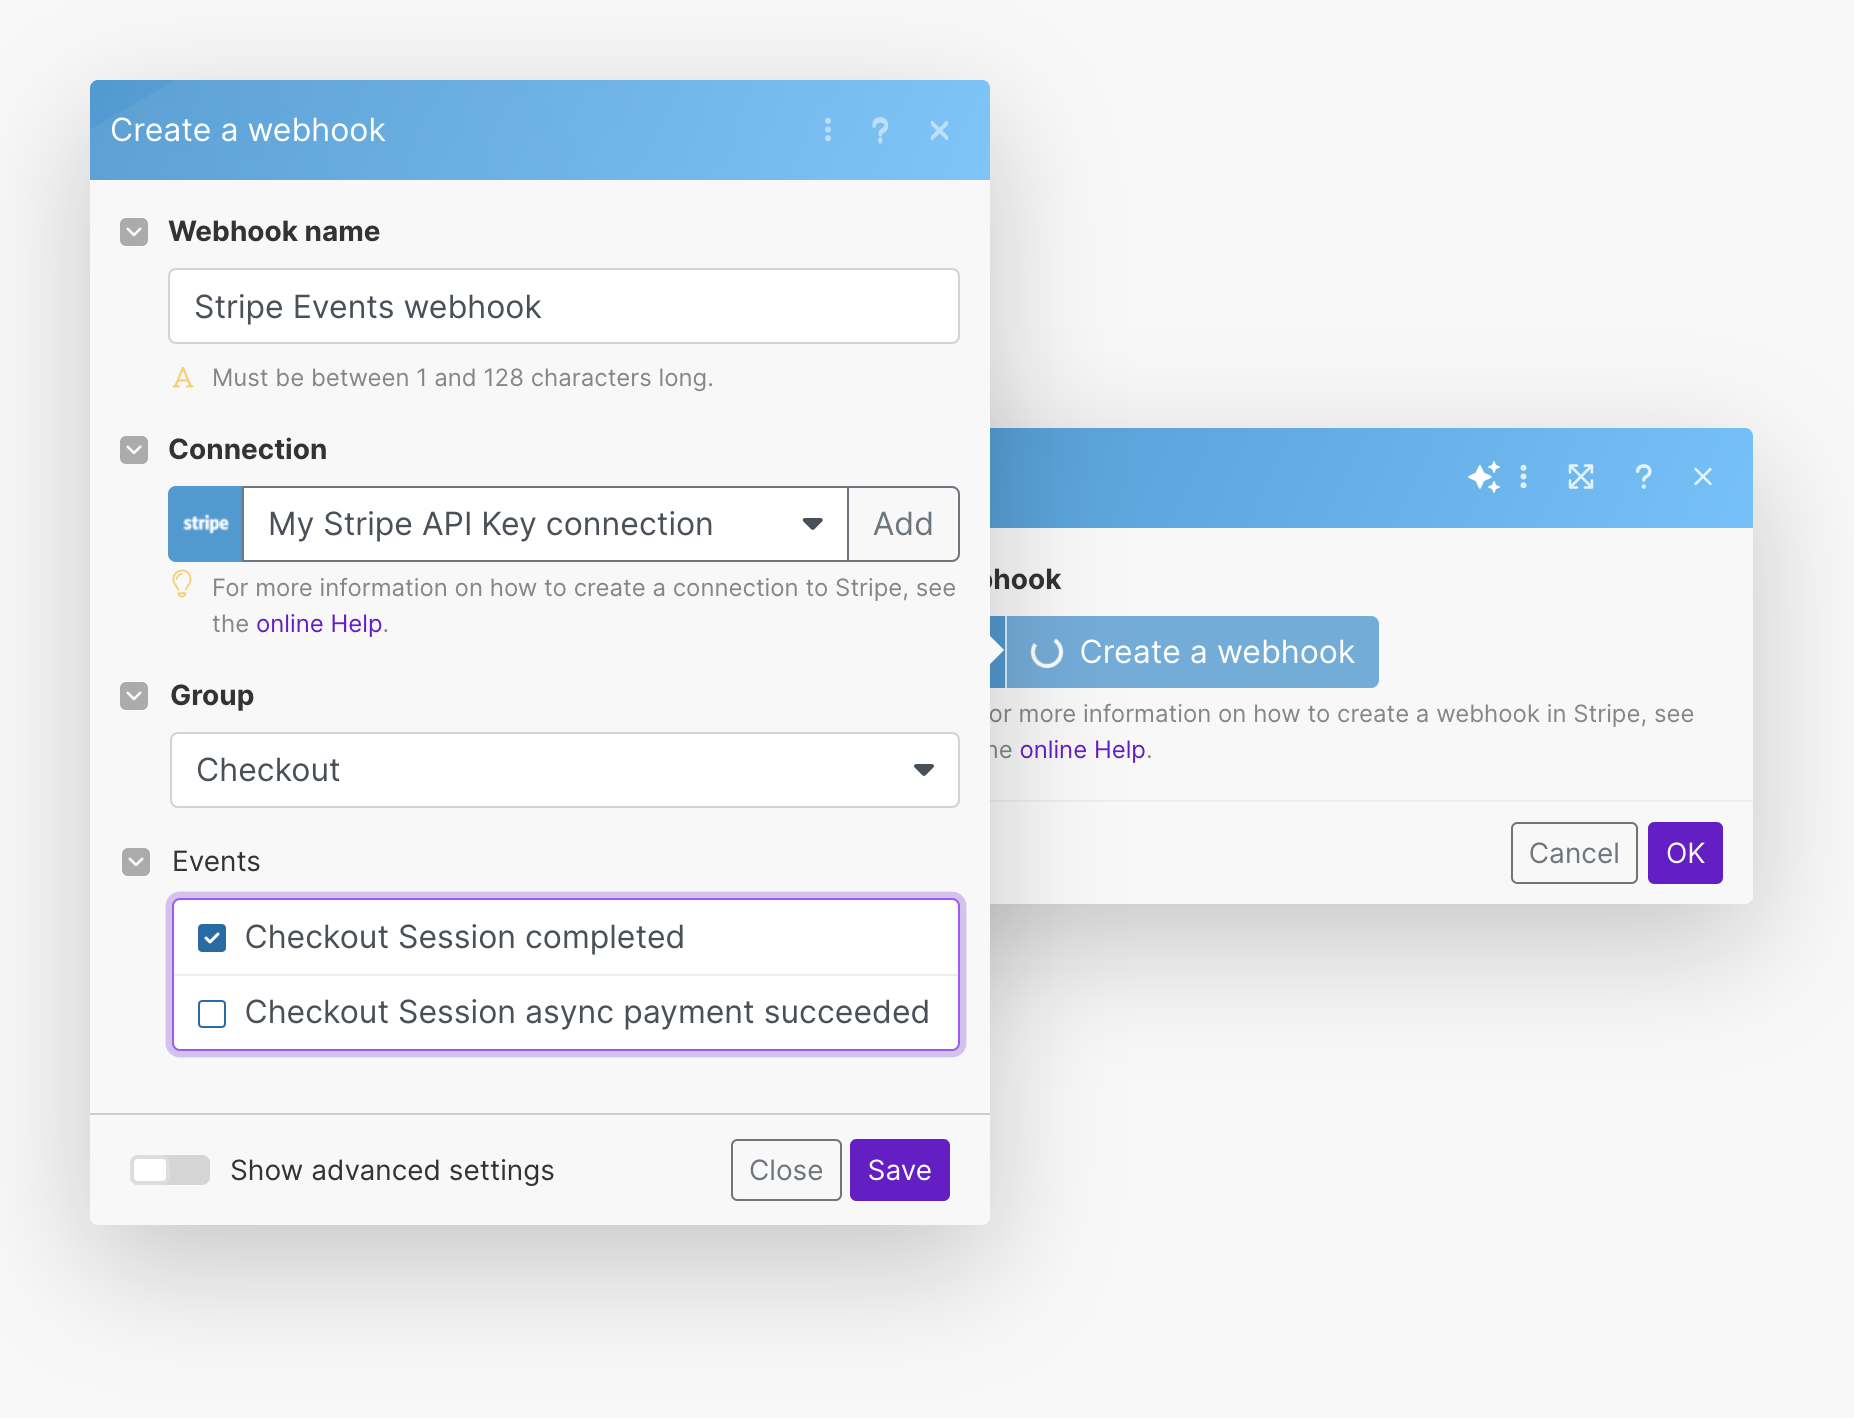
2. Create a Webhook for Checkout Session Completed
Next, you need to create a webhook in Stripe. Webhooks are crucial as they notify your system when certain events happen in your Stripe account. For this setup, we are interested in the Checkout Session completed event, which triggers when a customer successfully completes a purchase.
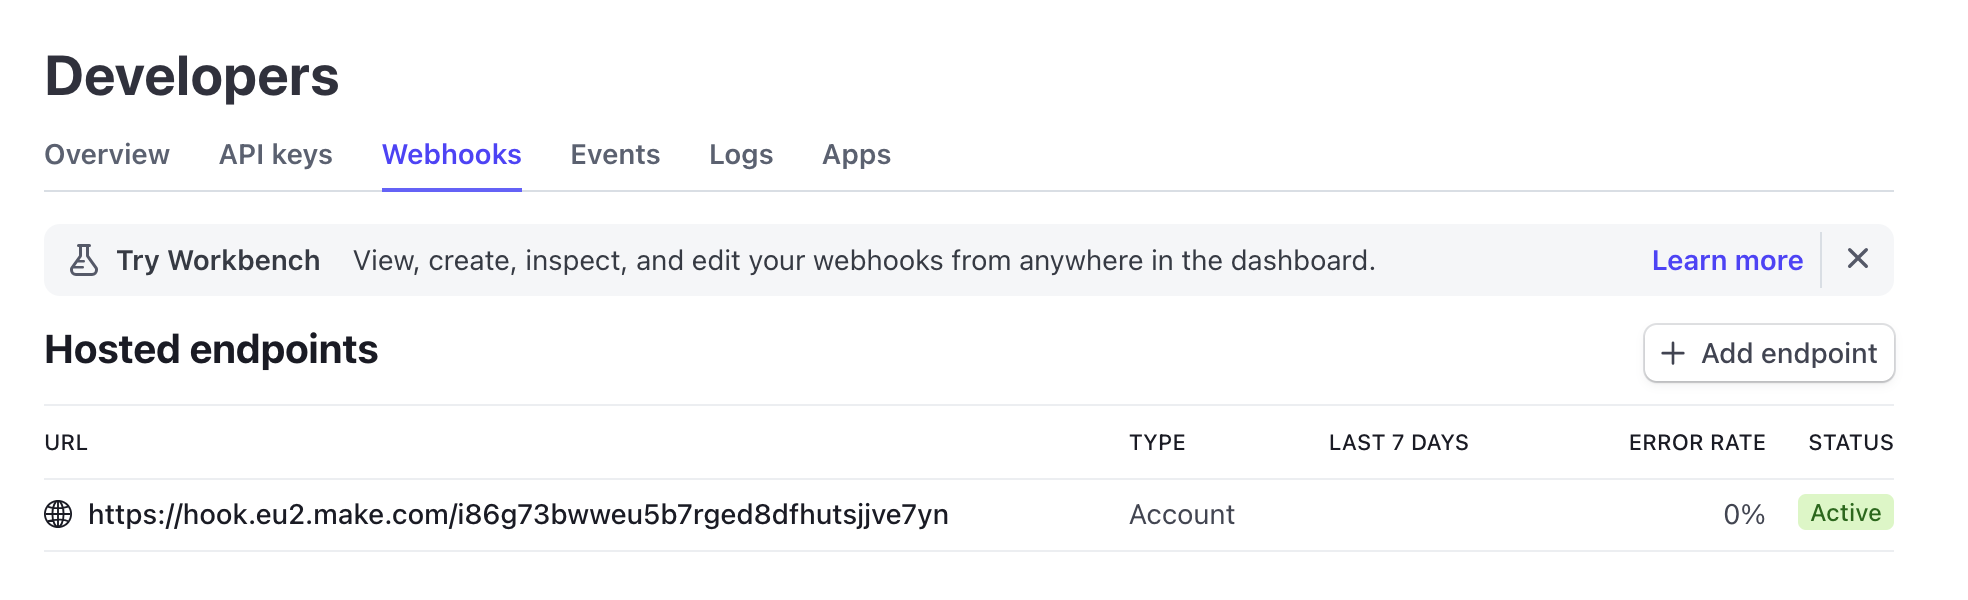
Once set up, this webhook will be visible on Stripe’s Developers page. This visibility ensures that you can monitor and manage your webhooks effectively, helping you troubleshoot any issues that might arise.
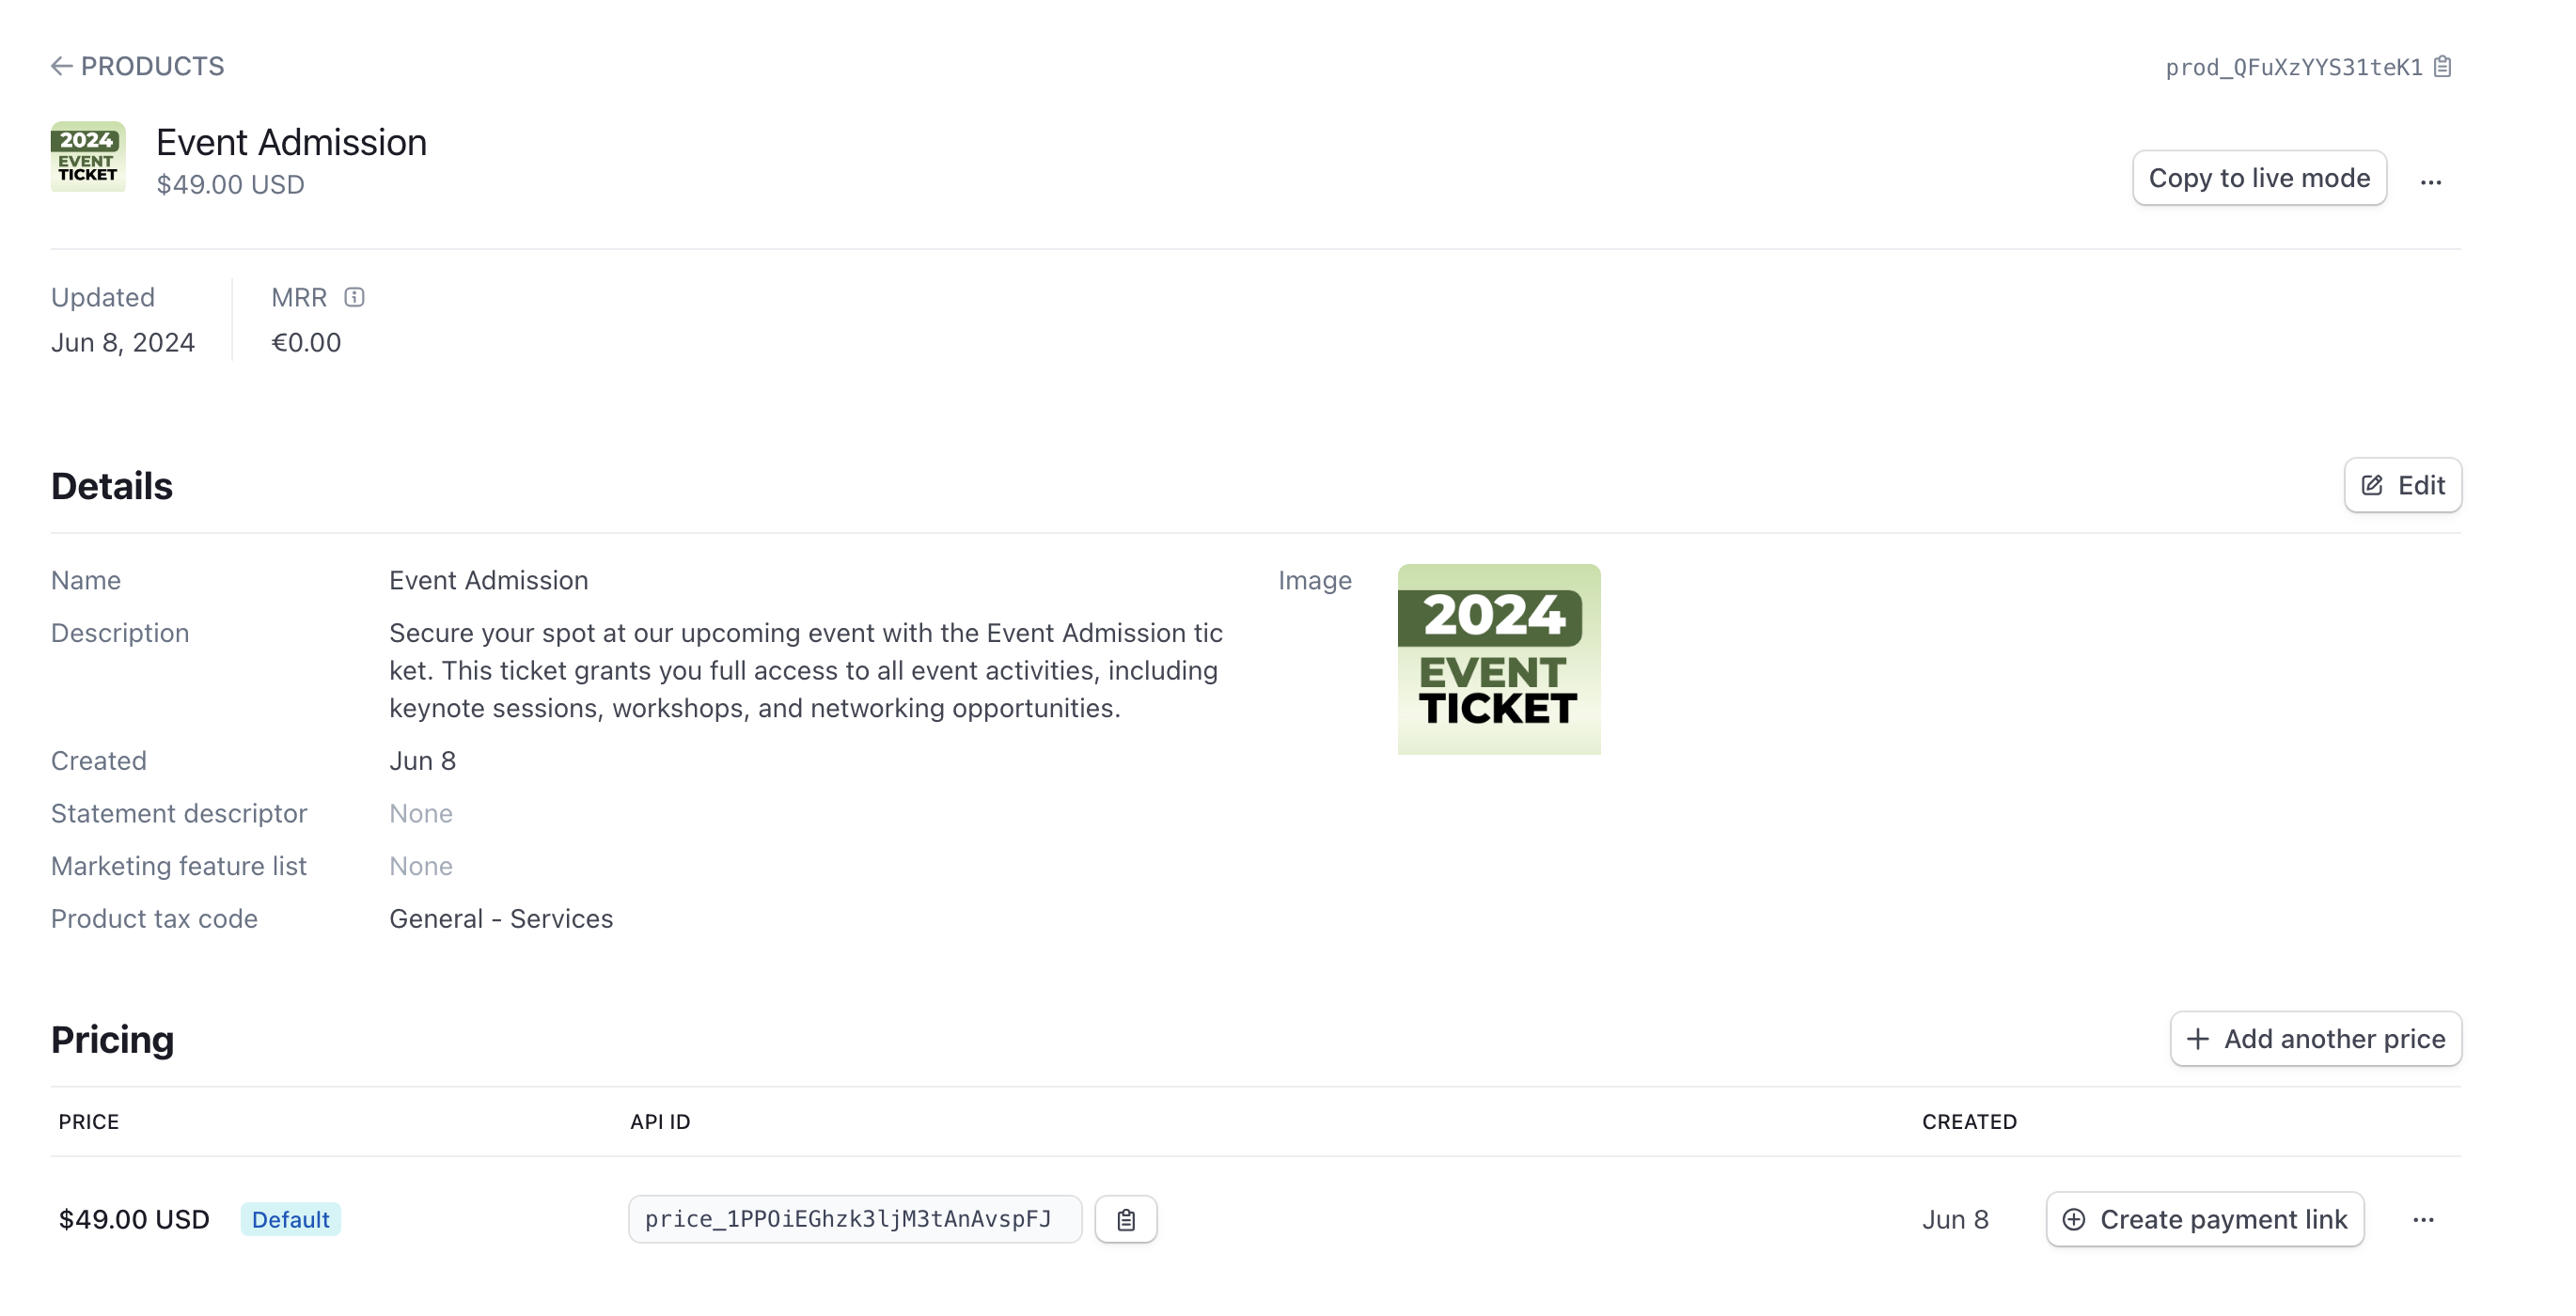
3. Create the “Event Admission” Product
Now, create a product in Stripe called Event Admission. This product represents the ticket for your event. When customers purchase this product, it triggers the entire ticketing process.
Creating a product in Stripe is straightforward. Ensure that all relevant details, such as price and description, are correctly filled out to provide clear information to your customers.
4. Create a Payment Link for Your Product
Once your product is set up, the next step is to create a payment link. This link is what your customers will use to purchase their event tickets. Stripe makes it easy to generate these links, which you can then share via email, social media, or your website. The payment link will direct customers to a secure checkout page where they can complete their purchase.
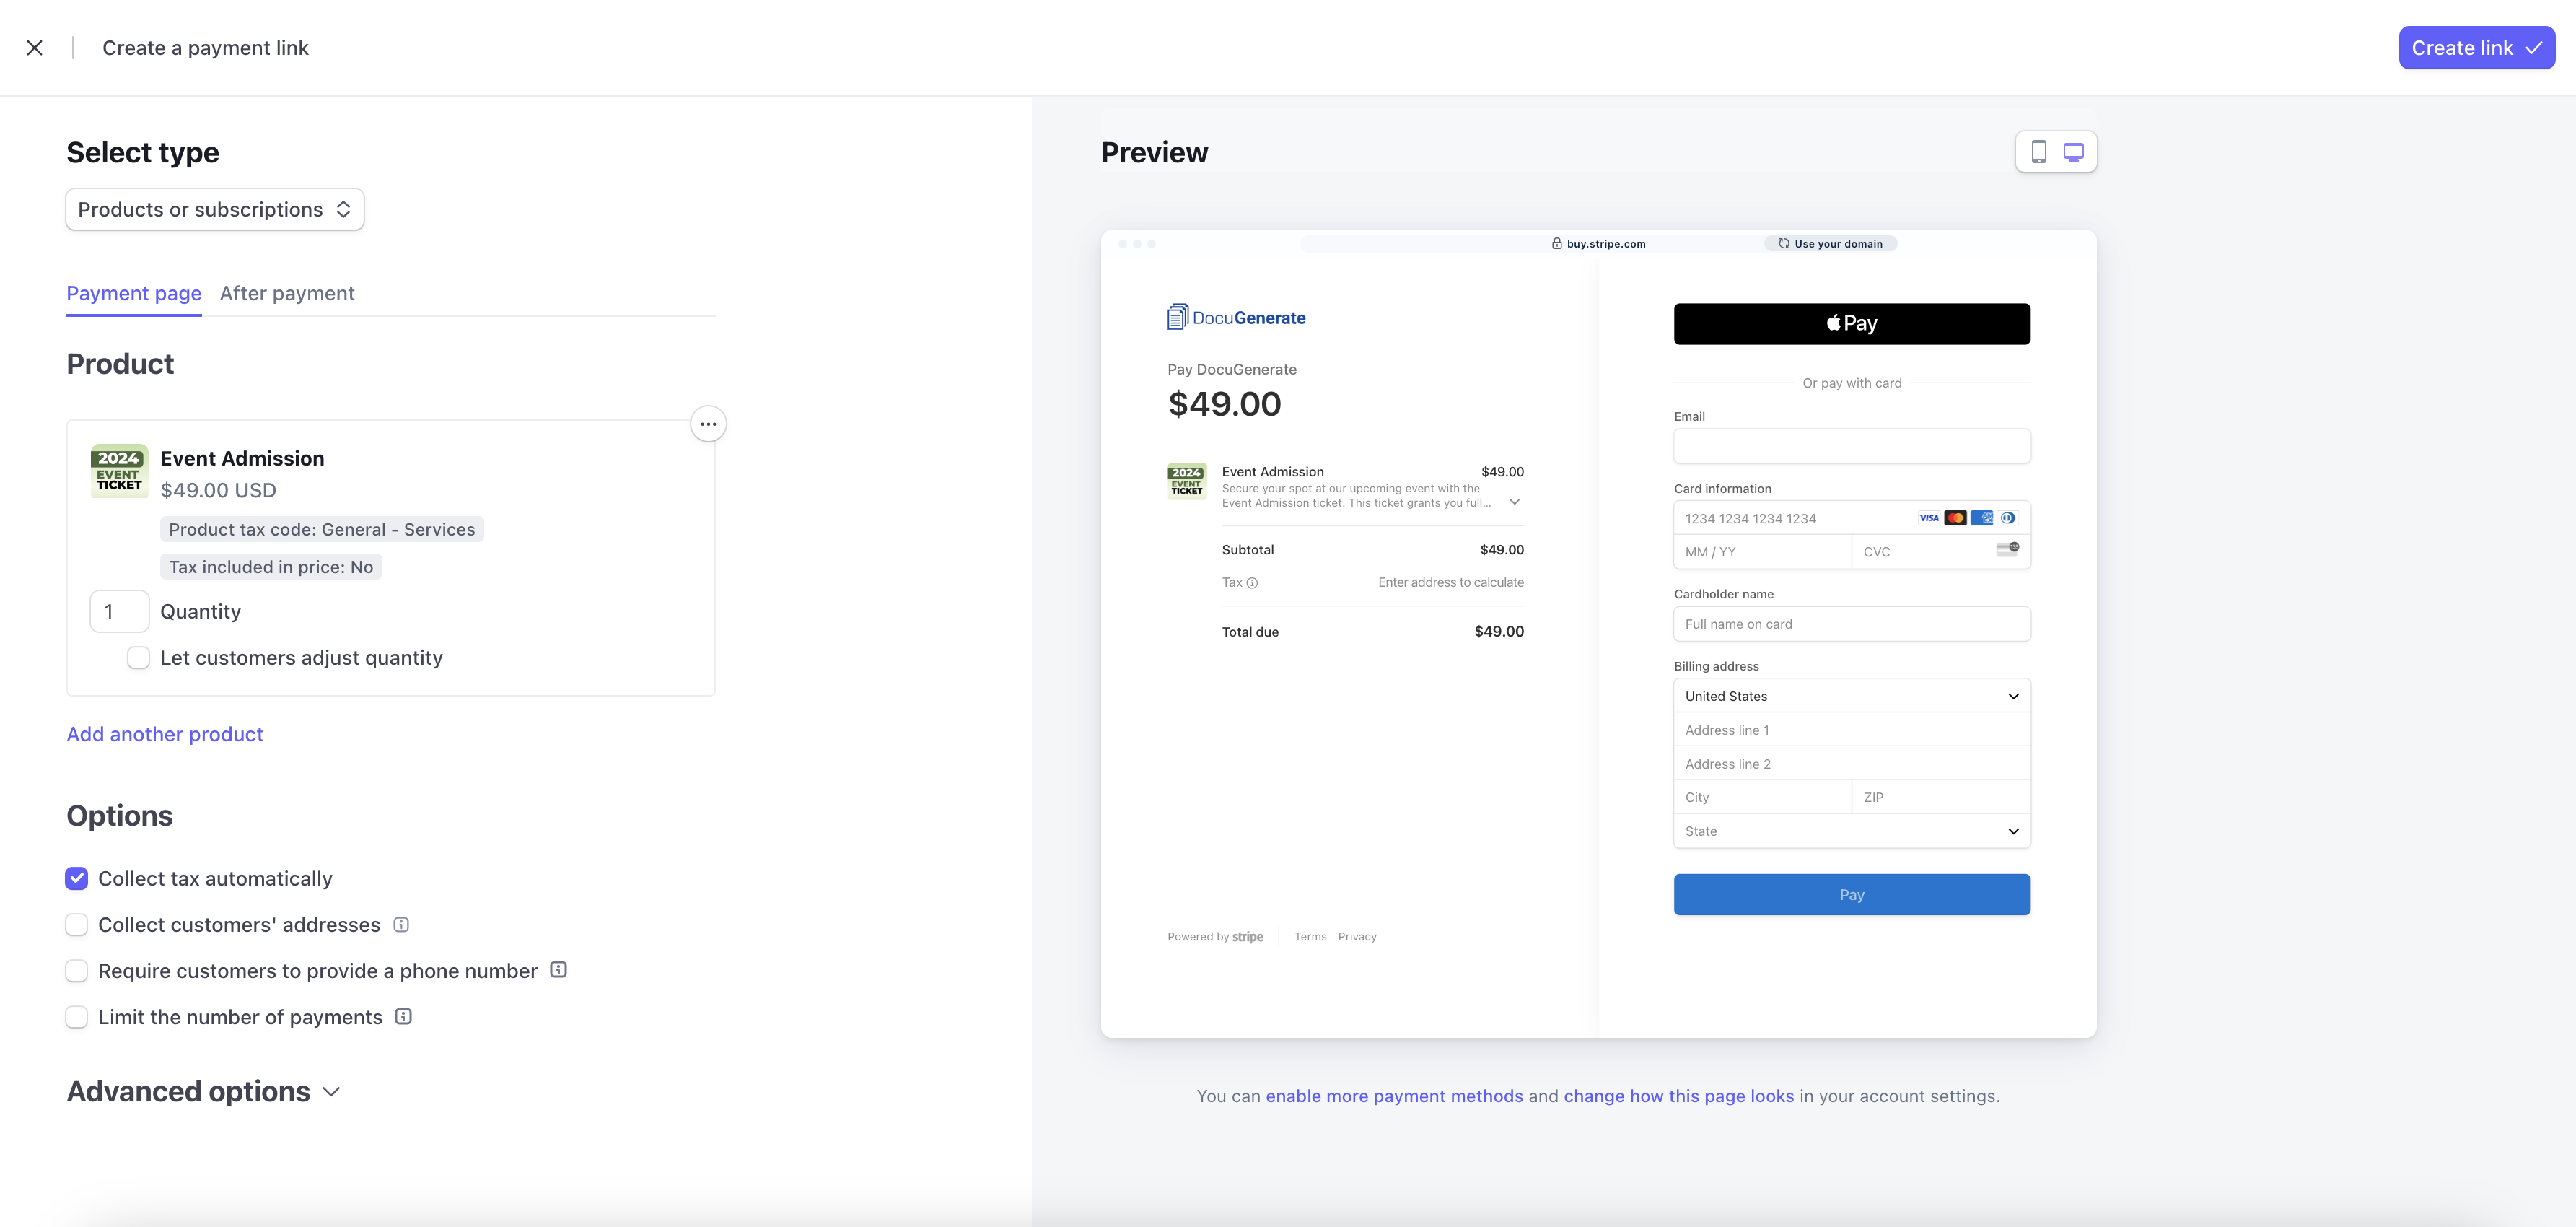
You can test the payment process using the Payment Link for the Event Admission product. Enter your email address and for the card information use 4242 4242 4242 4242, which is a test credit card number on Stripe. For the expiration data and CVC values you can use dummy values, as long as the expiration date is in the future. Then, if you hit Pay, you’ll receive an email with your test PDF ticket, as detailed further.
Setting Up DocuGenerate
DocuGenerate is a powerful tool for automating document creation. In this step, we’ll set up DocuGenerate to create a ticket template. This template will be used to generate personalized tickets for each customer.
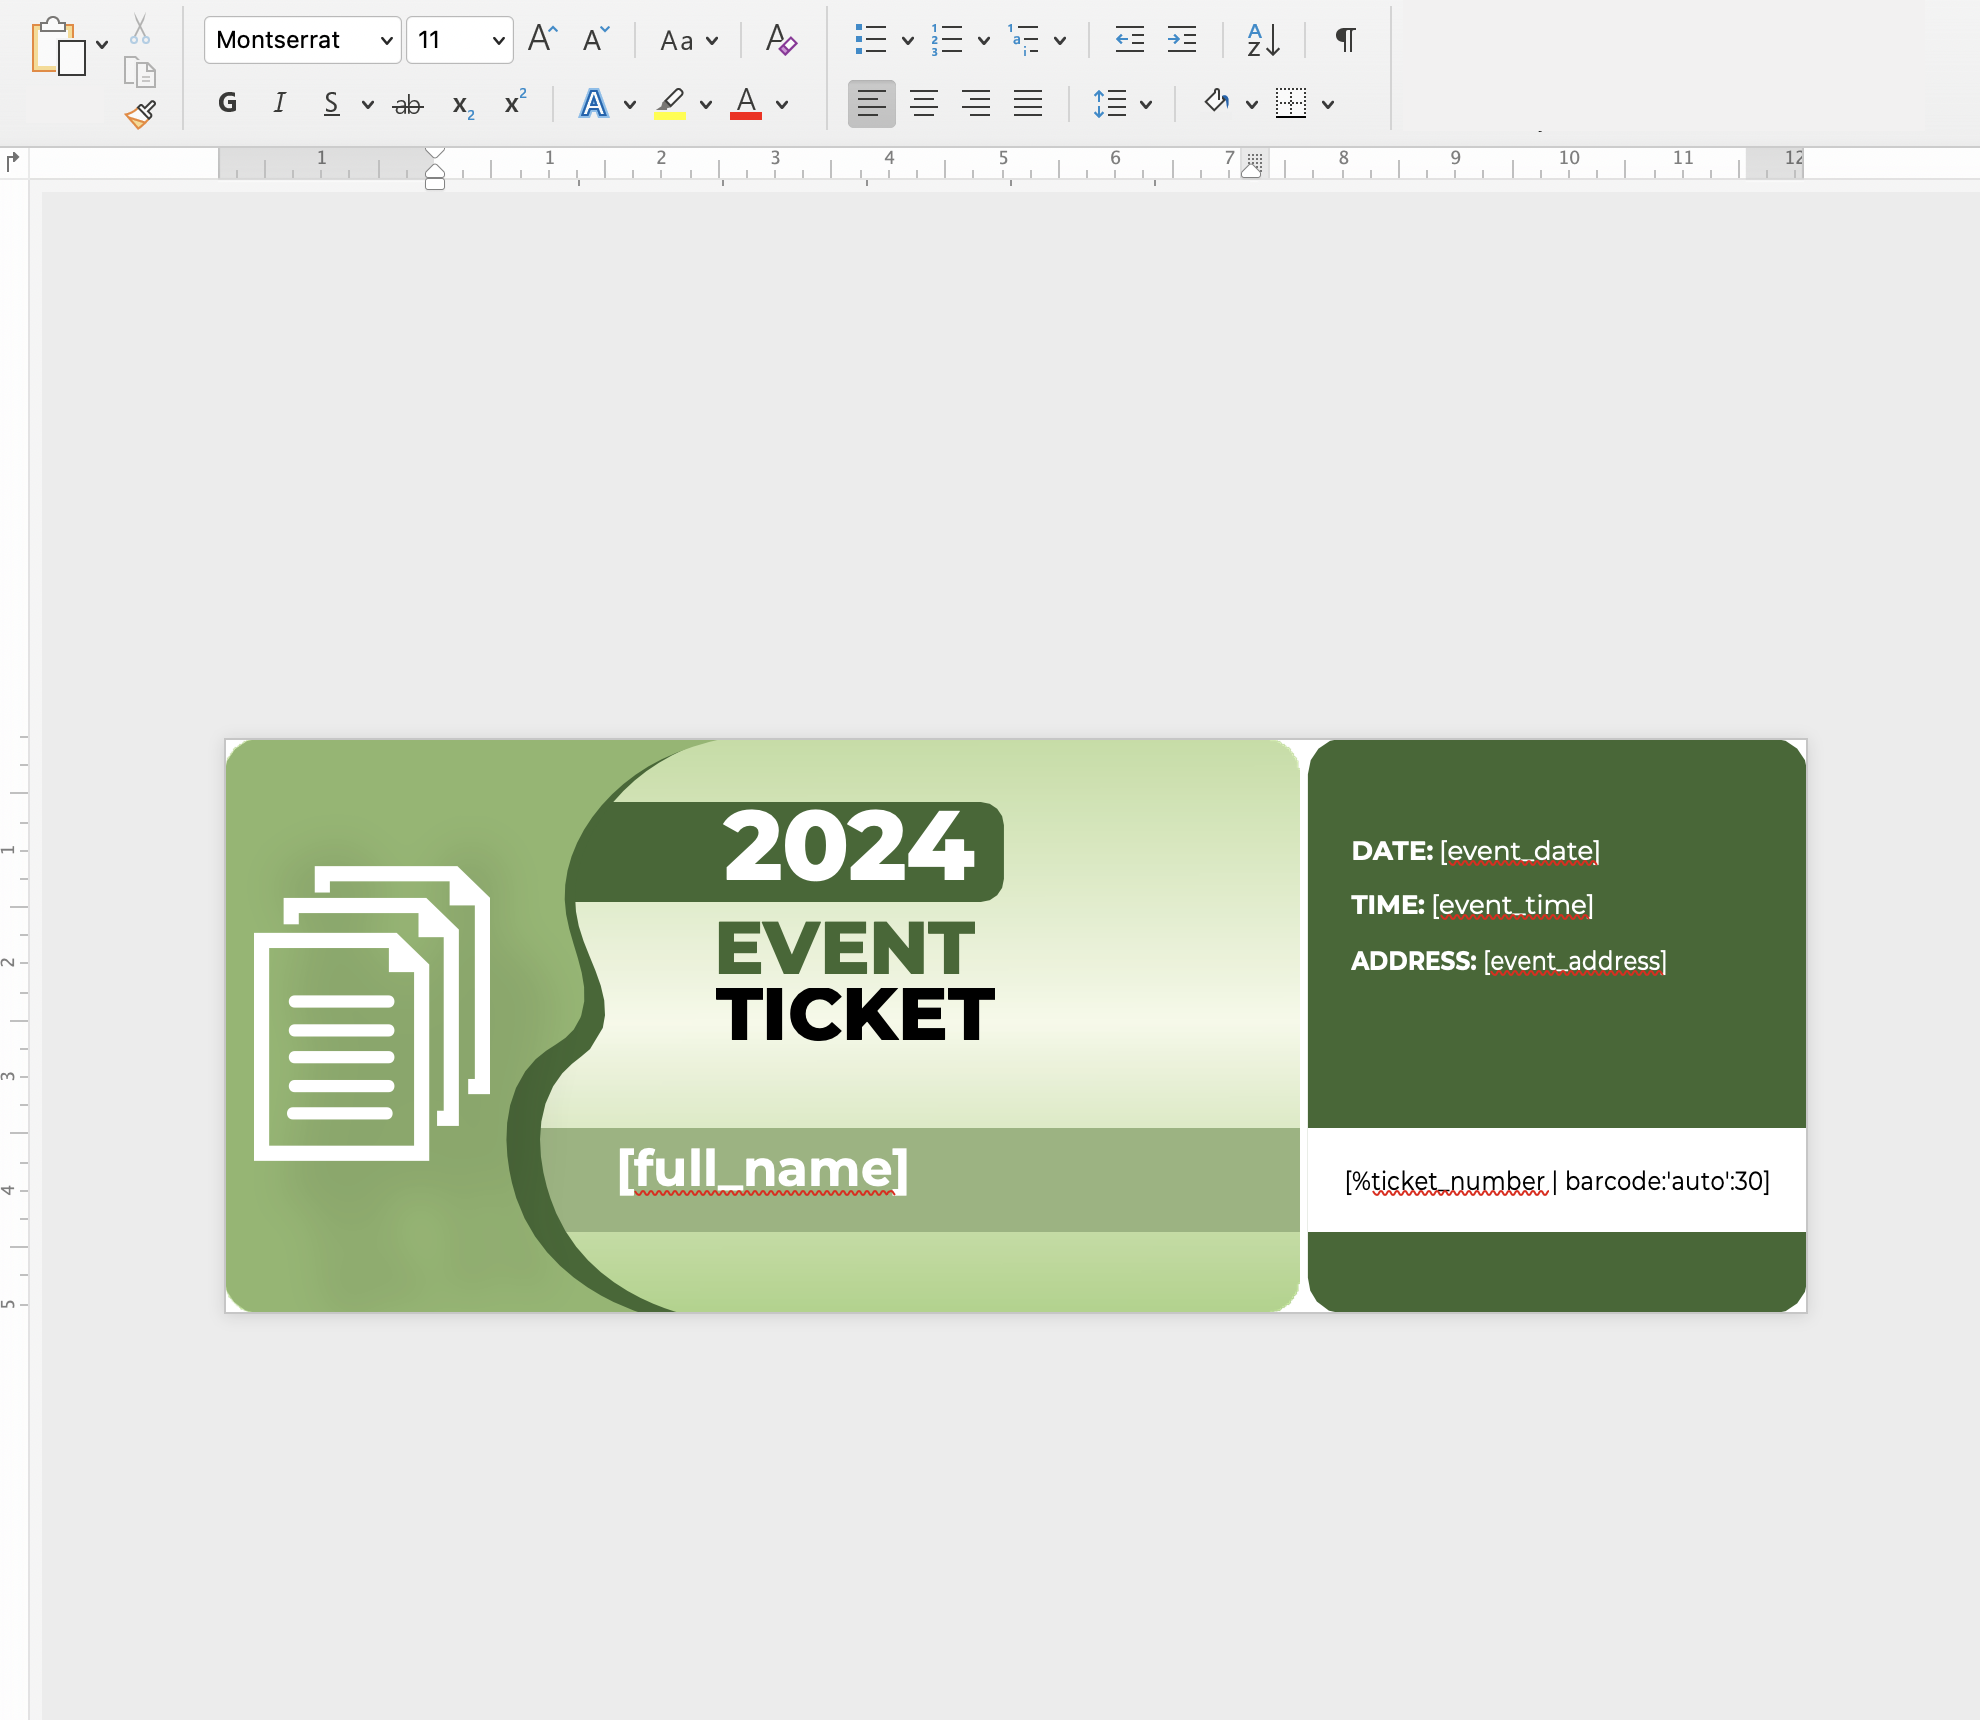
1. Design Your Ticket Template
Start by designing a ticket template in Microsoft Word. The template should include placeholders (also known as merge tags) for the following fields: ticket_number, full_name, event_date, event_time, and event_address. These placeholders will be replaced with actual data when generating the tickets.
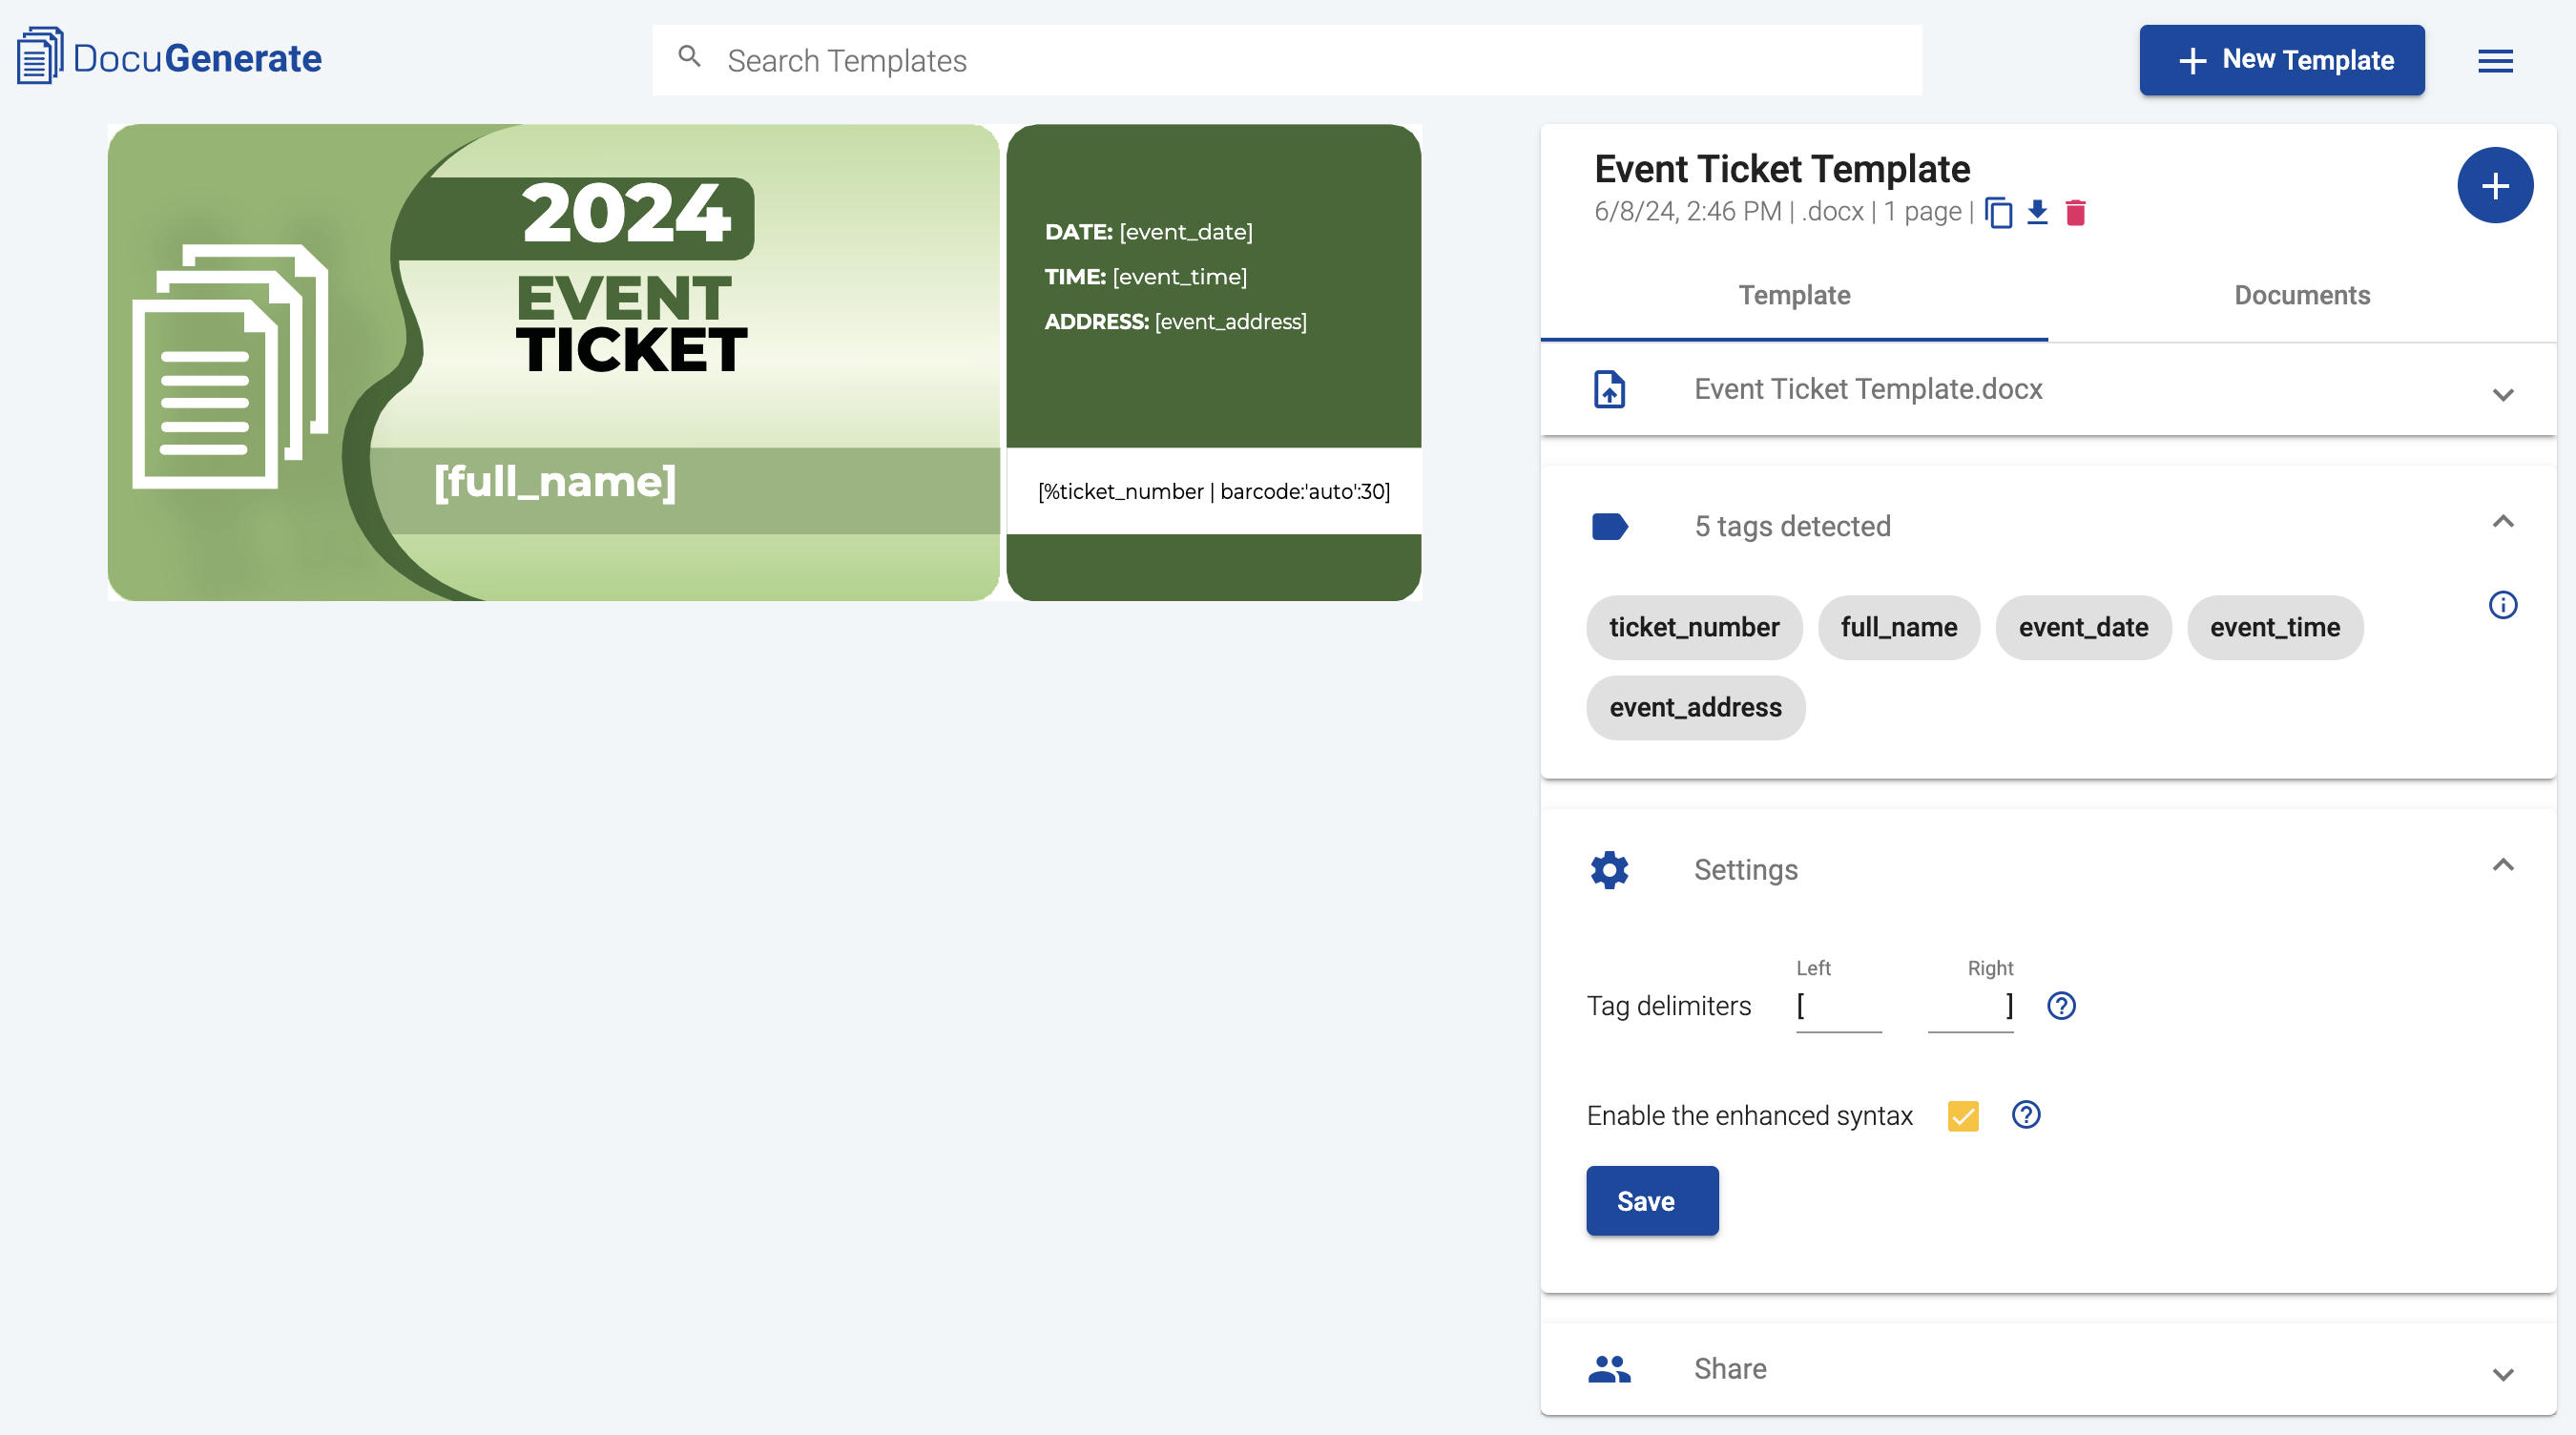
2. Upload the Template to DocuGenerate
Once your template is ready, upload it to DocuGenerate. This step is crucial as it prepares the template for automated document generation. DocuGenerate will use this template to create unique tickets for each customer based on the data received from Stripe.
Make sure to enable the enhanced syntax, which is necessary for using the barcode filter to add a barcode to the ticket. Also, please note that the merge tags don’t have any whitespaces because they are incompatible with the enhanced syntax. Instead, we use the underscore character (_) to separate words within the merge tags.
Feel free to download the template and customize it to fit the branding and details of your event.
Creating the Make Scenario
With Stripe and DocuGenerate set up, we’ll now create a scenario in Make to automate the ticket generation and email process. This scenario will connect all the components together, ensuring a seamless workflow from payment to ticket delivery.
1. Set Up the “Generate a Document” Action
In Make, set up the Generate a Document action by connecting the DocuGenerate app. This action will take the data from the Stripe checkout session and use it to generate a ticket. Ensure that all the placeholders in your ticket template are correctly mapped to the data fields from Stripe.
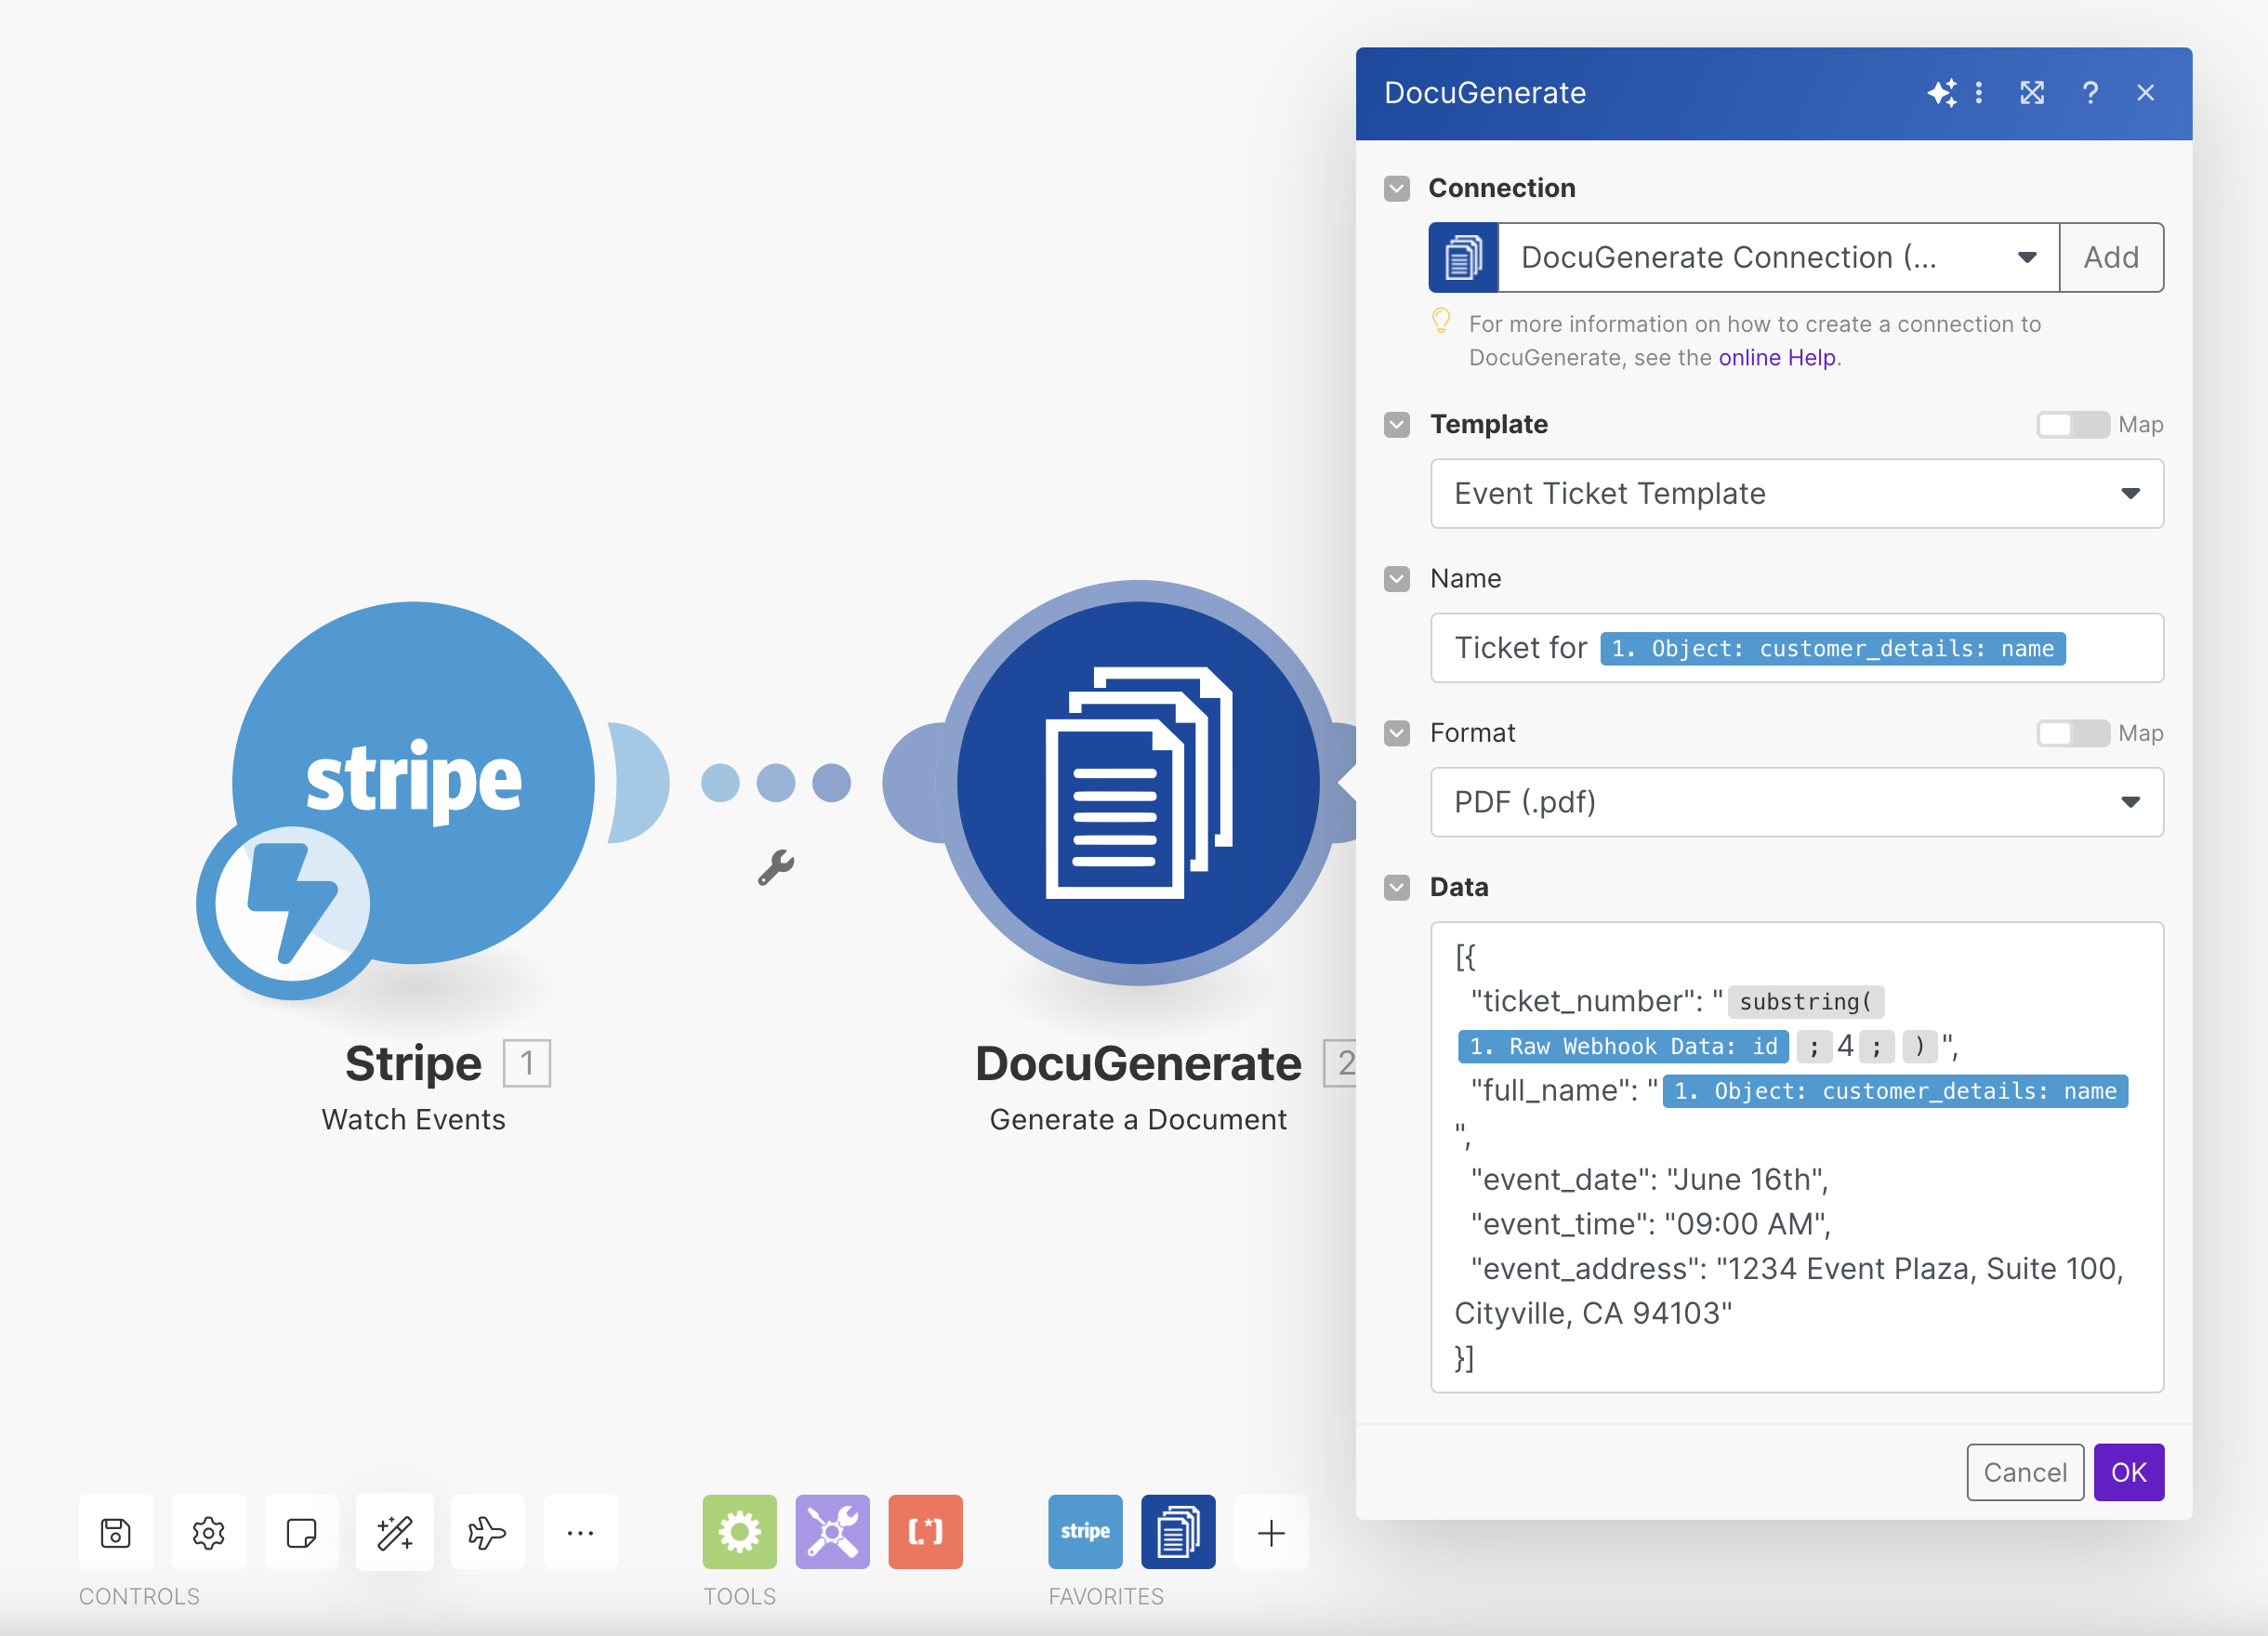
For this tutorial, we used the event ID as the ticket number, but you can use any value that fits your needs. We also used the customer_details: name property from the Stripe event payload to populate the document name and the full_name tag in the document.
2. Use the HTTP Module to Get the File Content
After generating the document, use the HTTP module in Make to retrieve the generated PDF file content. This module will fetch the ticket from DocuGenerate, ready to be sent via email.

3. Set Up the “Send an Email” Action in Make
Next, configure the “Send an Email” action from the official Email app. This action will send the generated ticket PDF to the customer’s email address. Make sure to customize the email content to include event details and any other relevant information.
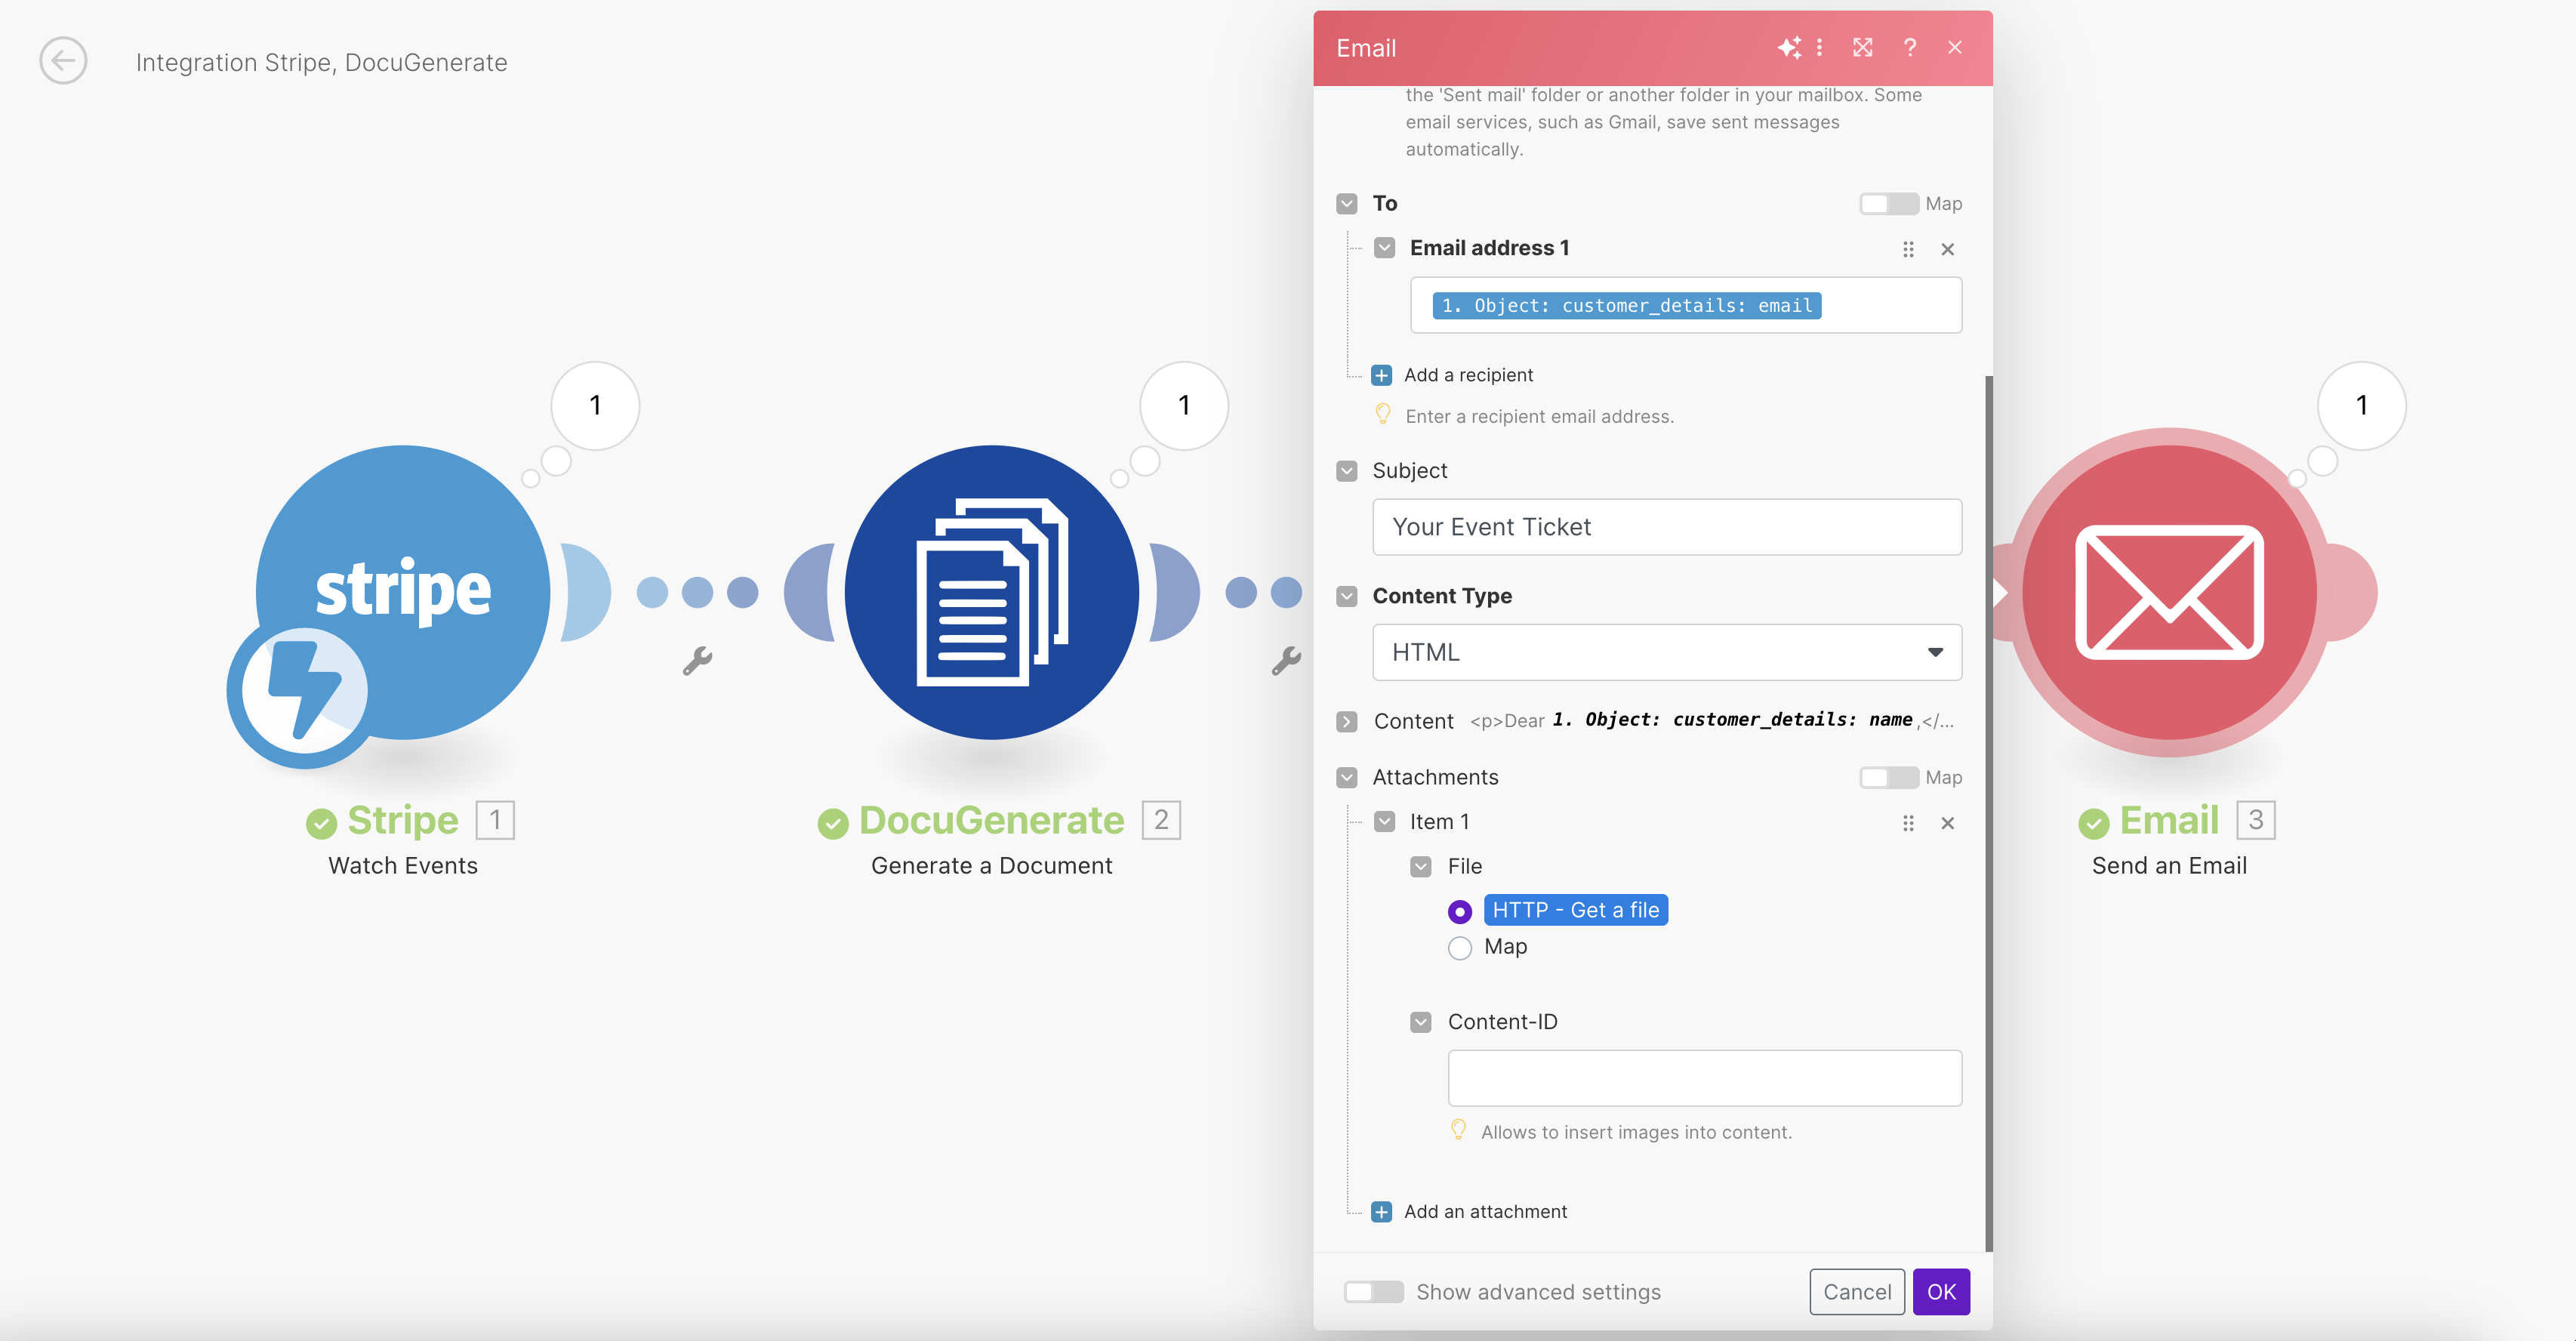
The To Email Address value is populated with the customer_details: email property from the Stripe event payload that was received by the webhook after a successful payment.
As for the Attachment, its value will be provided by the HTTP - Get a file action previously configured.
For a more advanced email marketing solution, consider using Mailmodo as an alternative to the generic Email app in Make. With Mailmodo’s Make app, you can easily create and send interactive, dynamic emails directly from your workflow. This option is particularly useful if you want to integrate features like AMP emails, tracking, or analytics.
4. The Complete Make Scenario
The visual representation of the complete scenario shows how each step is interconnected, ensuring a smooth flow of data and actions. Each module in the scenario plays a crucial role:
- The Watch Events trigger monitors Stripe for completed checkouts.
- The Generate a Document action creates the ticket using the DocuGenerate template.
- The Get a File action retrieves the generated PDF ticket.
- The Send an Email action delivers the ticket to the customer.
Once the scenario is triggered and the ticket is generated, the customer will receive an email with the ticket attached. This automated process ensures that customers receive their tickets promptly and without any manual intervention.
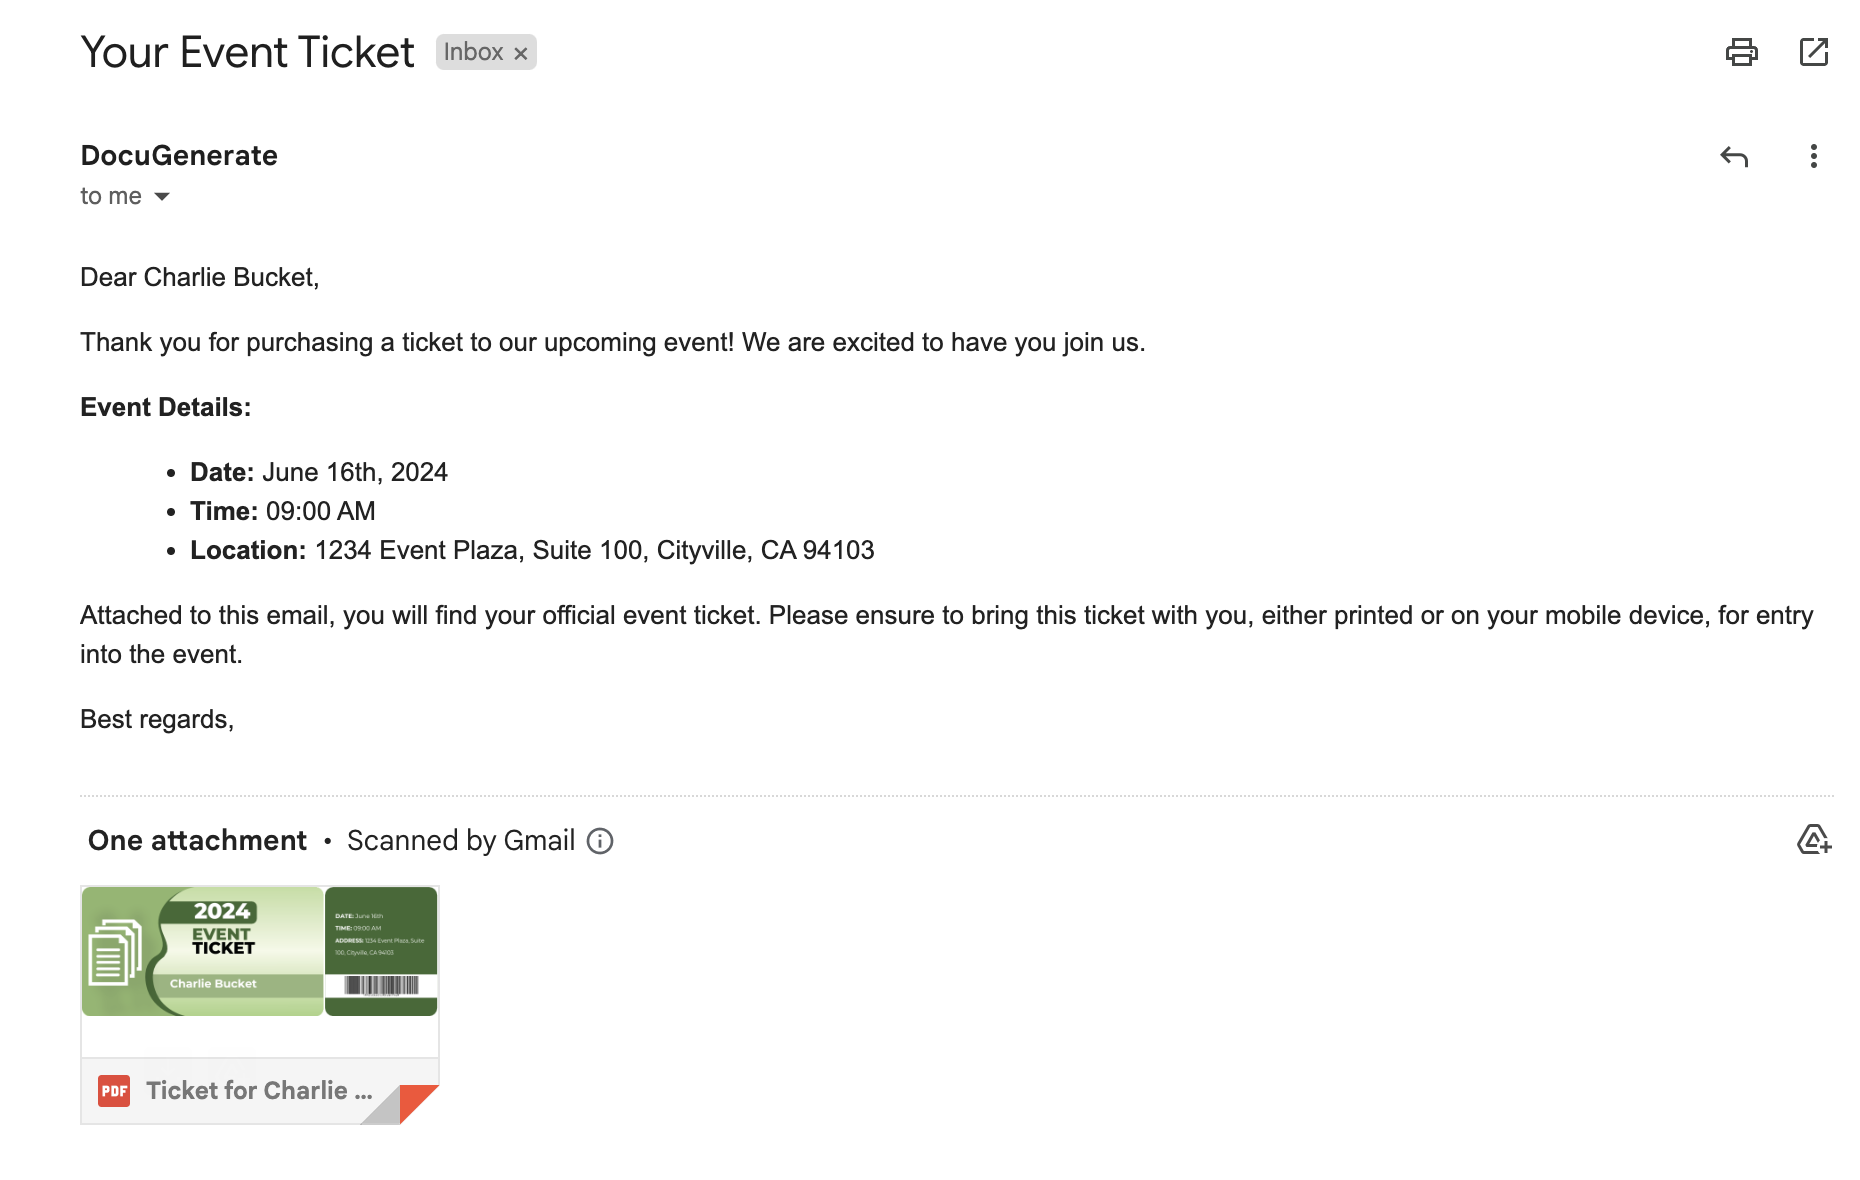
Here’s an example of a generated ticket, which you can download here if you’re interested.

Conclusion
By following this guide, you can automate the entire process of creating and sending event tickets with barcodes using Make. This not only saves time but also ensures a smooth and professional experience for your event attendees. Integrating Stripe, DocuGenerate, and Make provides a powerful solution to streamline ticket management for any event.
Automating ticket generation and delivery improves efficiency and reduces errors, making it easier for you to manage your events. Moreover, it enhances the customer experience by providing instant access to tickets and ensuring they have all the necessary information at their fingertips.
Resources
- The Payment Link for testing the product purchase.
- The Event Ticket Template used in this tutorial.
- A sample PDF Ticket generated using this scenario.
In today’s fast-paced digital world, automating repetitive tasks saves time and minimizes the risk of error. This is especially true for document generation. Imagine having a spreadsheet full of data and being able to automatically generate professional documents with minimal effort. In this tutorial, we’ll show you how to achieve this with three powerful tools: Google Sheets, Zapier, and DocuGenerate.
Google Sheets is a versatile tool for managing and organizing data. Zapier is an automation platform that connects your favorite apps, enabling them to work together seamlessly. DocuGenerate specializes in automated document generation, allowing you to create documents like invoices, contracts, and more.
This automation setup can be particularly useful in various scenarios:
- Sales and Invoicing: Automatically generate invoices from sales data stored in Google Sheets.
- HR and Recruitment: Create employment contracts or offer letters from candidate data.
- Legal Documentation: Produce legal agreements or contracts from structured data.
So let’s dive right in!
Importing the Data in Google Sheets
We’ll build a scenario where we generate contracts from data stored in Google Sheets. We will use the Accounting Contract asset from the DocuGenerate Template Library, which includes a Word template for the contract and a sample dataset in Excel format.
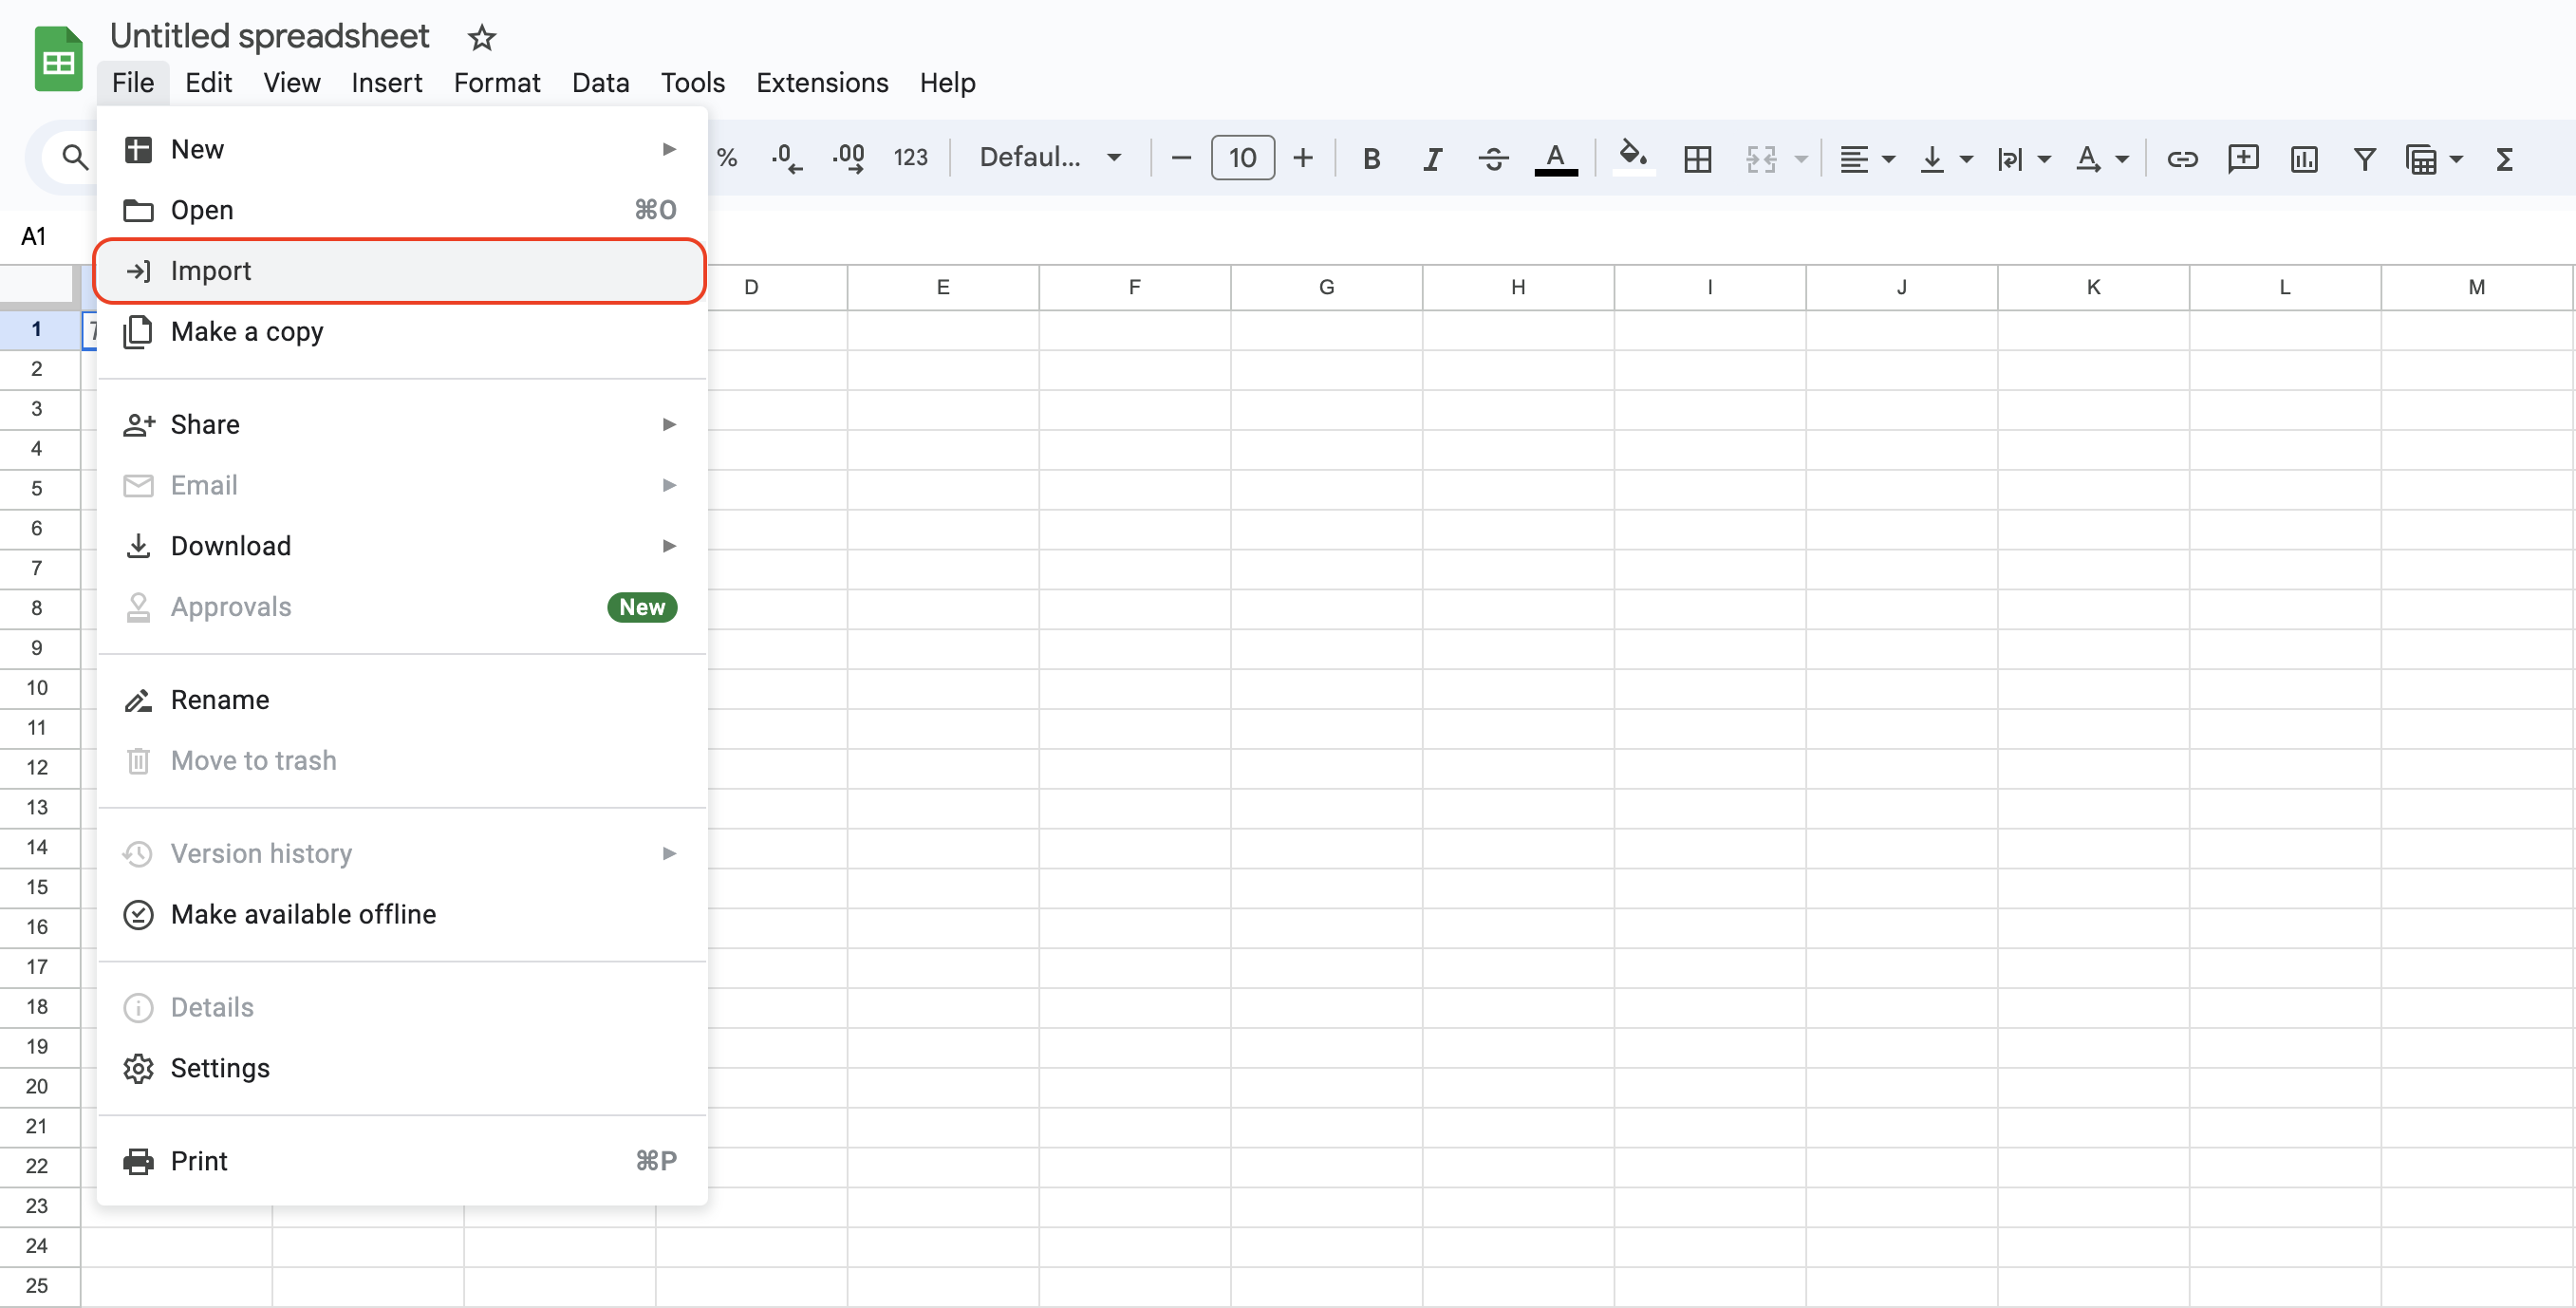
First, we need to import our Excel file with the sample data into Google Sheets. Open Google Sheets, create a new spreadsheet, and click on File -> Import.
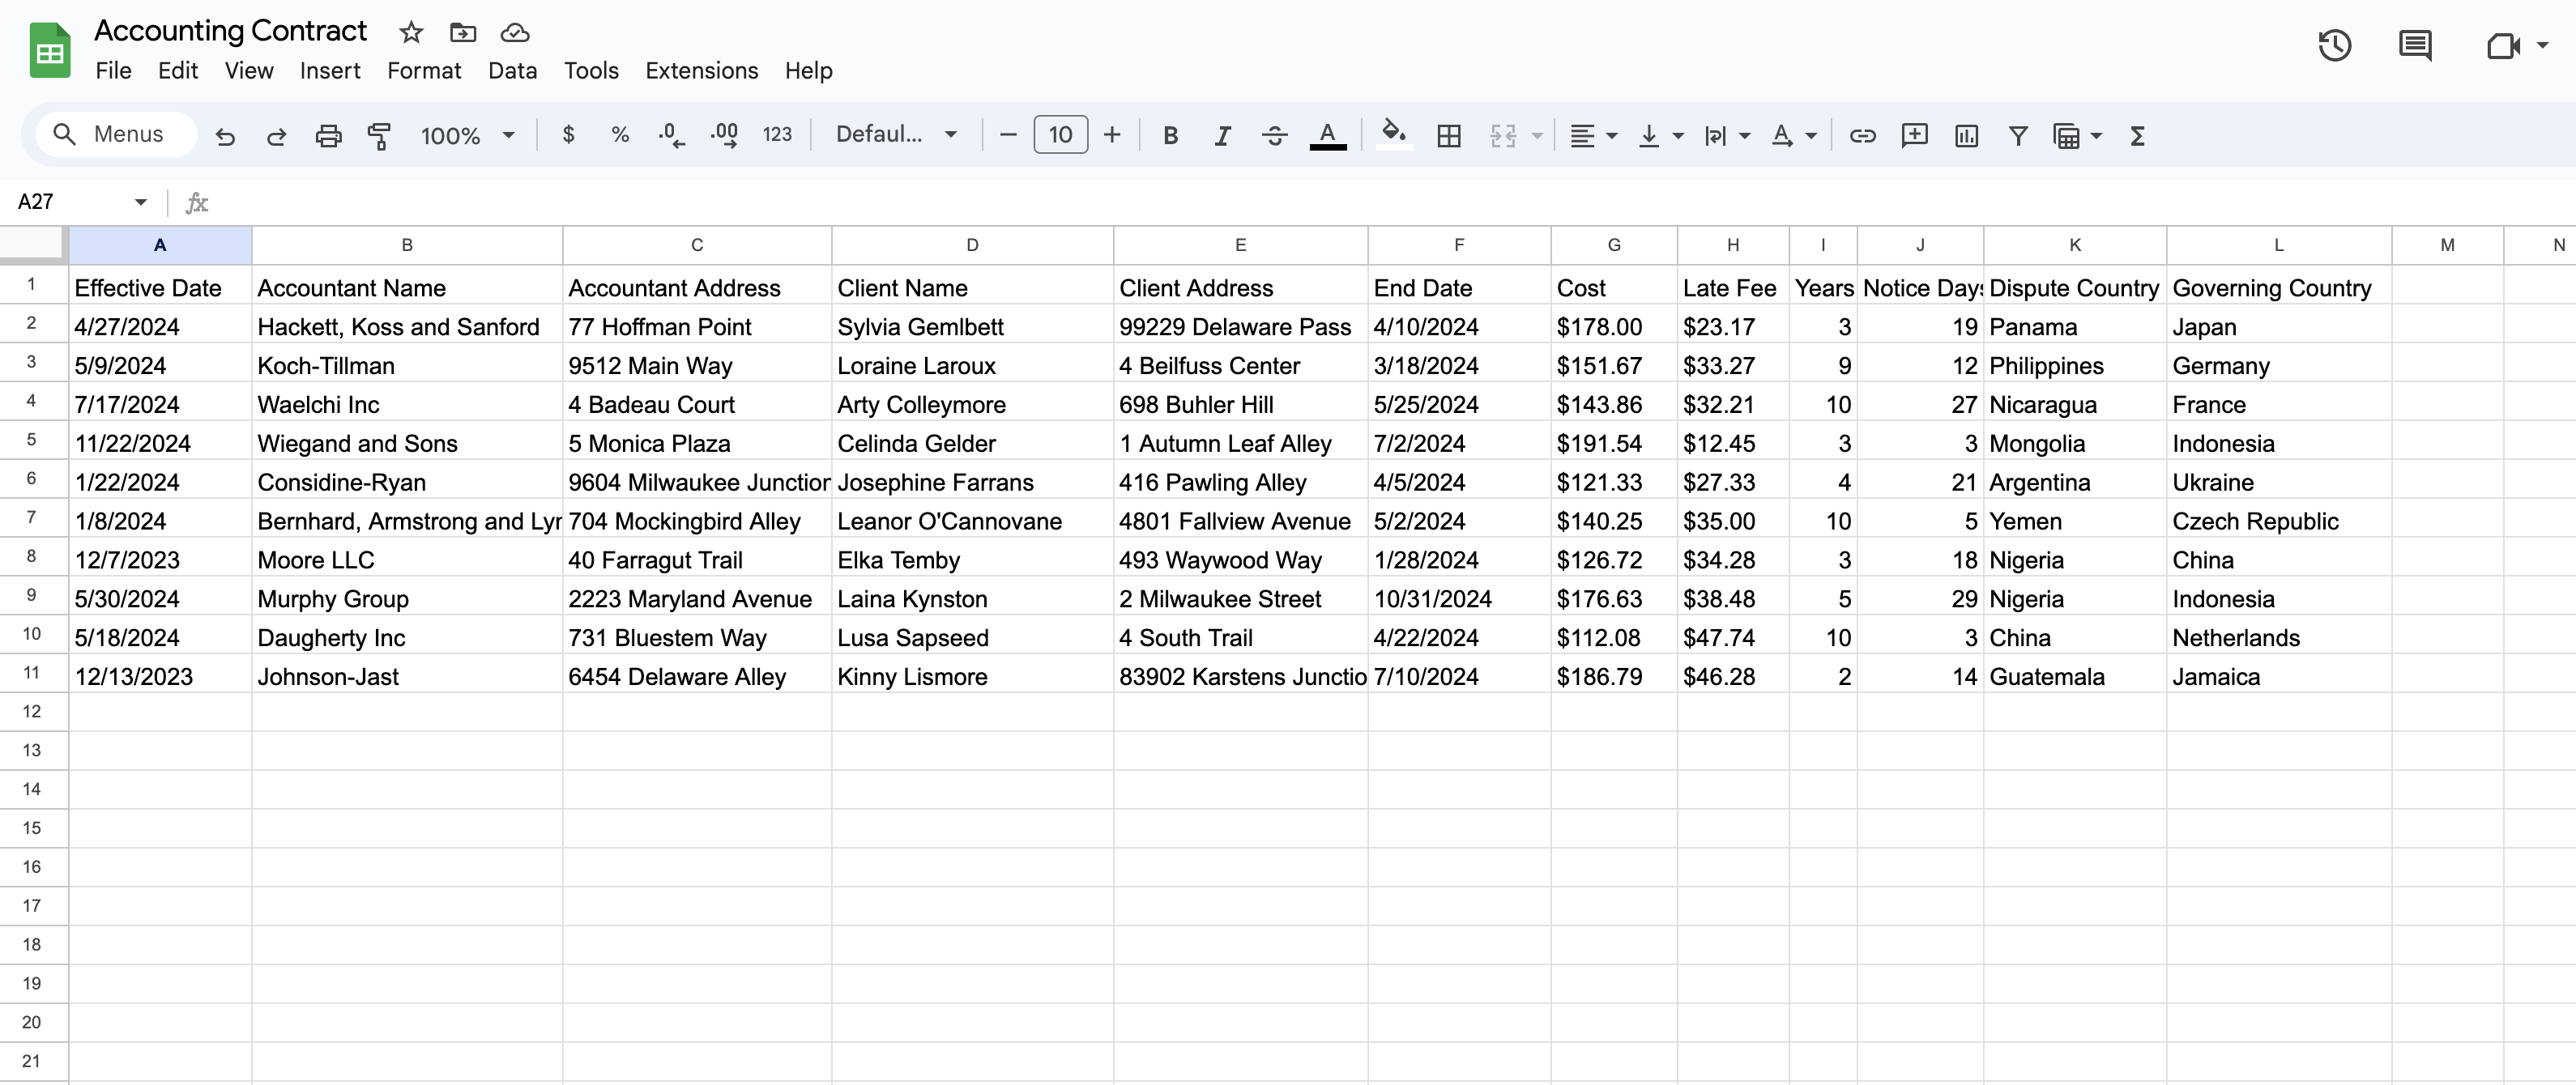
Choose the Upload tab, then select and upload the Accounting Contract.xlsx Excel file.
After the upload is complete, you should see your data in Google Sheets. Give the spreadsheet a name, like Accounting Contract for example, and you’re done!
Setting Up the Google Sheets Trigger
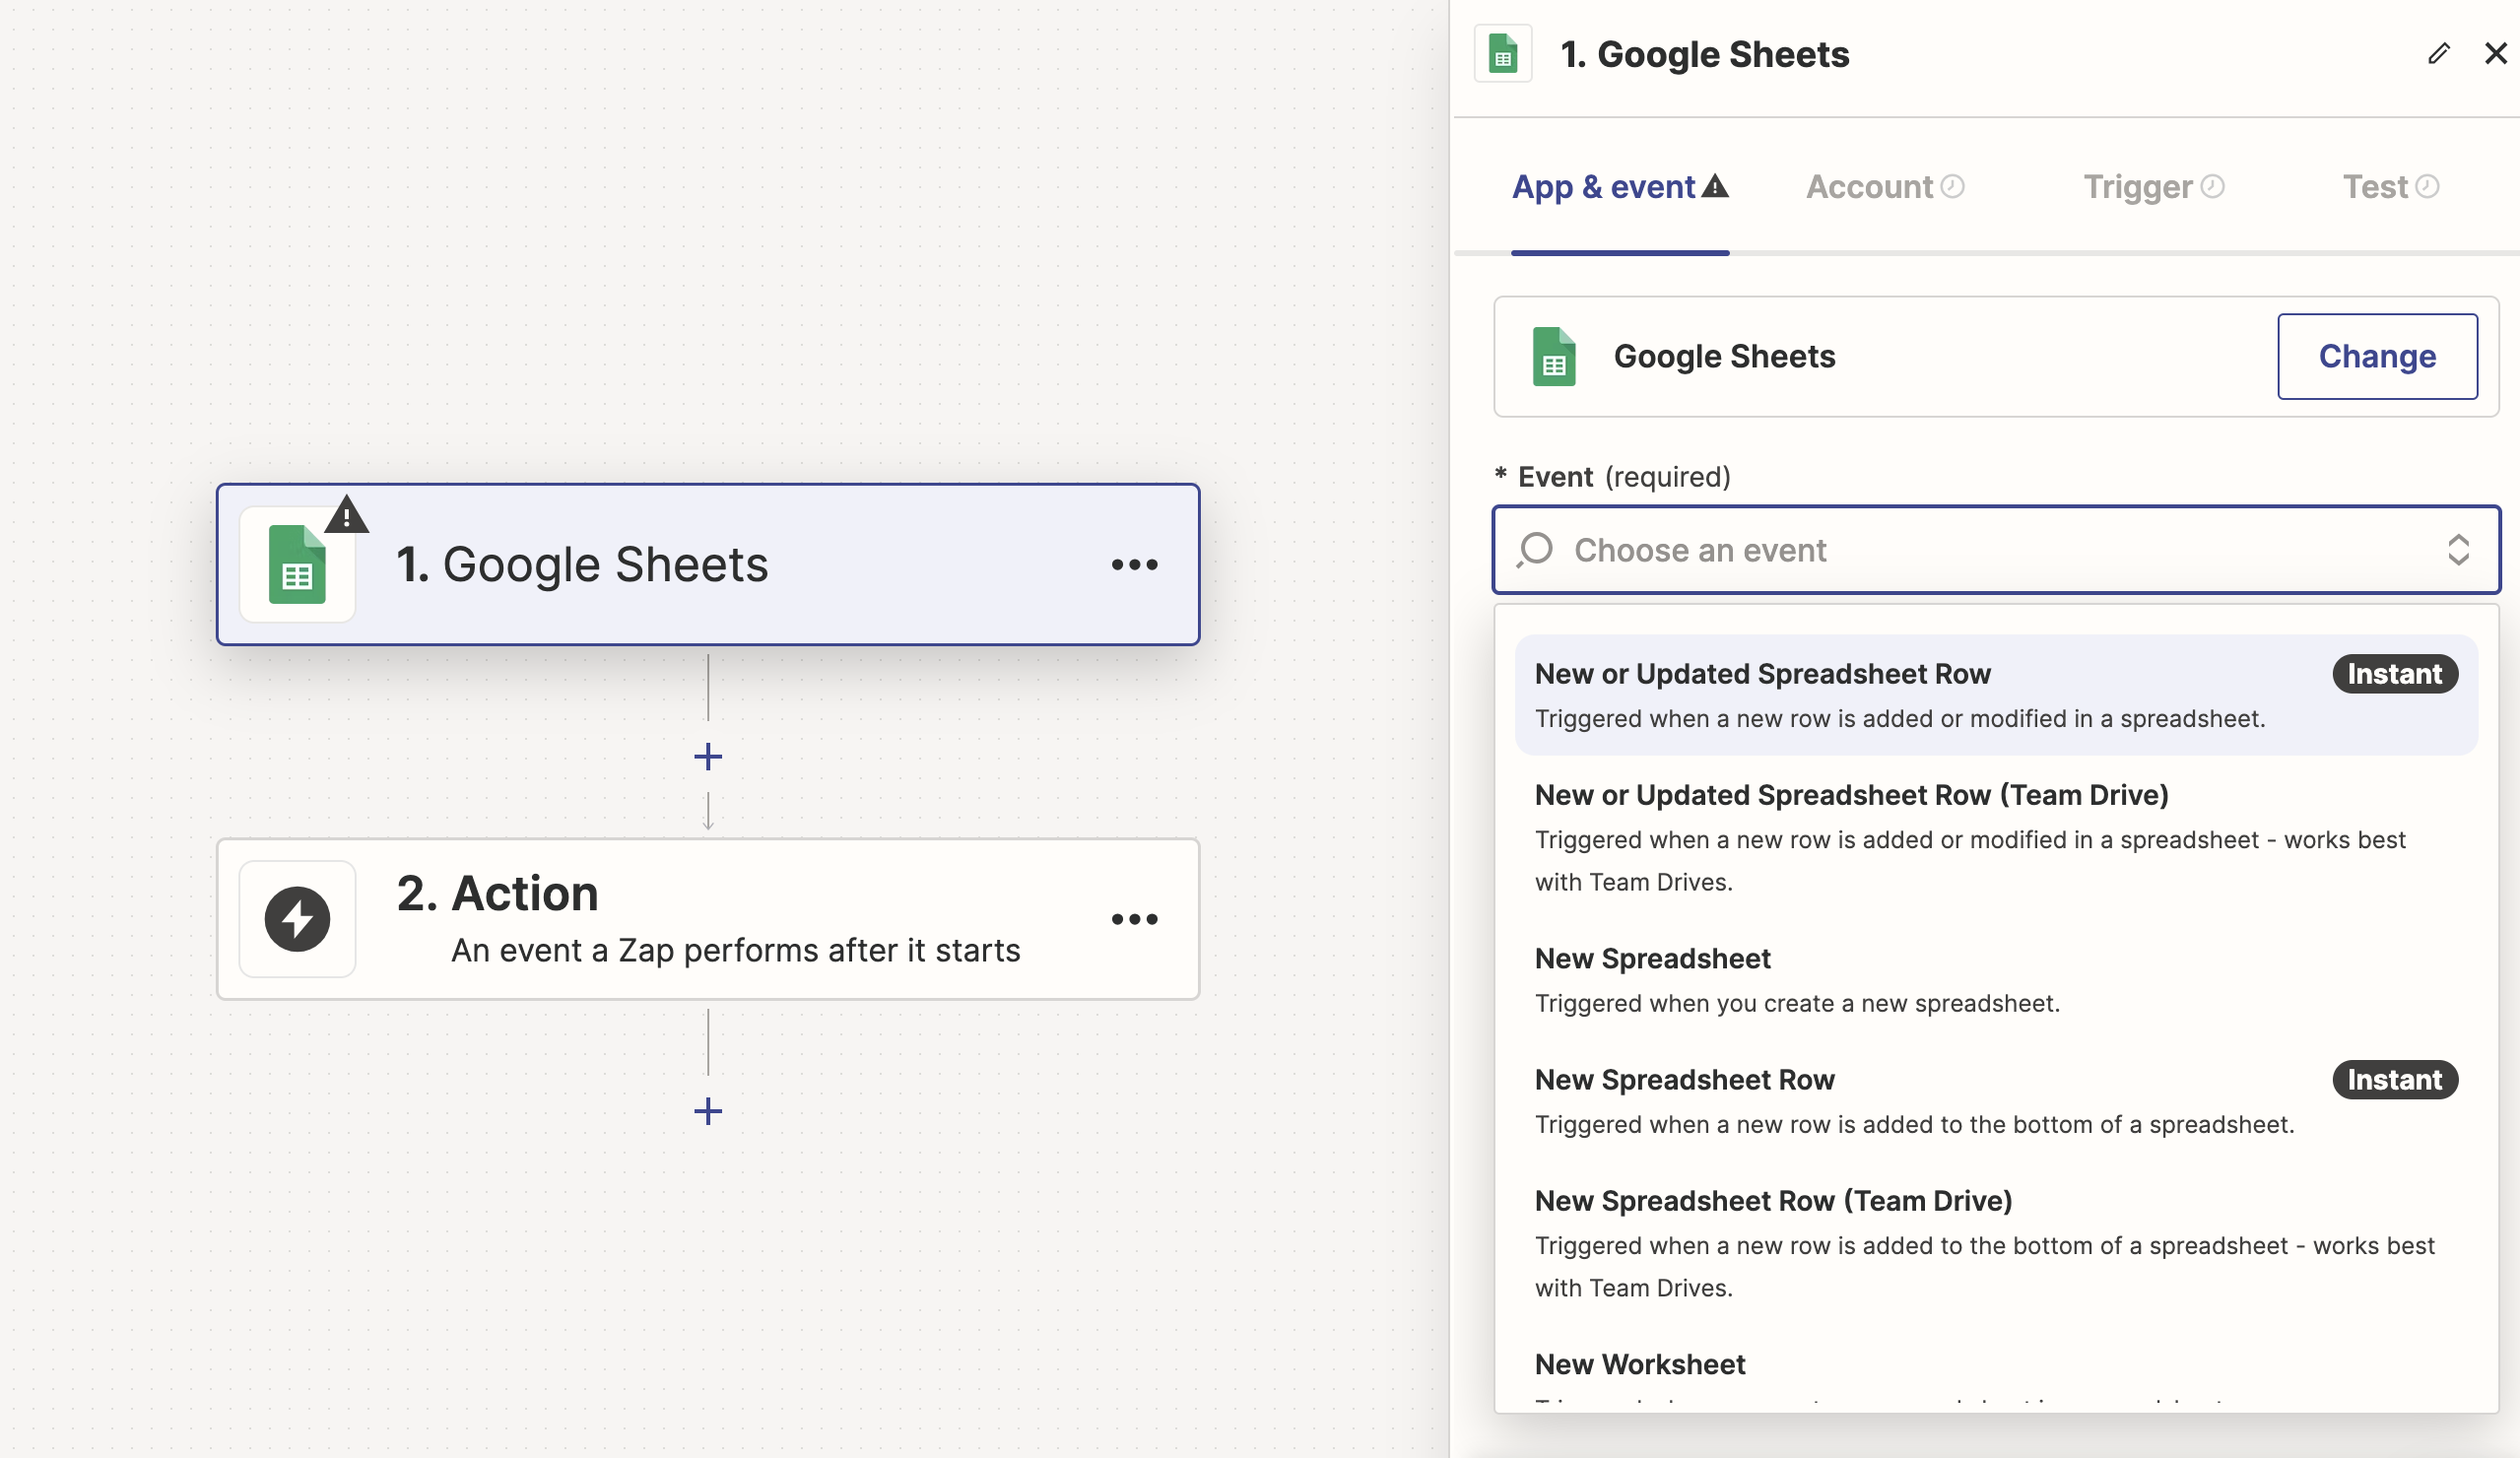
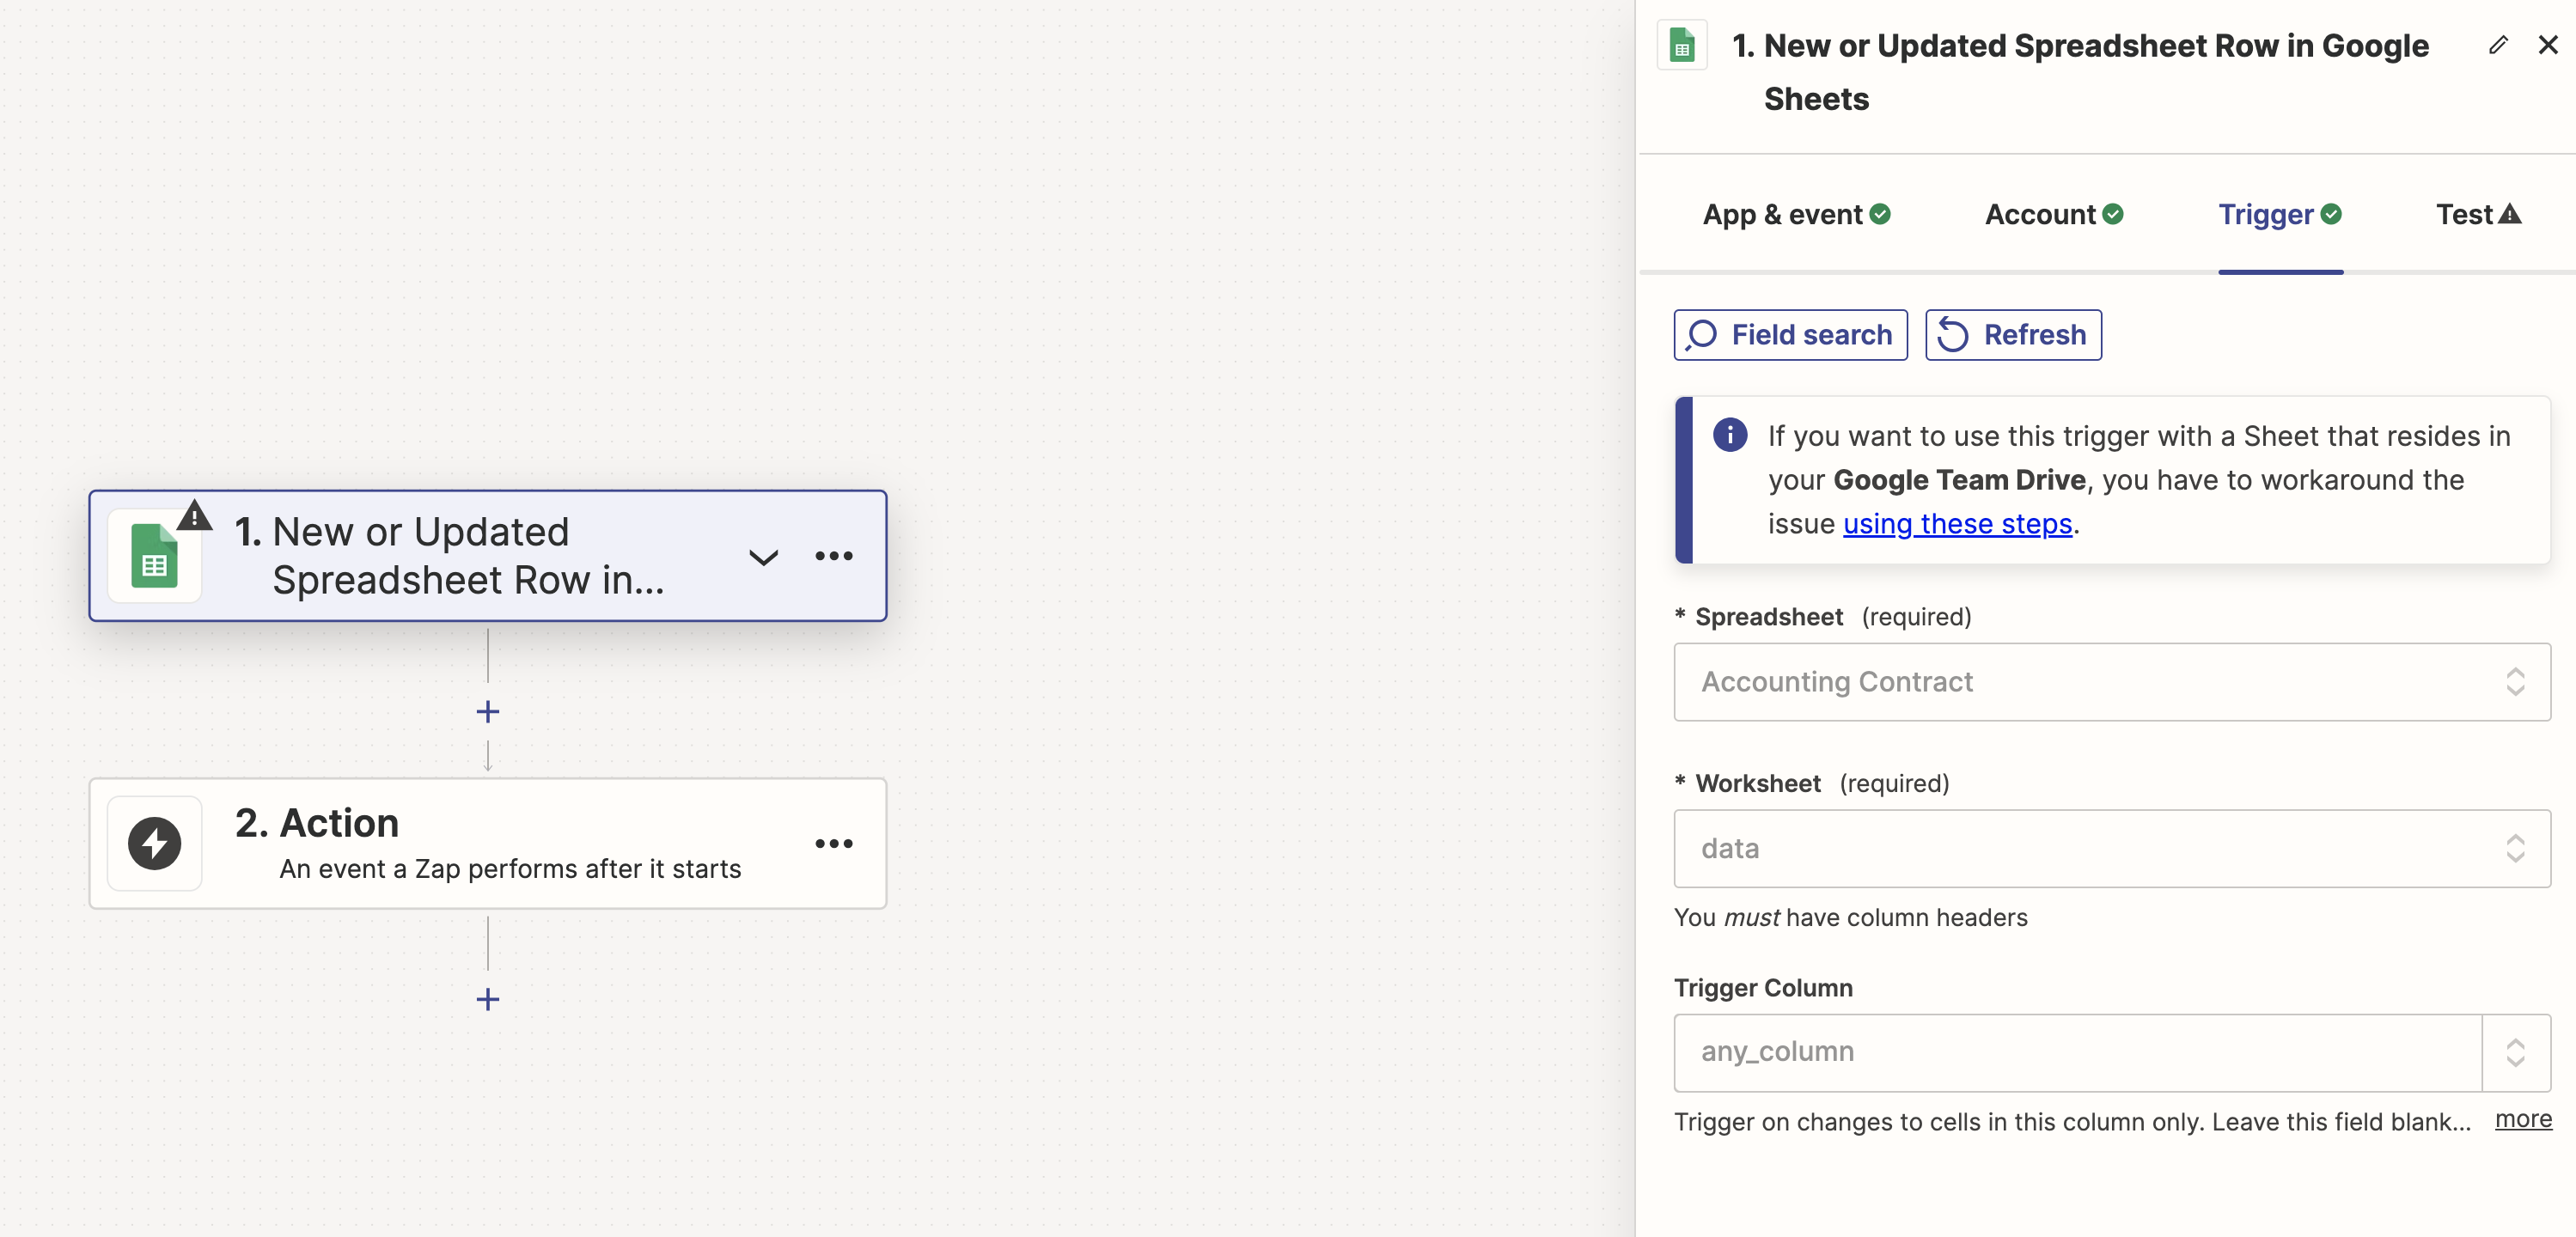
Start by creating a new Zap and selecting the Google Sheets app as the starting point. Then, add the New or Updated Spreadsheet Row in Google Sheets trigger in Zapier.
Next, connect your Google account that was used to import the data in Google Sheets. On the Trigger tab select the Spreadsheet and Worksheet corresponding to your Google Sheets document:
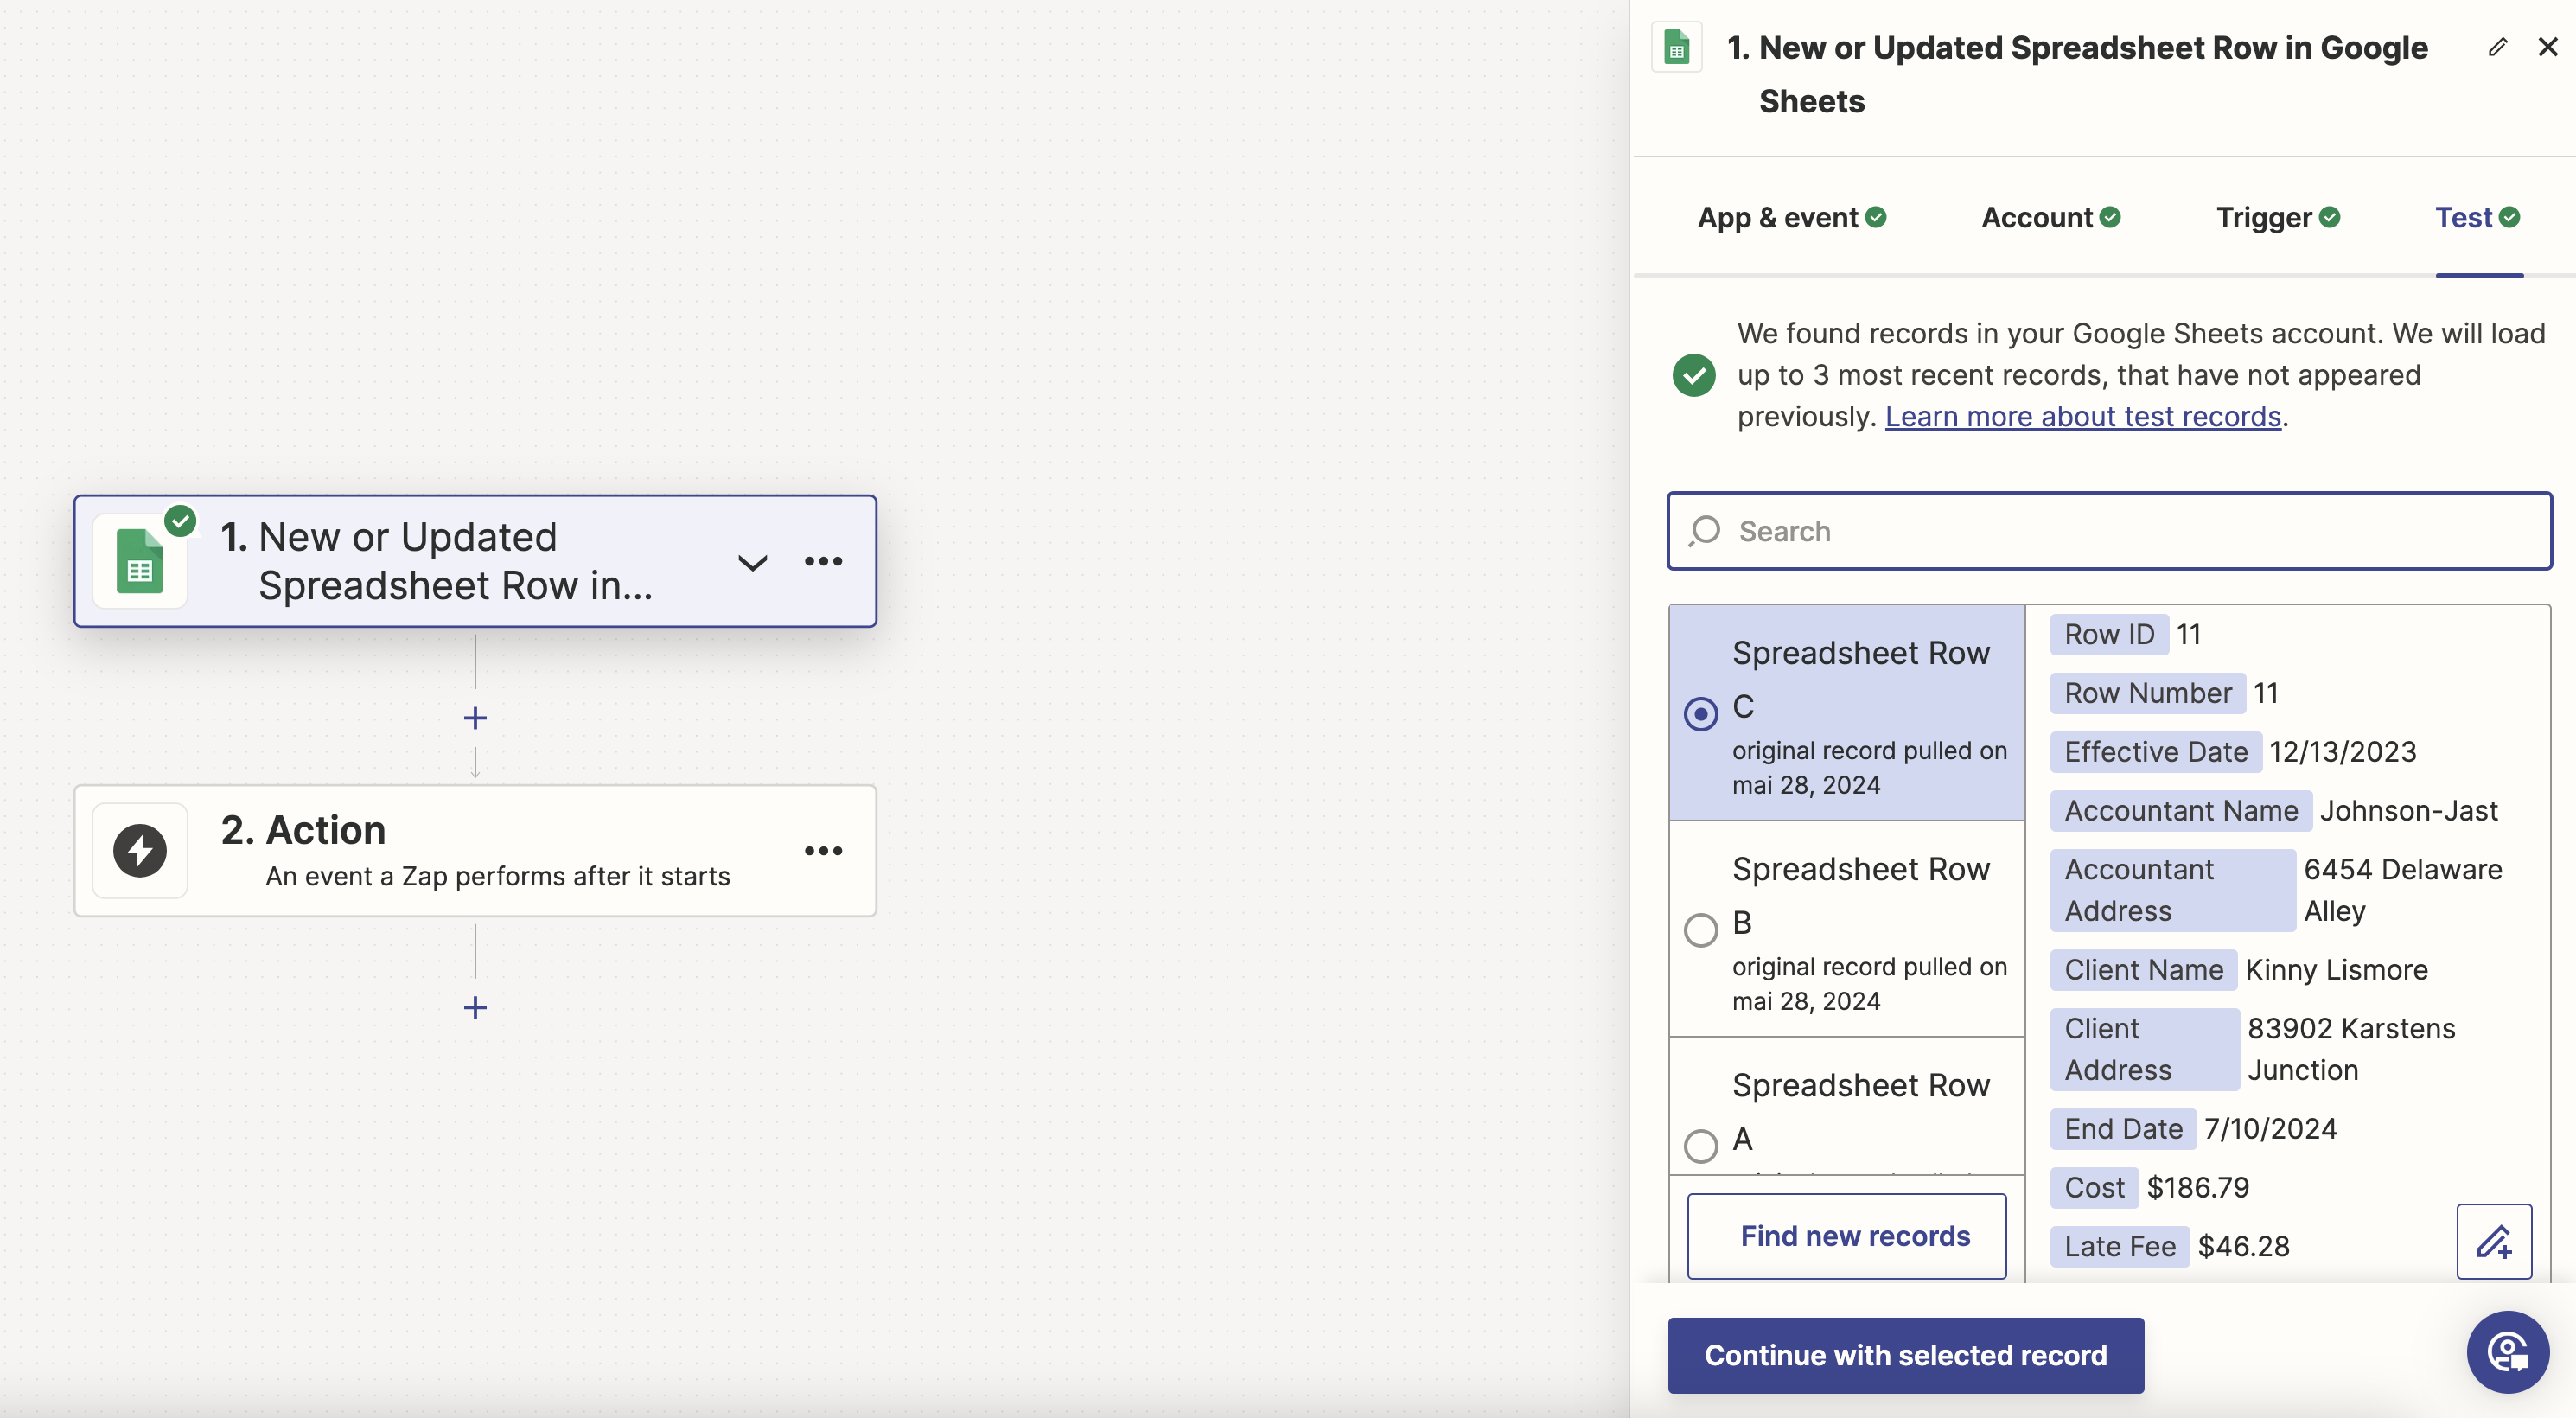
Finally, on the Test step, you can verify that the connection is successful. The listing shows the three most recent records of your data. Select one of them and click on Continue with selected record to complete this step. The selected record will be used when setting up the other apps in the Zap to preview the data that will be coming from the Google Sheets app.
Creating the Template in DocuGenerate
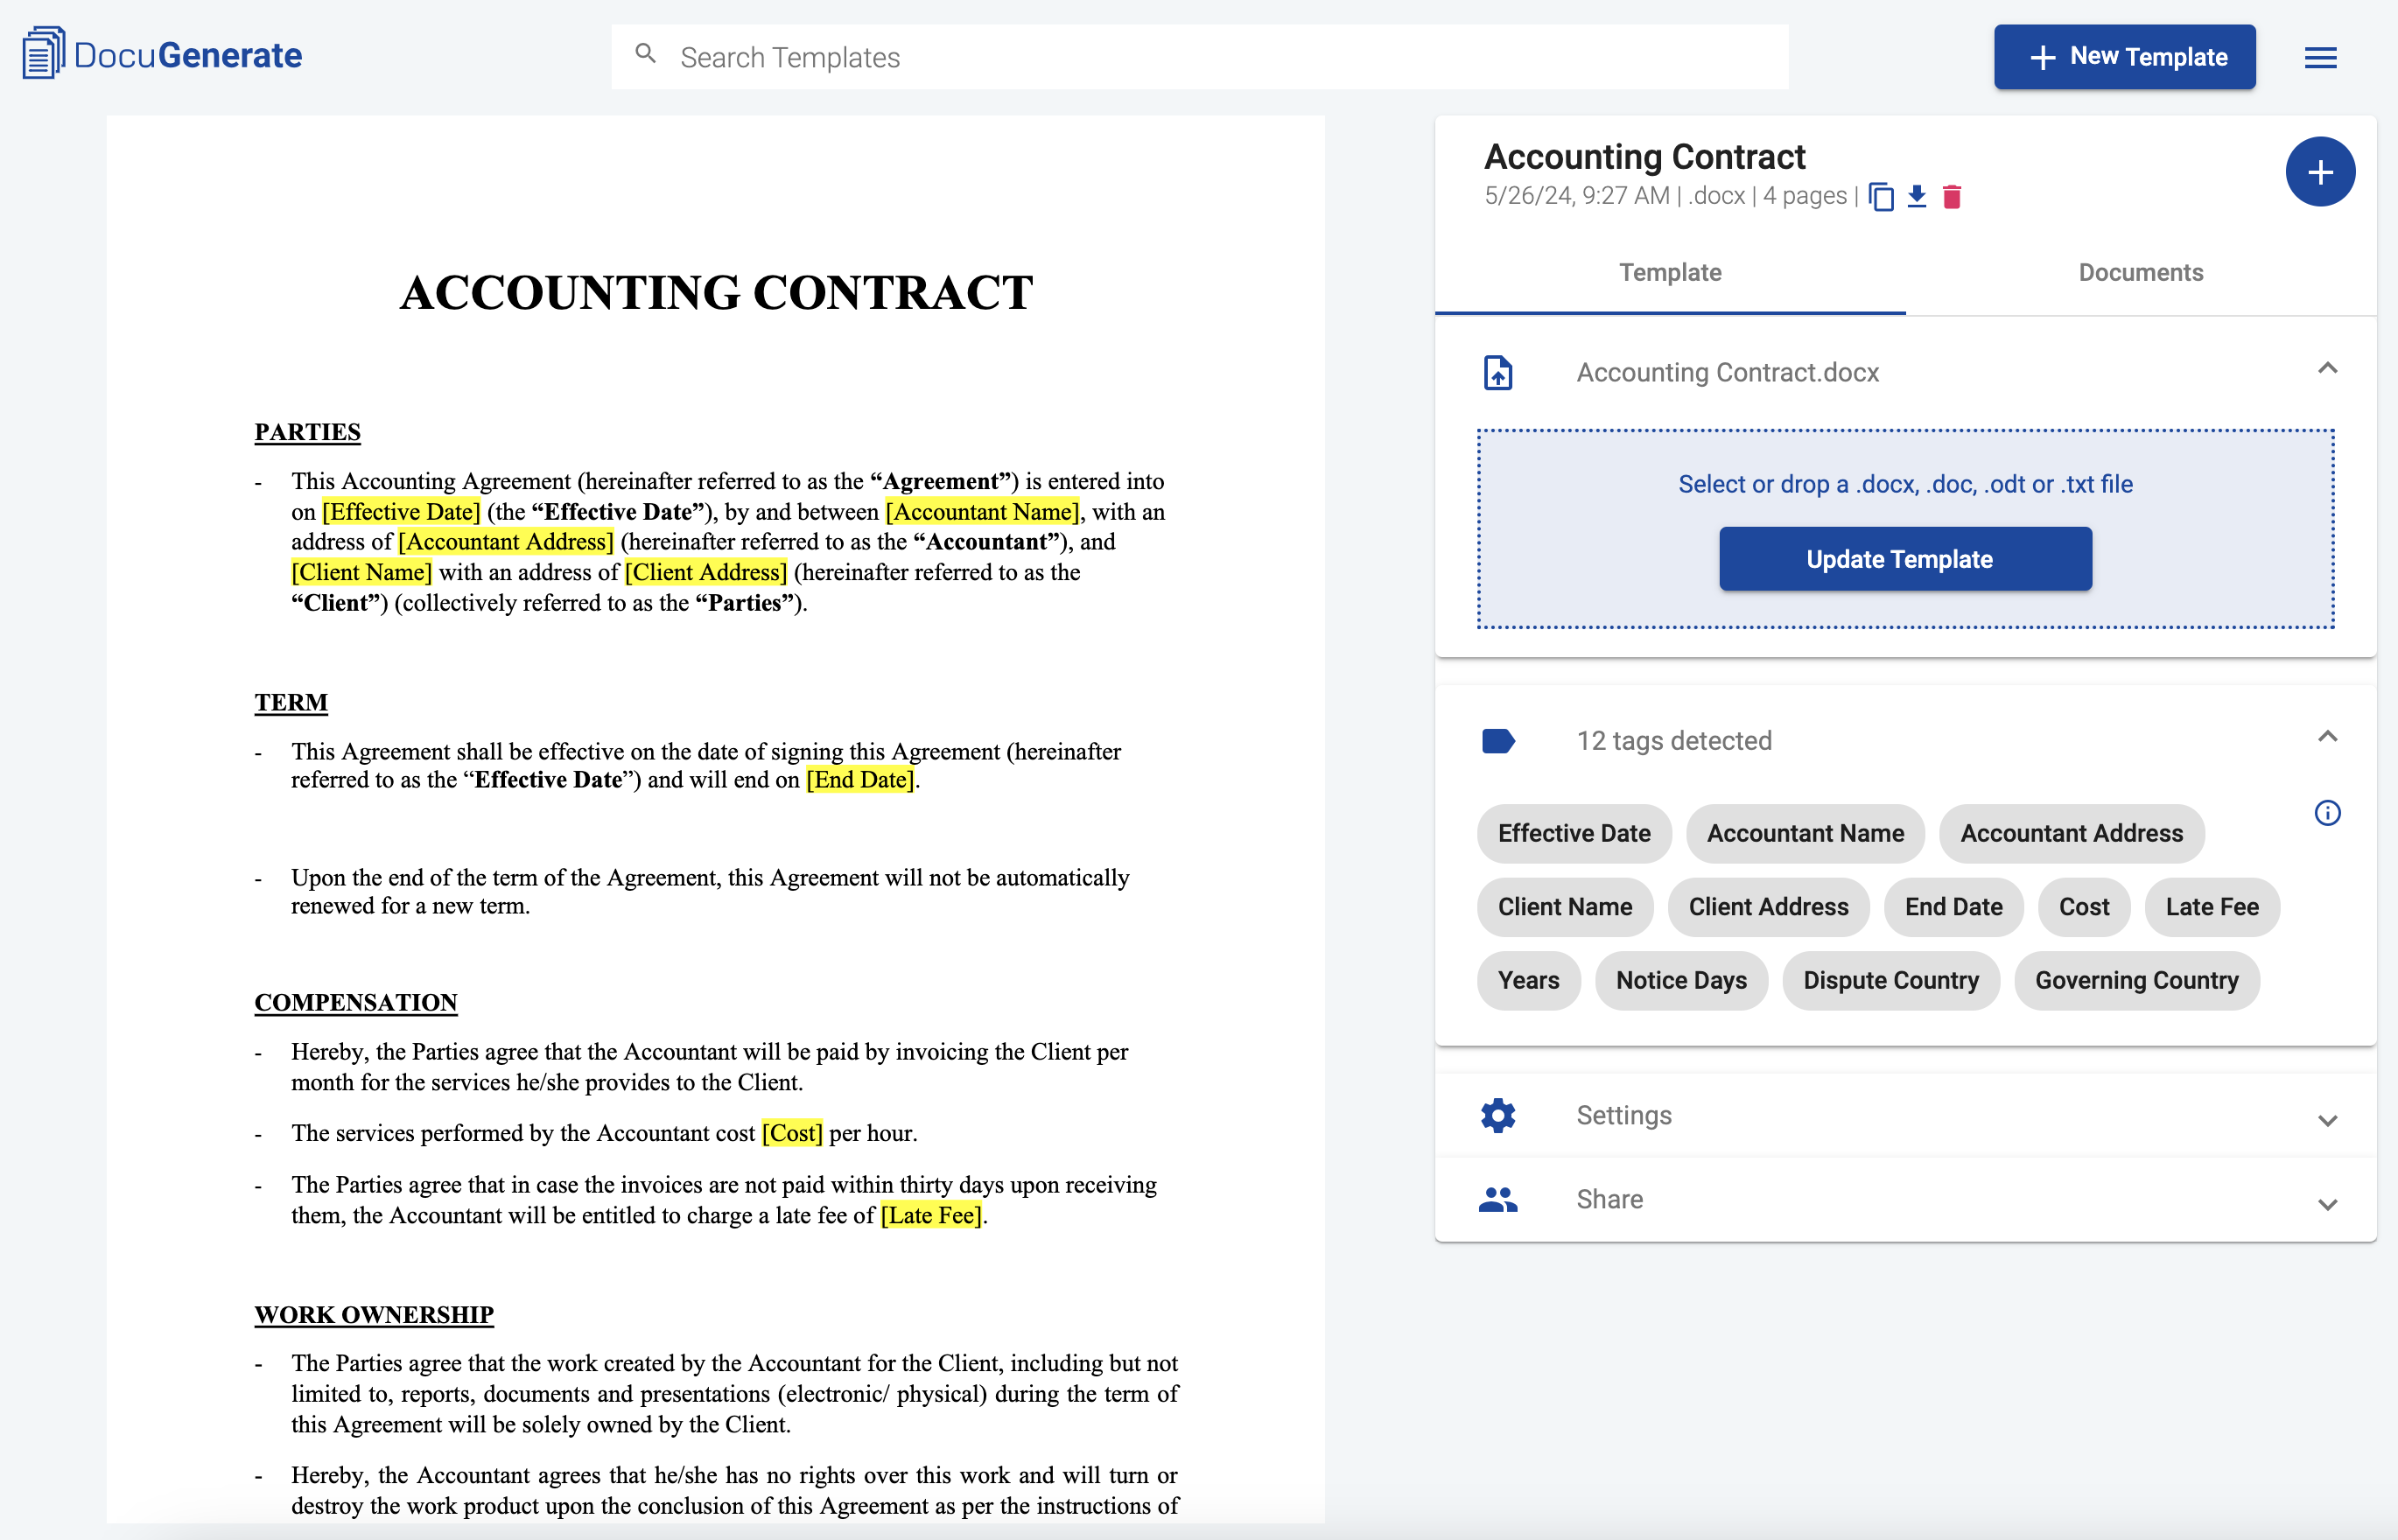
Log in to DocuGenerate and create a new template using the Accounting Contract.docx sample file. Follow the guide in our Help Center if you need help. Your screen should look something like this:
Setting Up the “Generate Document” Action
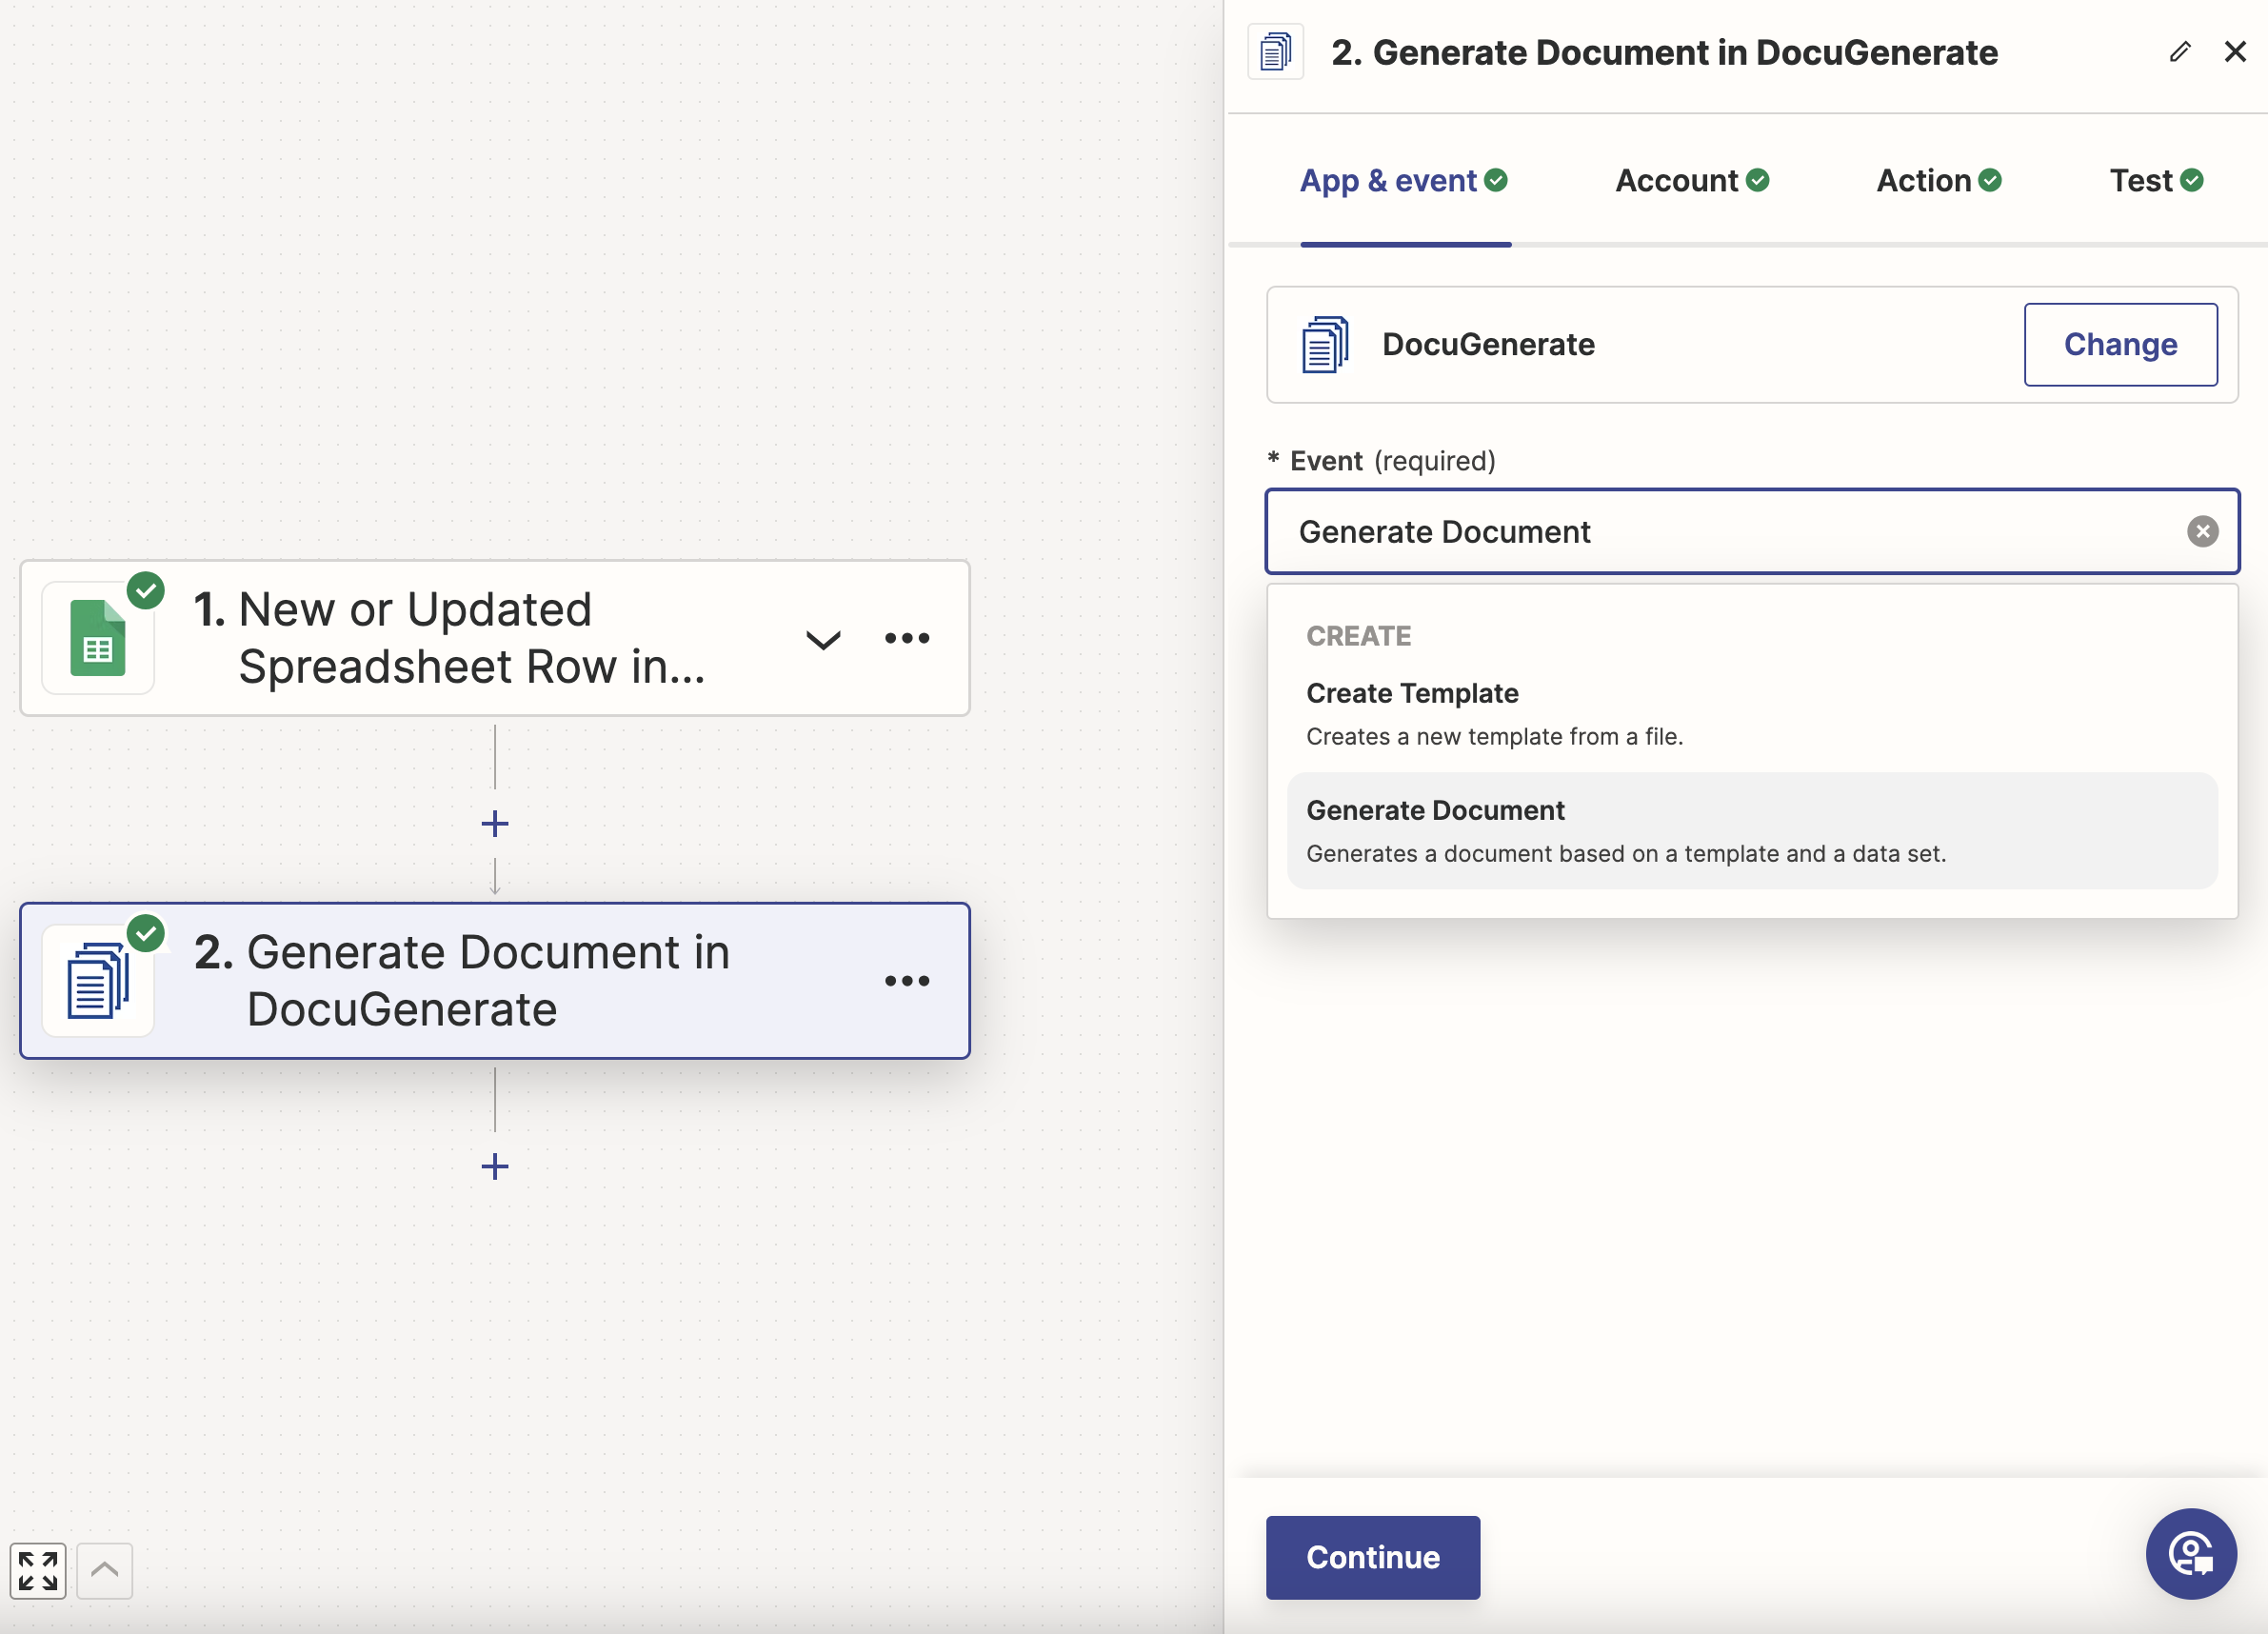
Search for the DocuGenerate app and add it to the Zap. Then select the Generate Document action. For more information about connecting Zapier with DocuGenerate, check out the guide in our Help Center.
After connecting your DocuGenerate account to Zapier, you need to configure the call parameters in the Action tab. From the drop-down list, select the Accounting Contract template created in the previous step. Specify a Name, like Contract for [Client Name], where [Client Name] is a dynamic field that will be inserted by Zapier during the API call to DocuGenerate. For the format, you can choose PDF.
When selecting the template, the Data parameter will be pre-populated with an empty JSON object corresponding to the merge tags contained in the template. For each key, you’ll need to map the values from the Google Sheet app. Make sure to keep the double quotes surrounding each value, otherwise the JSON will be invalid and the API call will fail.
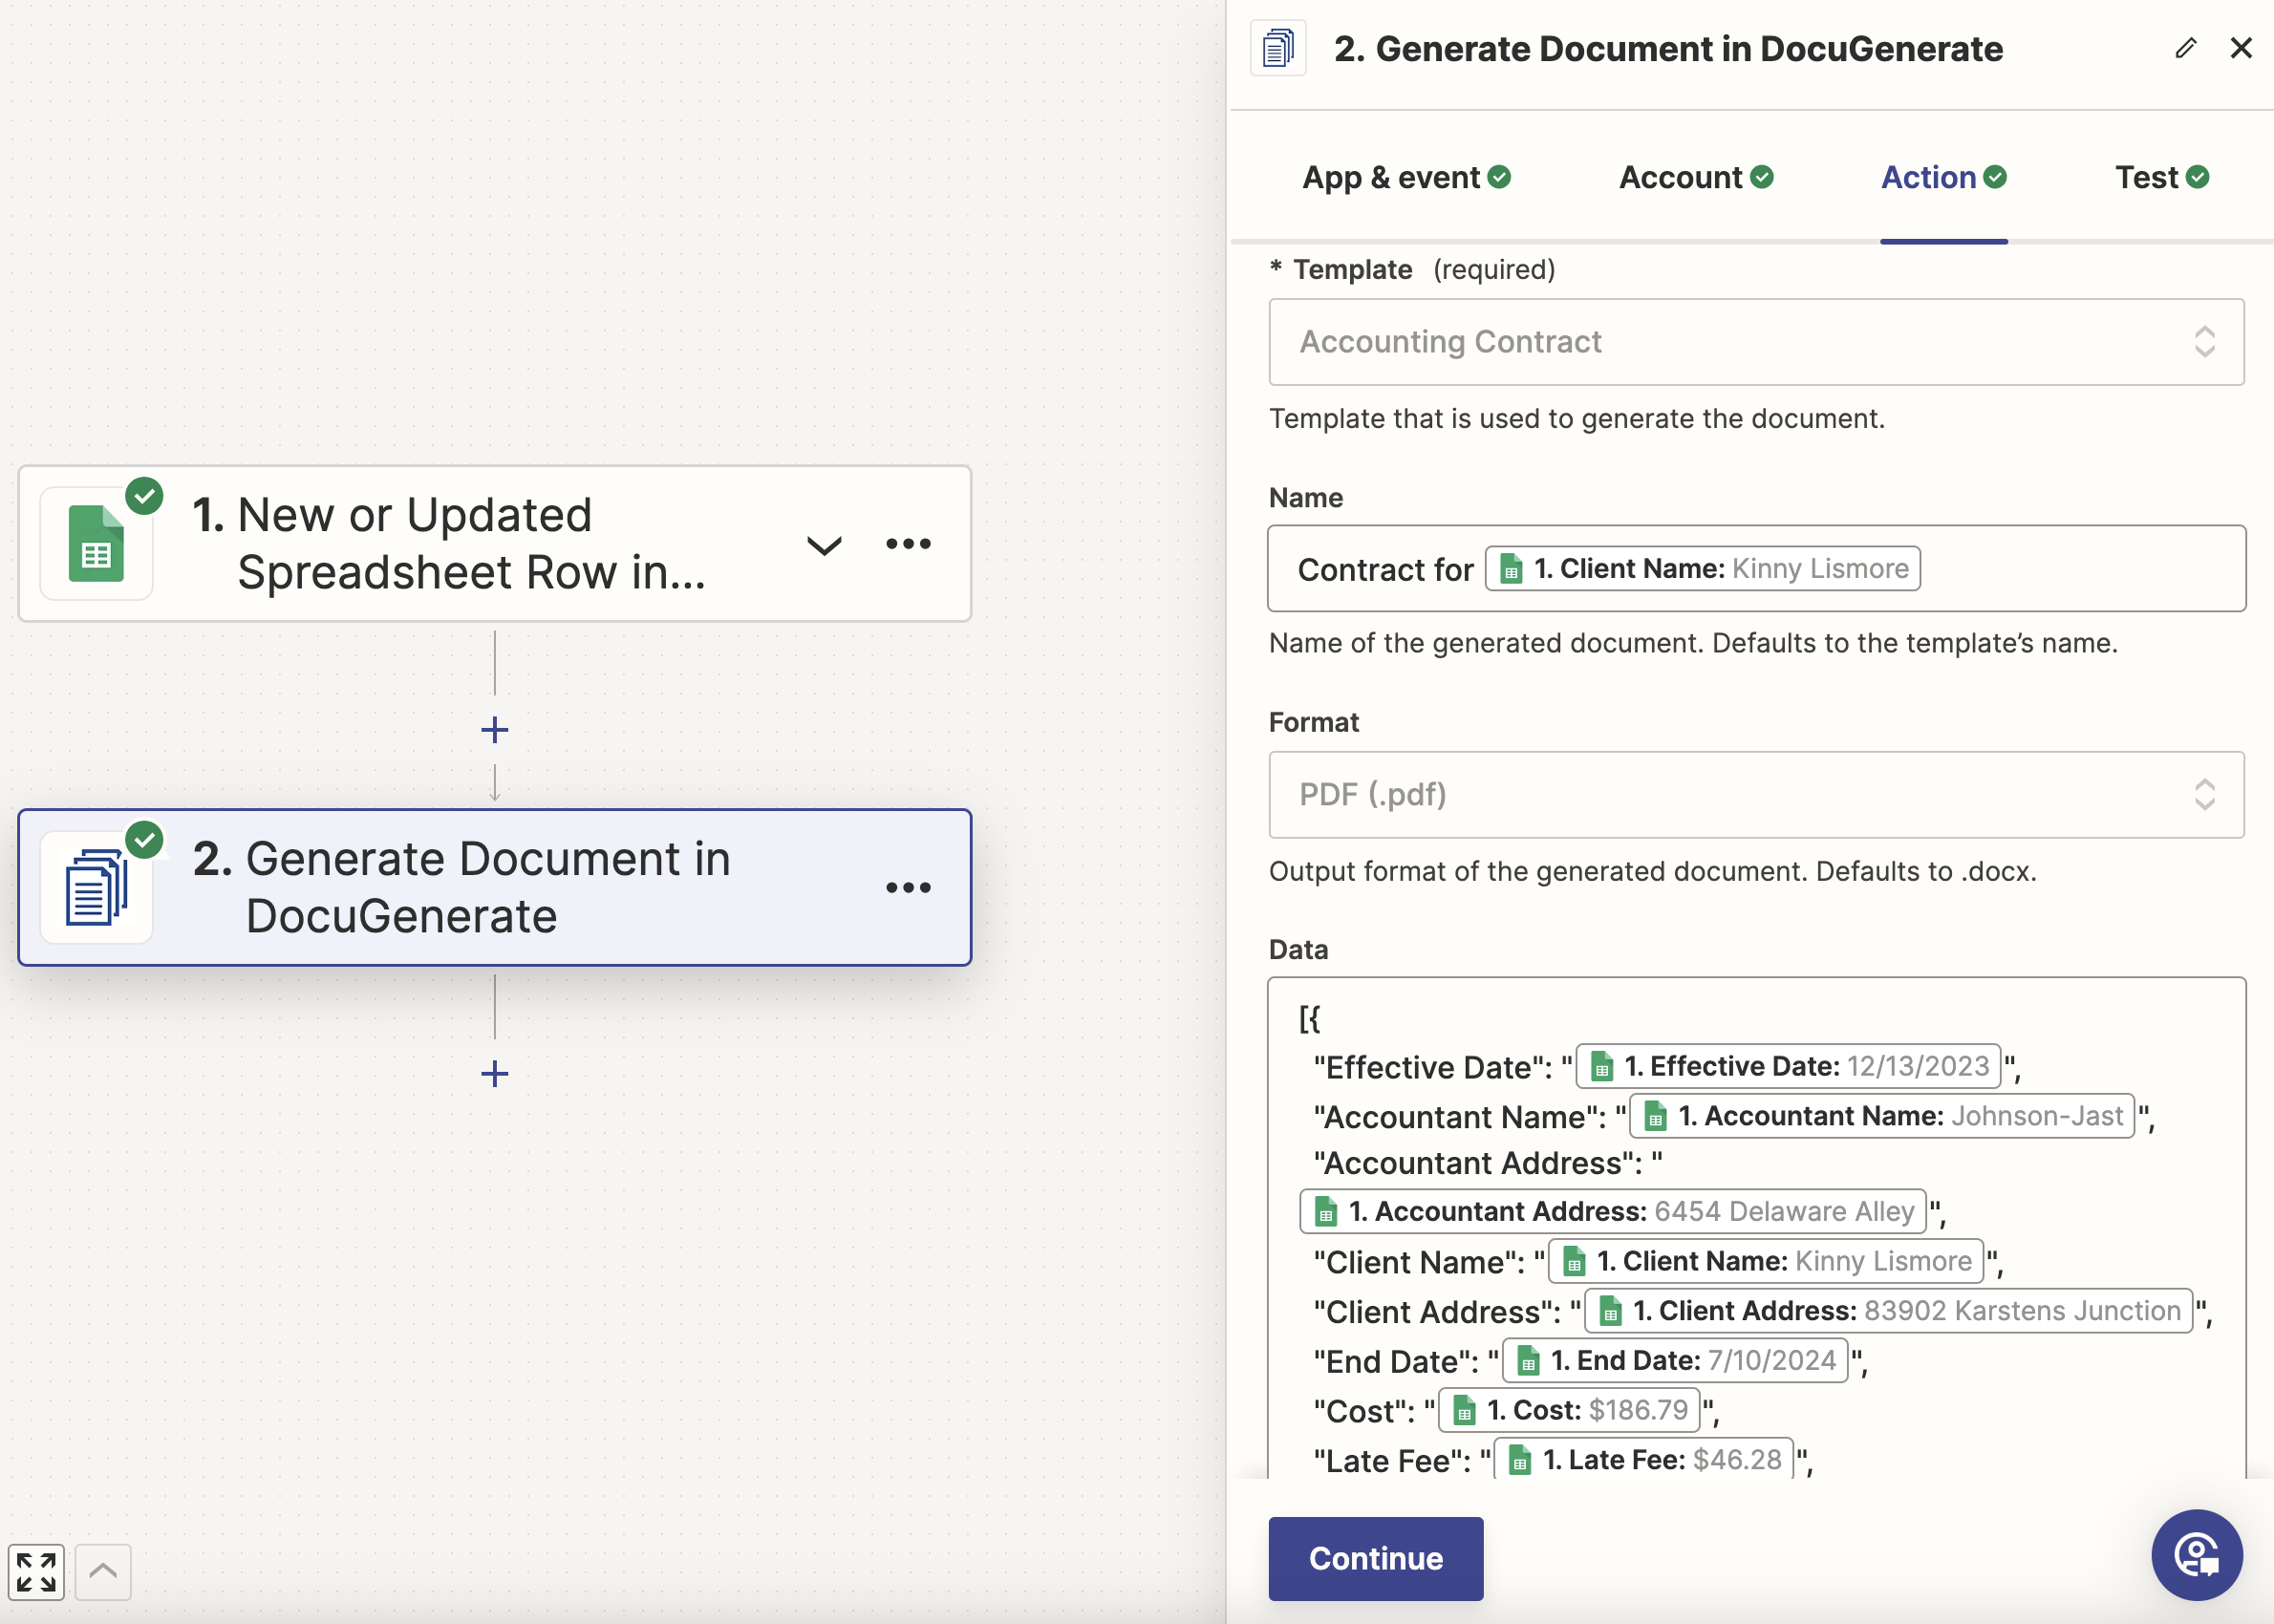
Take for example the first key, this is the correct way to do it:
"Effective Date": "1. Effective Date 12/13/2023"
This on the other hand, would be incorrect because the double quotes are missing:
"Effective Date": 1. Effective Date 12/13/2023
Finally, after the mapping is complete, you can go ahead and test this step. If everything is set up correctly, then the API call will be successful, and you will see the JSON response coming from DocuGenerate’s API:
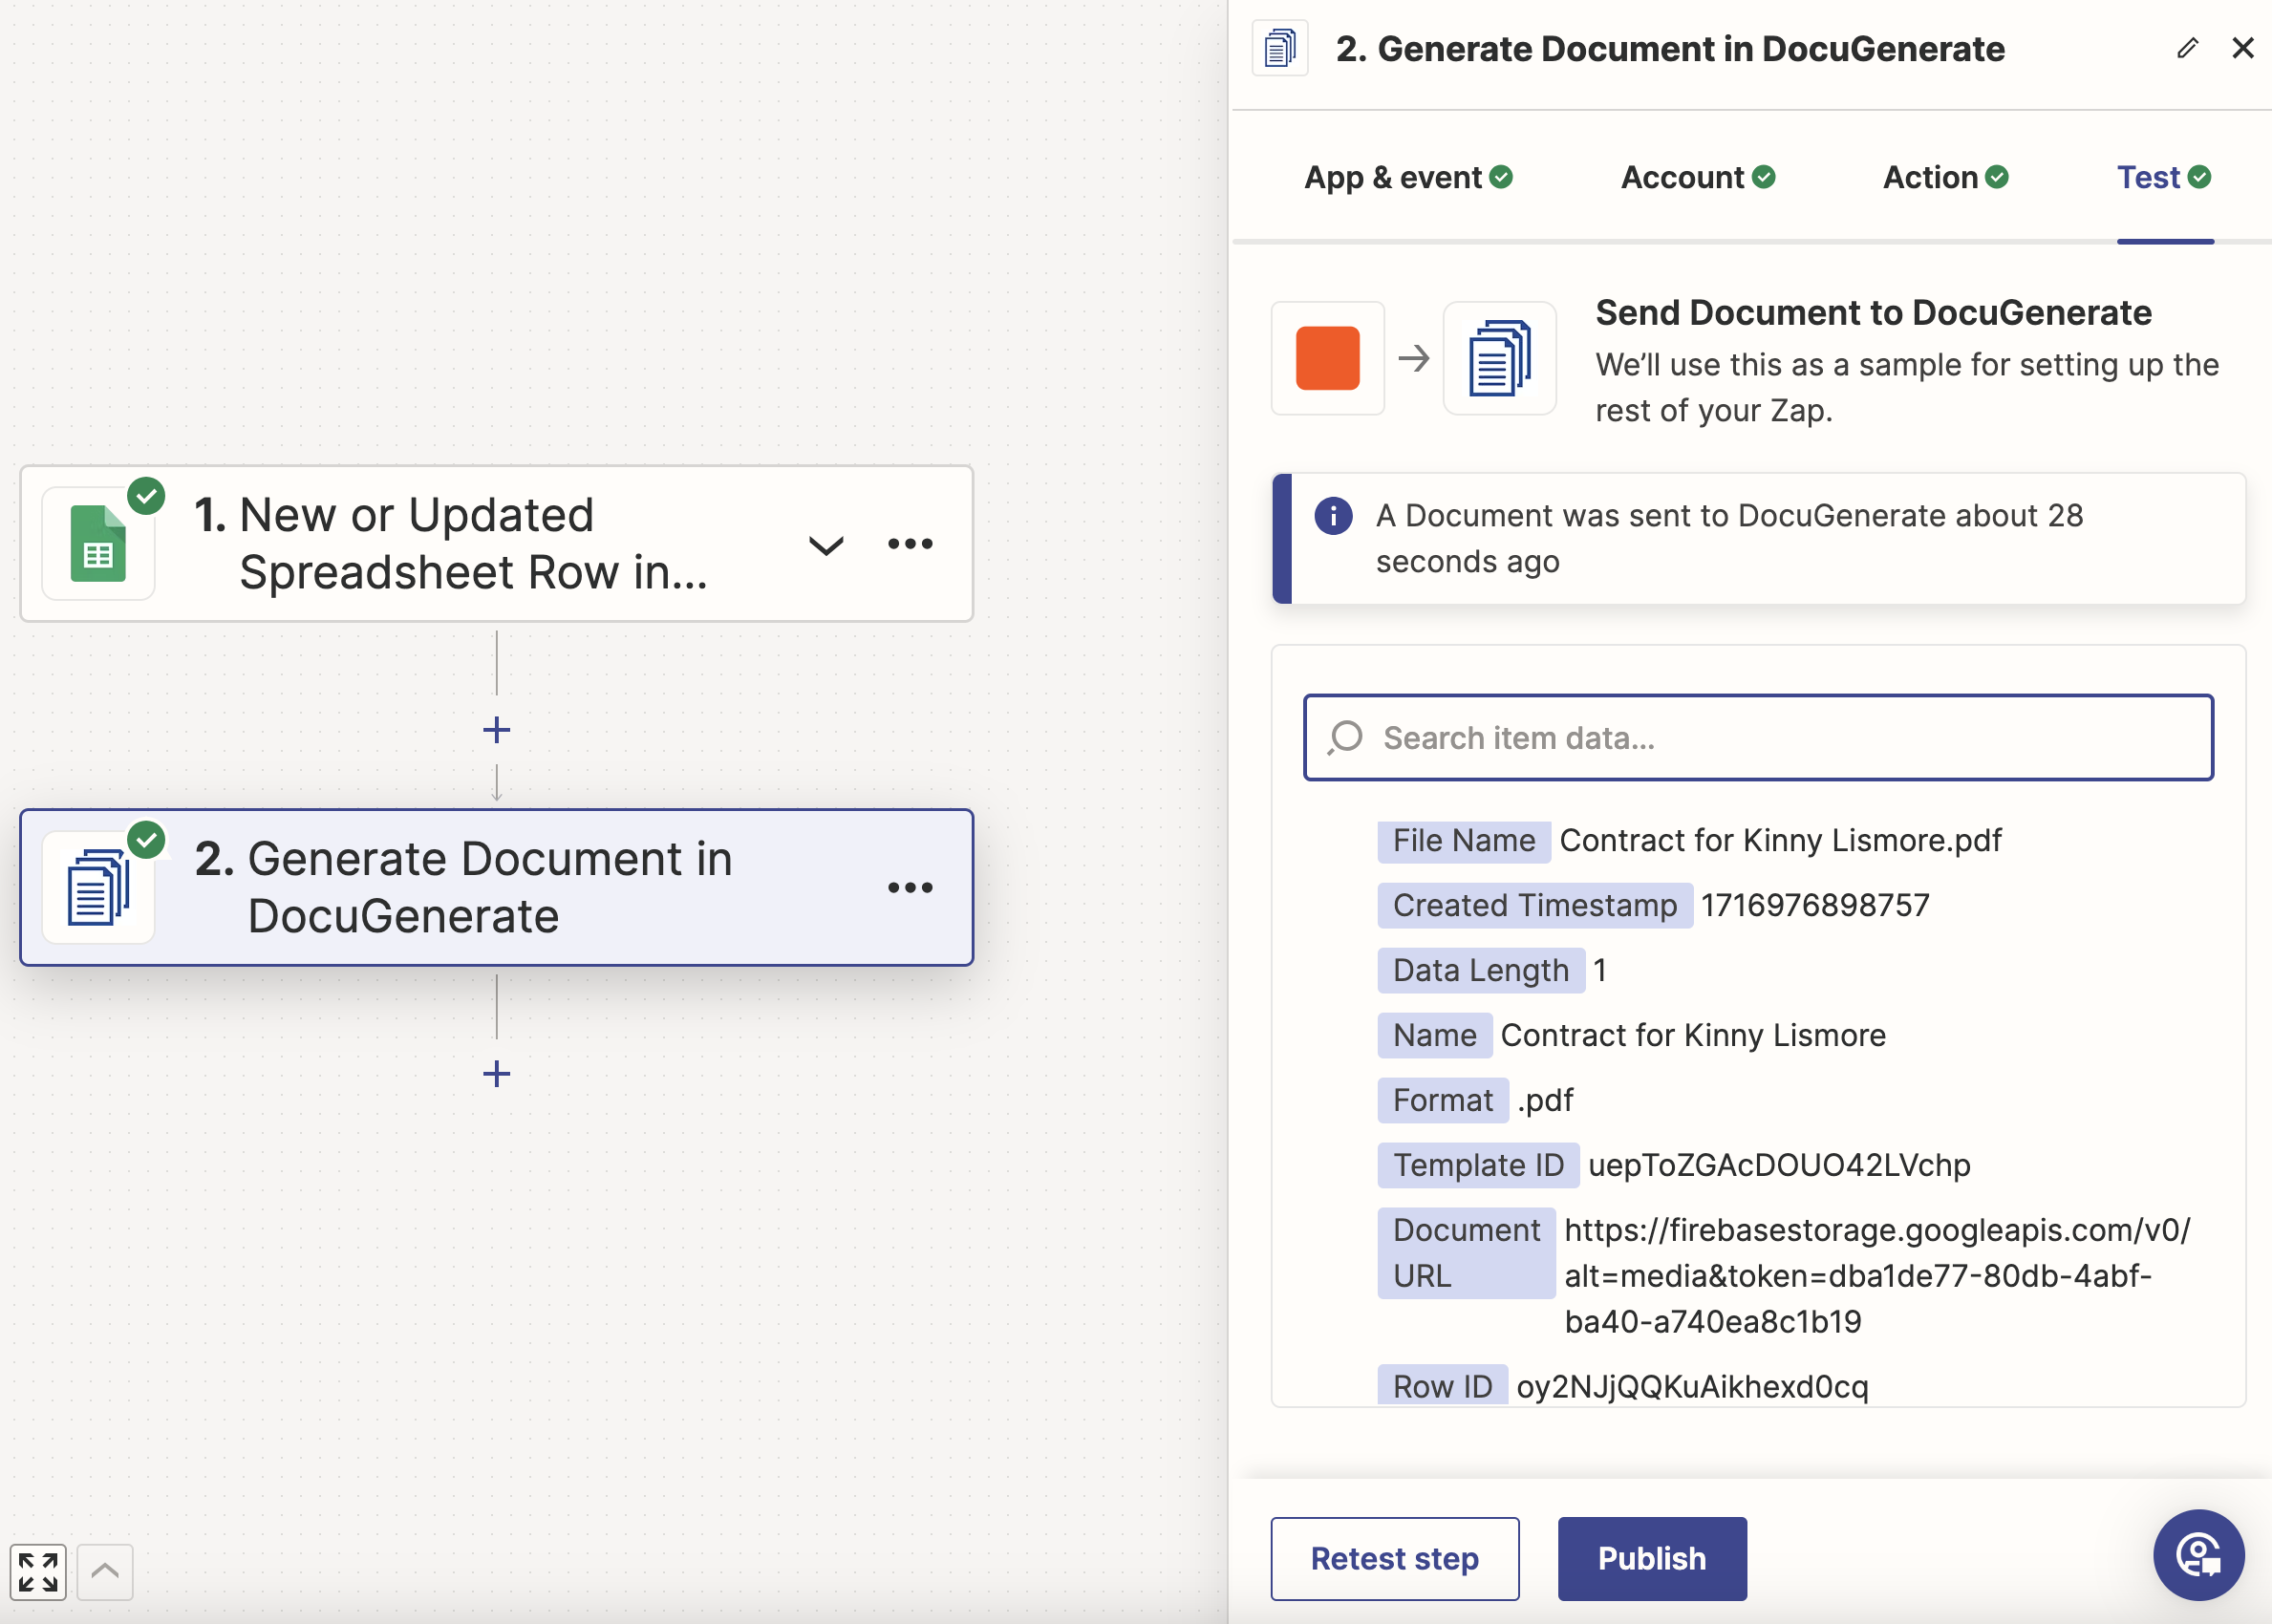
You’re all done! Click on the Publish button to save and publish your Zap.
Going Further: Handle Multi-Line Data Values
Sometimes the values from the data source, in this case, the Google Sheet, may be multi-line strings. Although this is usually not the case, as most string values are single-lined. But it’s best to handle this edge case to avoid issues while running the Zap.
For example, consider the same dataset, but with the Client Address in the last row changed to a multi-line value:
83902 Karstens Junction
Suite C

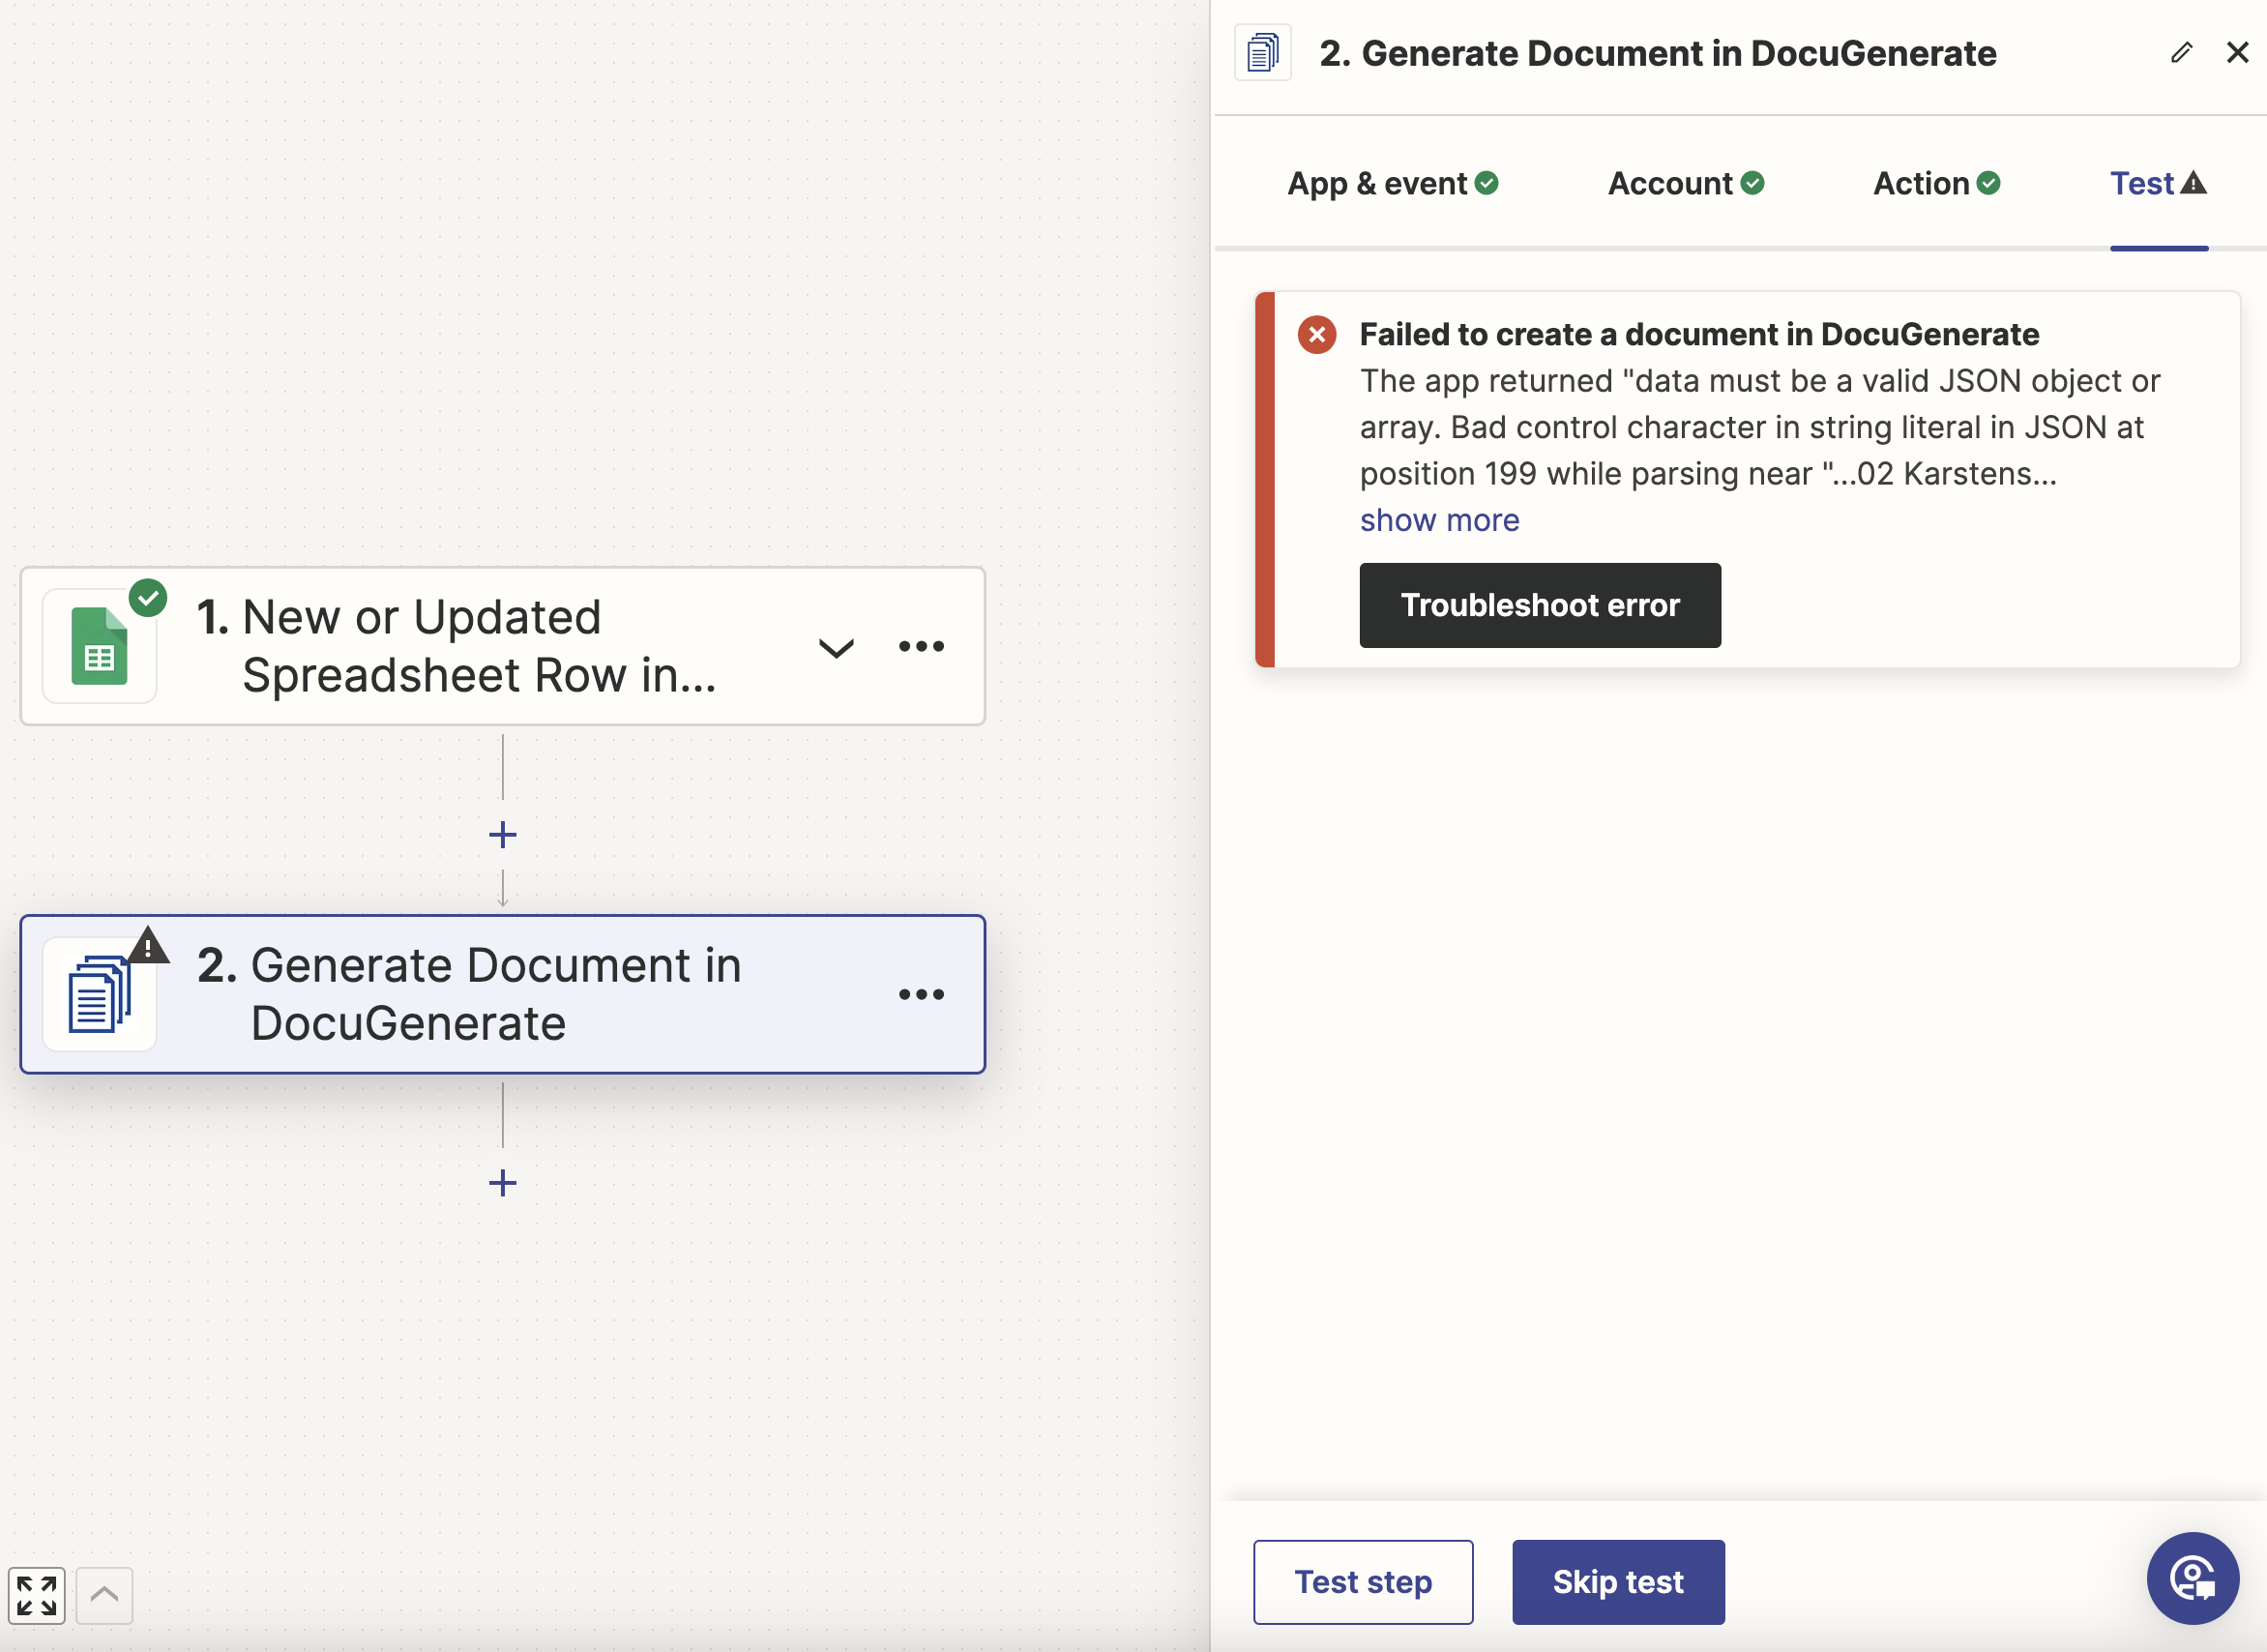
If we were to test the Zap again using this updated record, the Generate Document step would fail with the following error:
data must be a valid JSON object or array. Bad control character in string literal in
JSON at position 199 while parsing near "...02 Karstens Junction Suite C", "End Da..."
And this is how it would look in the Zapier interface:
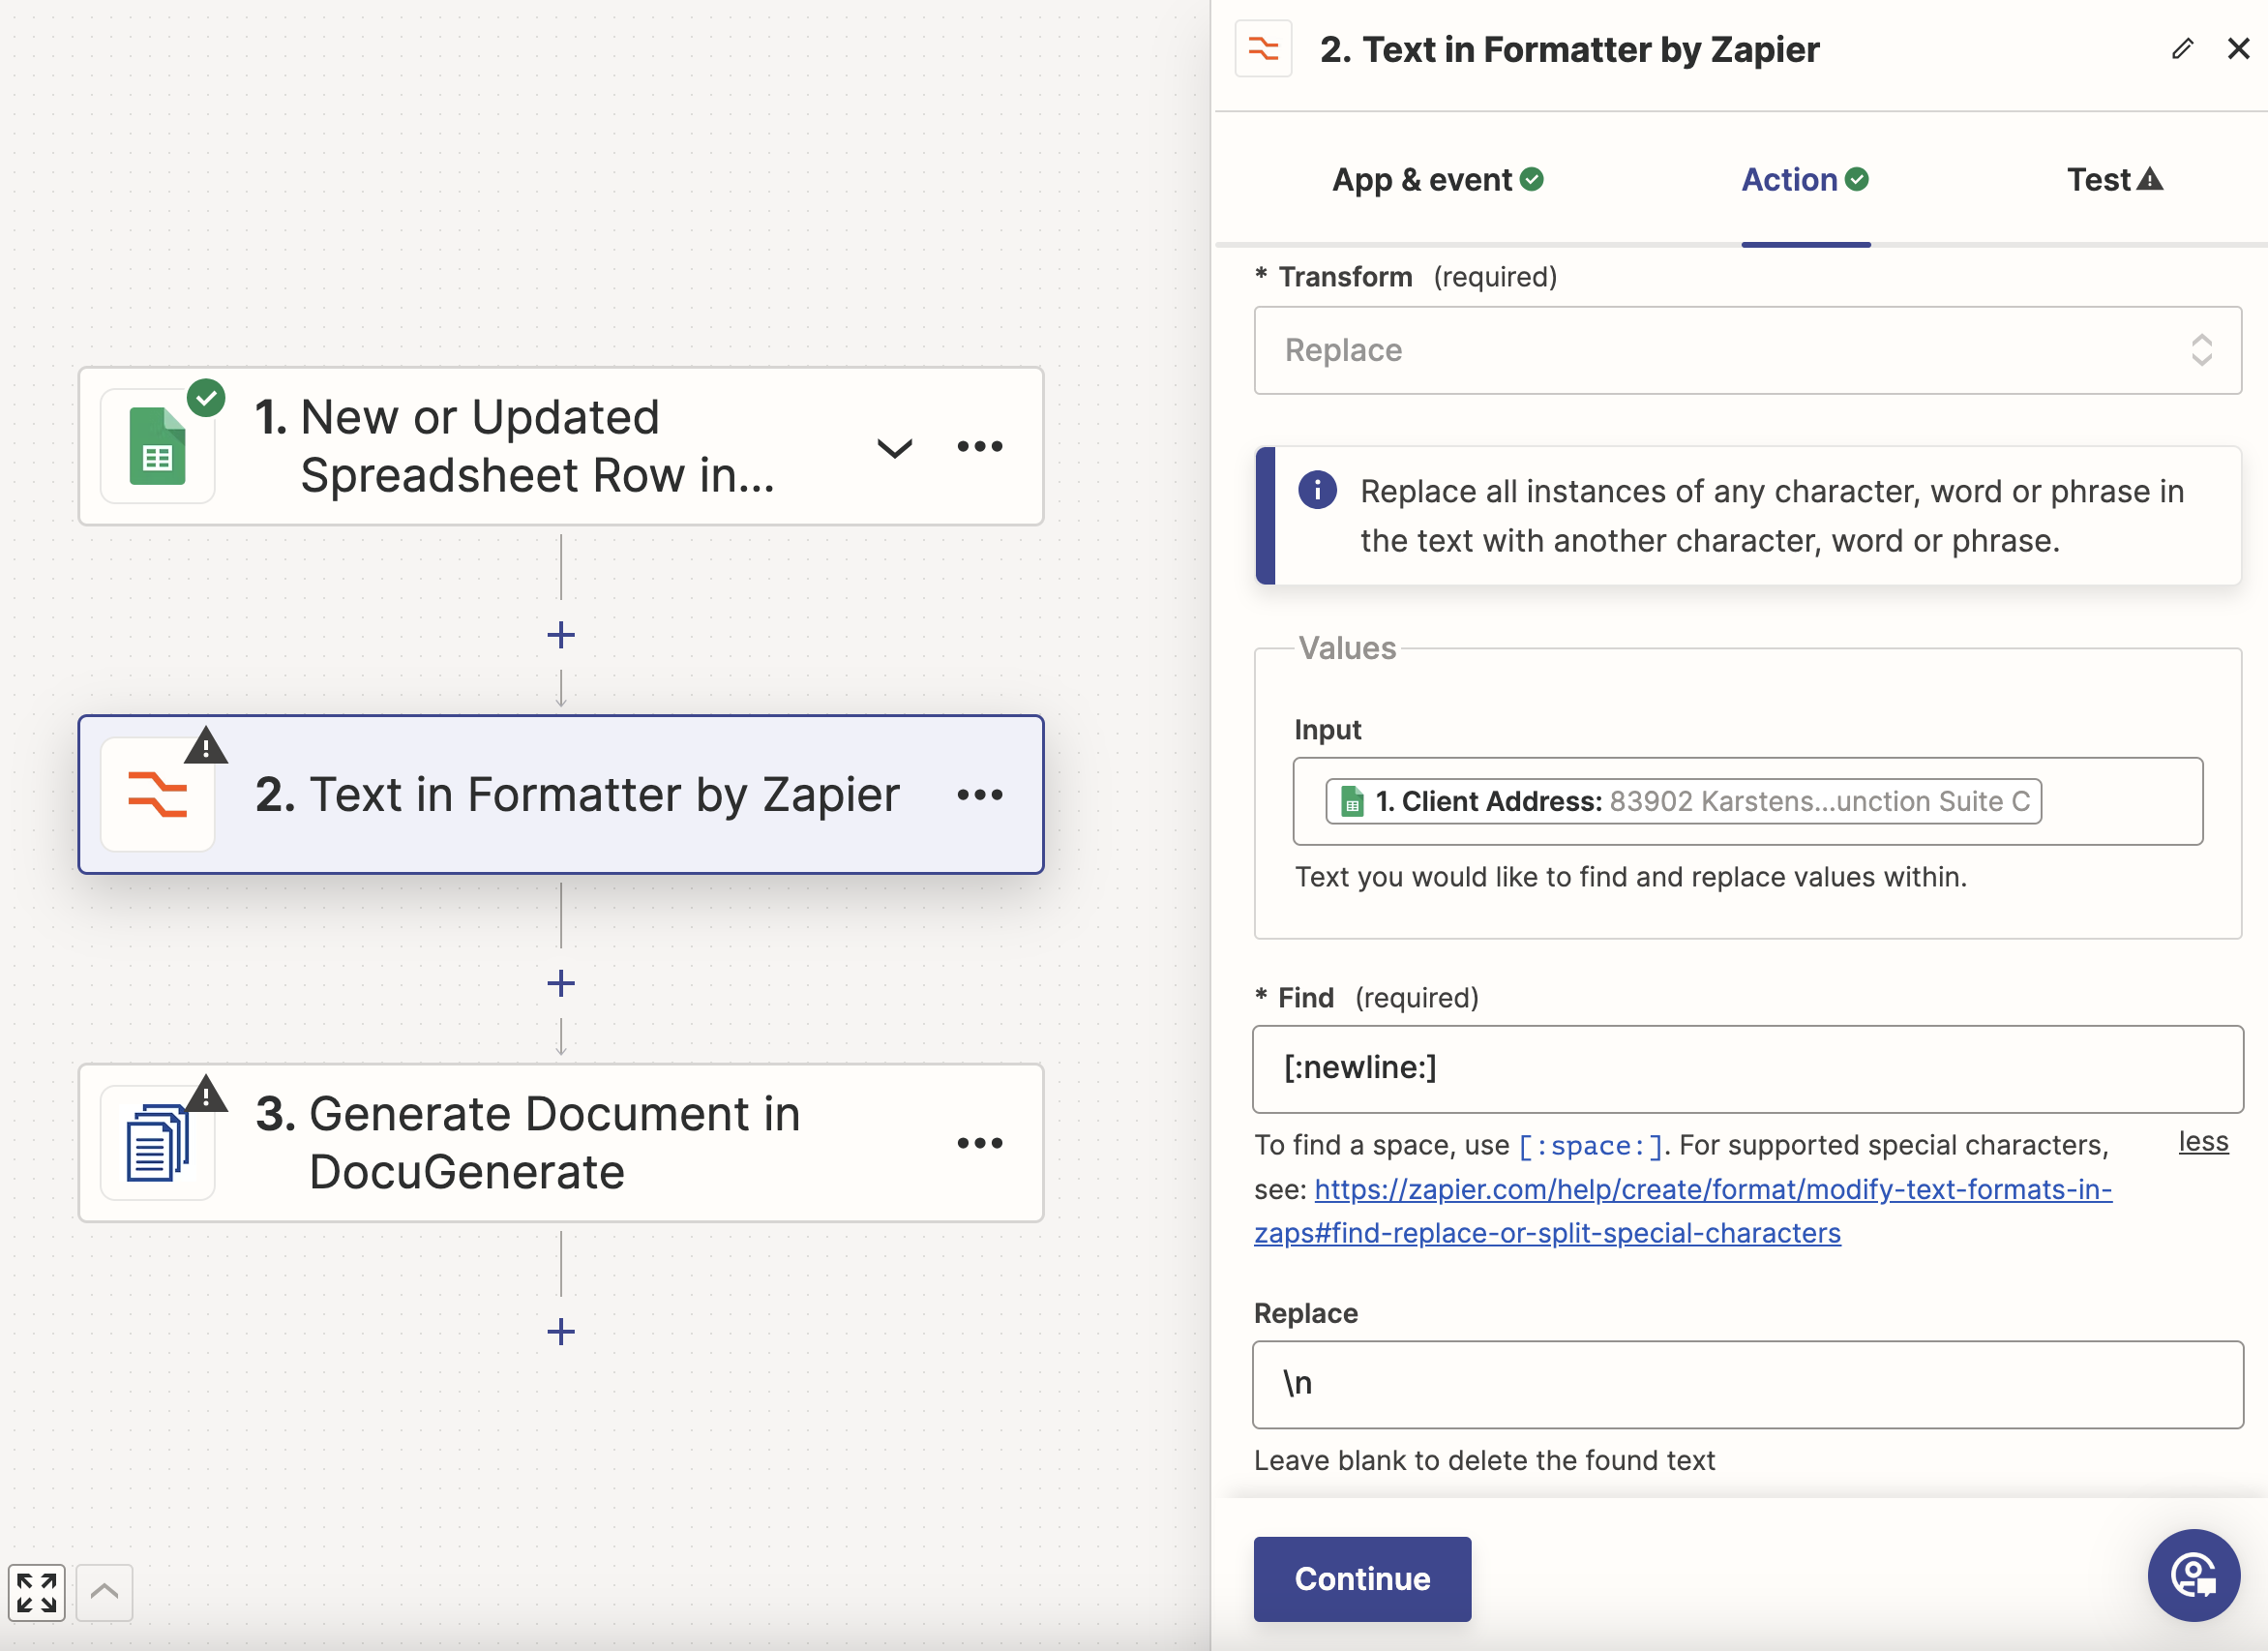
To fix this issue we need to add a new step to our Zap to format the Client Address value. Add the app Formatter by Zapier before the Generate Document step and choose the Text event.
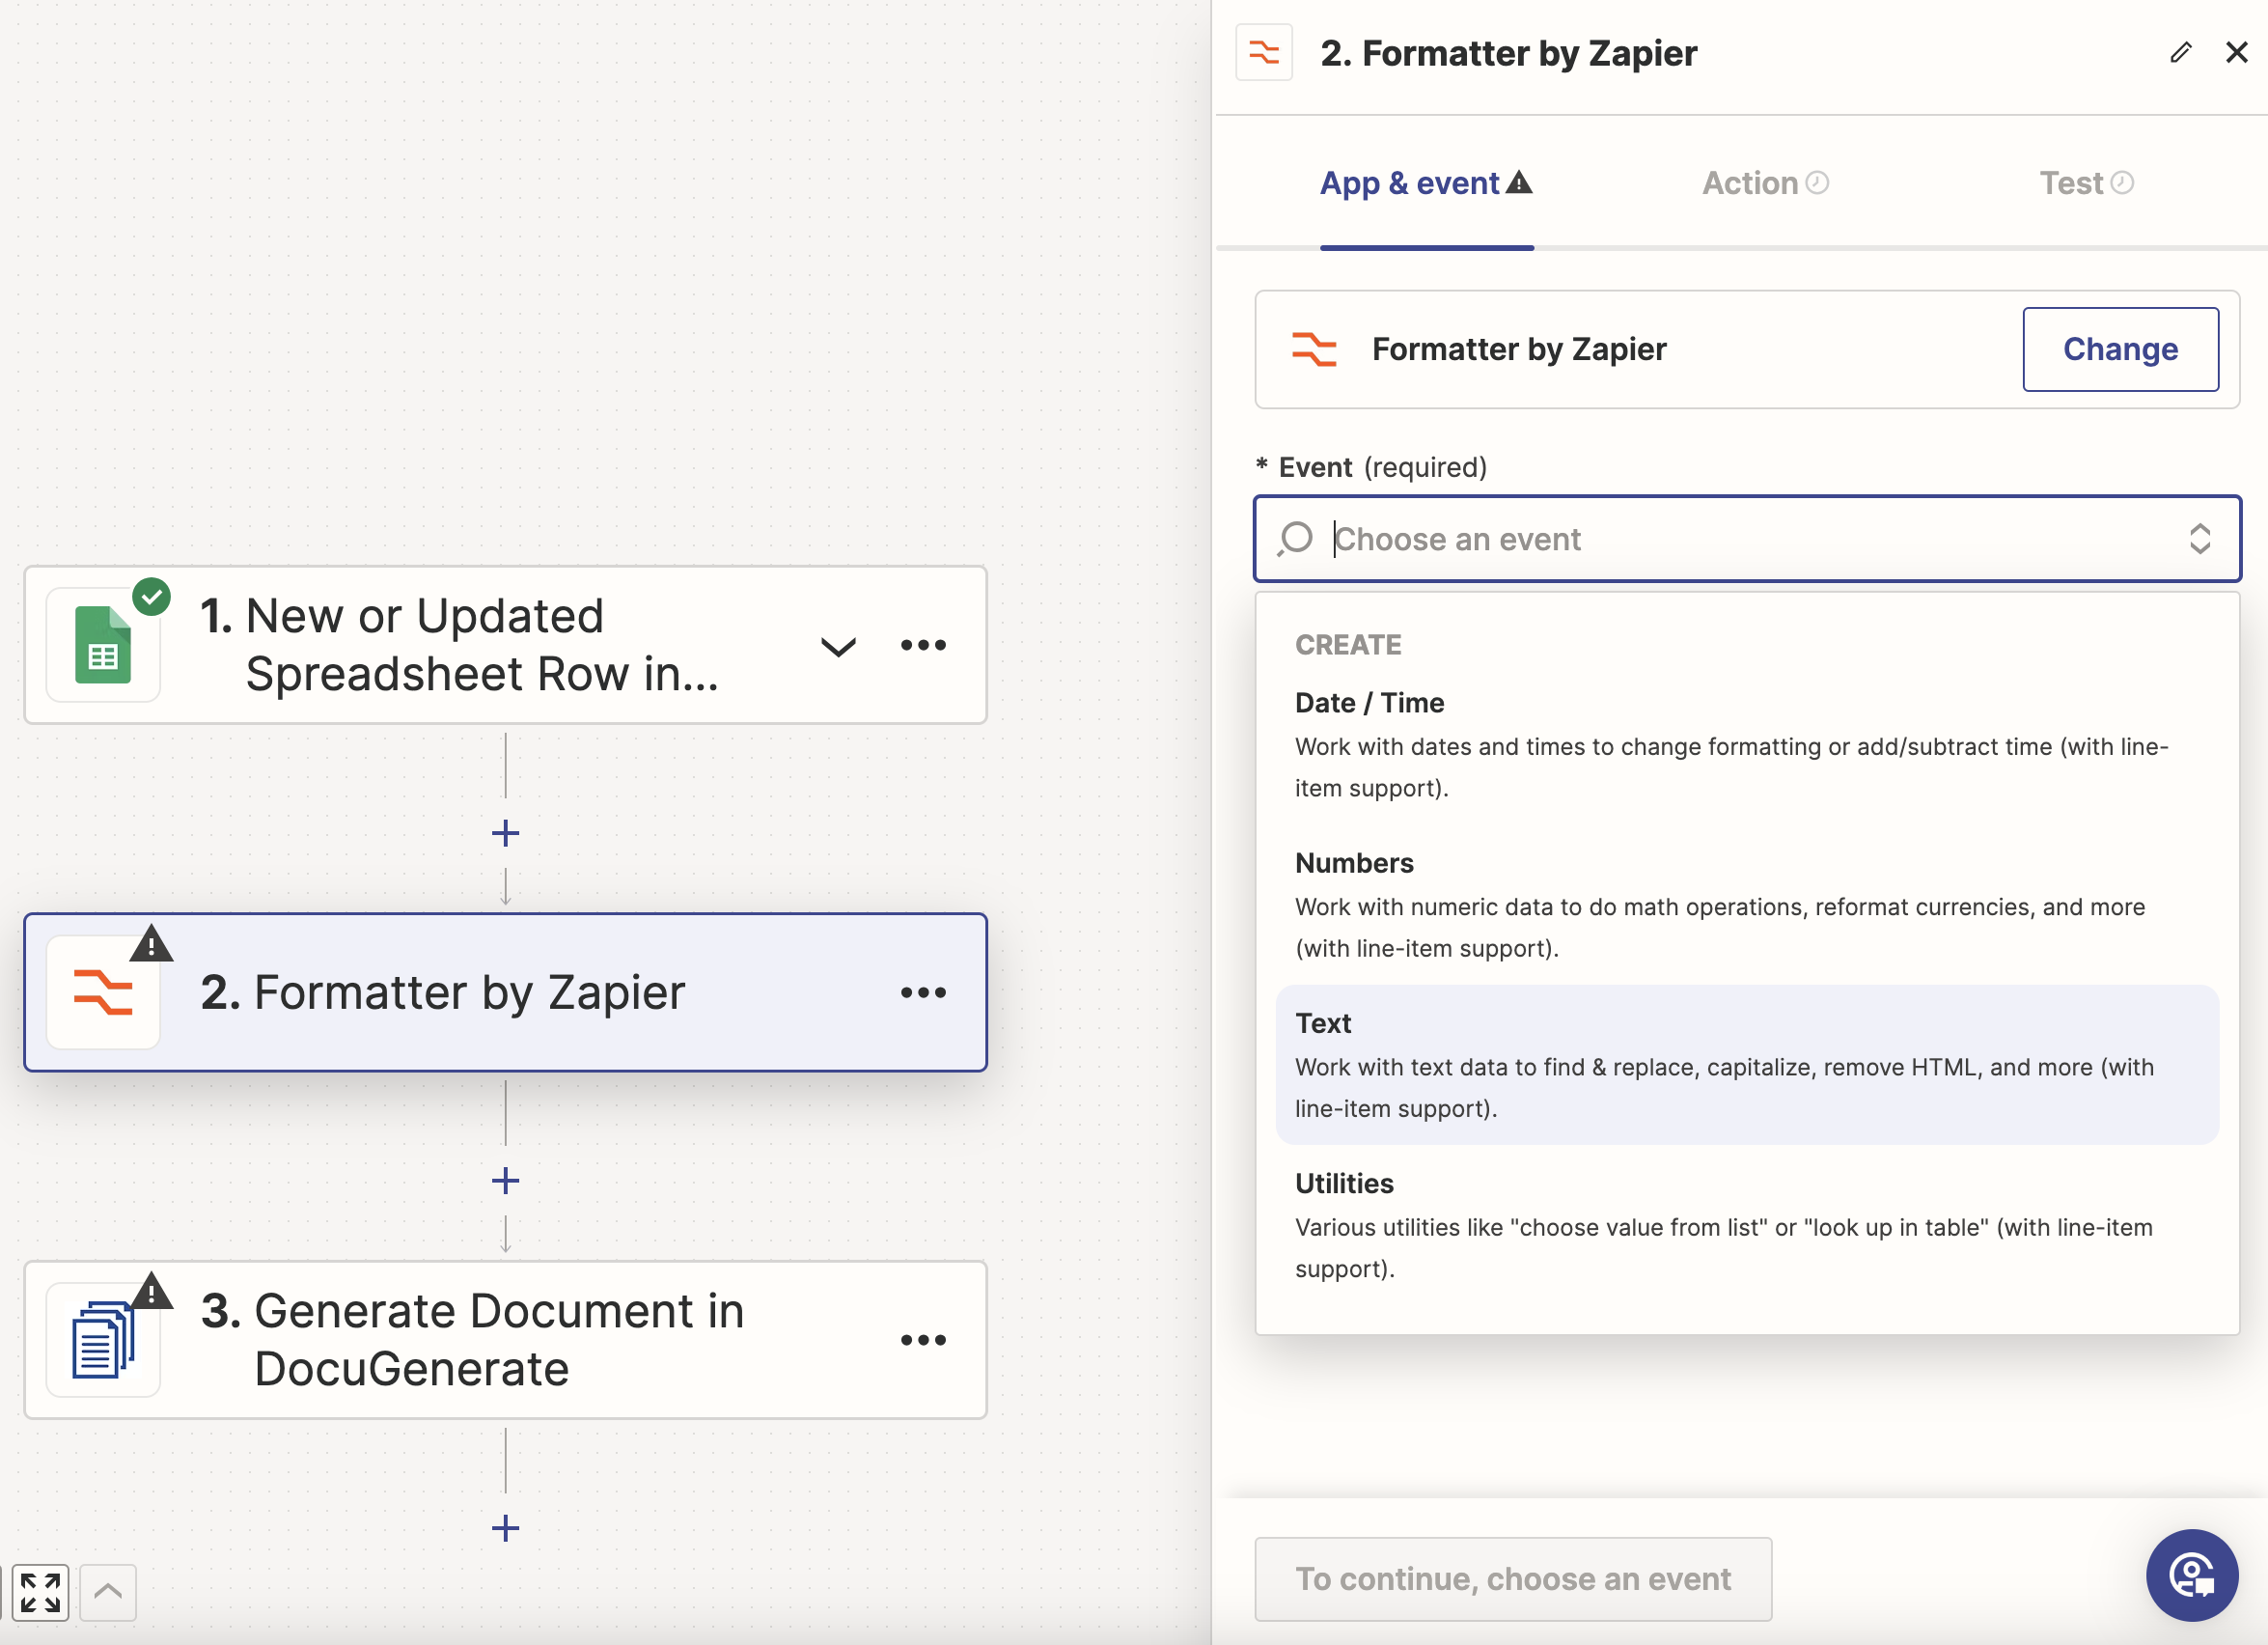
Then select the Replace action and for the input choose the Client Address field. For the Find value input [:newline:] which matches newline characters. And for the Replace value input the \n. This will replace all the carriage returns in the text with the \n character.
For more info about finding, replacing, or splitting special characters, check out this detailed article on Zapier. This guide provides comprehensive instructions and examples on how to handle various text formatting tasks in Zapier, ensuring your automation workflows run smoothly even when dealing with complex text data.
Moving on to the Test step. As you can see, the value is successfully replaced by:
83902 Karstens Junction\nSuite C
Finally, we need to update the Generate Document action to use the formatted value for the Client Address field. This way, we don’t use the value from the Google Sheet directly anymore but the output from the Formatter step, which fixes the new lines issue.
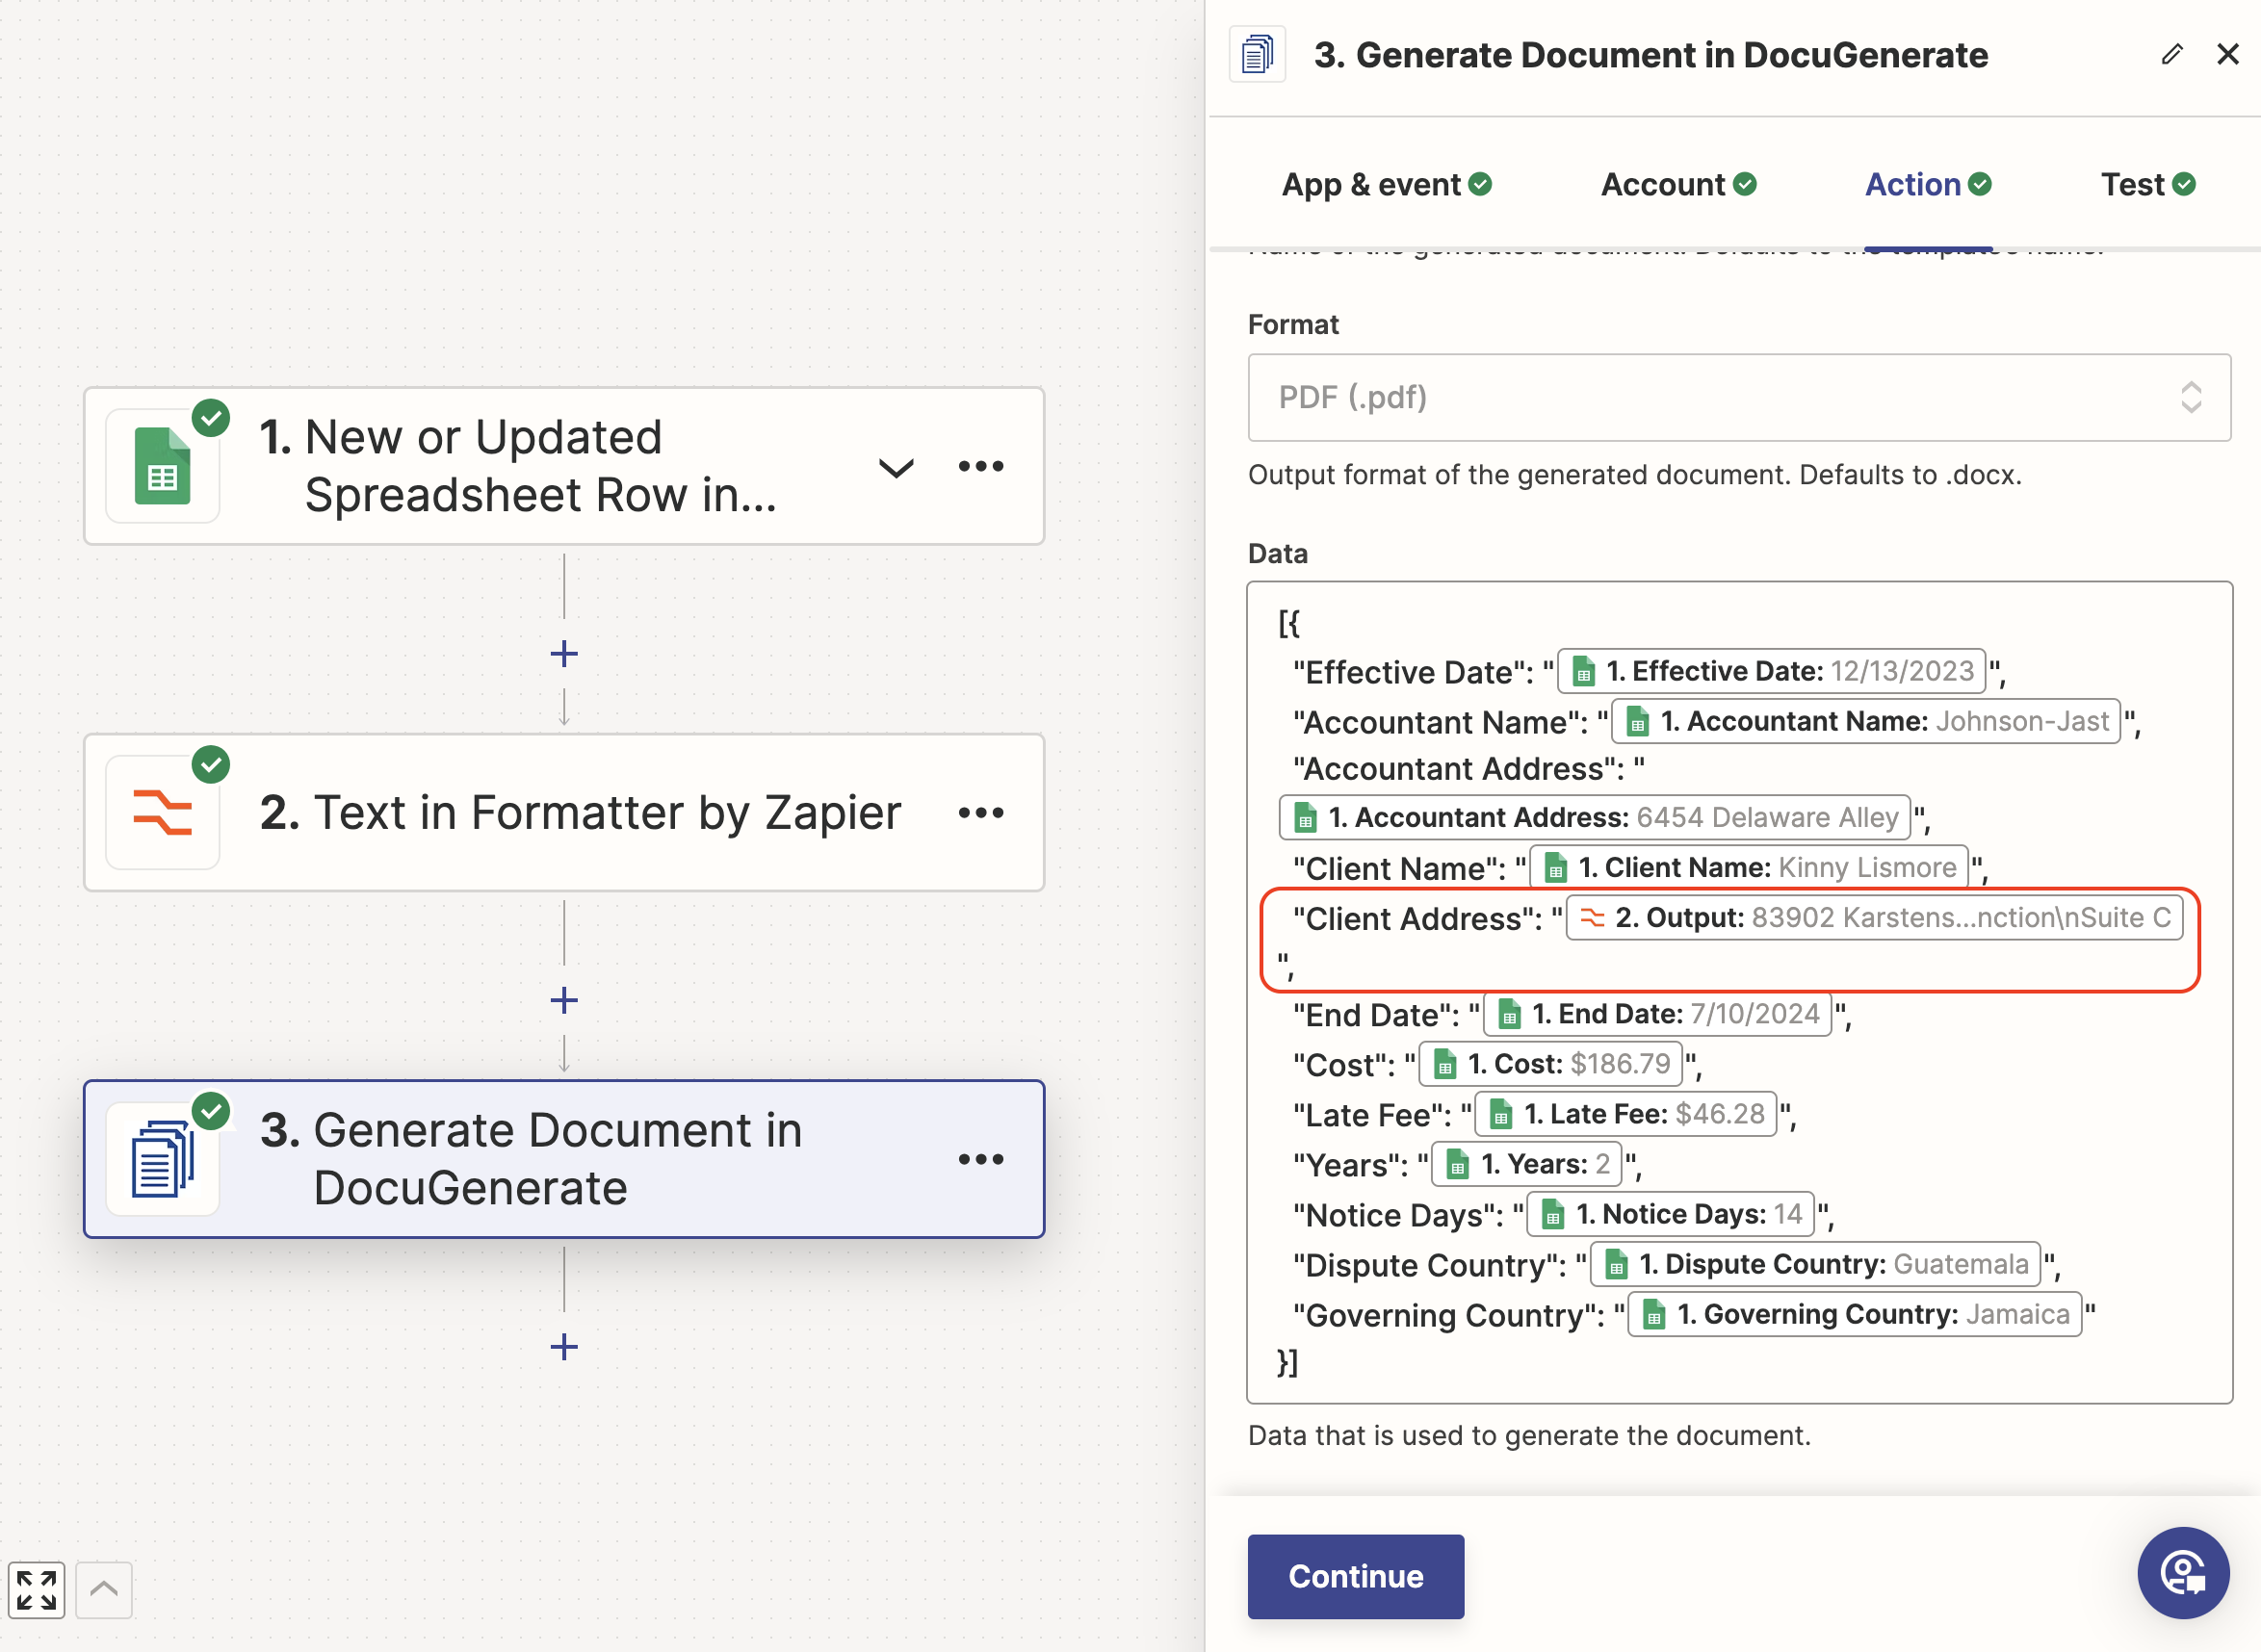
We only did the formatting for one field, but you can add additional formatting steps if other values from the data set are susceptible to being multi-line strings.
With this change, when we test the final step, the document generation doesn’t fail anymore, and the document is generated successfully.
Conclusion
Automating document generation using Google Sheets, Zapier, and DocuGenerate can significantly streamline your workflow. This setup not only saves time but also reduces errors and ensures consistency across your documents. Whether you’re generating invoices, contracts, or certificates, this powerful automation can handle it all.
By integrating these tools, you can focus on more critical tasks while your documents are created seamlessly in the background. We encourage you to try this setup and explore the possibilities of what you can automate with DocuGenerate and Zapier.
Resources
- The Accounting Contract Word template and Excel file containing the data used in this tutorial.
- Modify text formats in Zaps article on Zapier referenced in the Handle Multi-Line Data Values section.
In today’s work processes, managers sometimes have to deal with a multitude of tools, which reduces productivity and increases the risk of errors when transferring data from one tool to another. So it’s in their interest to find the right combination of tools, for a straightforward and efficient process.
That is why in this article we will create a convenient workflow allowing you to automatically generate documents from your Airtable interface, without having to transfer your data from one application to another. Furthermore, you will be using a Word template, which can be easily edited with the text processing software that you’re most familiar with.
Here are the services needed to create this workflow :
-
Airtable: is a no-code collaboration platform allowing users to interact simply with a database using, among others, a spreadsheet-like interface, web forms for input, and user-friendly data reports and data visualization interfaces for output.
-
DocuGenerate: is a web app and API designed for generating documents from Word templates and JSON data, by replacing merge tags in templates with dynamic data.
This article is mainly intended for people already having a minimal knowledge of Airtable’s basic features. We won’t go into detail about its functionalities, and will only focus on the aspects necessary for setting up our process.
Using Airtable’s Page Designer
You could use Airtable’s page designer extension, to create your own custom template for invoices, business cards, catalogs, and more — all using the data directly from your records. When you’re done making everything look beautiful, you can print out your records or turn them into PDFs.
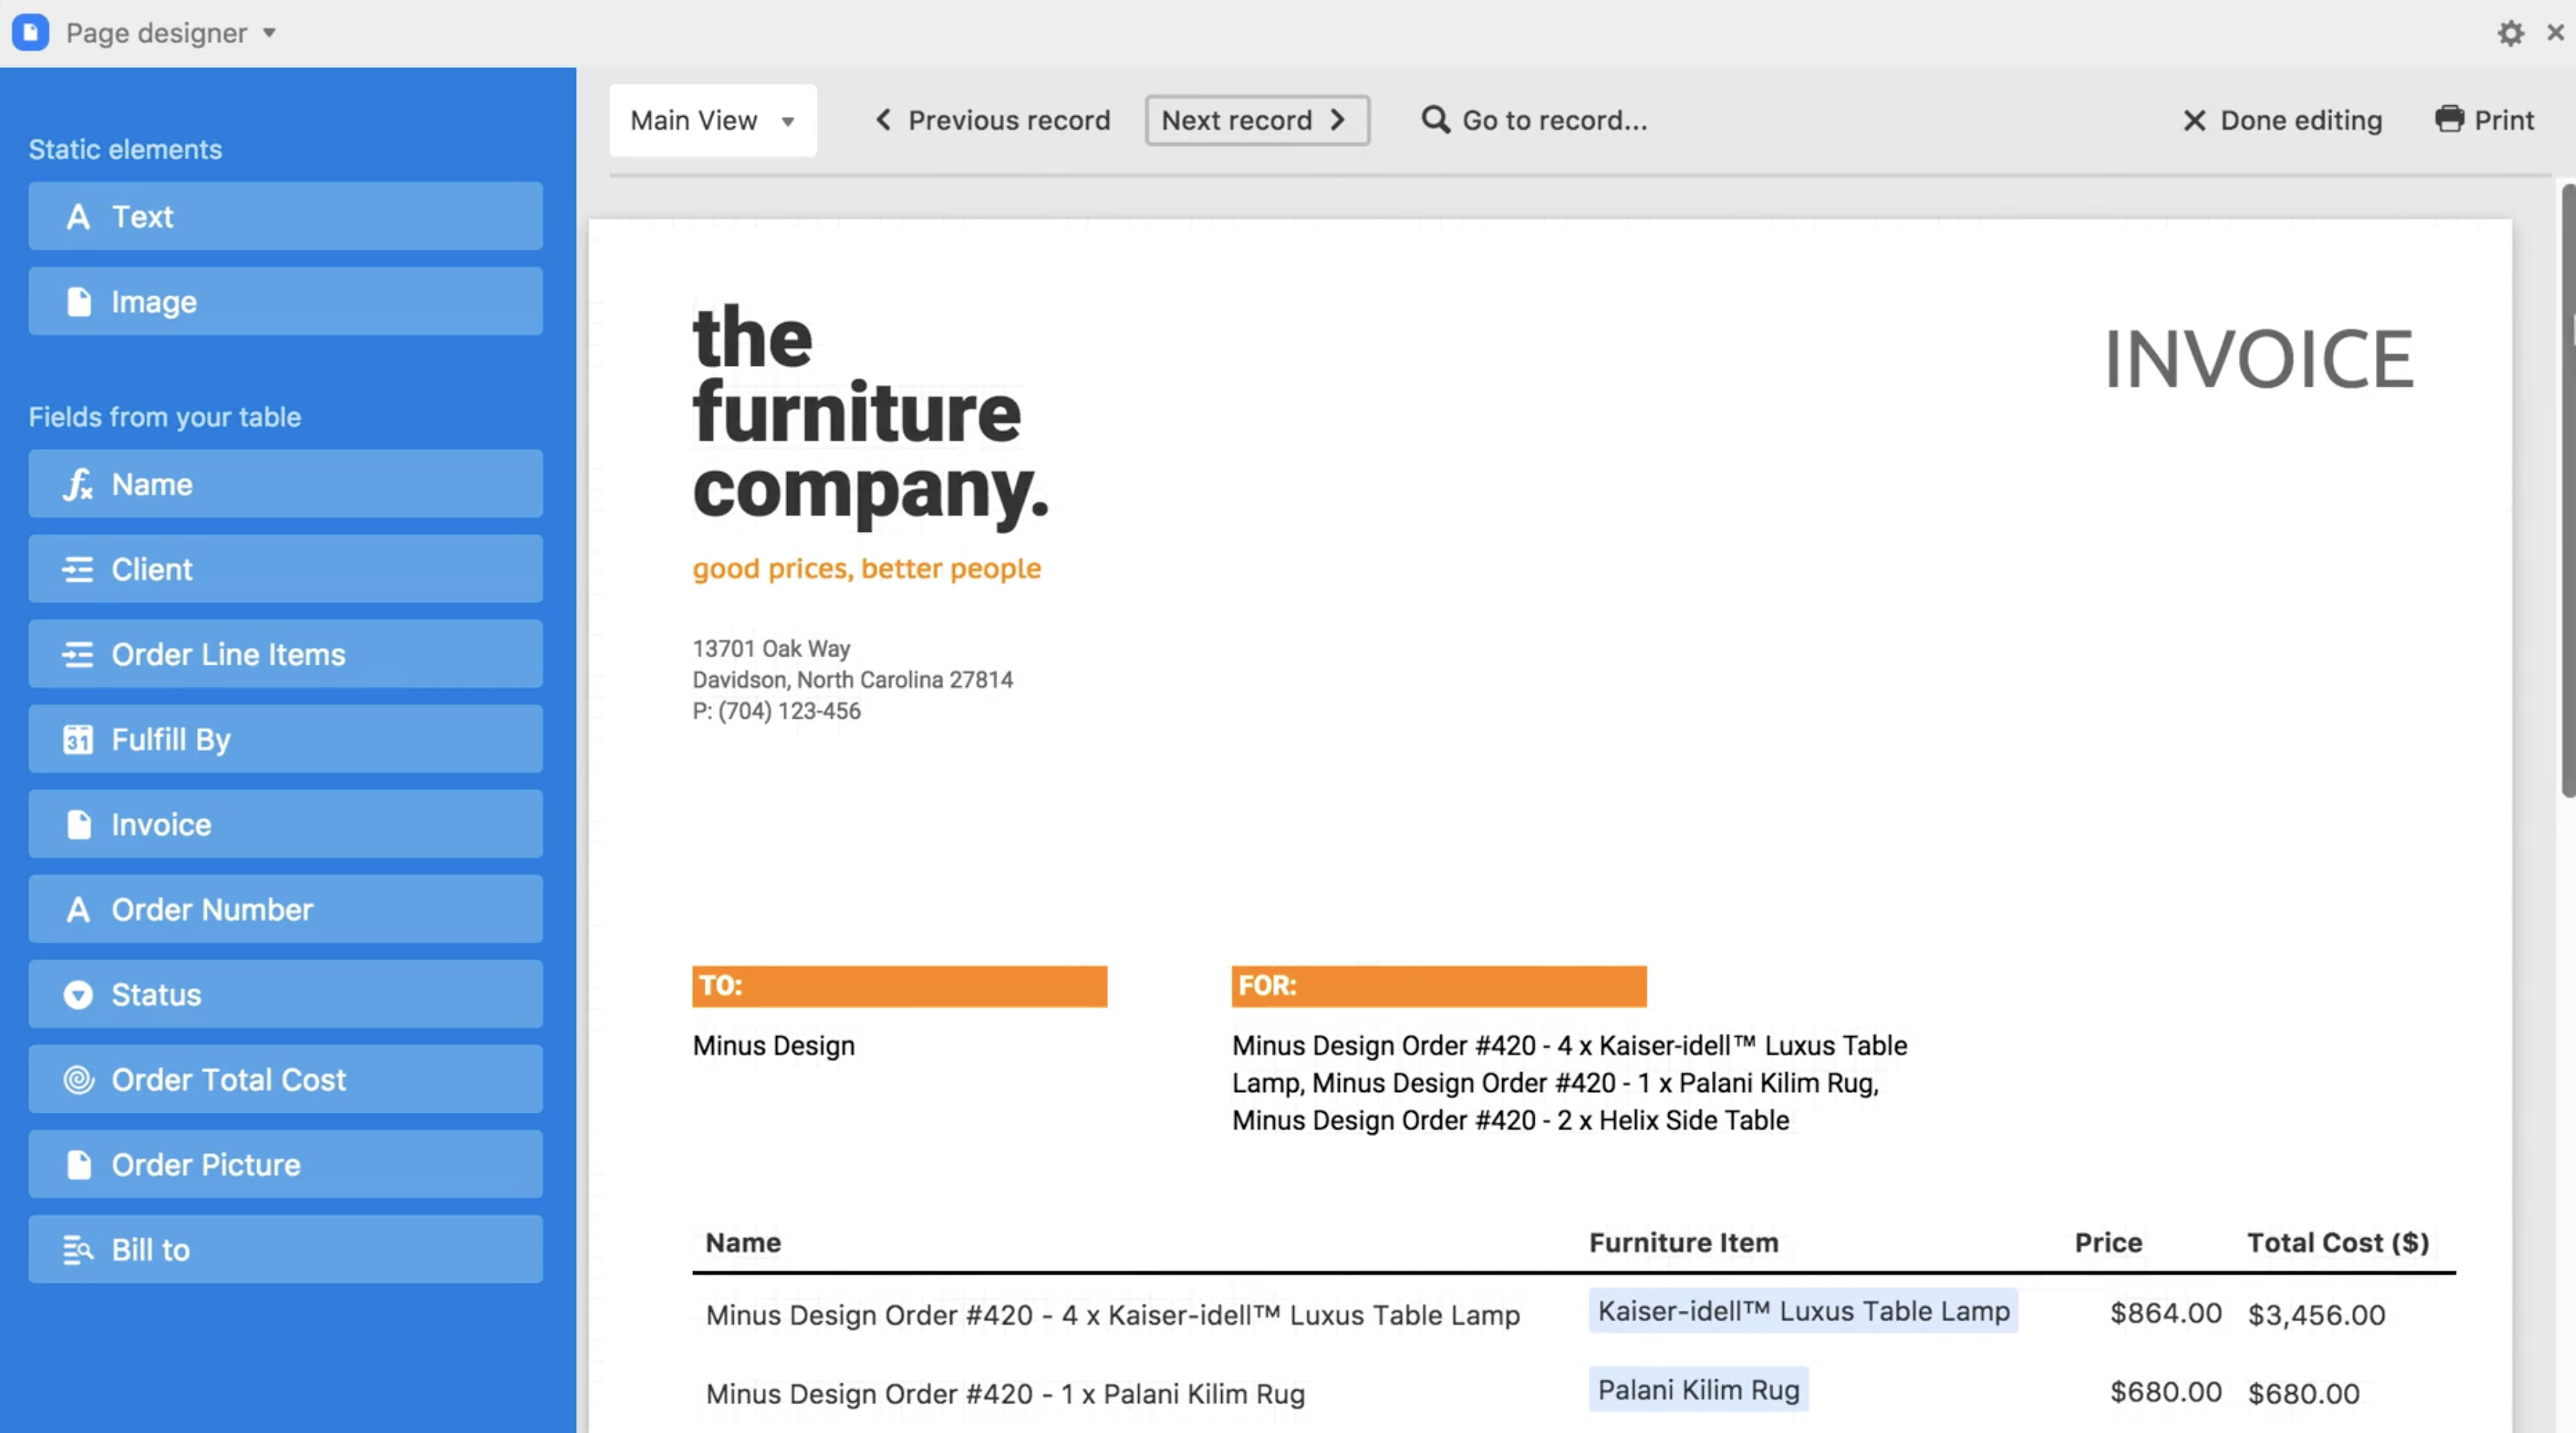
There are a few other limitations to consider for our use case:
- The files are generated one by one.
- It can only generate PDF files.
- It cannot store the generated files in your Airtable database.
The page designer layout editor is not that bad, but you will never be as productive as with your usual word processing software. Also, you will have to start from scratch again if you want to create a new layout in another base.
Creating the Word Template
Given the limitations of the page designer, we will be using a Word template instead. A template is a document that contains merge tags, which are placeholders intended to be replaced with dynamic data. They allow you to easily create documents that are visually very similar, but differ based on the data set that is used to populate the placeholders.
Our template is a slightly modified version of the Certificate of Completion template from the Template Library. The main changes were the addition of a profile photo to highlight our image resizing feature, and the integration of a skills list, to demonstrate using Airtable’s linked record fields together with DocuGenerate’s list syntax.

This template includes the following tags: {Company_Name}, {First_Name}, {Last_Name}, {Program}, {Photo}, {Start_Date}, {End_Date}, {Certificate_Date} and {Skills} (using the following syntax to create a skills list):
{#Skills}
- {.}
{/Skills}
💡 Going further The enhanced syntax is enabled for this template to allow the image resizing ability. You should avoid having whitespaces in your tag names in order to use it. That is why tag names composed of two words use an underscore between them.
Designing the Database
For our example, we started with the template and have then created an appropriate database structure. Of course, a real process will unfold in the other way: as your data will probably already be consistent, you will create a template matching your data and your base structure in order to generate the documents you need to, and not a database structure according to your template.
Here, our base includes three tables :
-
Skills table contains the skills acquired in the different programs, ordered by category.
-
Programs table contains data about each program : name, start date, end date, and the acquired skills (field linked to the Skills table).
-
Attendees table contains data about each attendee of the different programs, such as first name, last name and photo, and also a field link to the pursued program from which several lookup fields are created to access the program’s data directly in the Attendees table. This is needed as the script used to generate documents currently allows one single table selection, so every data has to be present in this table.
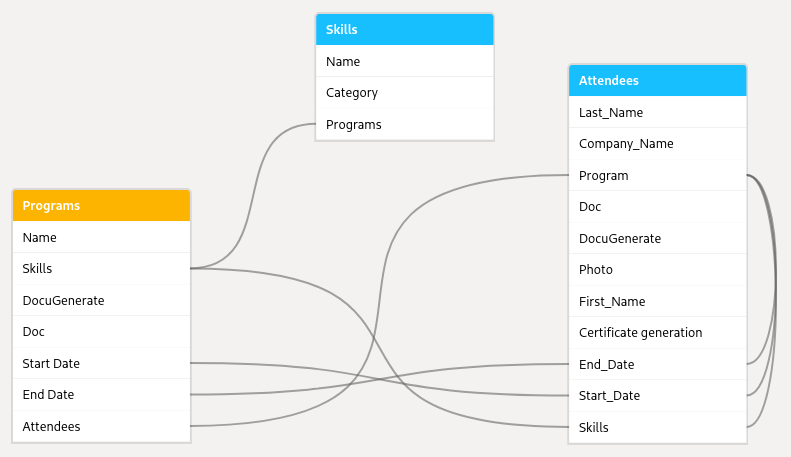
Please note that the certificate date needed in the template isn’t stored in the data. Don’t worry about that, it will be populated with today’s date when the document is generated.
If you want to see what our base looks like or start fiddling with it, you can simply explore the DocuGenerate script training data.
Populating the Database
Our base is already filled with data allowing to test our workflow, but in an actual process you would need a mechanism to collect this data. To achieve this goal, one of the easiest way is to create forms that users can fill directly by themselves.
A form is basically a web page that you will make accessible to anyone, with several input fields linked to your table’s fields, so filling the form will create a new record in your table. For example, the process for creating a form for the Attendees table is pretty straightforward:
- Create a new form in the Views sidebar.
- Upload a logo and/or a cover image for your form.
- Choose which fields you want the user to fill in.
- For each field specify if it’s required, then add a title and a description.
- Publish your form in order to get a public URL to share.
💡 Going further To learn more about building and sharing forms in Airtable, please refer to their official documentation.
Setting up the Scripting Extension
Now that our template and our base are ready, we will set up the script used to generate the documents. For that, you will need to add a Scripting Extension in one of your dashboards. Please remember that extensions are only available in paid plans.
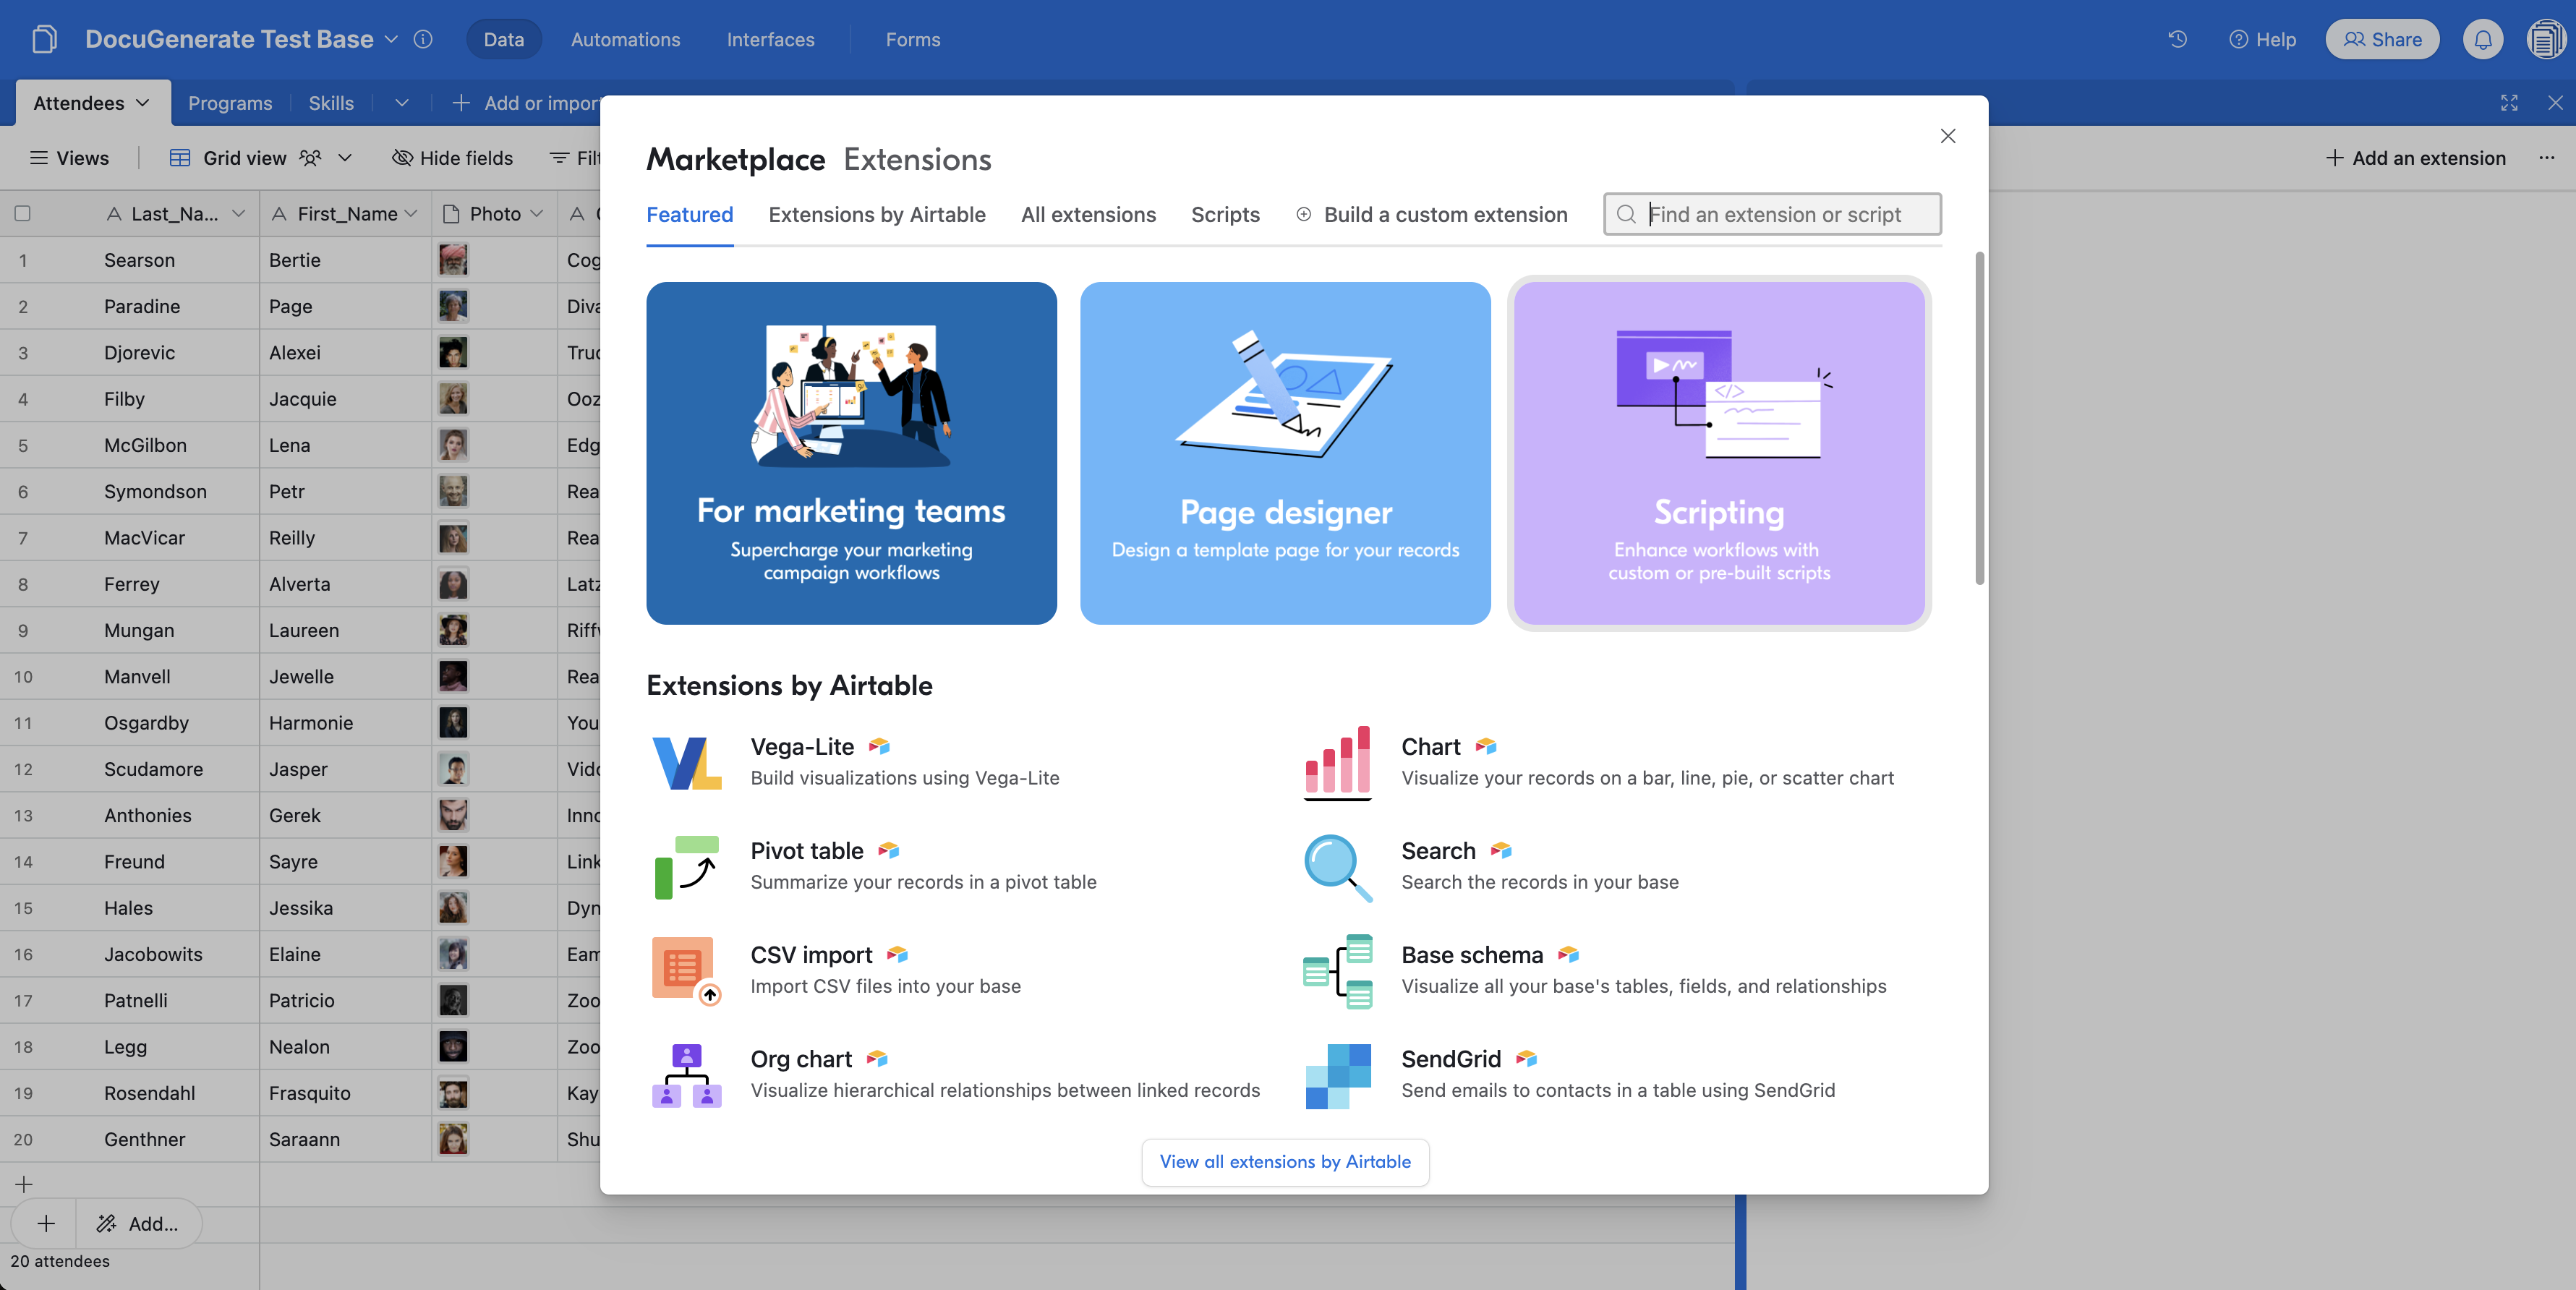
Next you’ll have to copy this JavaScript code and paste it in the scripting extension:
// Click the "gear" icon in the top right to view settings
const config = input.config({
    title: 'Generate Document',
    description: 'Automate document generation using DocuGenerate',
    items: [
        input.config.text('api_key', {
            label: 'API Key',
             description: 'Get your unique key from the Settings page in DocuGenerate'
        }),
        input.config.text('template_id', {
            label: 'Template ID',
            description: "ID of the template to use for generating the document"
        }),
        input.config.table('table', {
            label: 'Table',
            description: 'Source table for your records'
        }),
        input.config.field('storage_field', {
            label: 'Storage',
            description: 'Field for storing the generated documents (URL or Attachment)',
            parentTable: 'table',
        }),
        input.config.select('output_format', {
            label: 'Format',
            description: 'Output format of the generated documents',
            options: [
                {label: 'PDF (.pdf)', value: '.pdf'},
                {label: 'Microsoft Word (.docx)', value: '.docx'},
                {label: 'Microsoft Word 2007 (.doc)', value: '.doc'},
                {label: 'OpenDocument Format (.odt)', value: '.odt'},
                {label: 'Plain Text (.txt)', value: '.txt'},
                {label: 'HTML (.html)', value: '.html'},
                {label: 'PNG (.png)', value: '.png'}
            ]
        })
    ]
});

// Prompt the user to pick a record
// If this script is run from a button field, this will use the button's record instead
let record = await input.recordAsync('Select a record to use', config.table);

if (record) {
    // Customize this section to handle the selected record
    // You can use record.getCellValue("Field name") to access cell values from the record
    output.markdown(`Generating document for **${record.name}**`);

    // Get the program name
    const programsTable = base.getTable("Programs");
    const programRecord = record.getCellValue("Program")[0];
    const program = await programsTable.selectRecordAsync(programRecord.id);

    // Construct the data object based on the selected record's values
    const data = [{
        "Company Name": record.getCellValue("Company_Name"),
        "First Name": record.getCellValue("First_Name"),
        "Last Name": record.getCellValue("Last_Name"),
        "Program": program?.getCellValue("Name"),
        "Start Date": record.getCellValue("Start_Date"),
        "End Date": record.getCellValue("End_Date"),
        "Certificate Date": record.getCellValue("End_Date")
    }];

    const options = {
        method: 'POST',
        headers: {
            'Accept': 'application/json',
            'Content-Type': 'application/json',
            'Authorization': config.api_key
        },
        body: JSON.stringify({
            template_id: config.template_id,
            name: `Certificate for ${record.getCellValue("First_Name")} ${record.getCellValue("Last_Name")}`,
            output_format: config.output_format,
            data: data
        })
    };

    let status;
    const response = await fetch('https://api.docugenerate.com/v1/document', options)
        .then(response => {
            status = response.status;
            return response.json();
        })
        .catch(err => output.text(err));

    if (status !== 201) {
        output.markdown('Error generating document: ' + response.message);
    } else {
        const storageFieldValue = (config.storage_field.type === 'multipleAttachments') ? [{url: response.document_uri}] : response.document_uri;
        await config.table.updateRecordsAsync([{
            id: record.id,
            fields: {[config.storage_field.name]: storageFieldValue}
        }]);
        output.markdown('Document generated successfully! 🎉');
    }
} else {
    output.markdown('No record was selected');
}
If everything goes well, you should now be able to access the script’s settings page by clicking the gear icon that appears when hovering over the upper right corner of your extension. Do not hesitate to use the full-screen icon next to the settings icon, for better visibility.
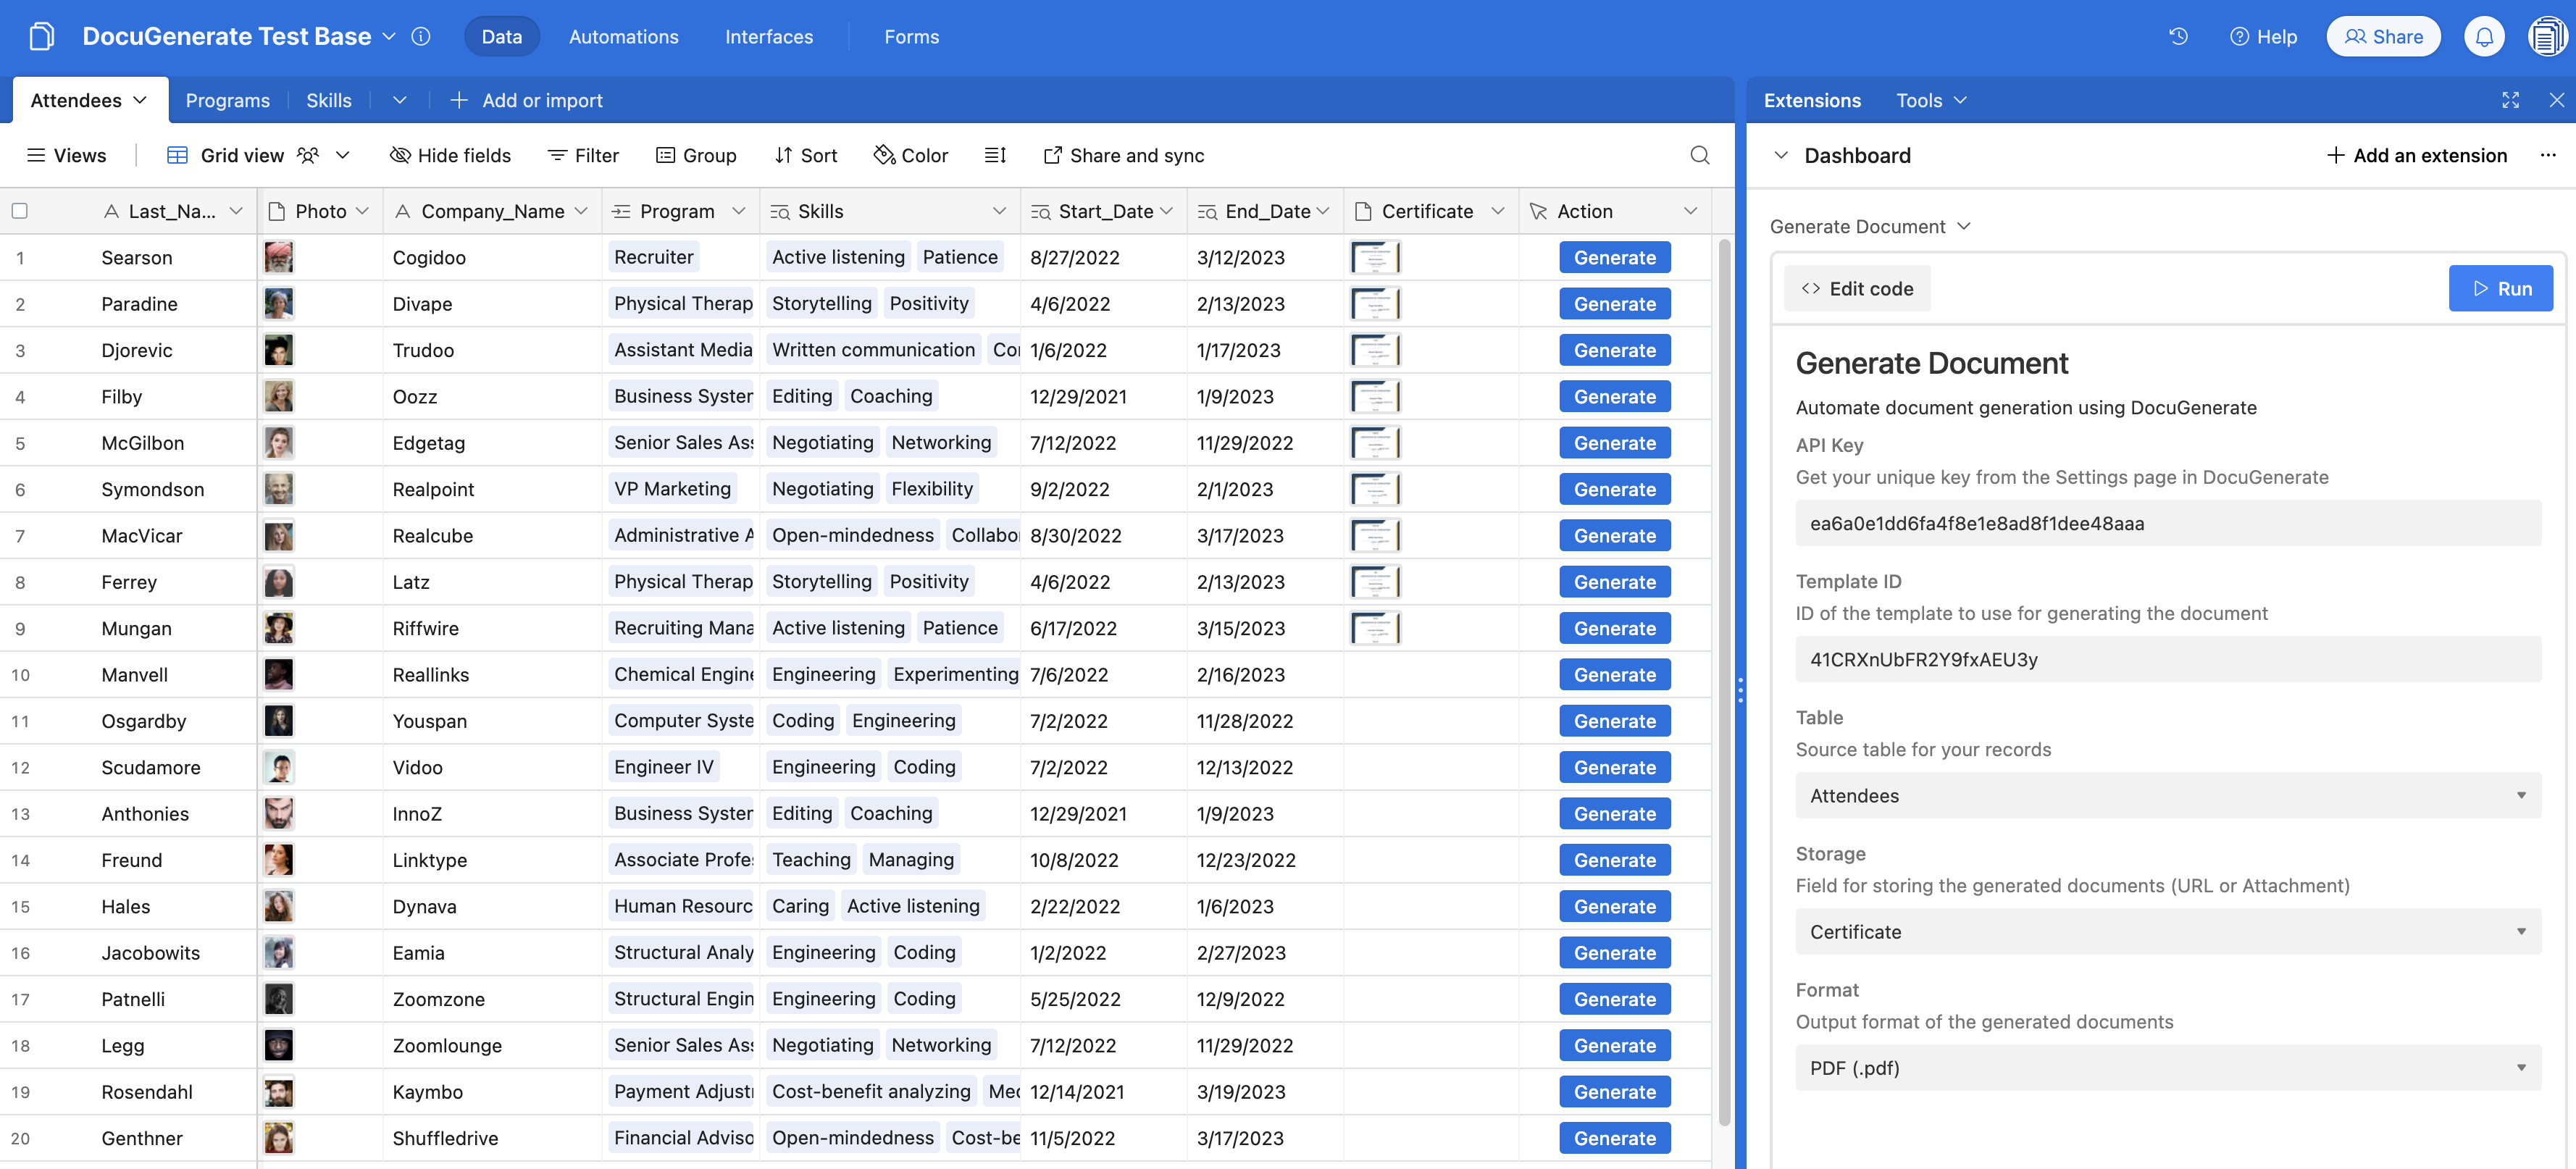
Here are the available settings :
-
API Key: your DocuGenerate API Key that you can get from your settings page once you’ve created your account. Simply copy the API Key to the clipboard by clicking on it.
-
Template ID: the ID of your template that you can copy from your template’s page. Please note that it also appears directly in the URL of your template’s page, the URL being of form
https://app.docugenerate.com/templates/:template_id -
Table: the table containing the records you will use to replace your template’s tags.
-
Storage: the field used to store the generated document. It can be either a URL field (which will store a link to the document) or a File type field (which will store the actual file).
-
Format: output format of the generated document. The options are
.docx,.pdf,.doc,.odt,.txt,.html, or.png.
With all these parameters set, we are now ready to automate the process of document creation!
Adding the Generate Button
The scripting extension is waiting for the user to input a specific record to process. But in order to make things easier for the end-user, we want to generate the document simply by clicking on a button. For this to work, we’ll need to add a new Button Field, that will be configured to run our script when it’s clicked. This way, the record from which the button was clicked is automatically selected for running the script.
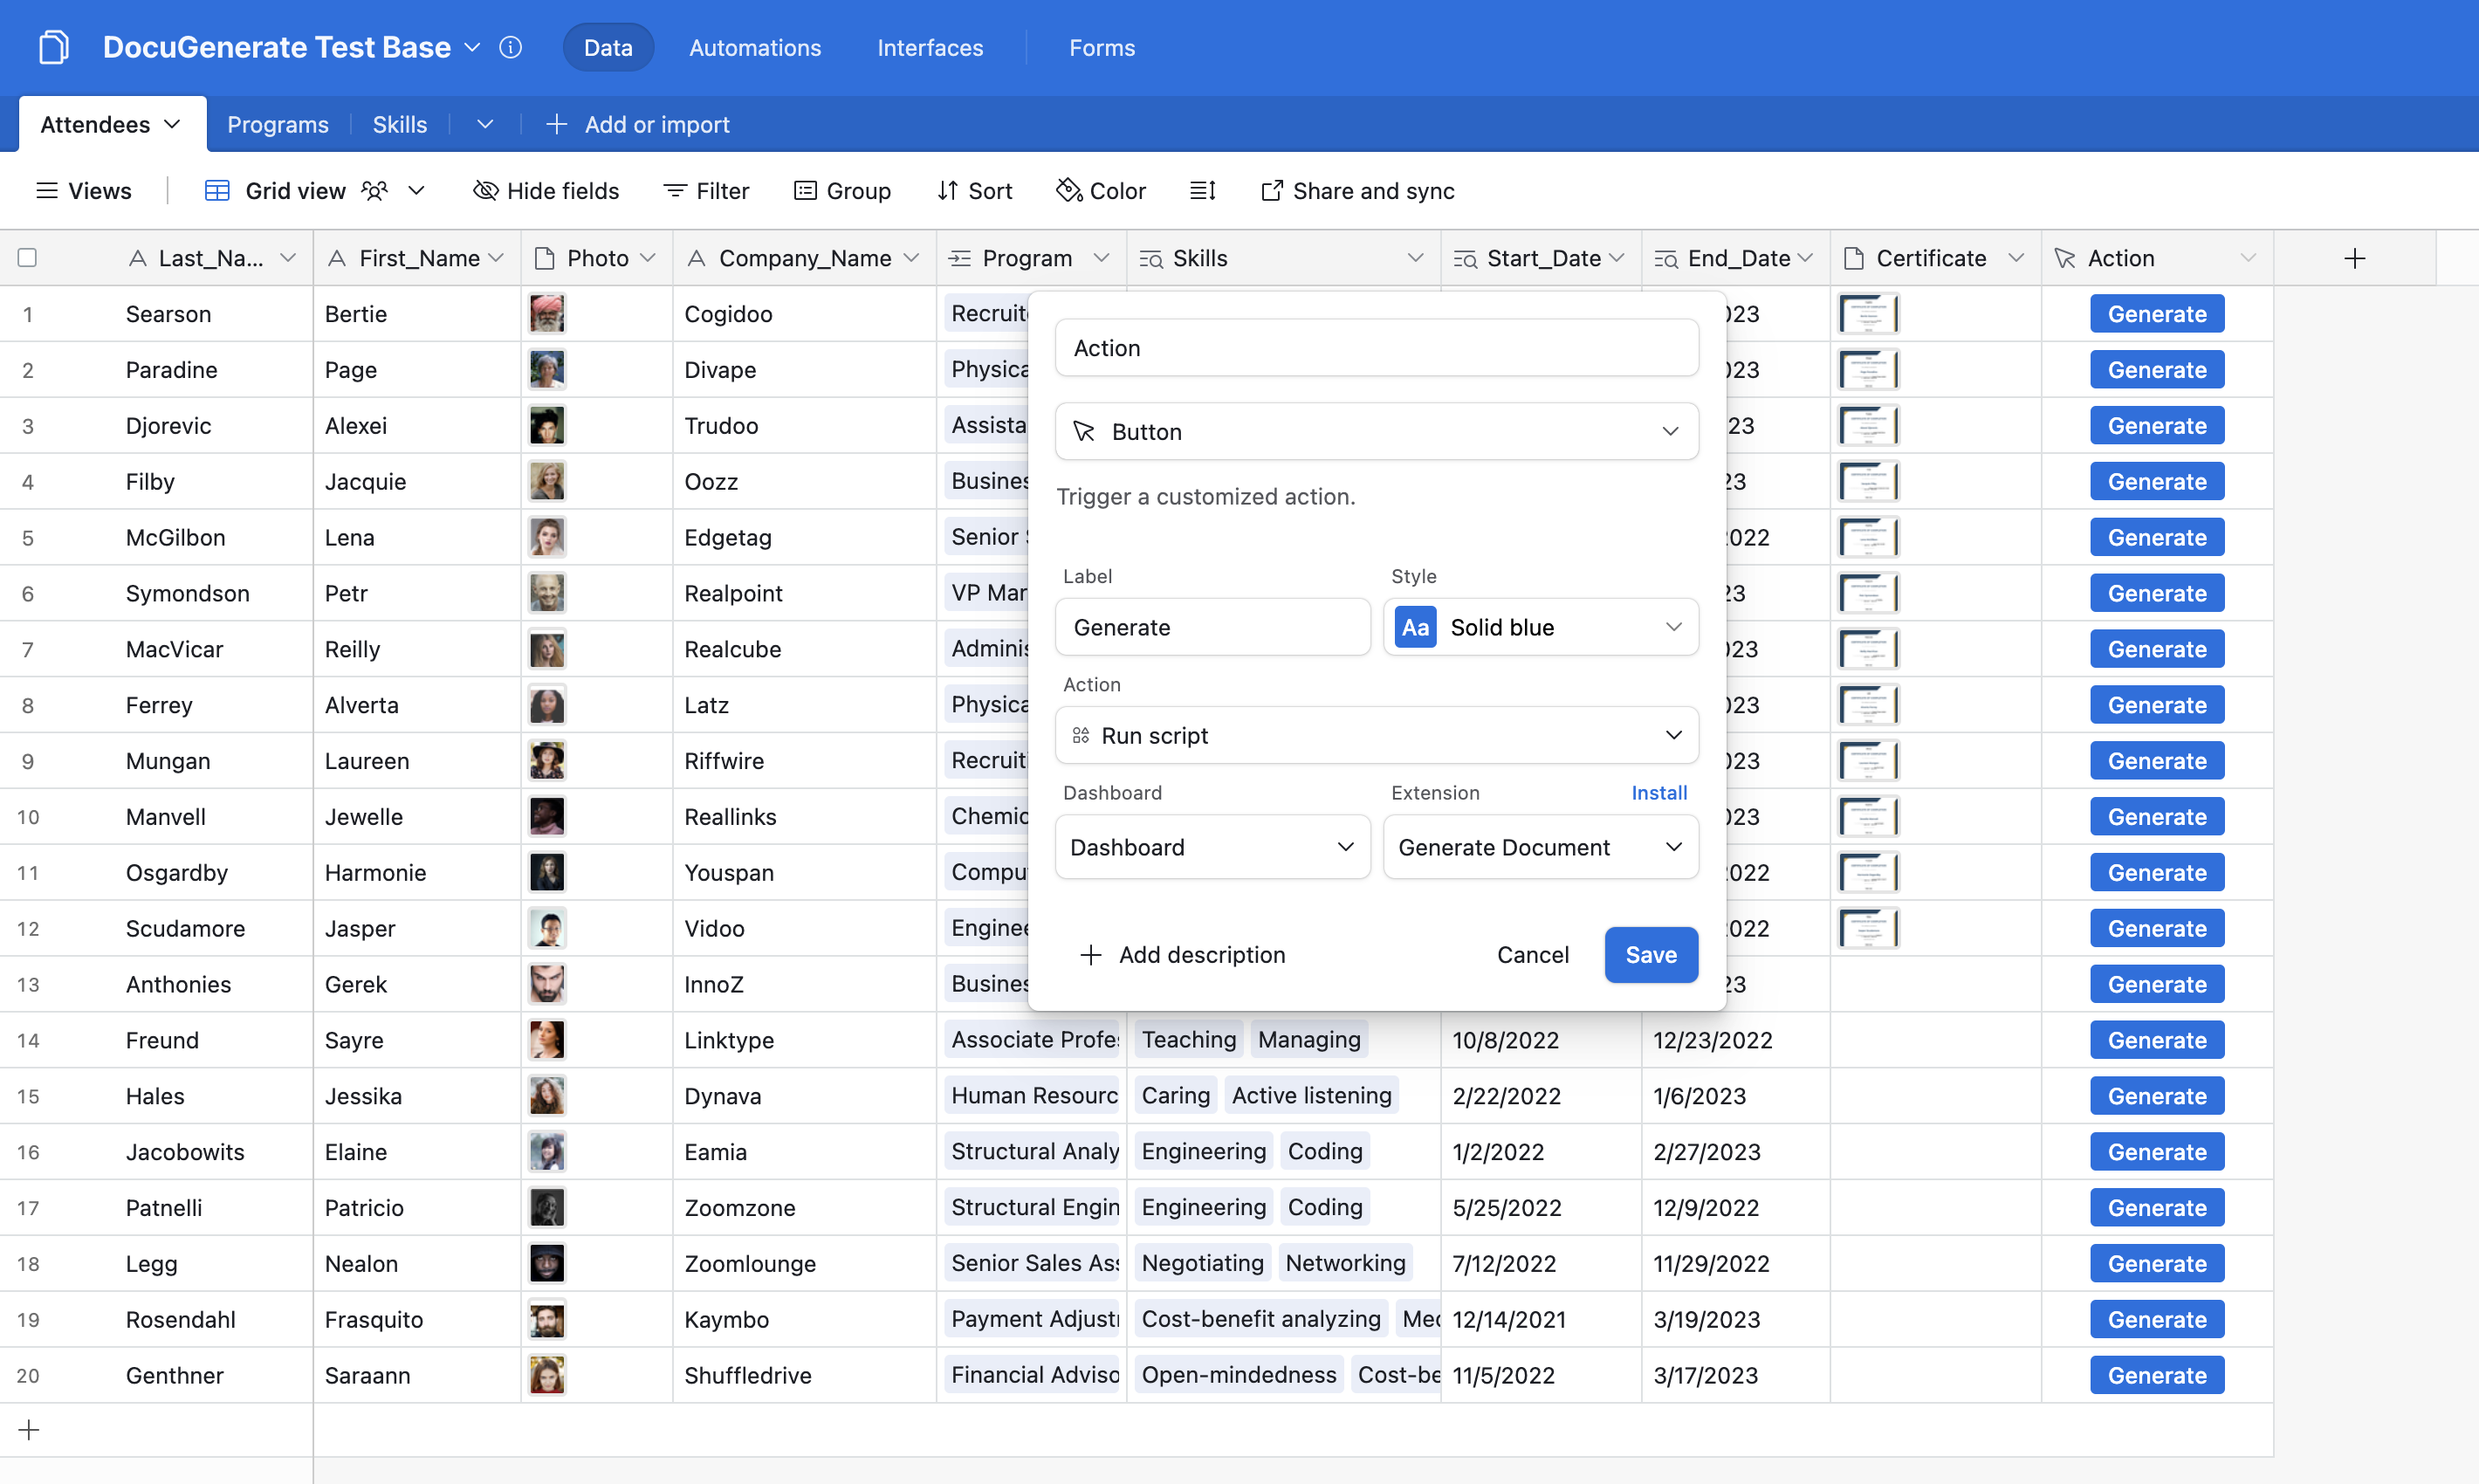
Generating and Storing Documents
With everything set up, let’s see how the document generation process works. When you click the Generate button on any record, the script executes and performs several actions:
- It gathers all the necessary data from the current record.
- It sends that data to DocuGenerate’s API along with your template ID.
- DocuGenerate processes the request, replacing all merge tags with your data.
- The generated document is returned and automatically stored in your database.
The result is a professional-looking certificate that’s ready to be shared with participants.
Going Further with Airtable Automations
While our button-triggered script is already quite powerful, you can take document generation to the next level by integrating it with Airtable Automations. This allows for completely hands-free document workflows that trigger based on specific conditions in your database.
Here are some powerful automation scenarios you could implement:
-
Automatic Certificate Generation: Generate certificates automatically when an attendee’s status changes to “ Completed” or when a program end date is reached, eliminating the need for manual button clicks.
-
Email Delivery: Send certificates directly to attendees via email as soon as they’re generated, creating a seamless experience for program participants.
-
Batch Processing: Set up weekly or monthly automations that generate certificates for all attendees who completed programs during that period.
-
Conditional Document Generation: Create different types of documents based on criteria like program type, achievement level, or geographic location.
-
Notification System: Notify program administrators when certificates have been generated and delivered, helping to track the process.
To set up these automations, you’ll need to adapt the scripting code we provided earlier into a “Run script” automation step. The core API integration will remain the same, but you’ll need to modify how records are selected and processed based on your trigger conditions.
Conclusion
In this tutorial, we’ve shown how you can transform your Airtable database into a powerful document generation system using DocuGenerate’s API and Airtable’s Scripting Extension. By combining these tools, you can generate professional documents directly from your Airtable data with a single click and store generated documents within your database for easy access and organization.
While automation tools like this can dramatically improve your productivity, it’s important to remember that they should serve as process facilitators. Don’t get lost in complex automation development when a simpler approach might be more efficient! Recognizing this balance is key to creating truly effective workflows. Start with the basic implementation we’ve provided, and then gradually expand your automation as your needs grow and evolve.
Resources
- DocuGenerate Test Base in Airtable, containing the Skills, Programs and Attendees tables.
- Airtable DocuGenerate GitHub repository created by Benjamin Hatton that contains the initial version of Airtable scripts for generating documents using DocuGenerate’s API.
- All profile photos are royalty-free and come from Pixabay, the royalty-free images & stock website.
- The Certificate of Completion template used in this tutorial.
- An example of PDF Certificate generated from Airtable data.
GetApp, a company that helps businesses navigate the software buying journey, featured DocuGenerate in its “7 Top-Rated Affordable Contract Management Software” list, which evaluates seven top-rated affordable contract management software solutions based on verified user reviews and pricing found on vendor websites.
This recognition stands as a testament to the outstanding quality of our product and the unwavering dedication to providing a user-friendly and reliable solution that meets the diverse needs of our customers. Our team is committed to continuous improvement and innovation, ensuring that our users always have the best tools at their disposal.
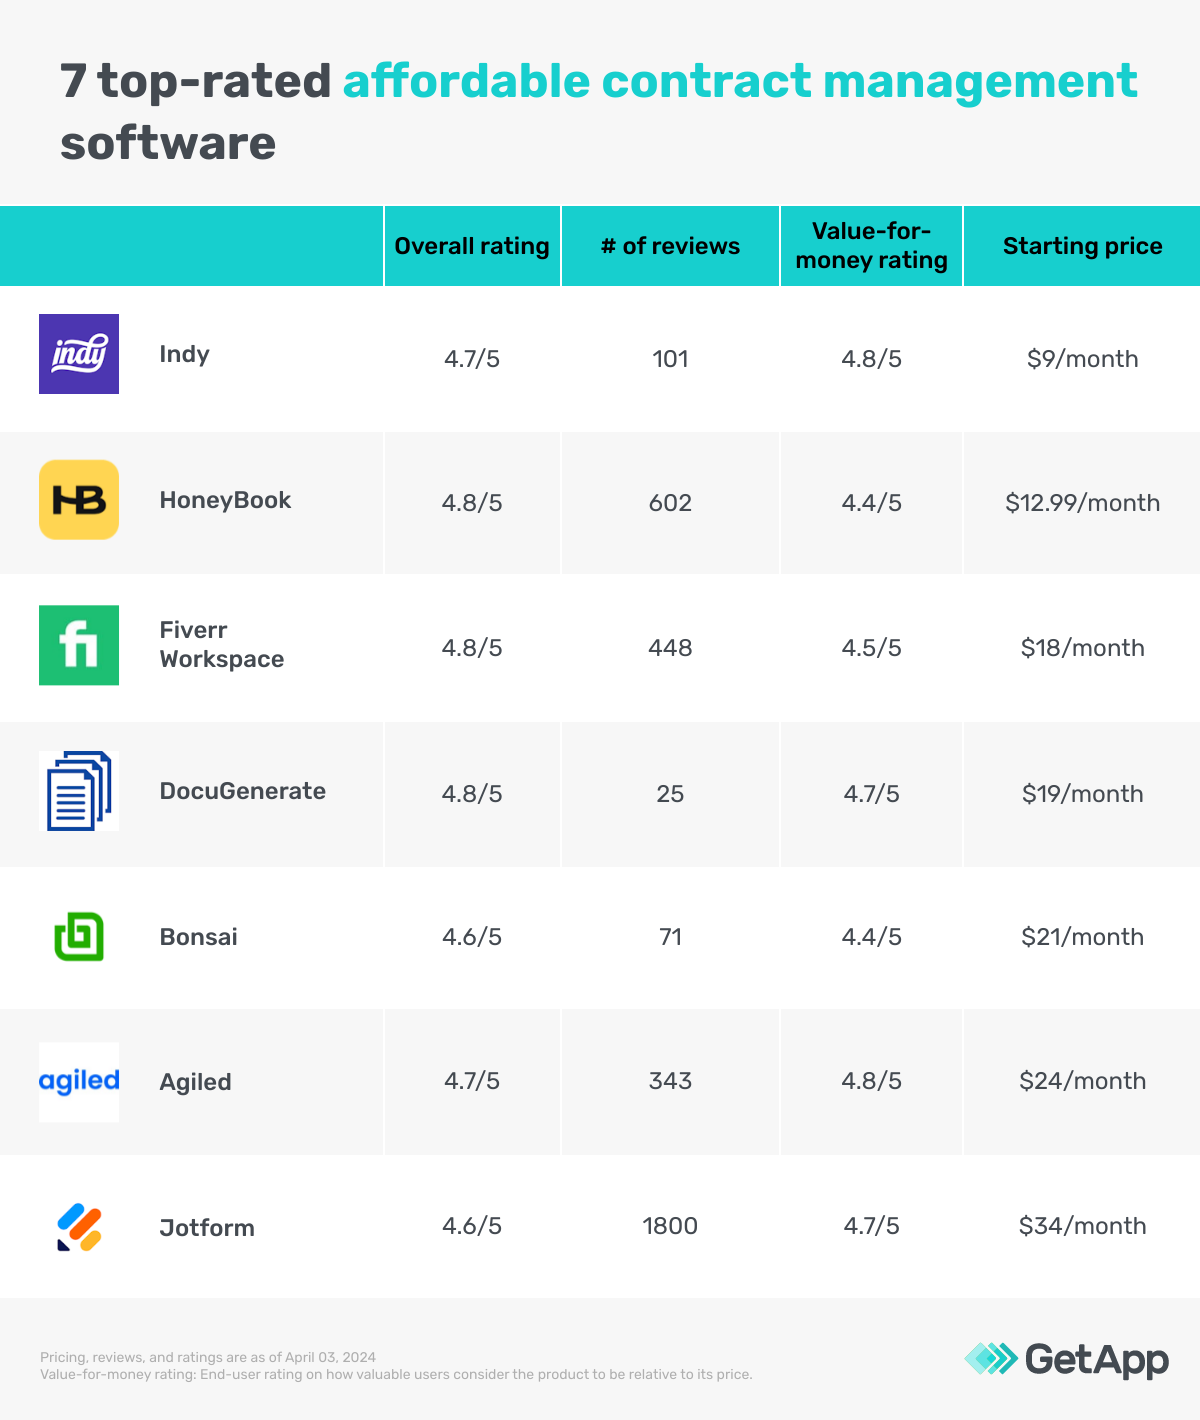
User Reviews
DocuGenerate stood among the top-rated products with a stellar rating of 4.8 out of 5. As the report is based on real user reviews, we want to thank our esteemed users who love our product!
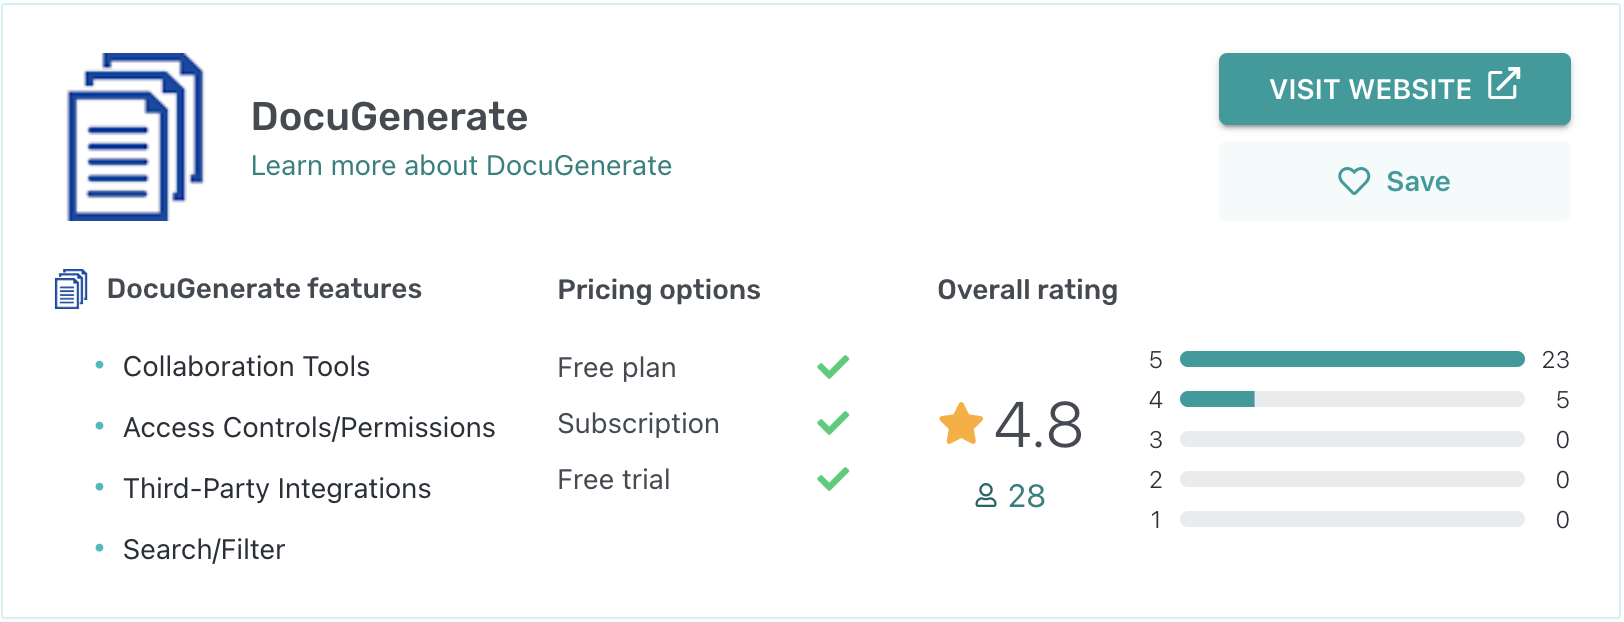
Here’s what users have said about our product:
Customer service was amazing. They spoke to me like I was a real human and didn't have canned responses that made the conversation even more confusing. After I worked through my issue with customer service, working with the generated document was extremely easy.
Source: GetApp
I needed an easy way to generate PDF files from JSON data, and DocuGenerate made it easy. The support was amazing too. I am not a developer, but I was able to implement this in a few hours using their API.
Source: GetApp
Document templates are very easy to use, we haven't found a single use case they wouldn't support. The simple API made the integration of our product straightforward.
Source: GetApp
Join us in shaping the future of Contract Management by reviewing DocuGenerate on GetApp here.
About Us
DocuGenerate is a leading provider of automated document generation solutions. Our platform allows businesses to easily create PDF documents such as invoices, letters, contracts, agreements, and certificates using our intuitive web app or REST API.
By streamlining the document creation process, we help companies save time and resources while ensuring accuracy and consistency. With flexible pricing plans and full API access, DocuGenerate caters to businesses of all sizes, from startups to large enterprises.
About GetApp
GetApp is the recommendation engine small businesses need to make the right software choice. With over 2 million verified user reviews, GetApp enables SMBs to achieve their mission by delivering the tailored, data-driven recommendations and insights needed to make informed software purchasing decisions. For more information, visit GetApp.com.
]]>