Introduction
Automating document generation can significantly boost your productivity, especially when managing multiple templates and datasets. While DocuGenerate’s web app provides a comprehensive solution, you might want to integrate document generation capabilities into your own Bubble application.
That’s why we’ve created a Bubble plugin that lets you harness the power of DocuGenerate’s API directly within your Bubble apps. In this tutorial, we’ll walk through how we built a simplified version of DocuGenerate using Bubble and our plugin - no coding required!
How the App Works
To get a better sense of what we’ll be building, you can check out the Bubble demo app. The animation below demonstrates a complete user journey through the application, from template creation to document generation and download.
The typical user journey follows these steps:
- Template Creation: Upload a Word template with merge tags and give it a name.
- Browsing Templates: From the dashboard, browse all available templates.
- Template Selection: Click on a template to view its details and previously generated documents.
- Document Generation: Using the “+” button, navigate to the document generation form.
- Data Entry: Provide a document name, select an output format, and enter the JSON data.
- Generation: After clicking “Generate,” the document is created using the DocuGenerate API.
- Document Access: Return to the template detail page and view the new document.
This workflow mirrors the core functionality of DocuGenerate’s web app but is implemented entirely within Bubble. The seamless integration between Bubble’s visual development platform and DocuGenerate’s API creates a powerful yet accessible document generation solution.
Setting Up Your Bubble Project
Before we start building our app, you’ll need to prepare your development environment. Bubble’s visual platform makes this process straightforward, but there are a few essential steps to complete:
- Sign up for a Bubble account if you don’t already have one.
- Create an app in Bubble and give it a name.
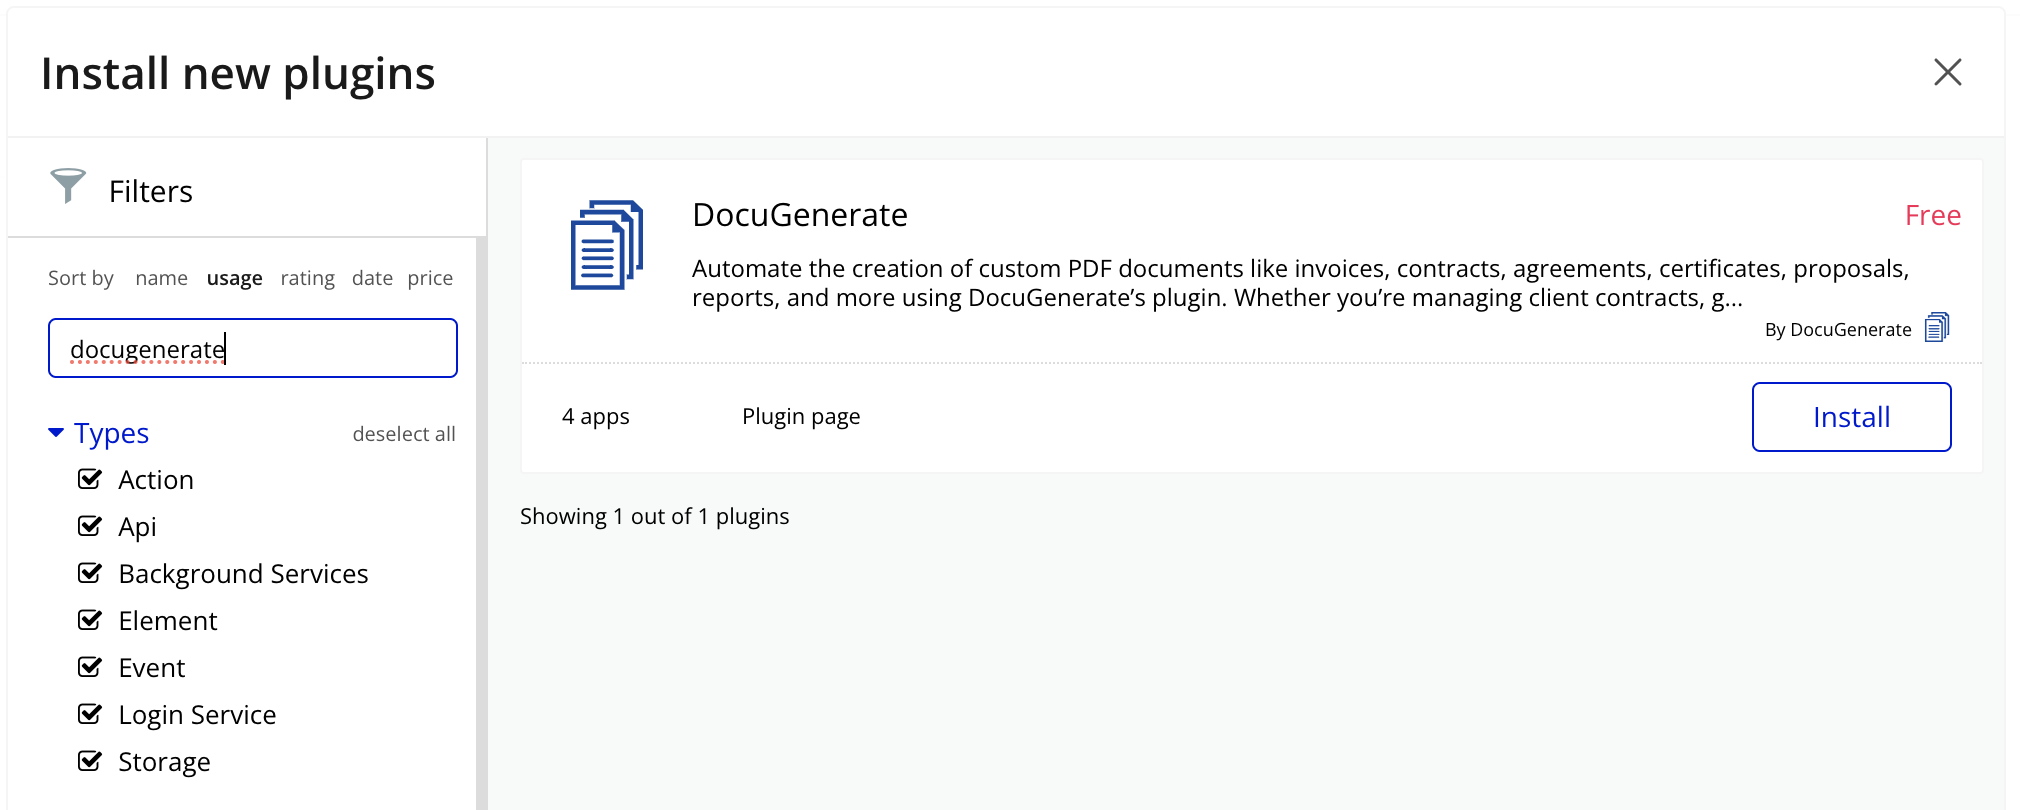
- Install the DocuGenerate plugin in your new app.
- Configure the plugin with your DocuGenerate API Key.
What’s Included in the DocuGenerate Plugin?
The DocuGenerate Bubble plugin provides a comprehensive set of API calls that mirror our REST API functionality. These are categorized into two types:
Data Calls
These are used to retrieve information from your DocuGenerate account:
- List Templates: Returns all templates available in your account.
- Get Template: Retrieves detailed information about a specific template.
- List Documents: Returns all documents generated from a specific template.
- Get Document: Retrieves detailed information about a specific document.
Actions
These are used to create, modify, or delete resources in your DocuGenerate account:
Understanding these API calls is essential as they form the backbone of our demo application. Throughout this tutorial, we’ll be using most of these calls to create a fully functional document generation workflow.
Designing the App Navigation
Before diving into each page, let’s set up the navigation structure that will connect all parts of our application. A consistent navigation system is crucial for providing a smooth user experience across the app. We created a simple navigation bar that appears at the top of every page, which includes:
- The DocuGenerate logo on the left side, which serves as a home button pointing to the dashboard.
- A New Template button on the right side that takes users directly to the template creation page.
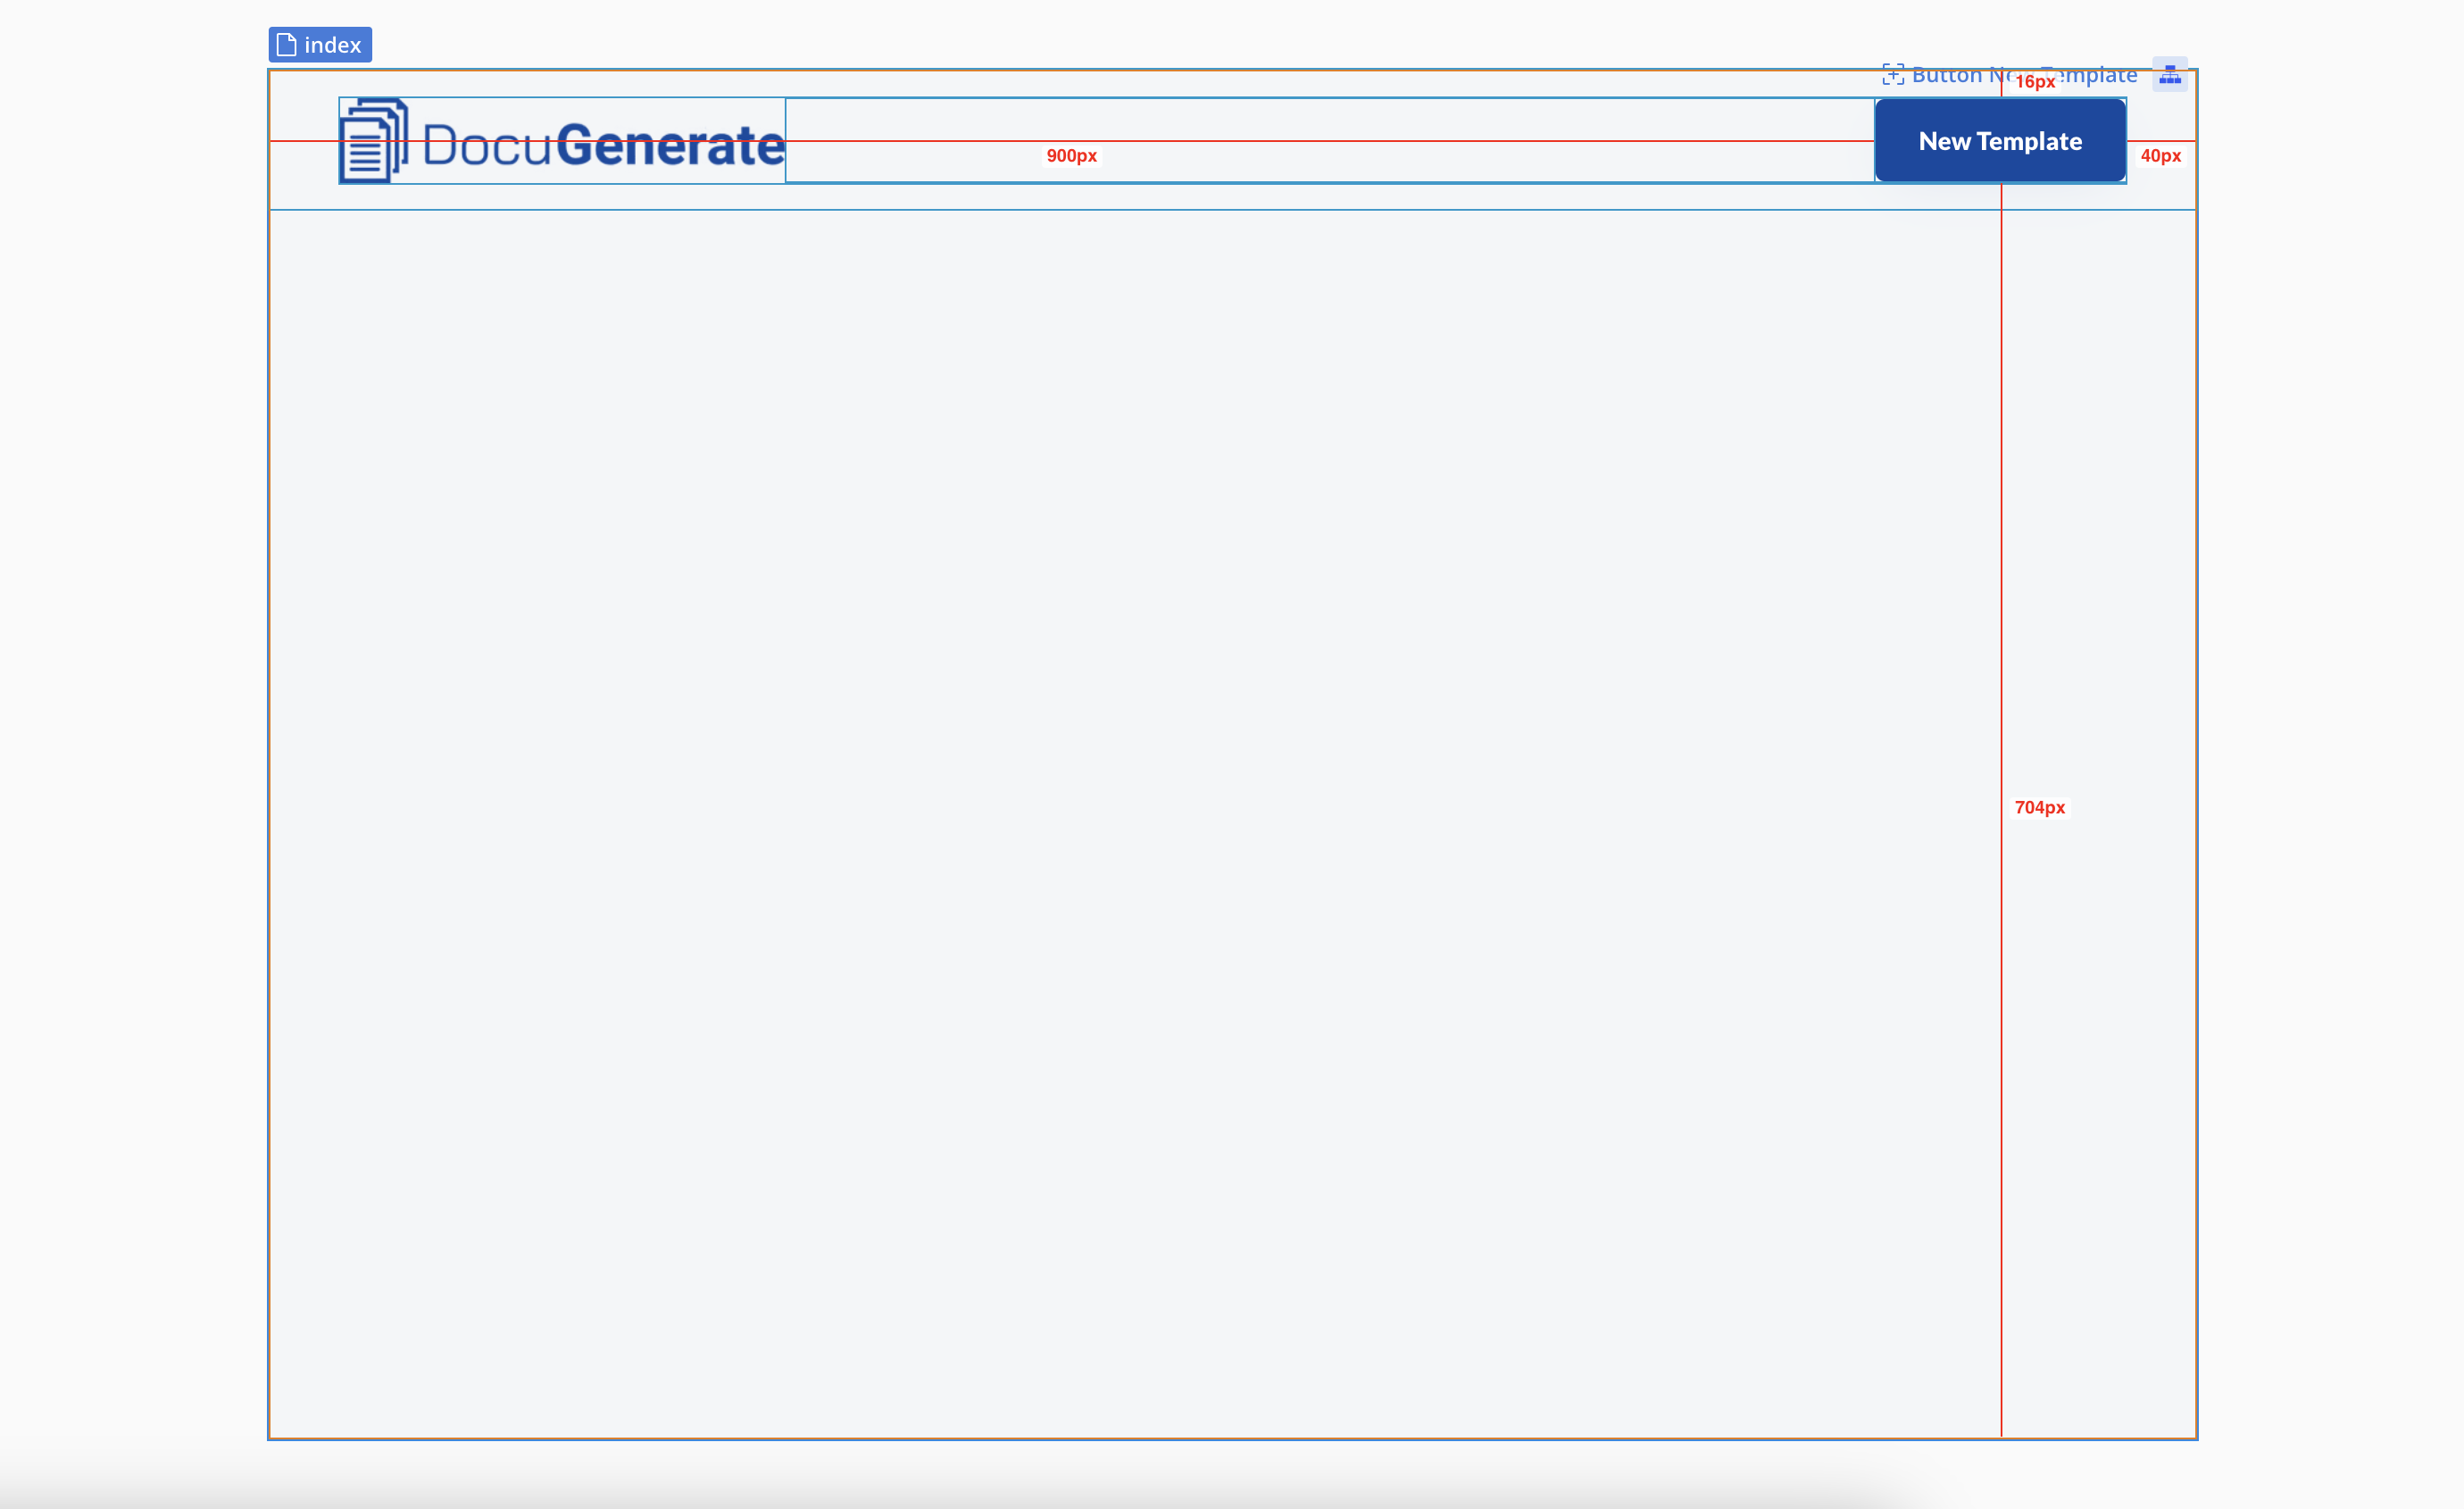
This navigation structure mirrors the approach used in the actual DocuGenerate web app, providing a familiar experience for users who have used our main platform. The familiar layout helps users intuitively understand how to navigate the application without requiring additional instructions.
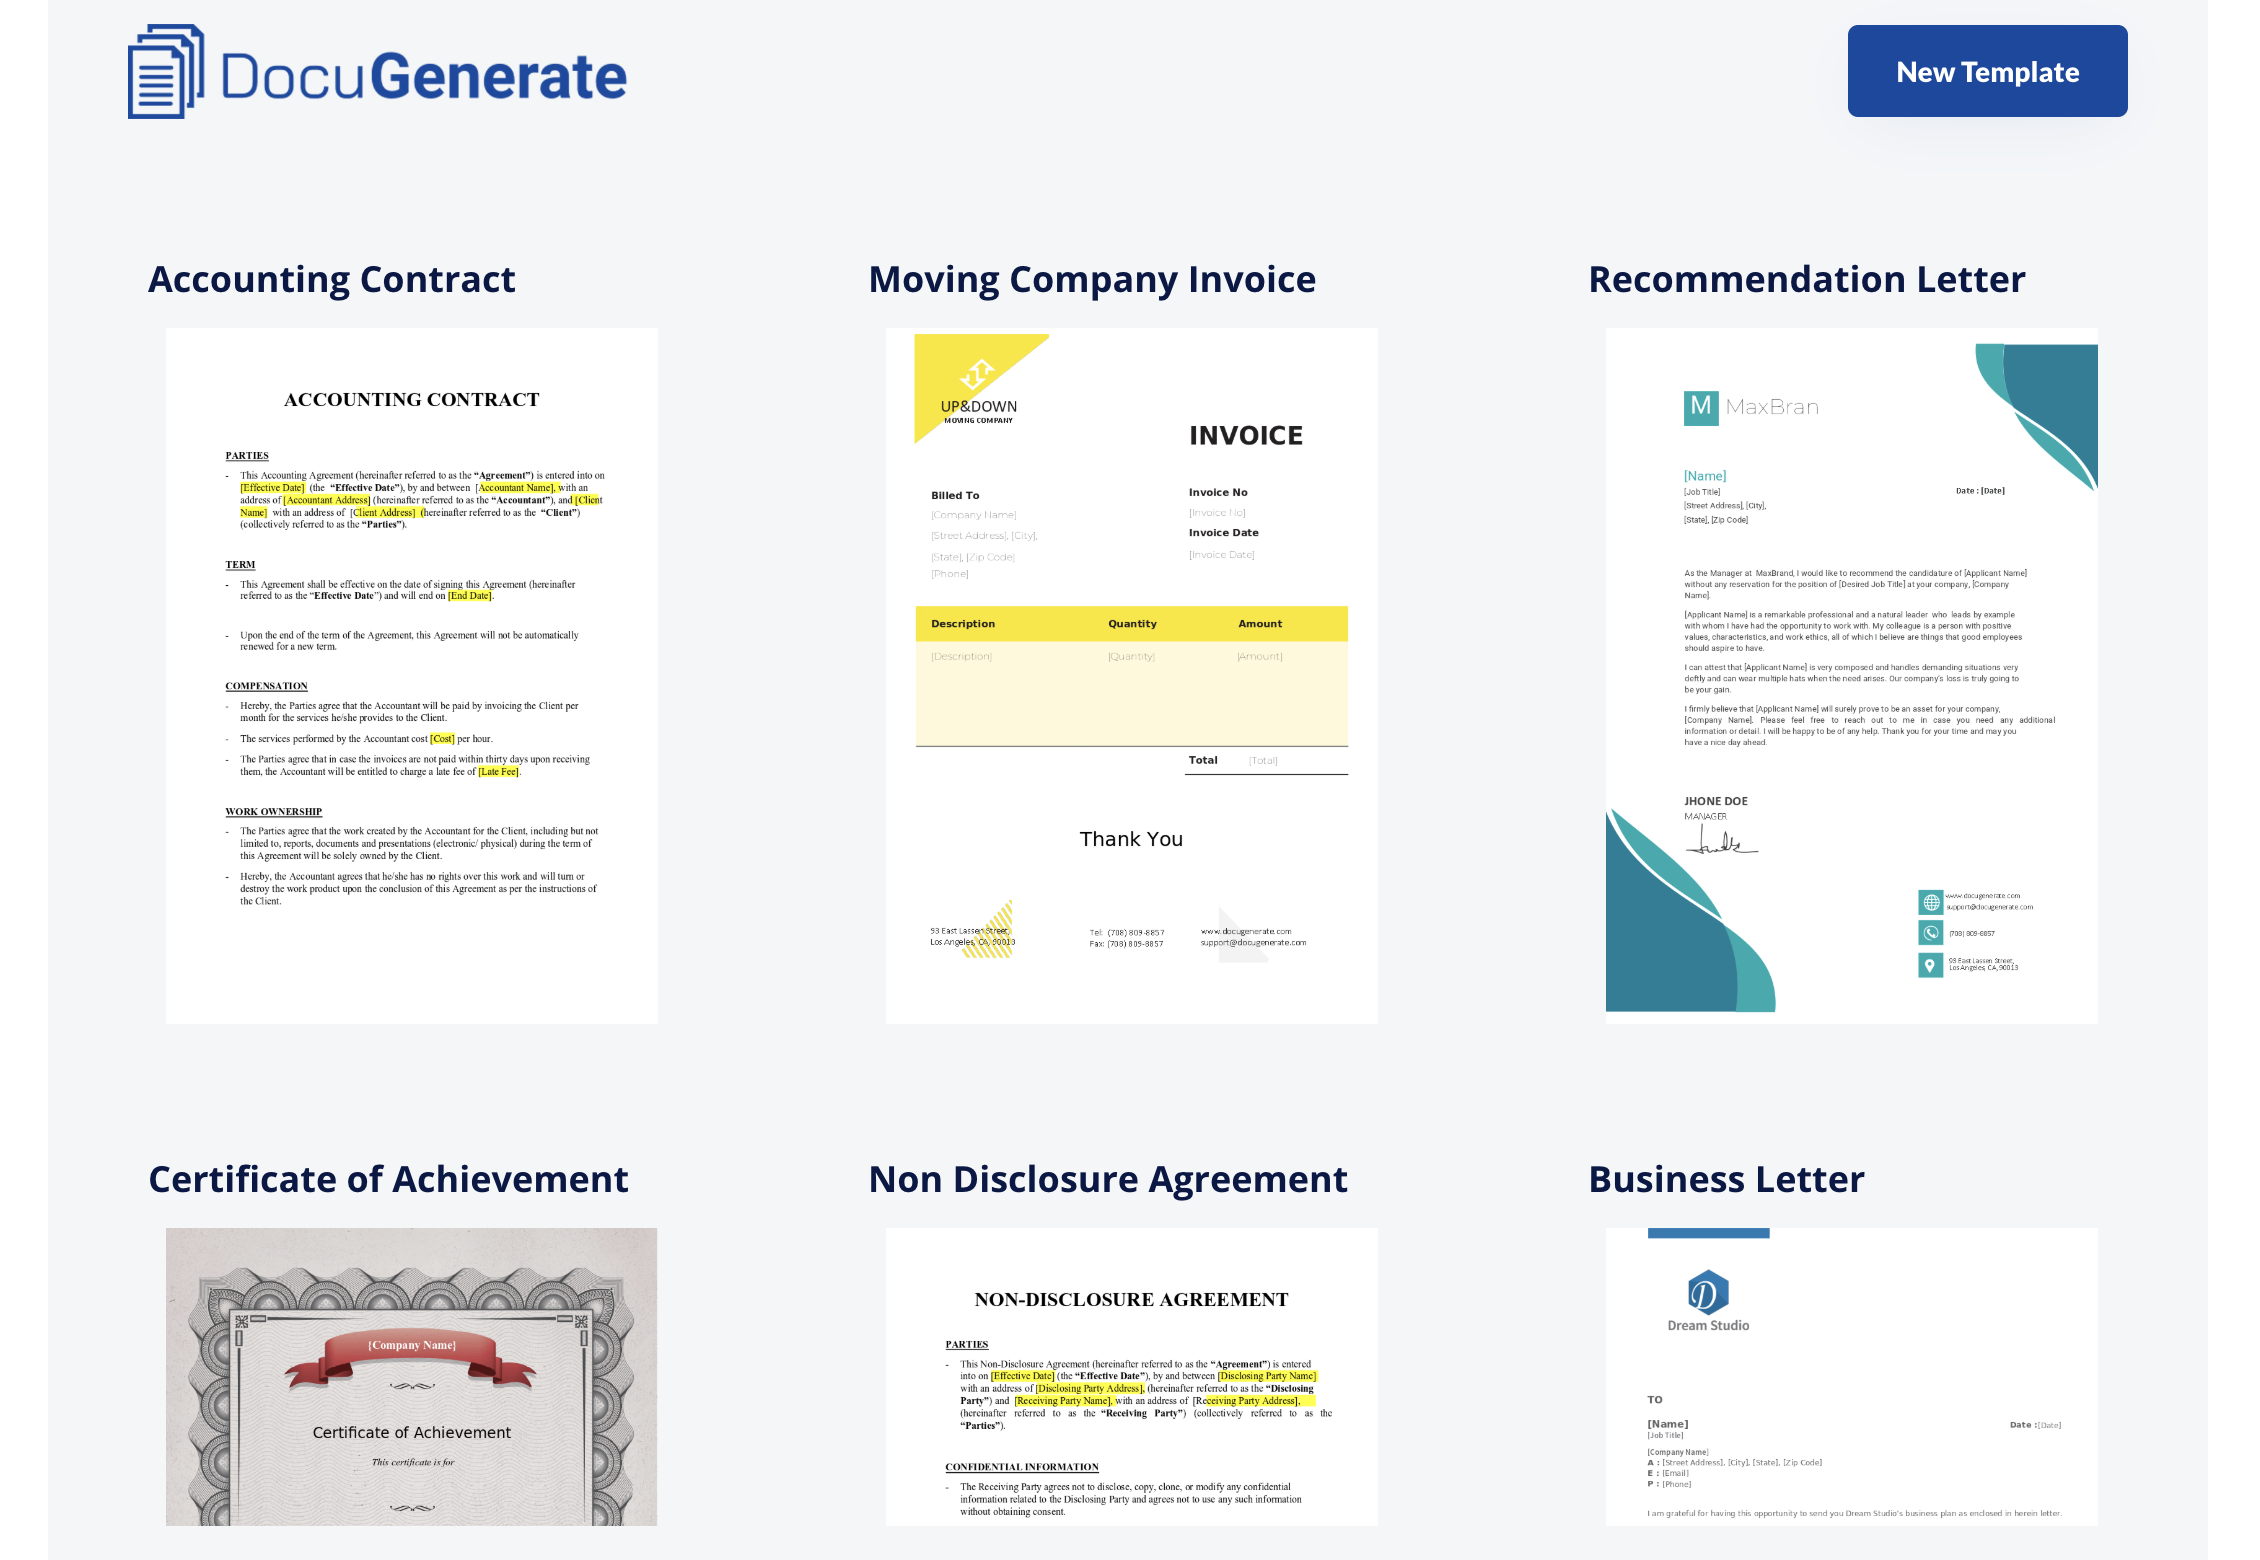
The Dashboard Page
The dashboard page serves as the central hub of our application, providing users with an immediate overview of all their available templates. This is the first screen users see when they open the app, so it’s designed to be both informative and intuitive, allowing for quick access to the most important functionality.
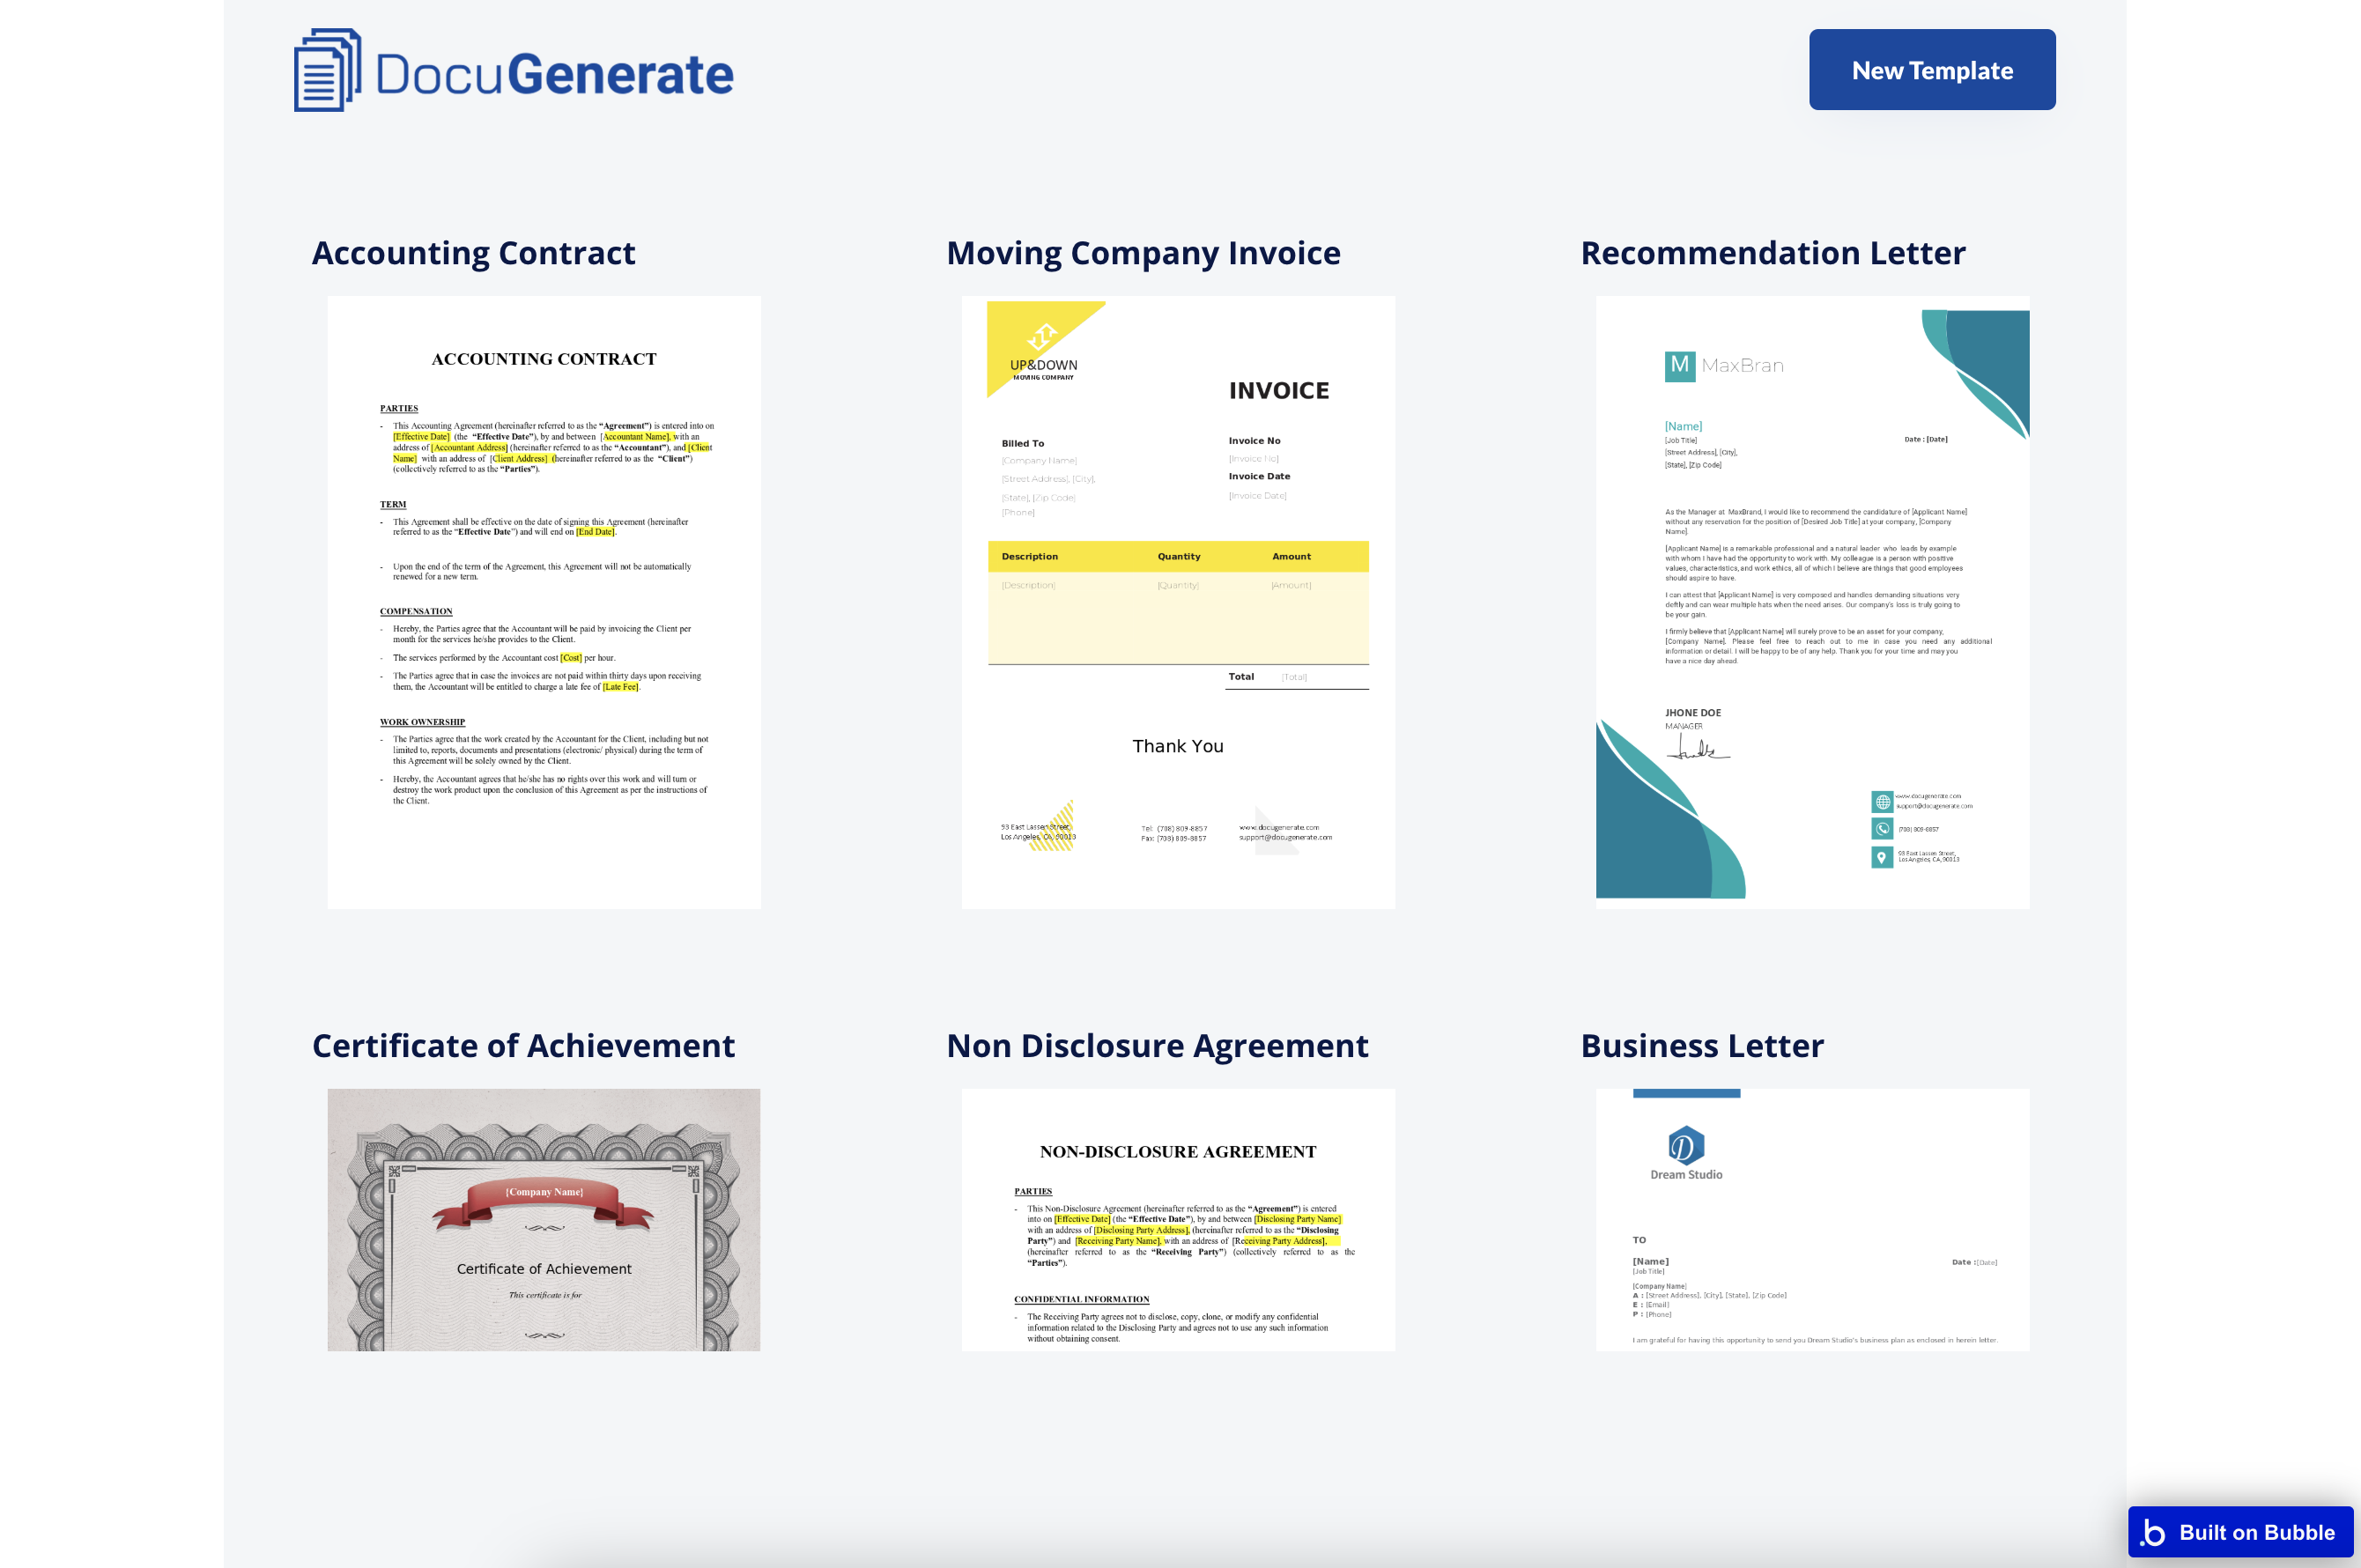
Much like DocuGenerate’s web interface, we’ve organized templates in a visually appealing grid layout that showcases template previews alongside their names. This visual approach makes it easy for users to quickly identify the template they’re looking for, even when managing dozens of different templates.
How to Build It:
- Create a RepeatingGroup element to display the templates.
- Set the Data Source to the List Templates data call from the DocuGenerate plugin.
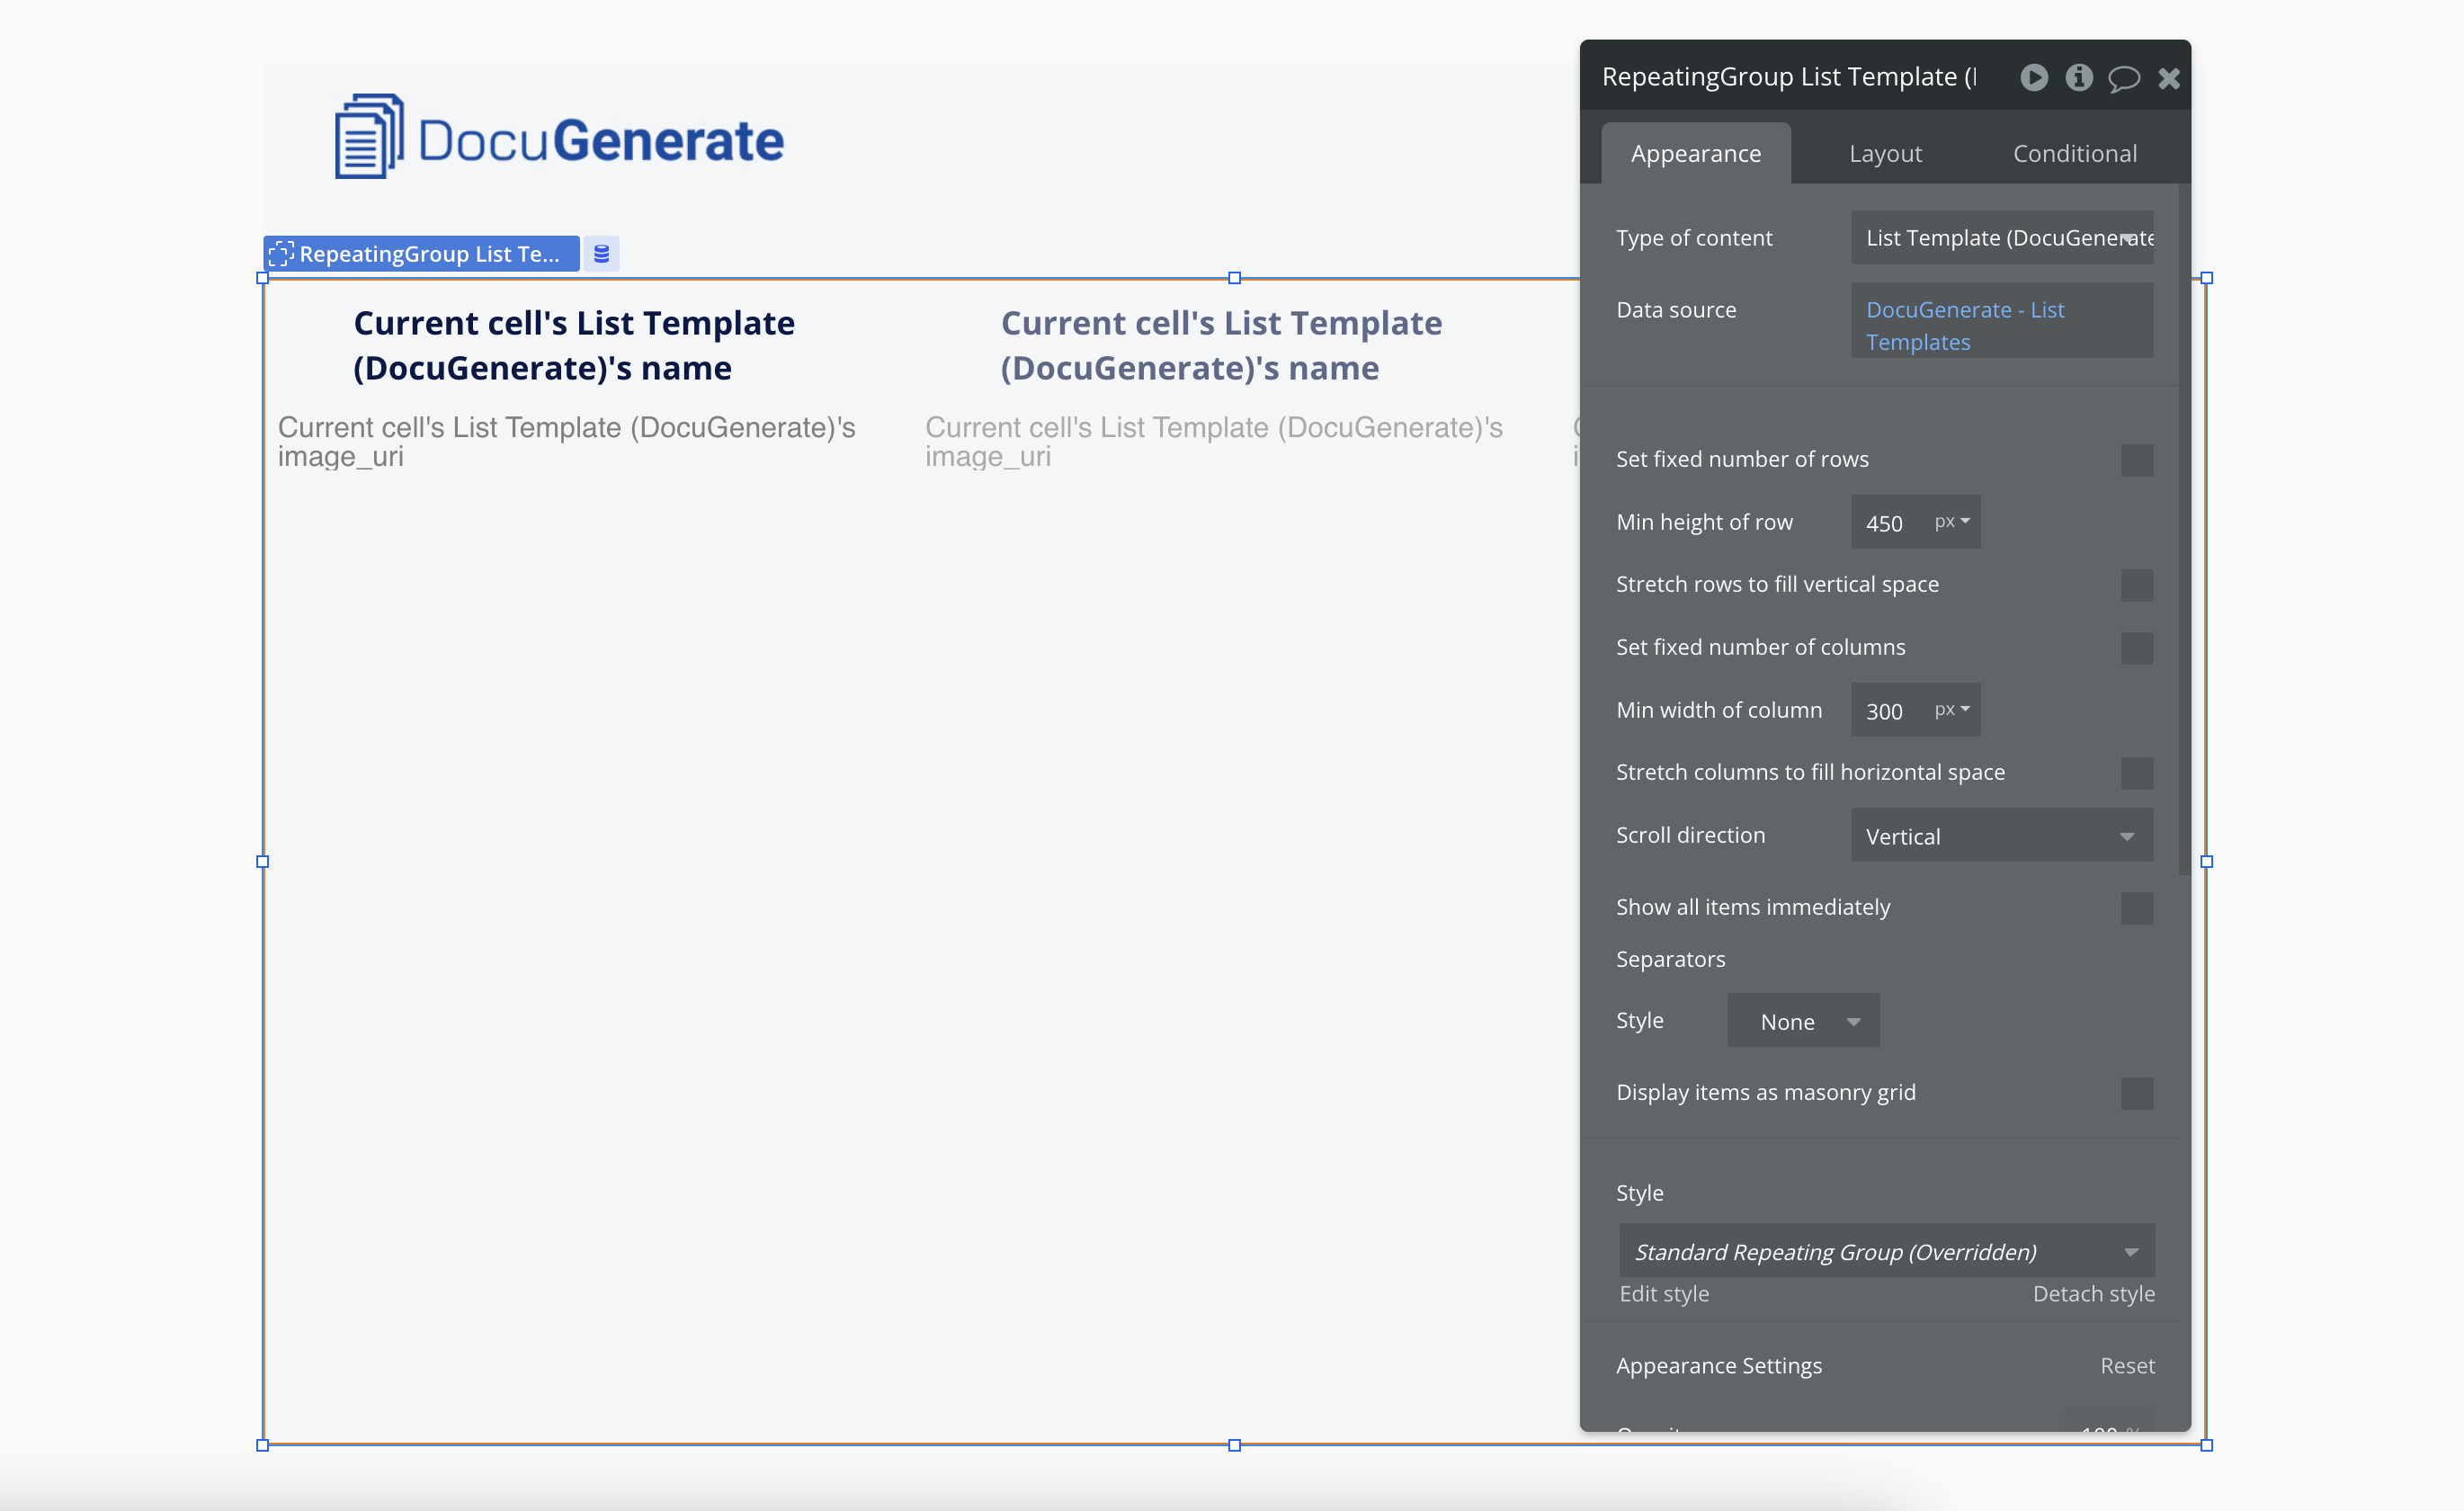
- Design each grid item to include:
- A text element for the template name
- An image element for the template preview
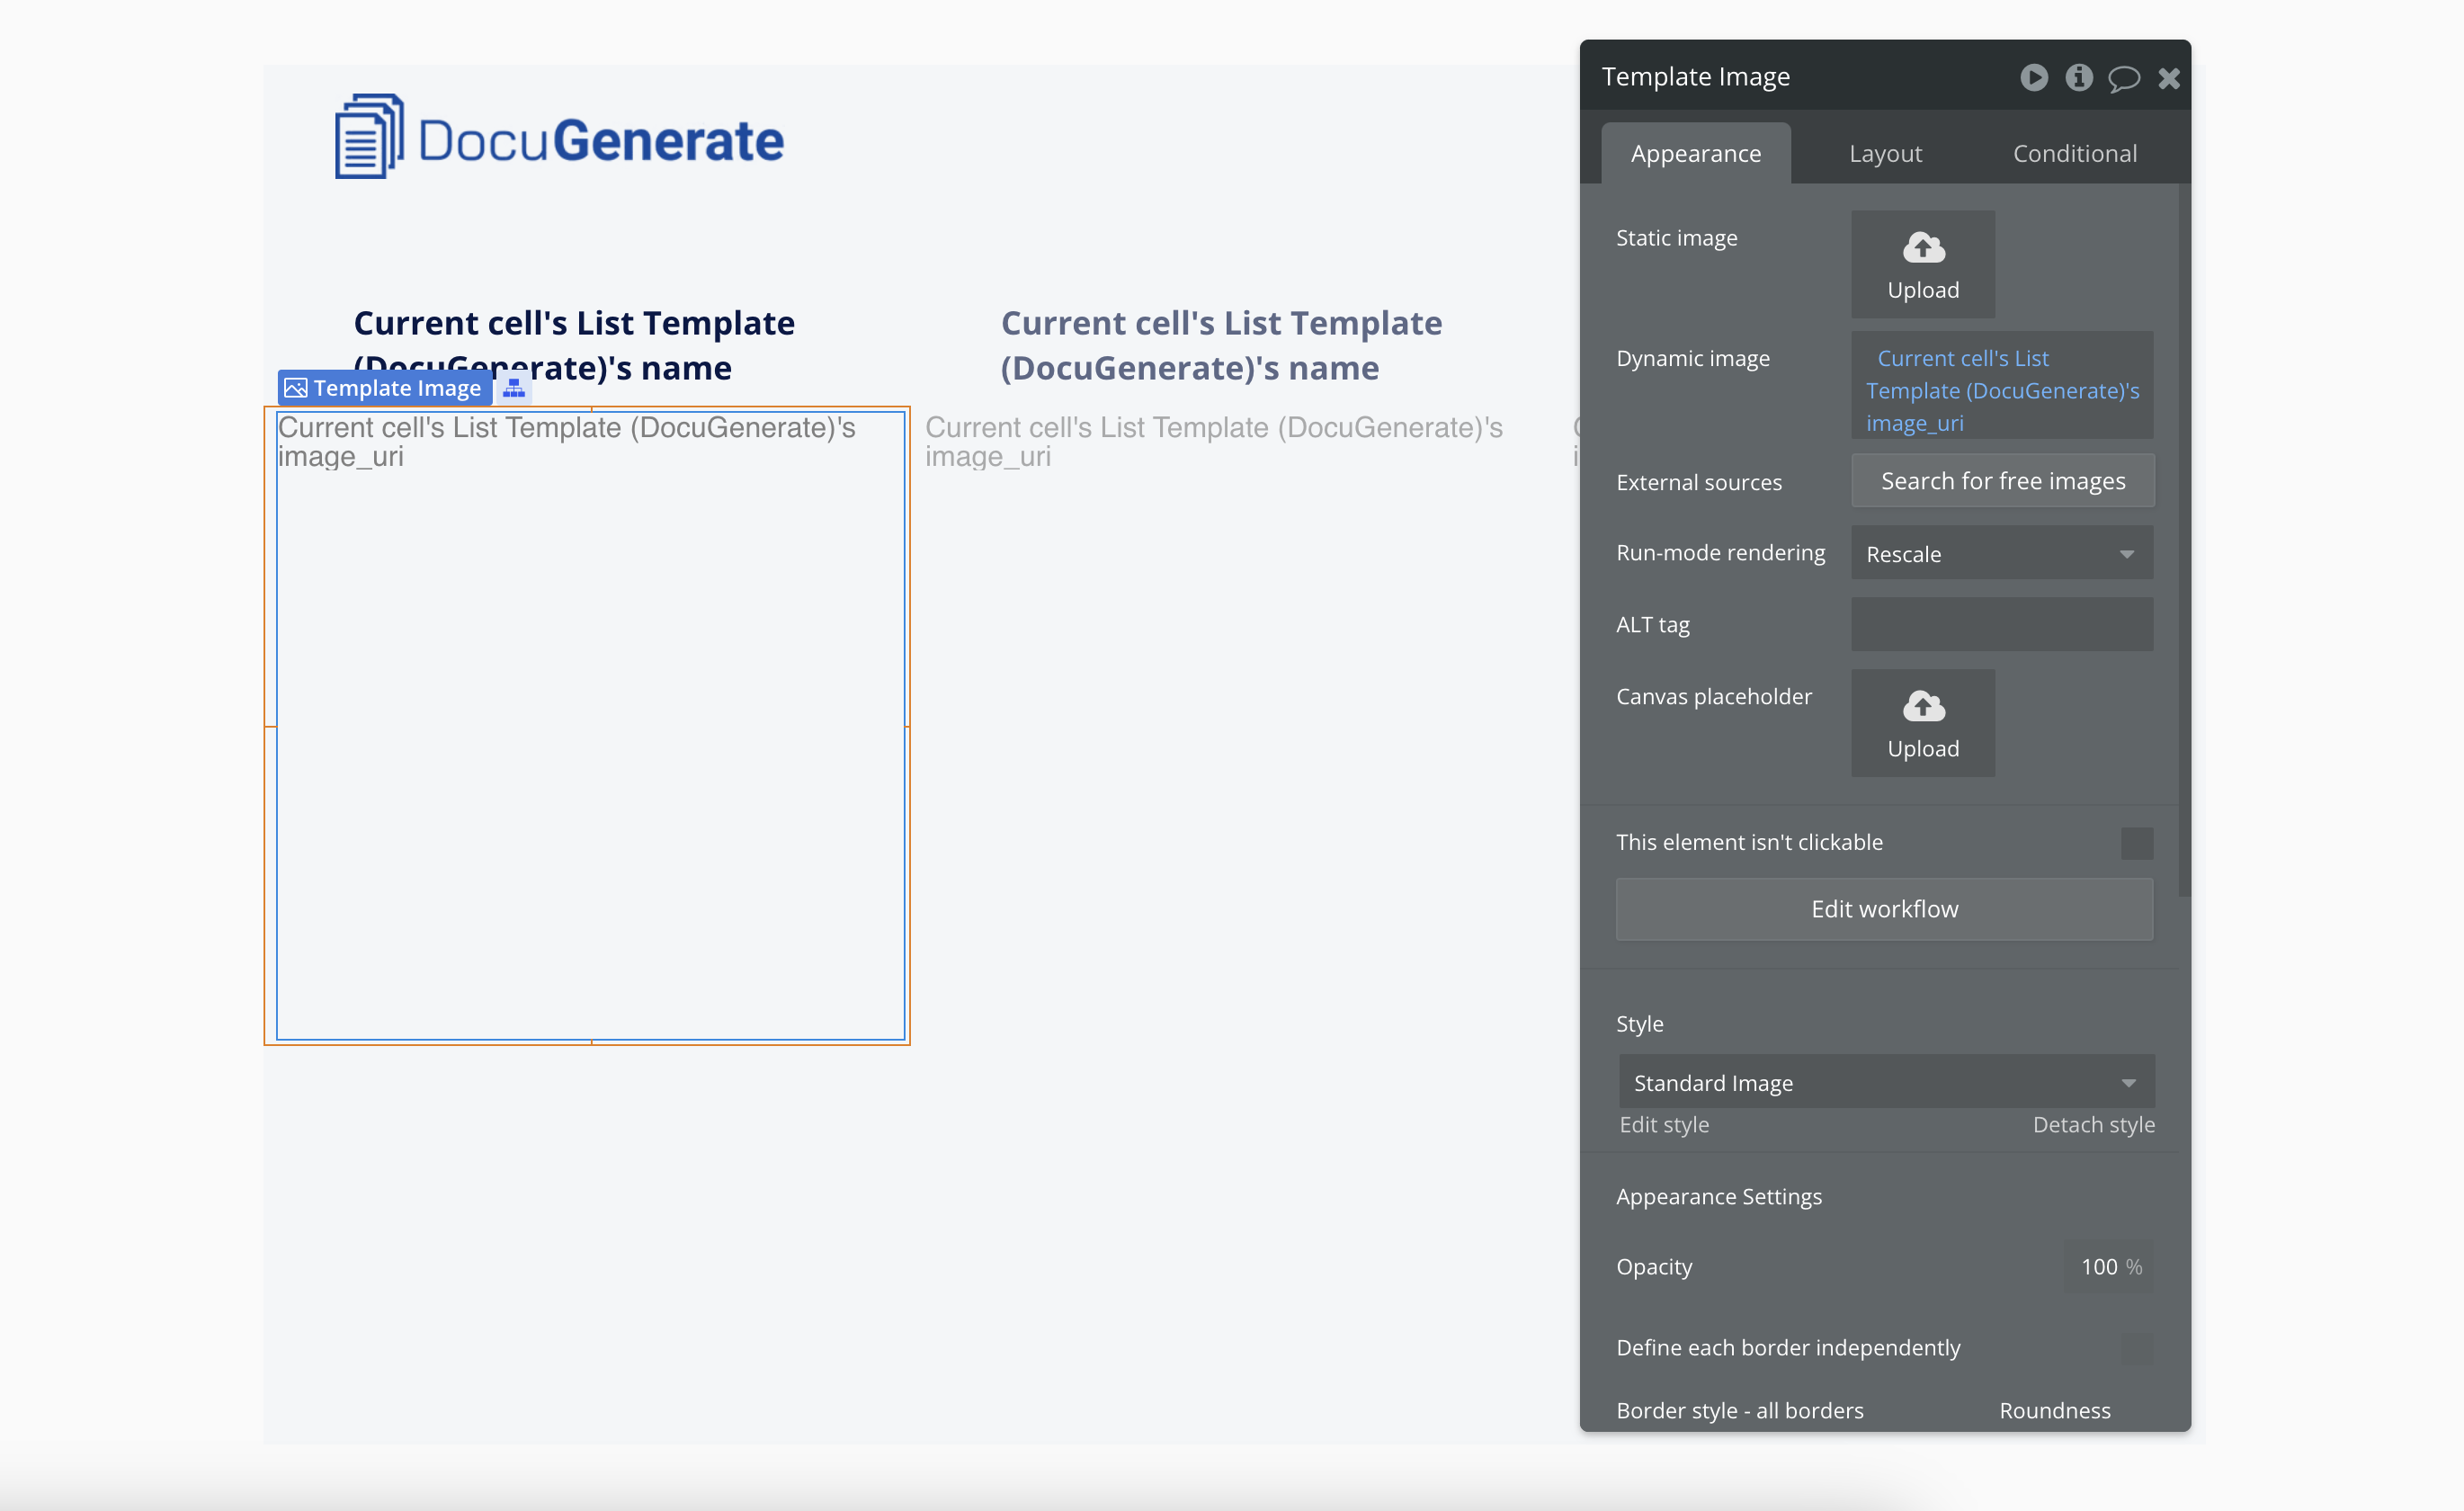
- Add a workflow to the image element so that when clicked, it navigates to the template detail page and passes the template ID as a URL parameter.
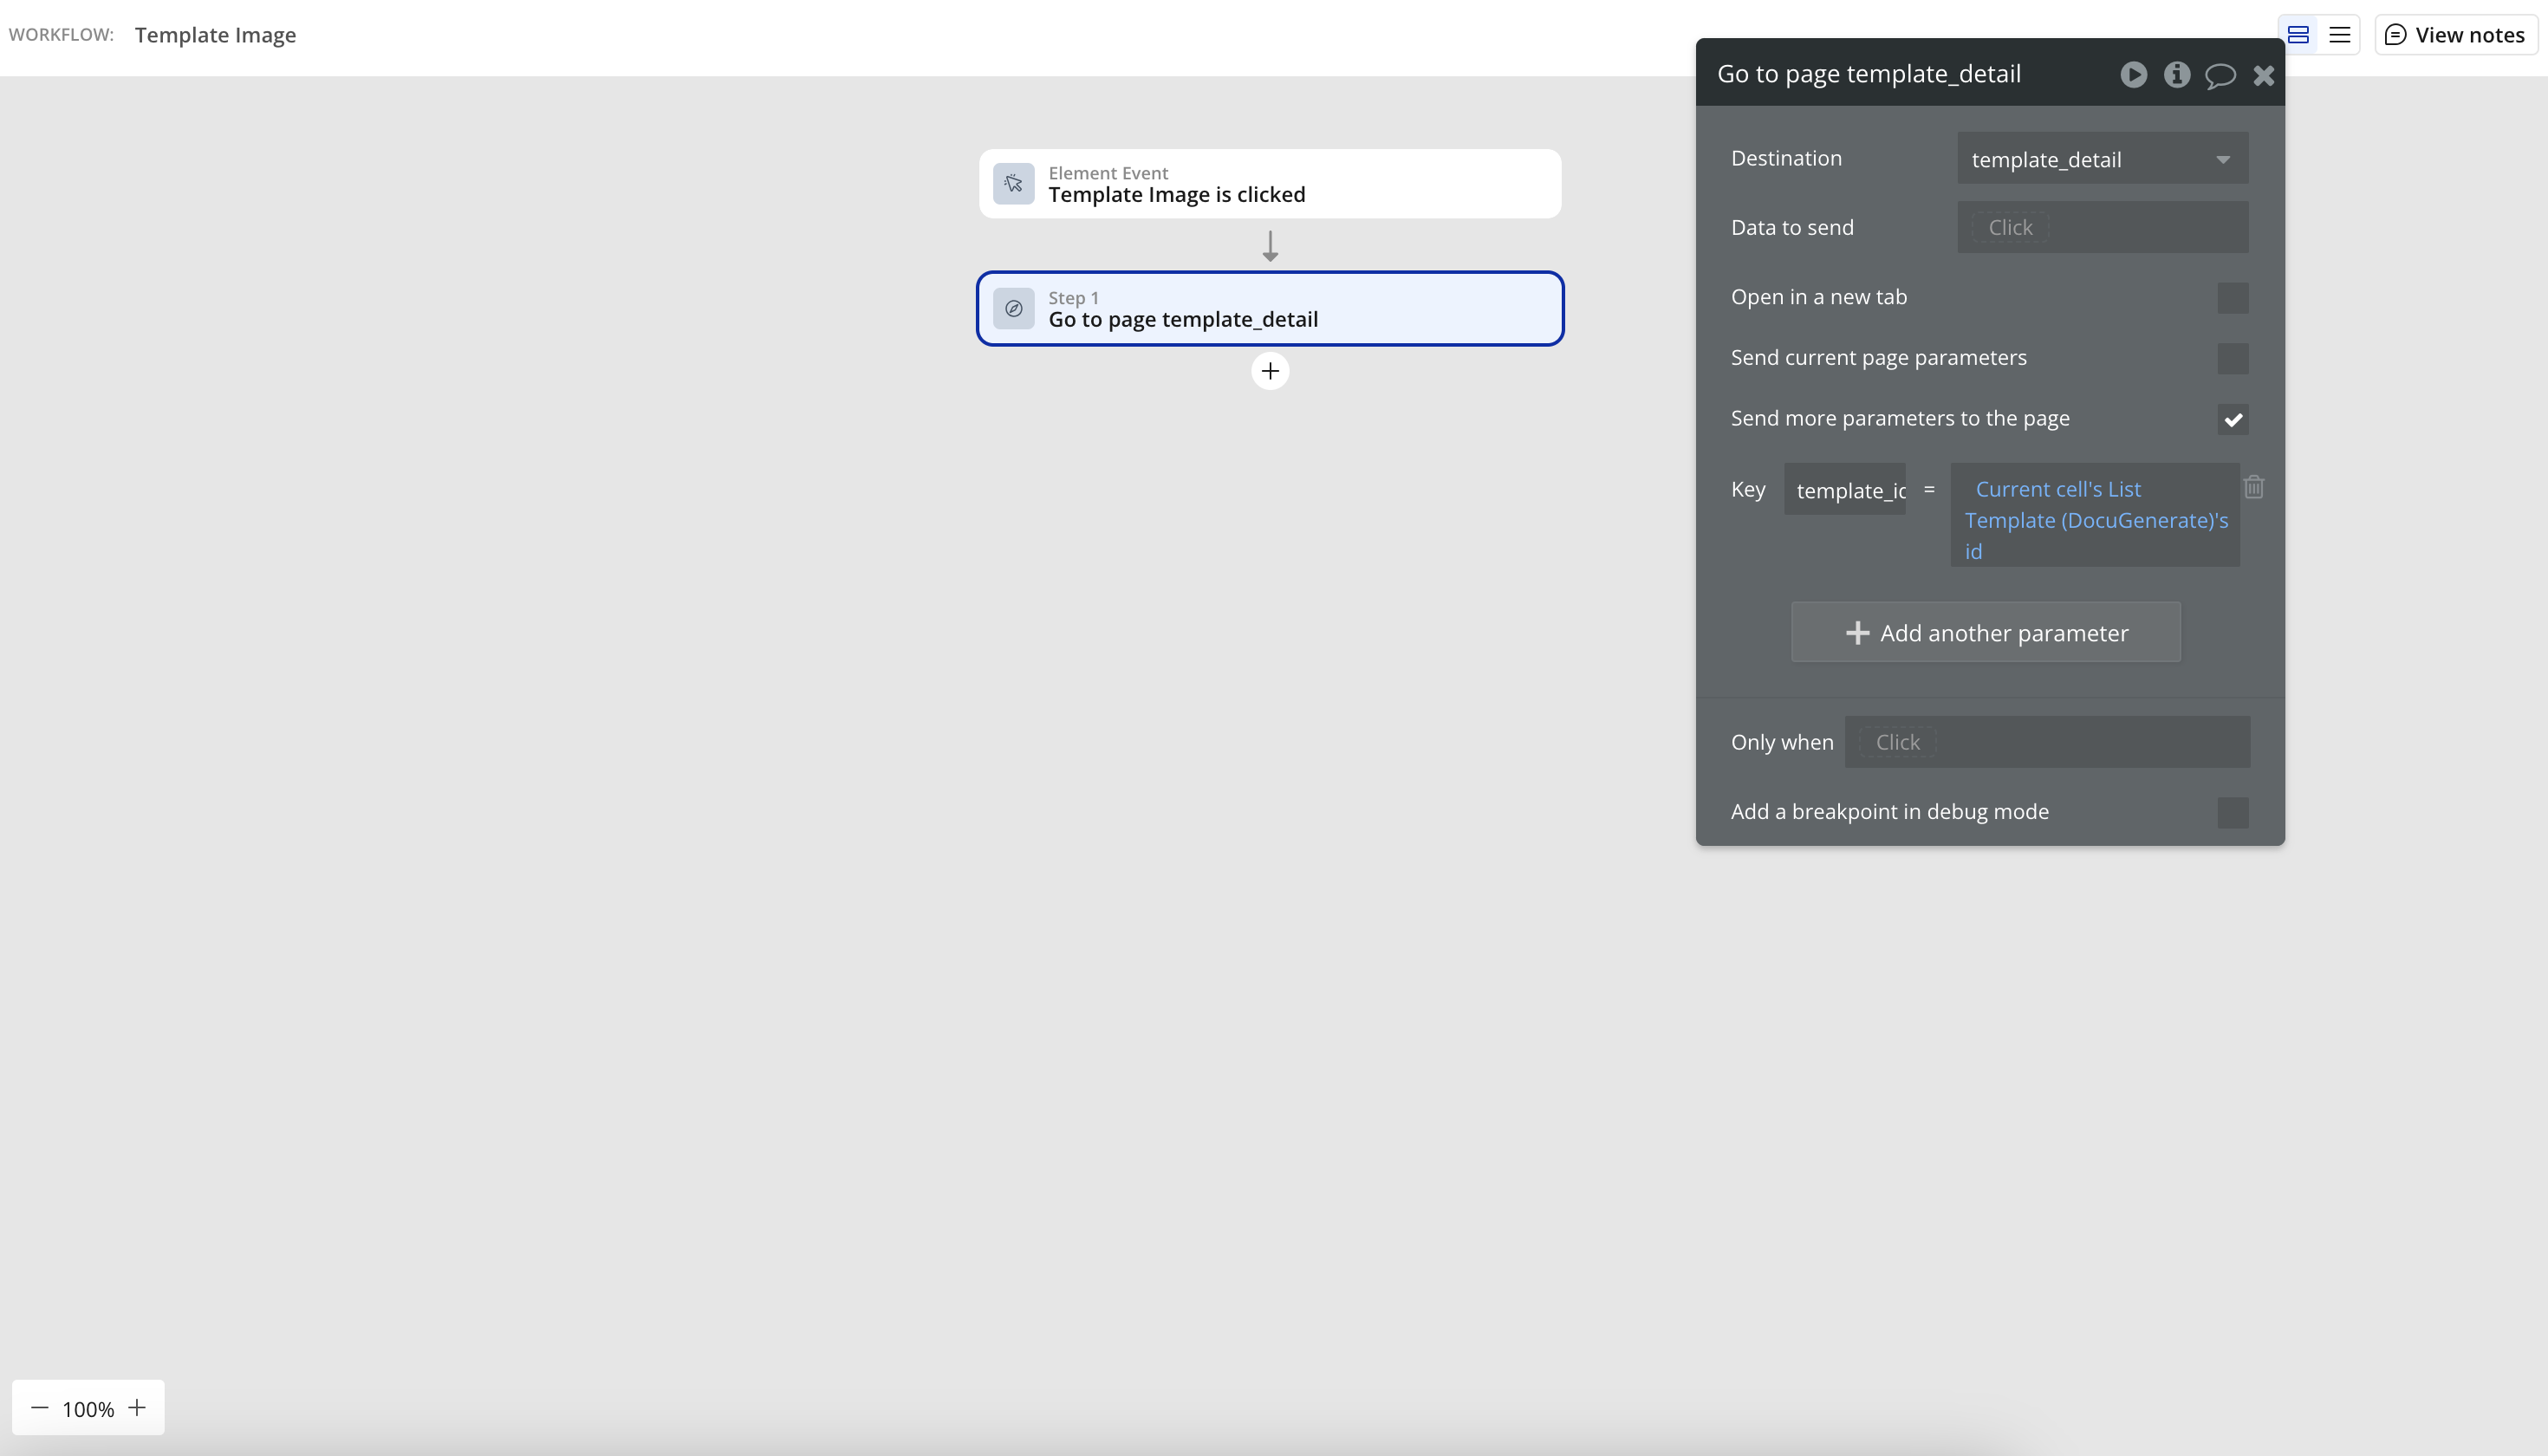
The key component here is the RepeatingGroup, which automatically populates with all templates from your DocuGenerate account. This dynamic approach ensures that the dashboard always shows the most up-to-date list of templates without requiring any manual updates.
Each template in the grid is clickable and navigates to a detailed view of that specific template. This interaction pattern creates a natural flow through the application, guiding users from the overview to more detailed information with a single click.
The dashboard also integrates seamlessly with our navigation bar, which includes the “New Template” button for quick access to template creation. This ensures that users can easily start the document generation process from this central location.
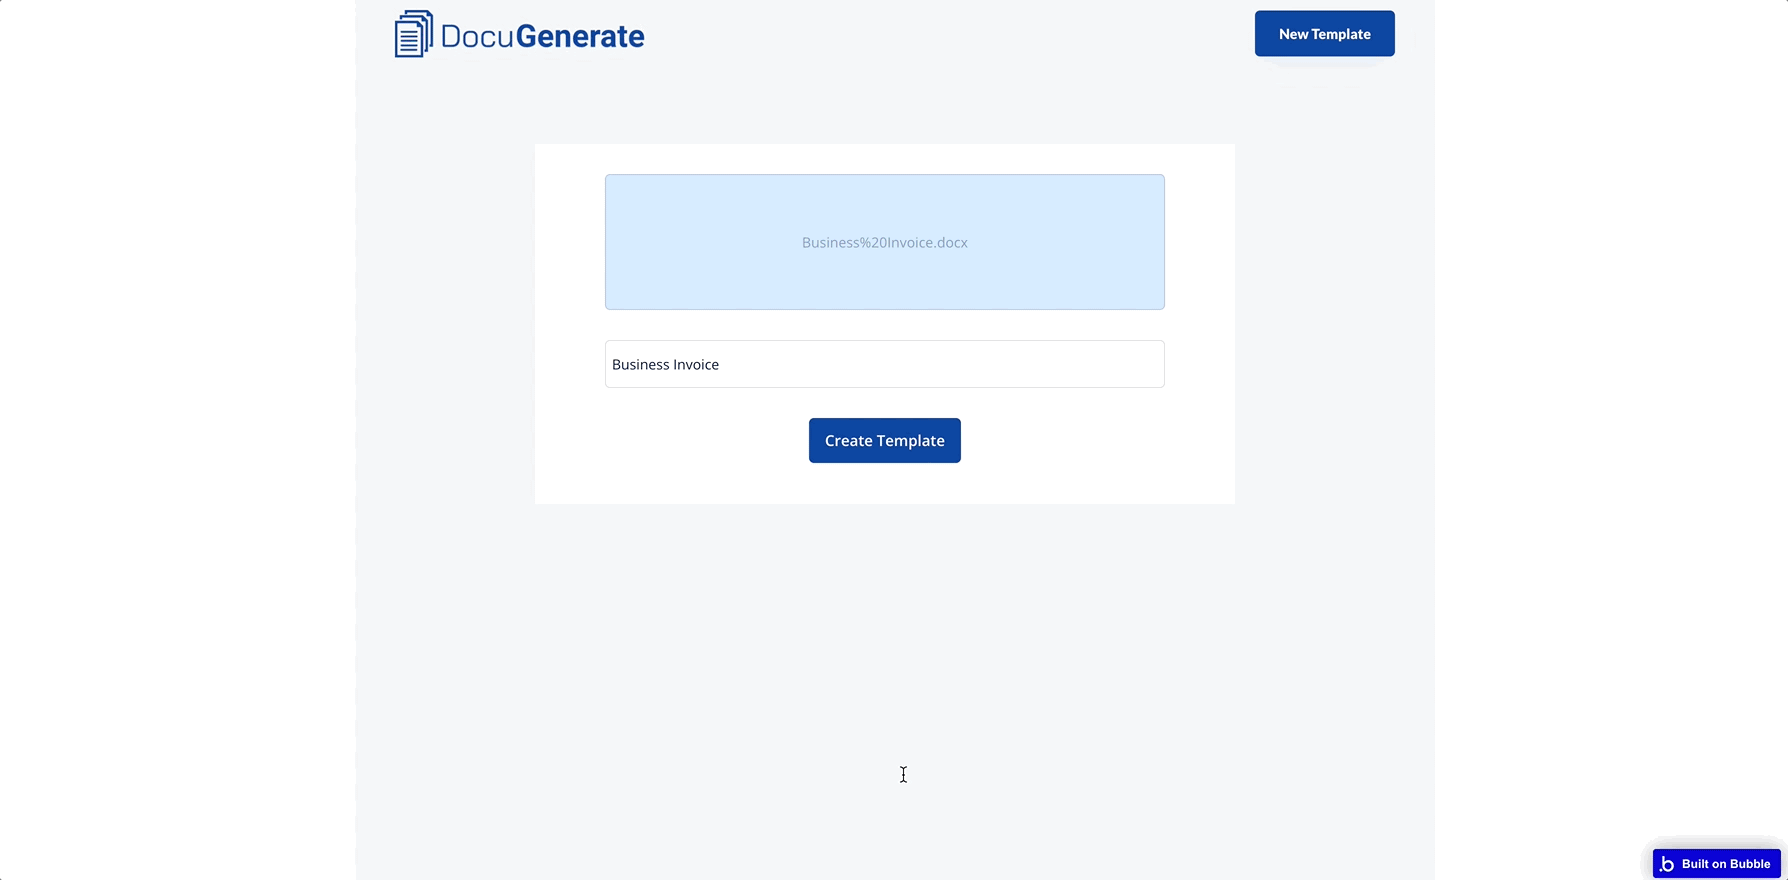
The Template Creation Page
This page is where users begin the document generation process by uploading a Word document that will serve as a template. This critical step lays the foundation for all subsequent document generation, as the uploaded template contains the structure, formatting, and merge tags that will be used when generating documents.
We’ve designed this page to be straightforward and focused, eliminating unnecessary distractions and guiding users through the template creation process. The interface clearly communicates what’s required (a Word document and a name) and provides immediate feedback when the template is successfully created.

How to Build It:
- Add a FileUploader element to let users select their Word document.

- Add an input field for entering the template name.
- Add a “Create Template” button with the following workflow:
- When clicked, call the Create Template action from the DocuGenerate plugin
- Pass the file from the FileUploader as the
file parameter using the dynamic link option - Pass the name from the input field as the
name parameter 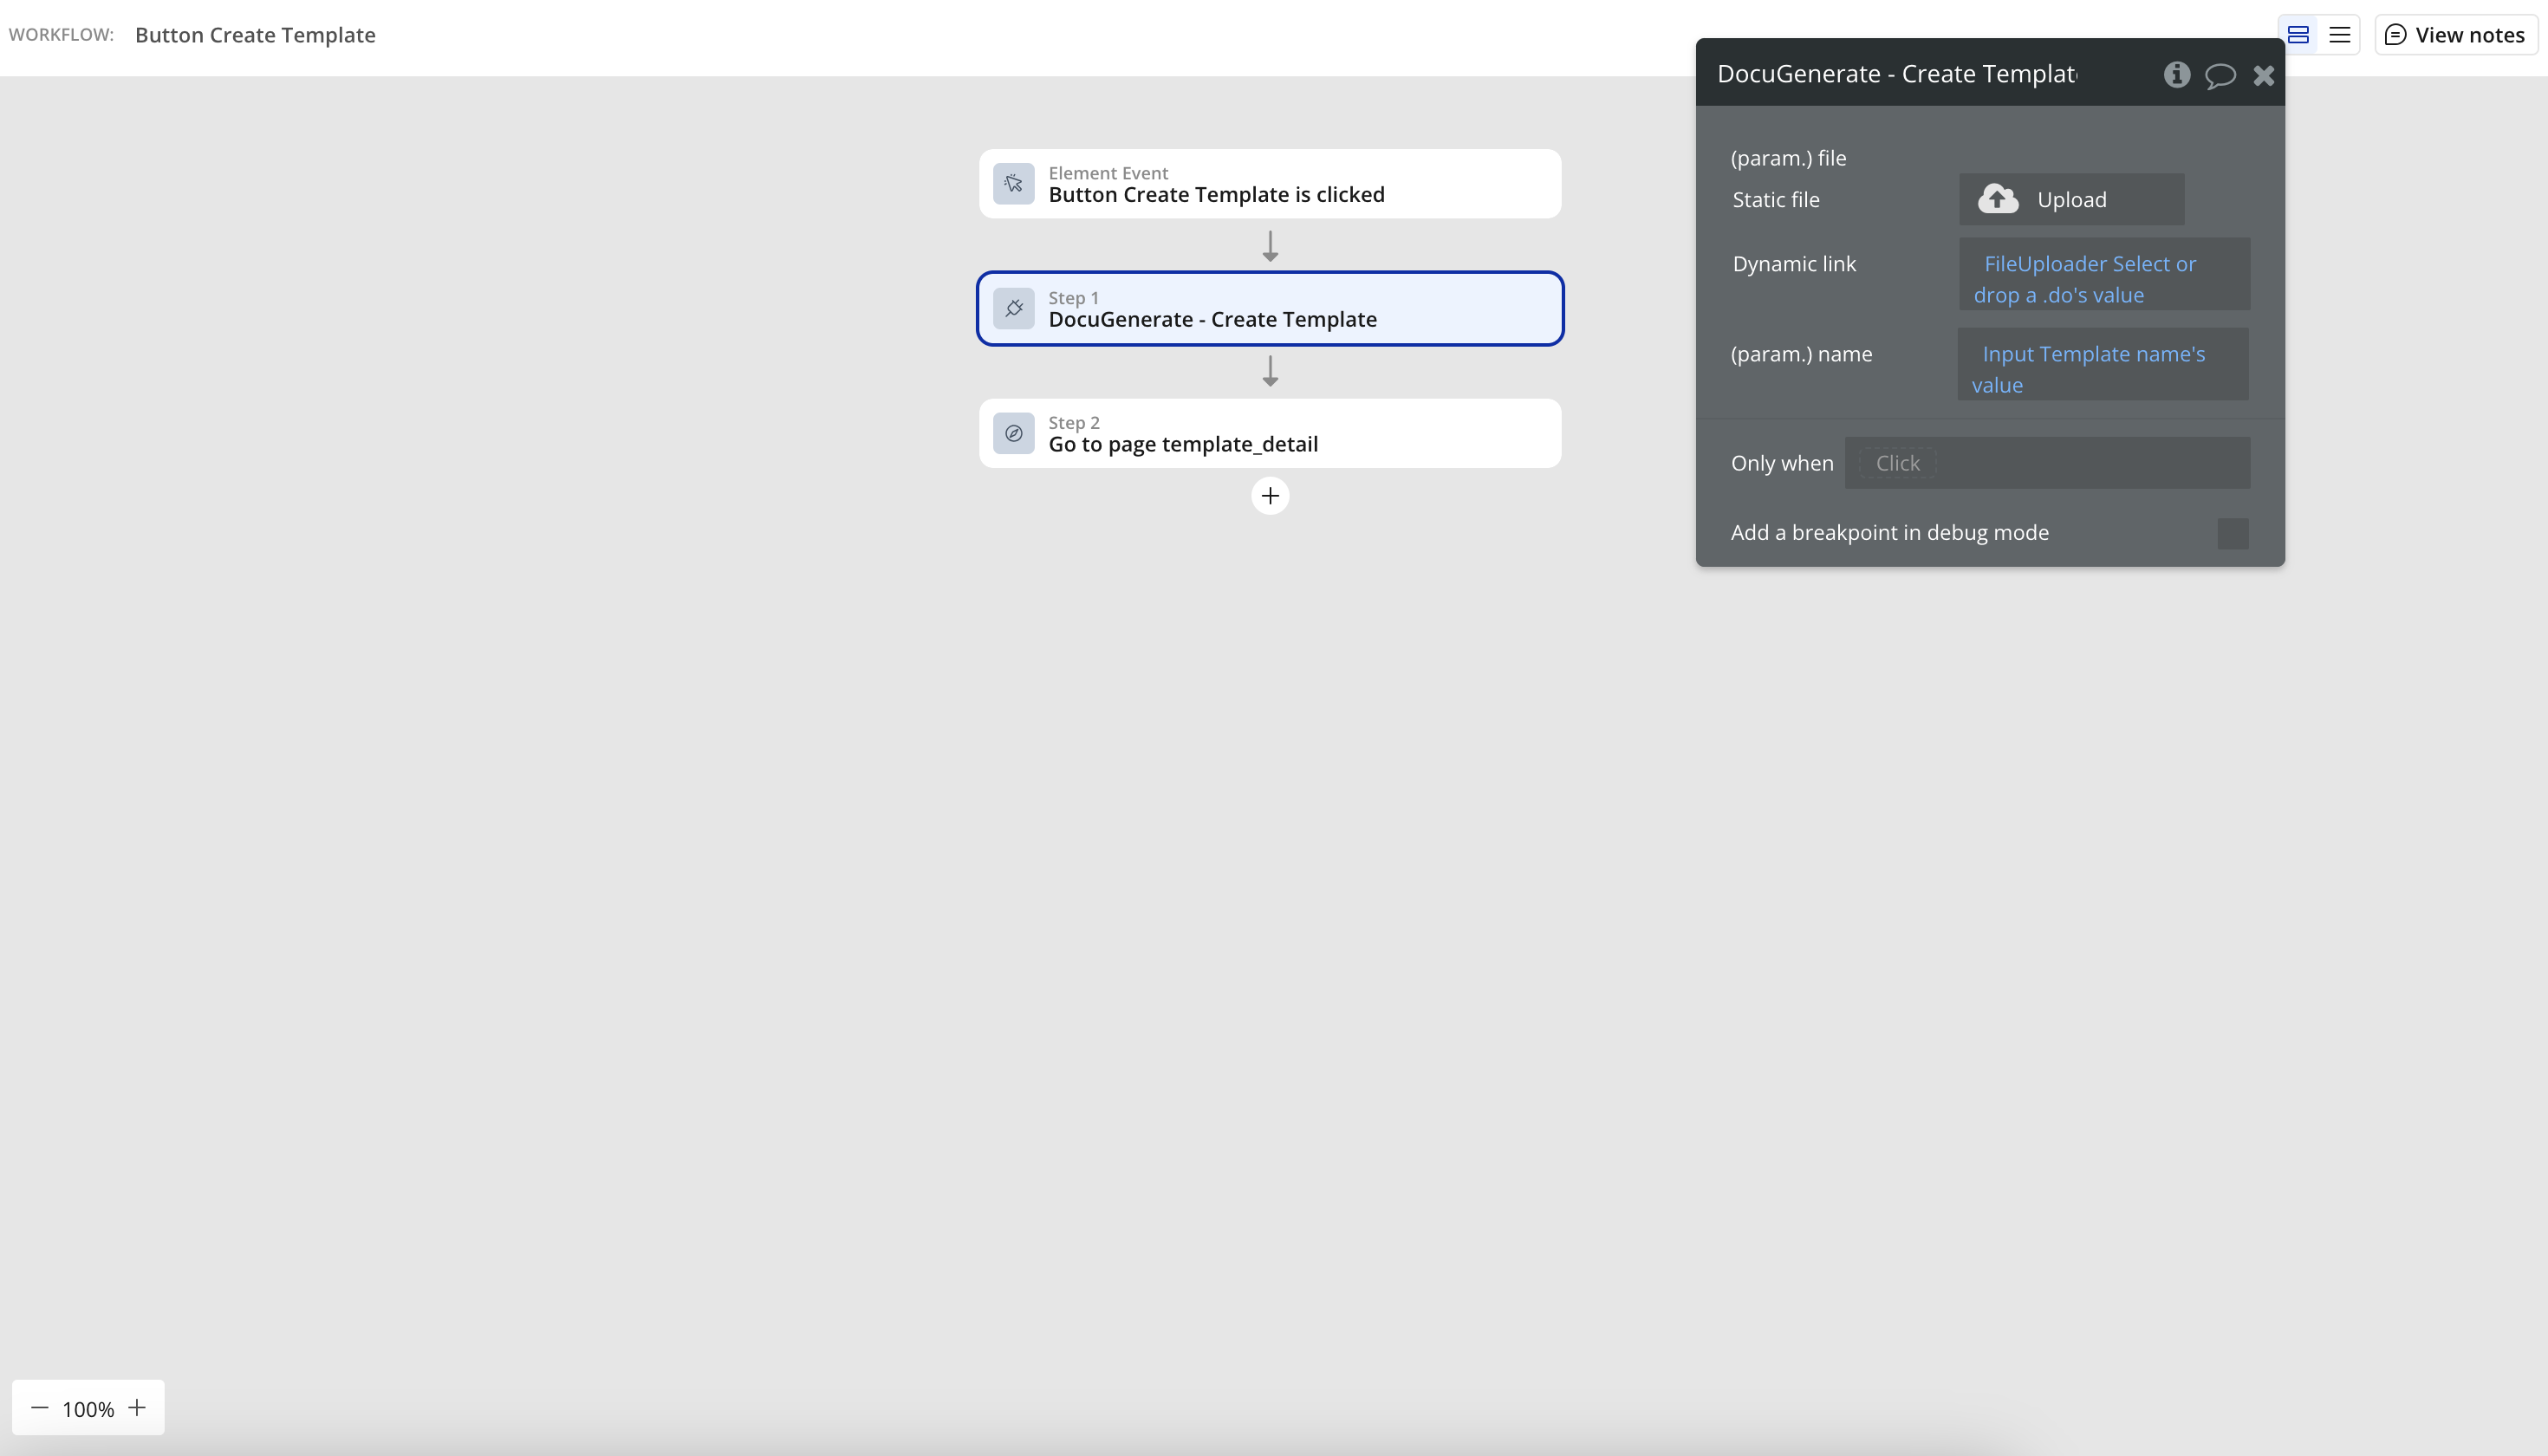
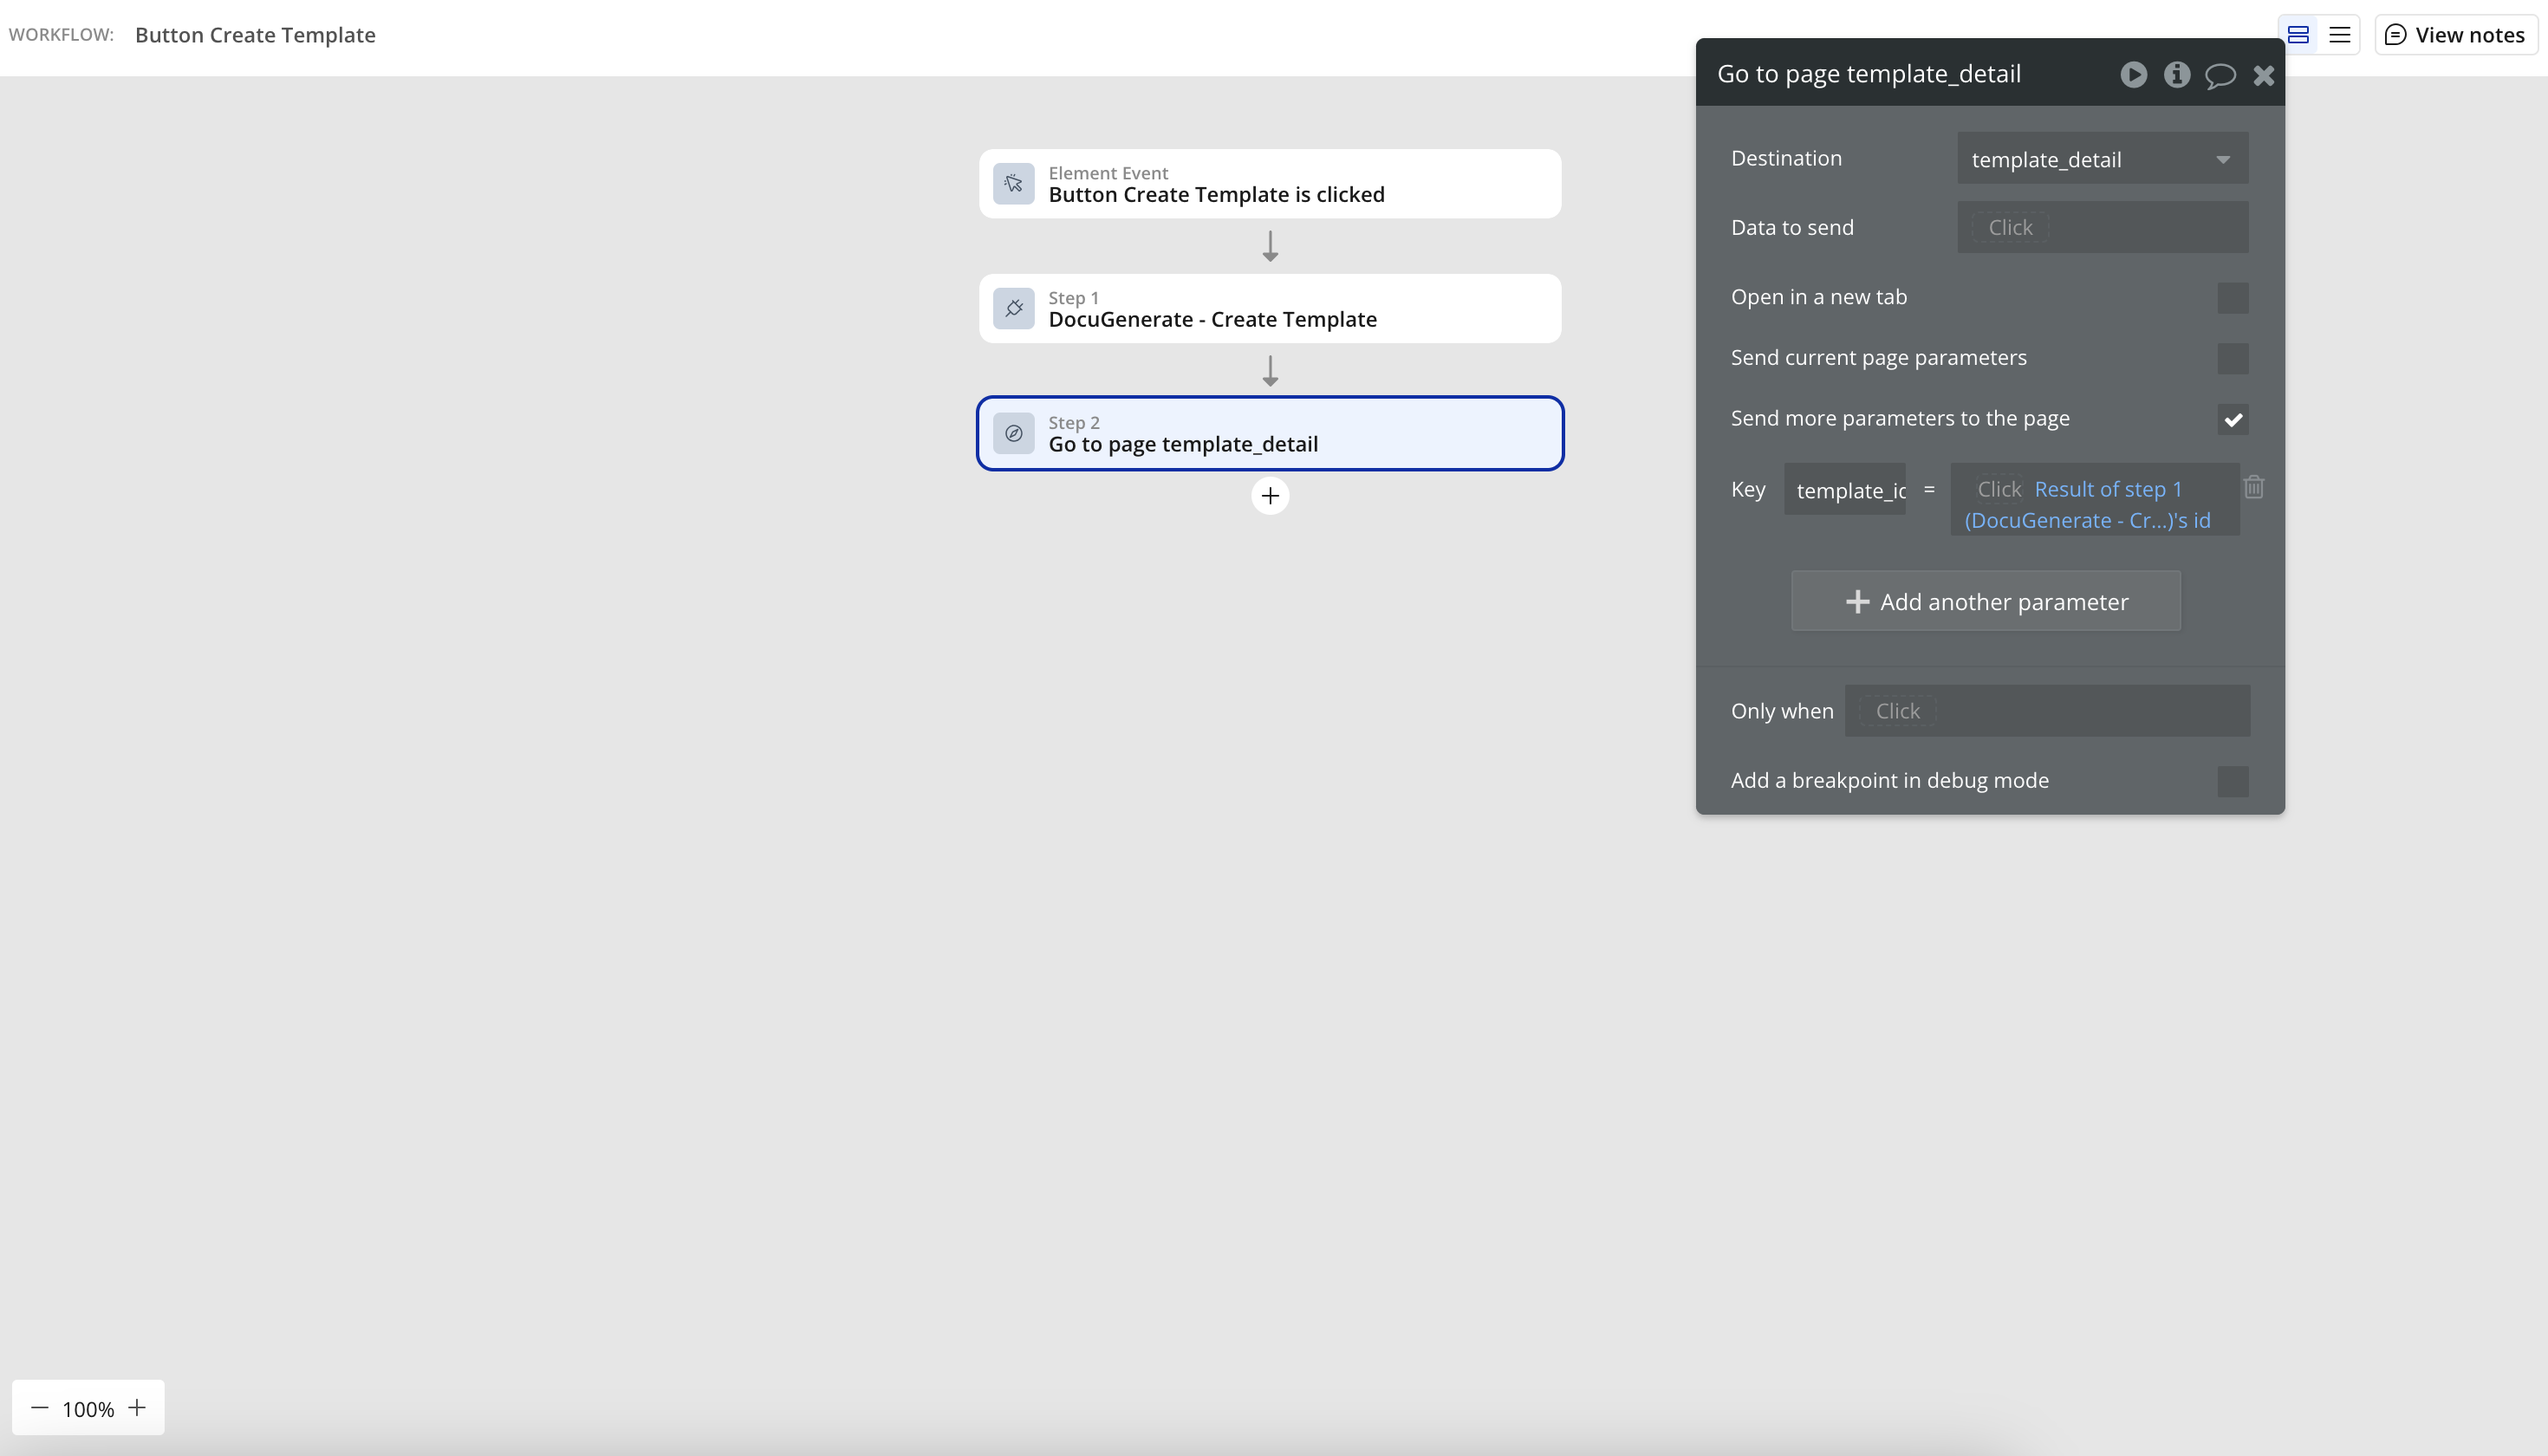
- After the template is created, navigate to the template detail page with the new template ID
This streamlined form handles everything needed to create a template in DocuGenerate. The FileUploader component provides a native way for users to select files from their device, complete with drag-and-drop support and clear visual feedback. This makes the process intuitive even for non-technical users who may be unfamiliar with document automation.
After the template is created, the automatic navigation to the template detail page creates a seamless transition to the next step in the workflow. This thoughtful user journey eliminates the need for users to manually navigate between pages, reducing friction and improving the overall experience.
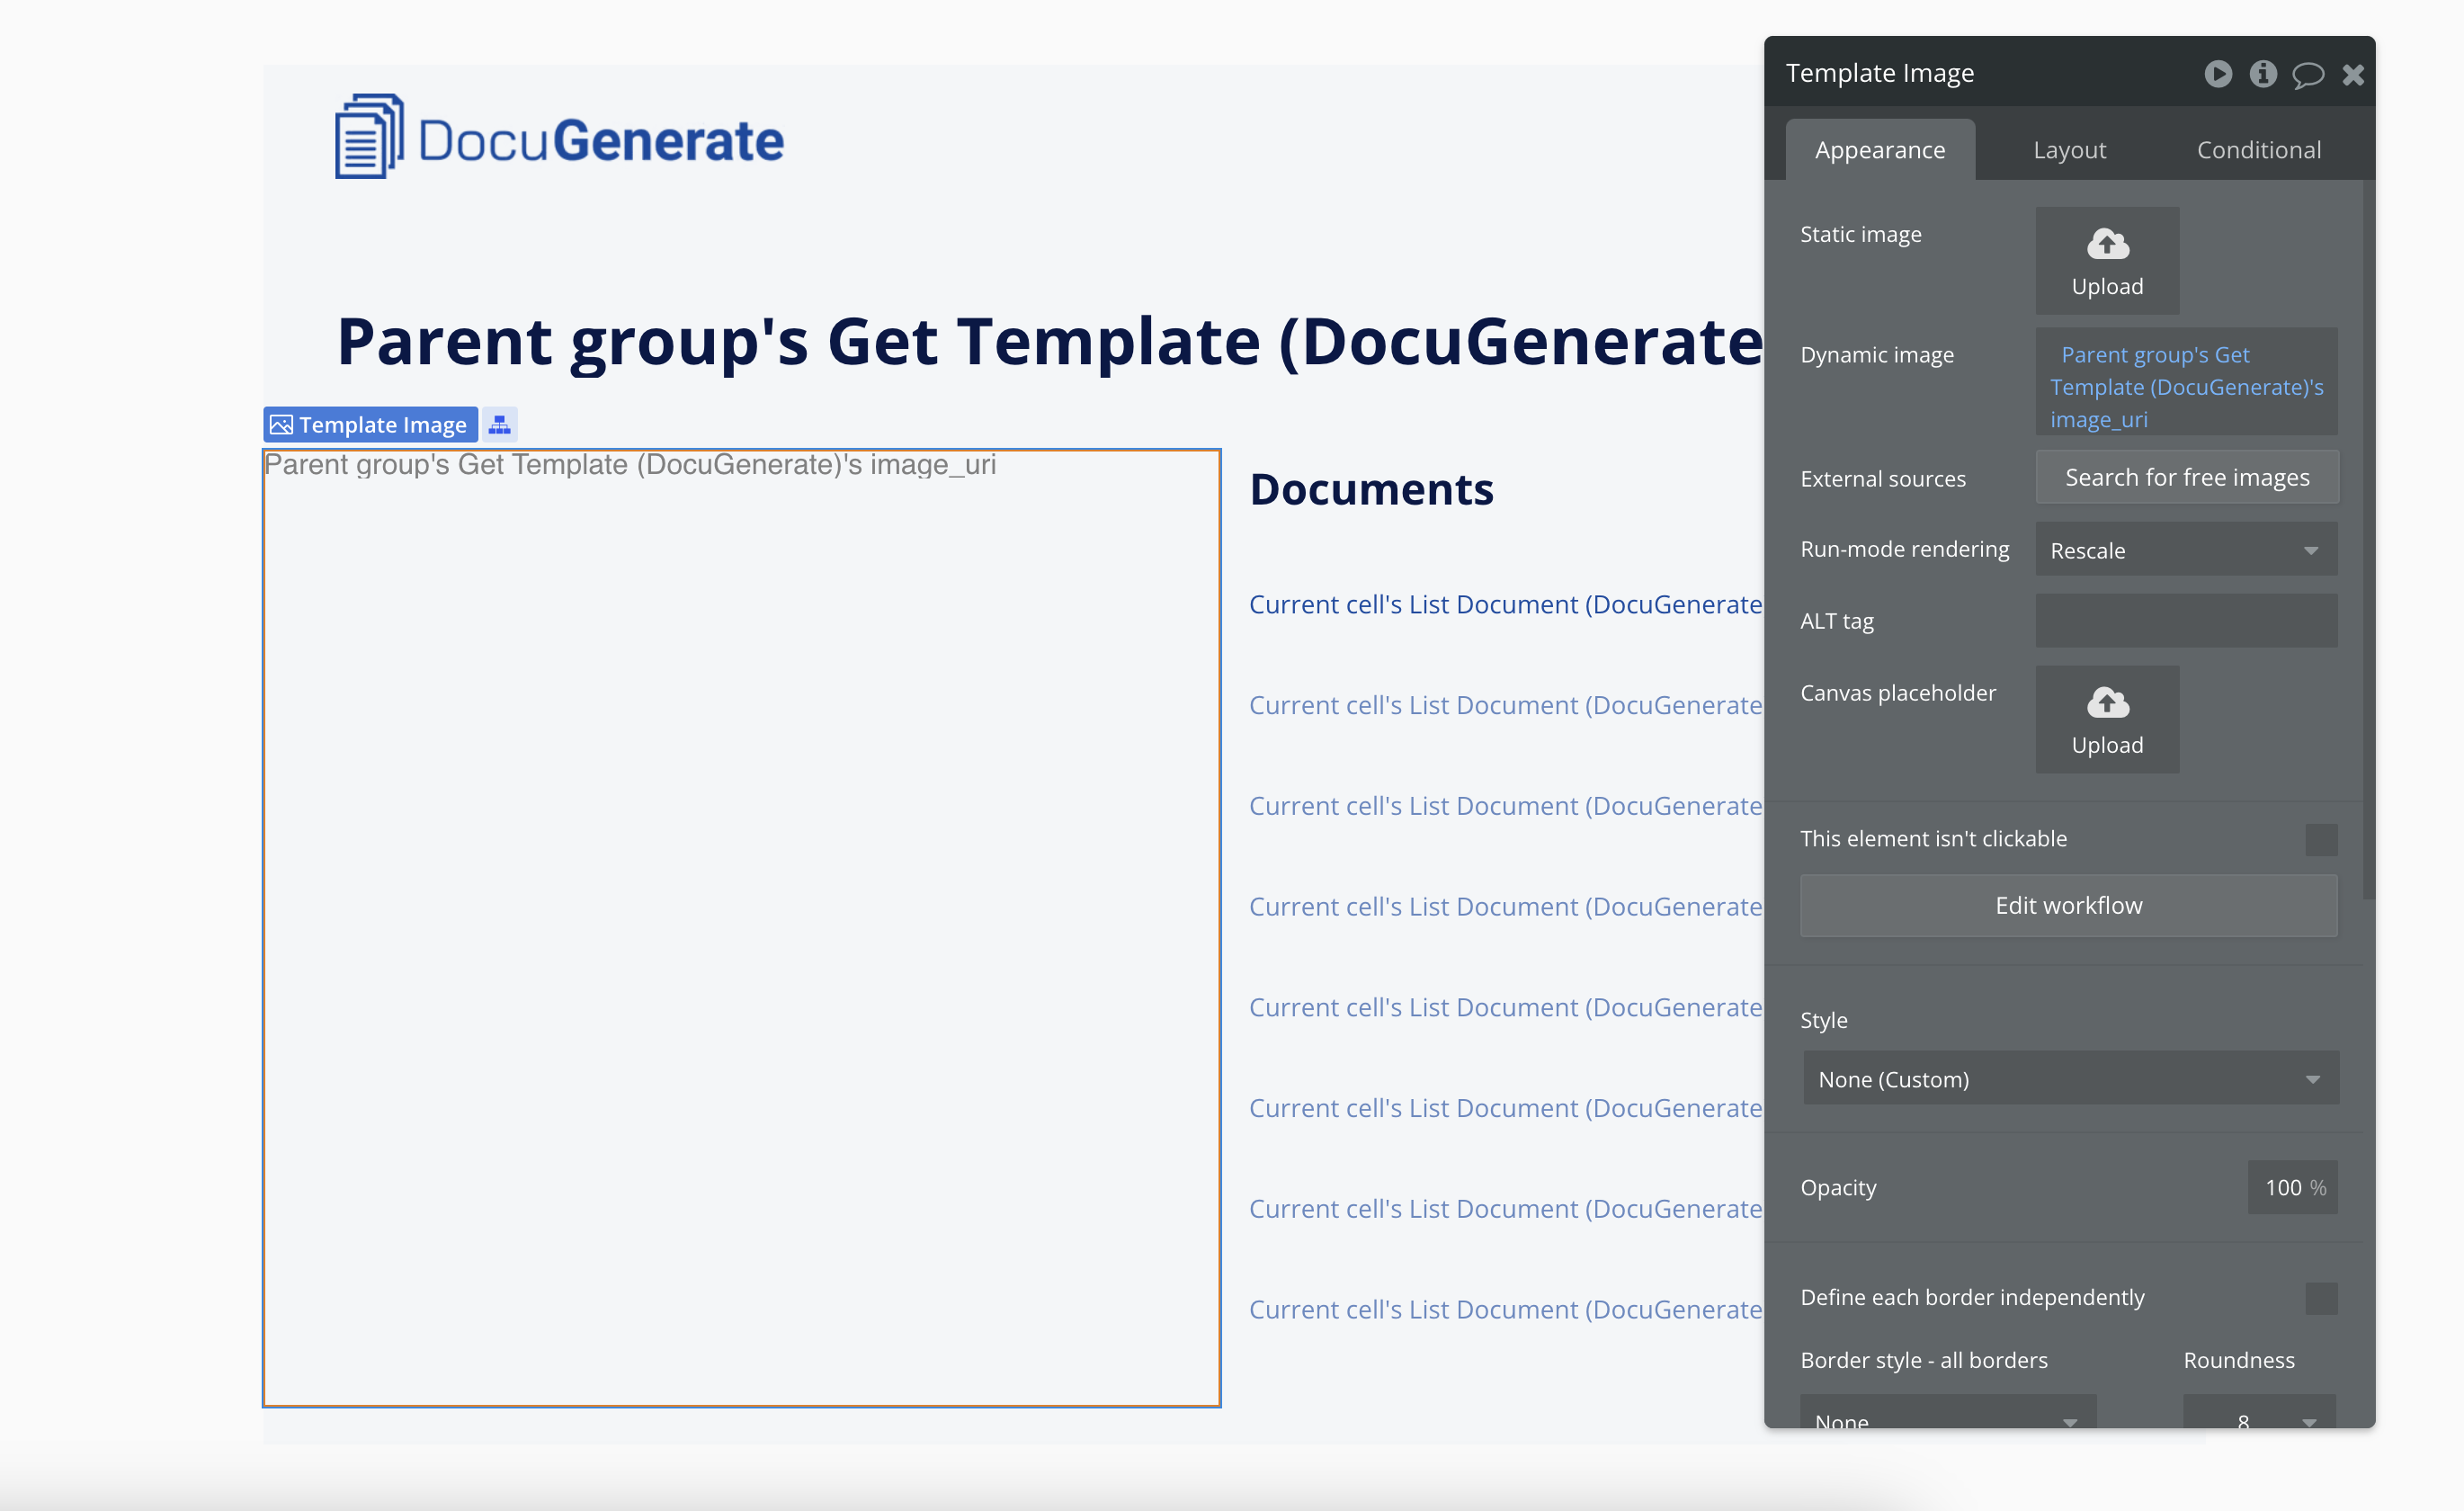
The Template Detail Page
The Template Detail page serves as the central hub for managing a specific template and all documents generated from it. This page brings together essential template information with document management capabilities, providing a comprehensive view of each template’s usage and output.
Unlike the simpler pages we’ve created so far, the Template Detail page integrates multiple data sources and interactive elements to create a more complex and functional interface. We’ve carefully organized these elements to maintain clarity despite the increased complexity, ensuring that users can easily find and use the features they need.

How to Build It:
- Create a Group element as the container for the page content.
- Set the Group’s Data Source to the Get Template data call from the DocuGenerate plugin, with the
id parameter set to the template_id from the URL. 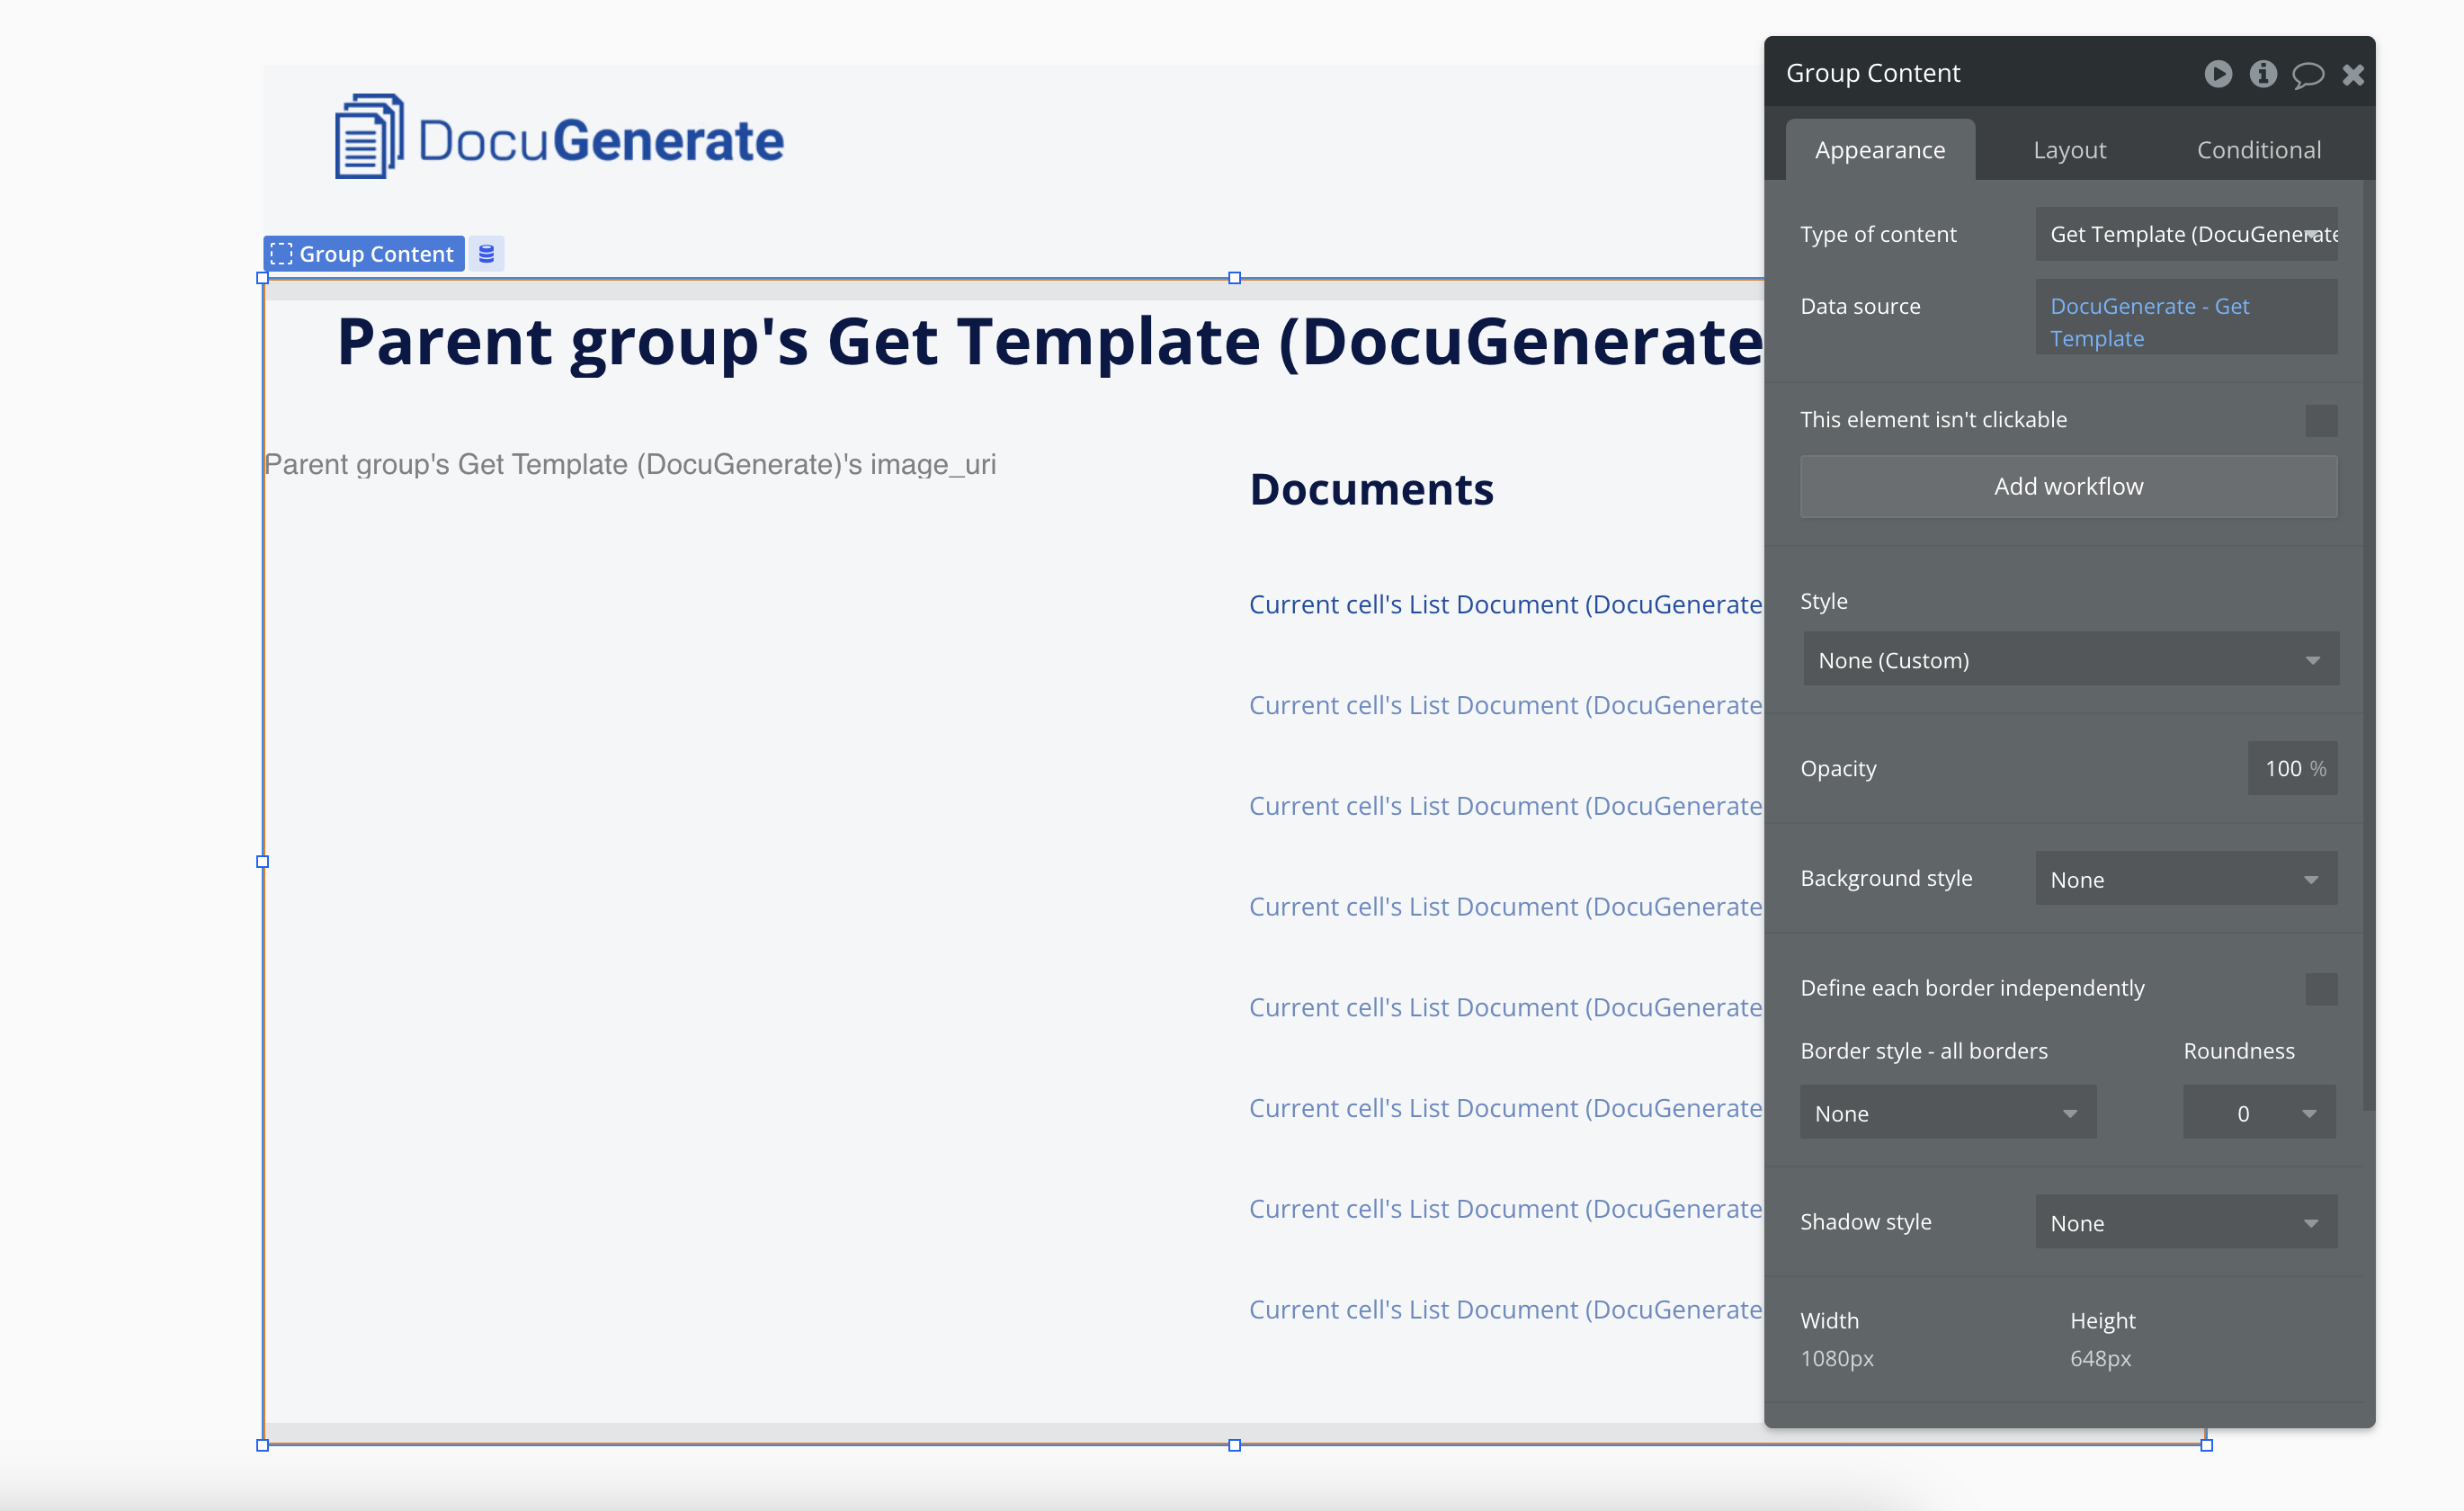
- Add a text element to display the template name.
- Add an image element to display the template preview.
- Add a RepeatingGroup for the documents list with:
- Data source set to the List Documents call with the
template_id parameter - Each item displaying the document name as a link to the
document_uri for downloading 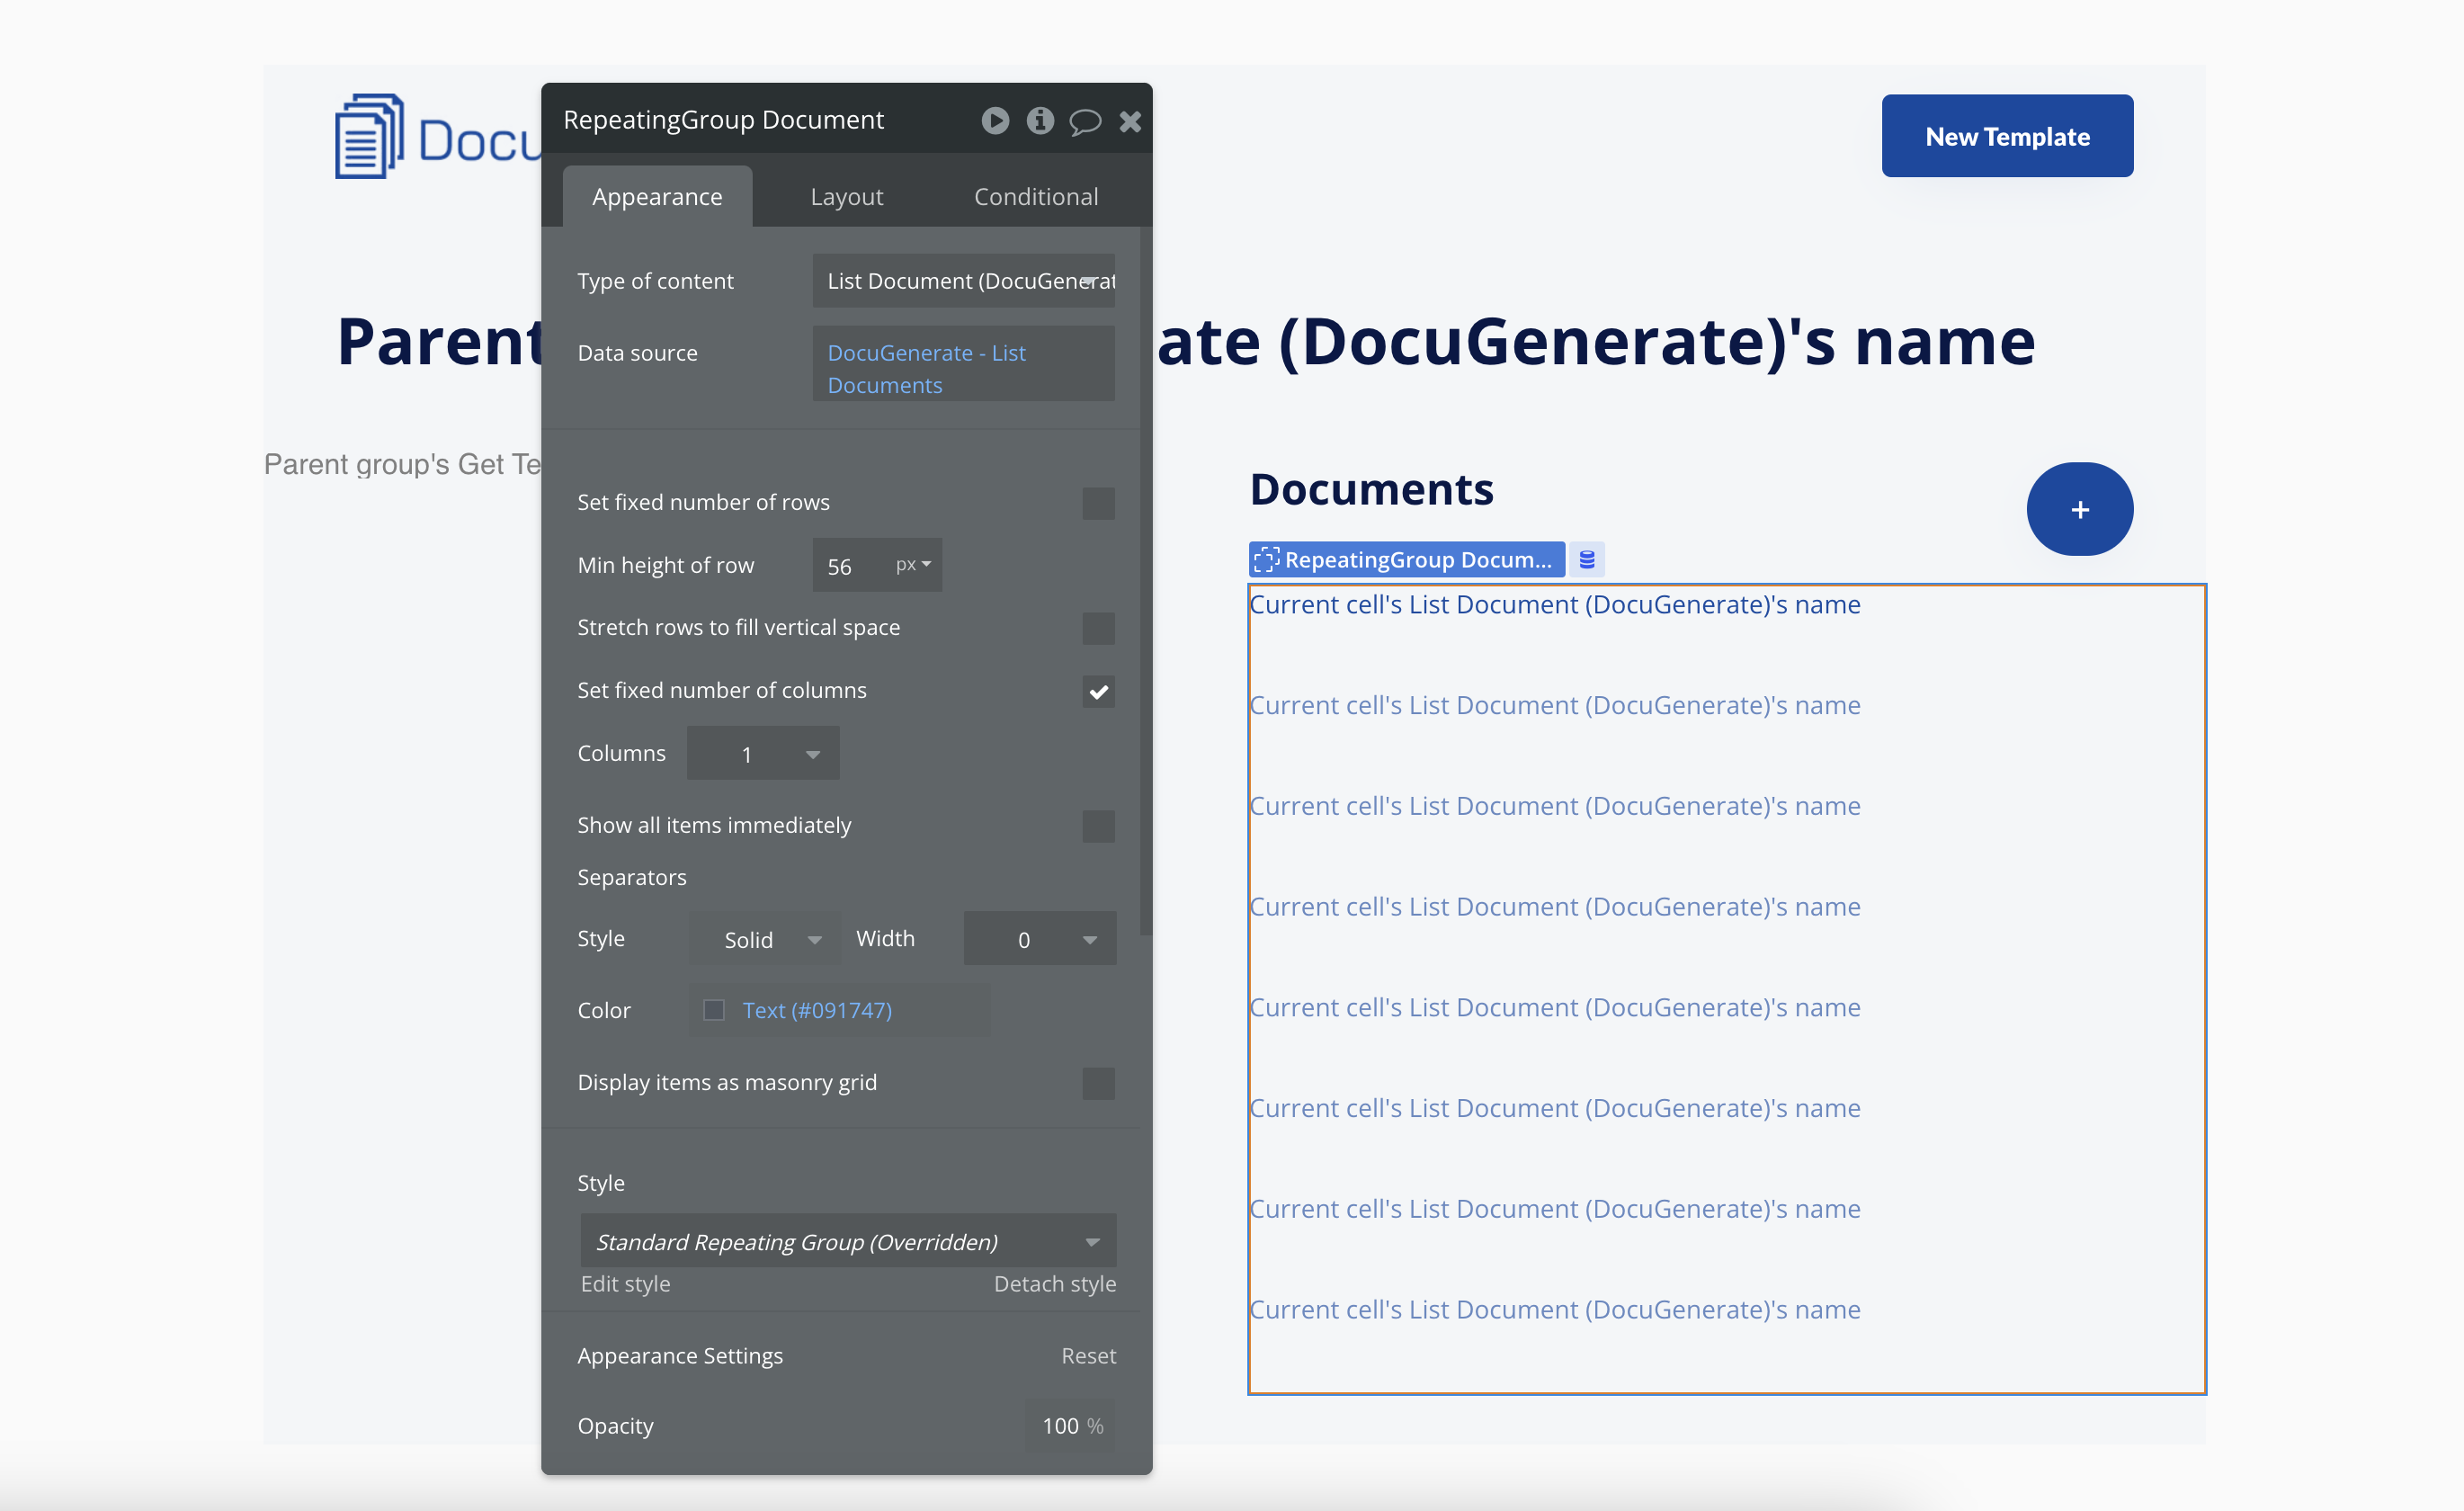
- Add a “+” button that navigates to the new document page.

The most powerful aspect of this page is how it uses the Group element’s data source to make all template data available to child elements. This pattern, sometimes called “data inheritance” in Bubble, ensures that all elements on the page automatically update when a different template is selected. This approach simplifies the page’s logic and improves performance by reducing redundant API calls.
The documents list provides a chronological view of all documents generated from this template, with the most recent documents appearing at the top. Each document entry includes a direct download link, allowing users to quickly access their generated files without navigating to additional pages.
The prominent “+” button serves as a clear call-to-action, guiding users toward the document generation process. When clicked, this button navigates to the document generation page, passing along the template ID to maintain context. This thoughtful interaction design ensures that users can easily move between viewing template details and generating new documents.
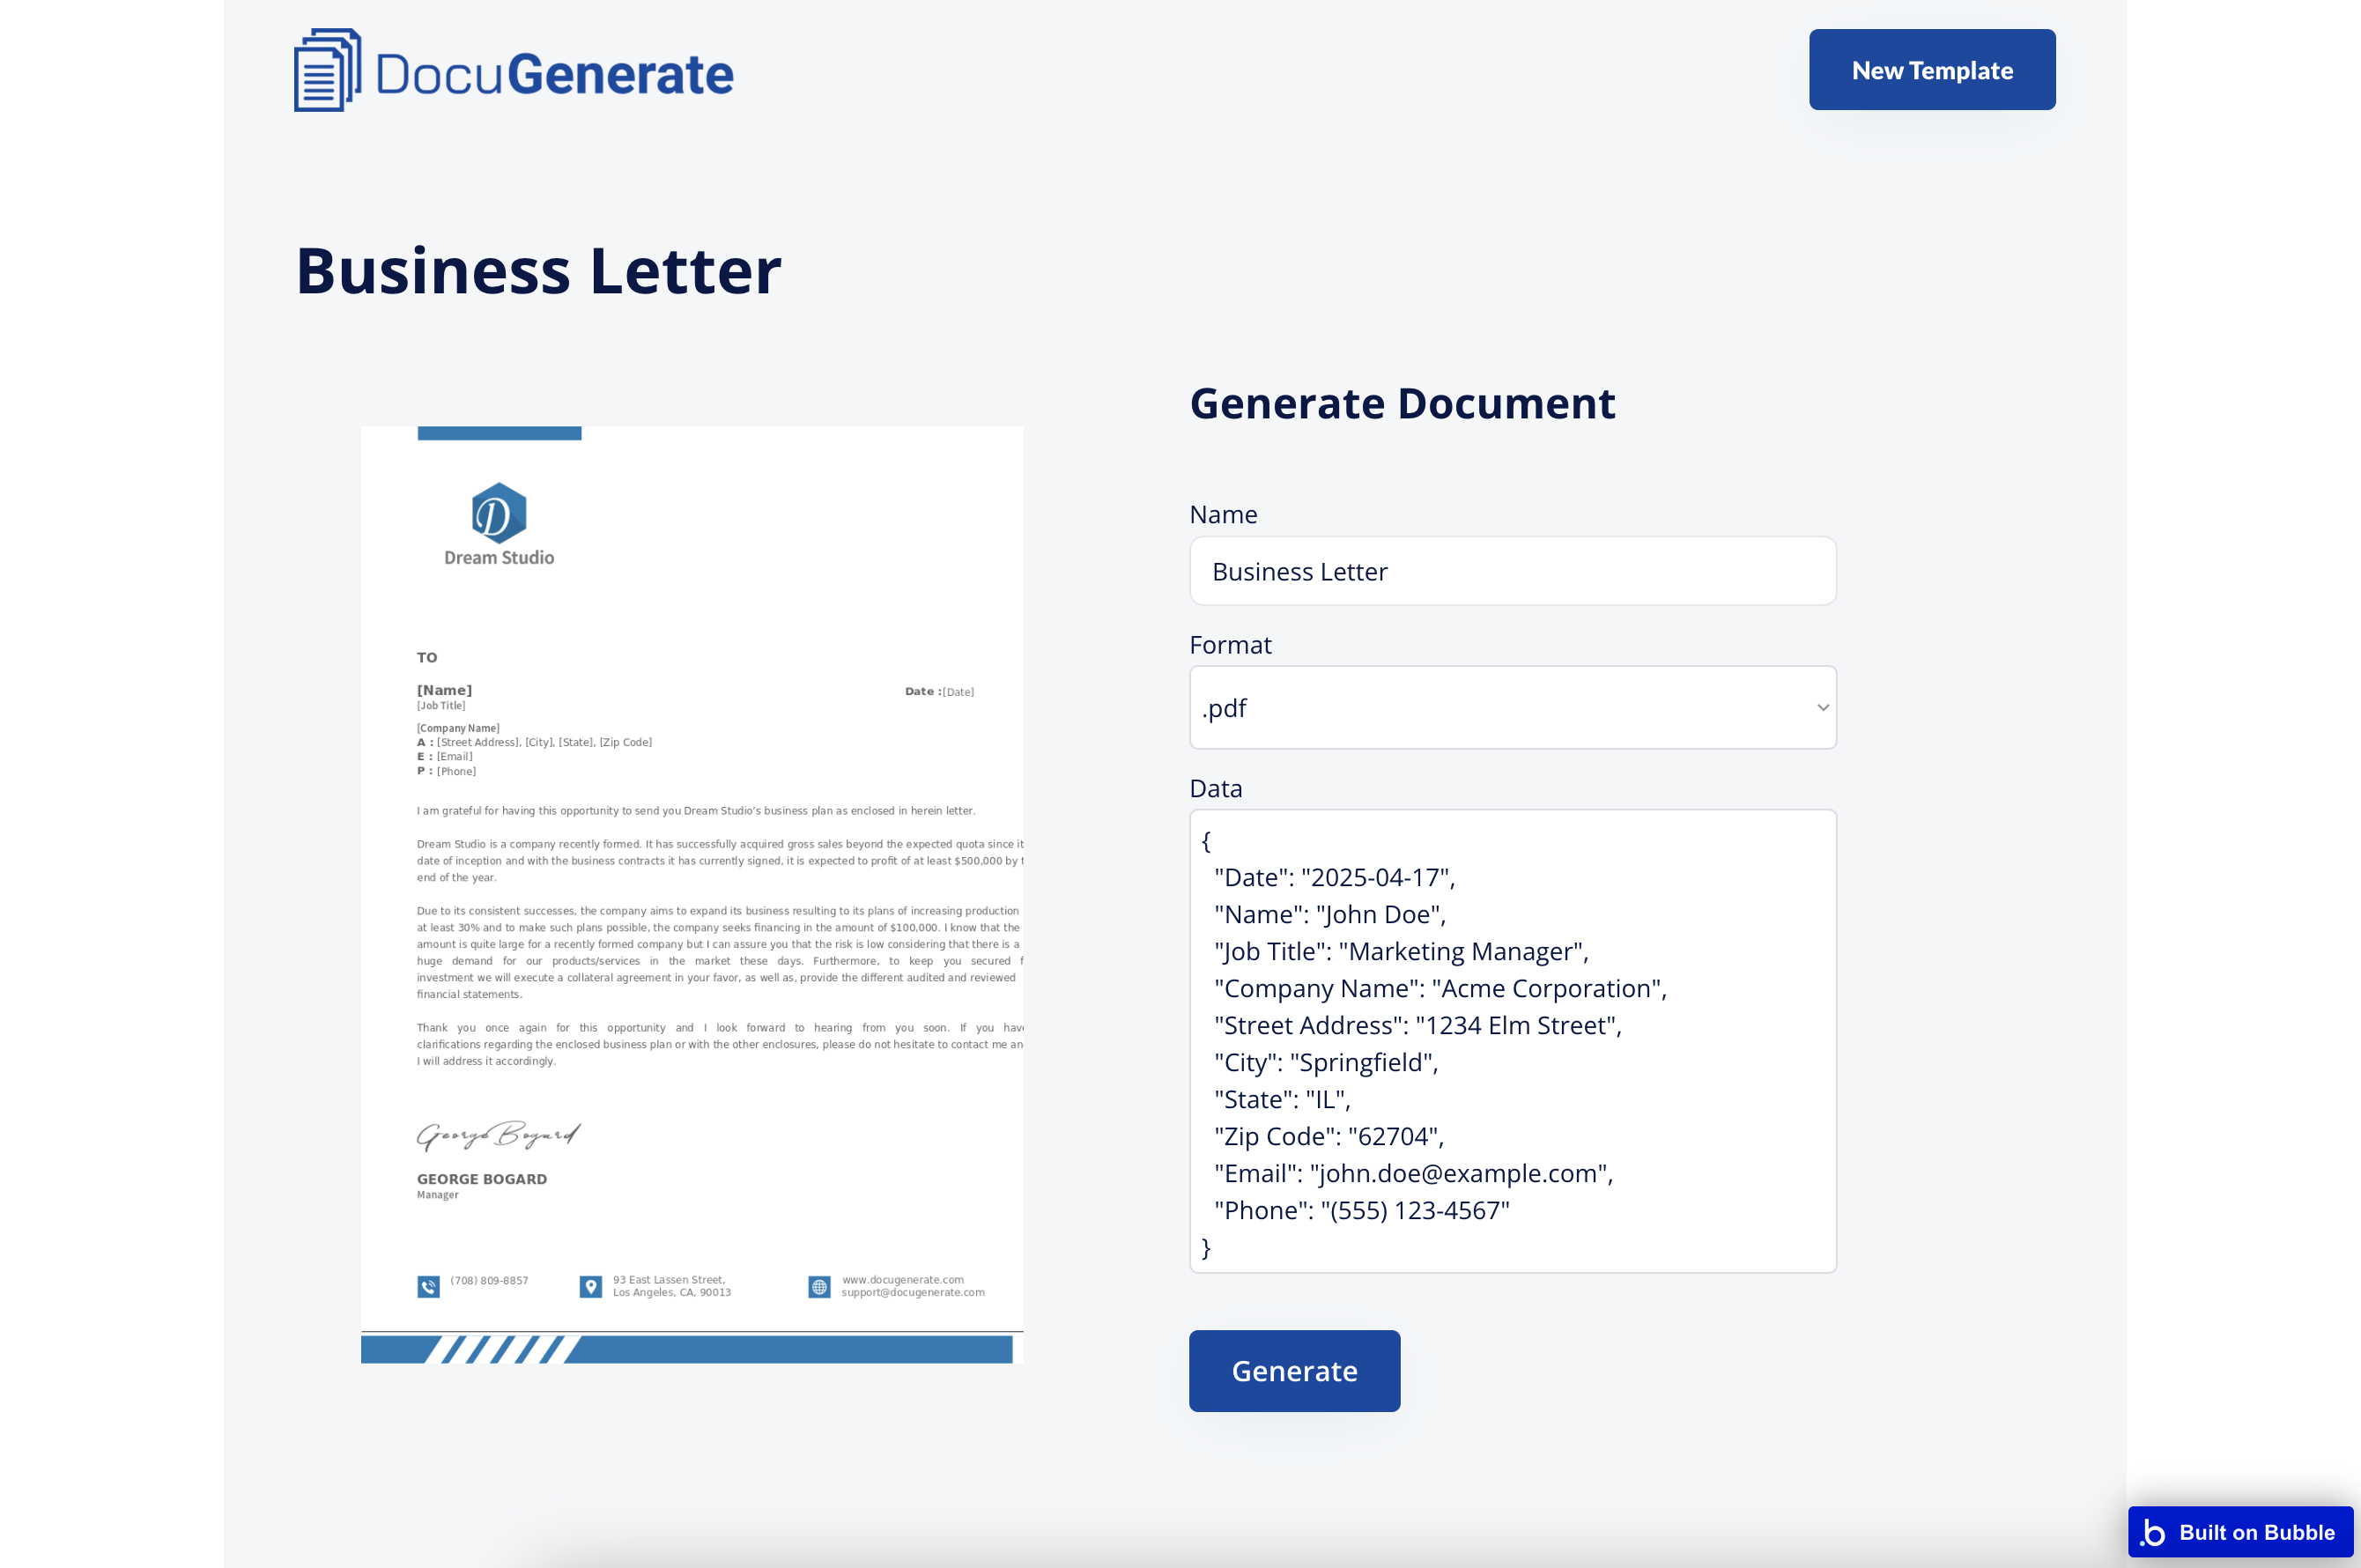
The Document Generation Page
This is where the true power of document generation comes to life, allowing users to connect their data with templates to produce customized documents. We’ve designed this page to be powerful yet approachable, balancing advanced functionality with a clear interface.
This page maintains visual consistency with the template detail page, showing the same template information at the top to provide context. This helps users confirm they’re working with the correct template before proceeding with document generation, preventing potential errors or confusion.
How to Build It:
- Display the template information (name and preview) similar to the template detail page.
- Create a form with:
- A text input for the document name
- A dropdown for selecting the output format (PDF, DOCX, DOC, ODT, TXT, HTML, PNG)
- A MultiLine Input for entering the JSON data
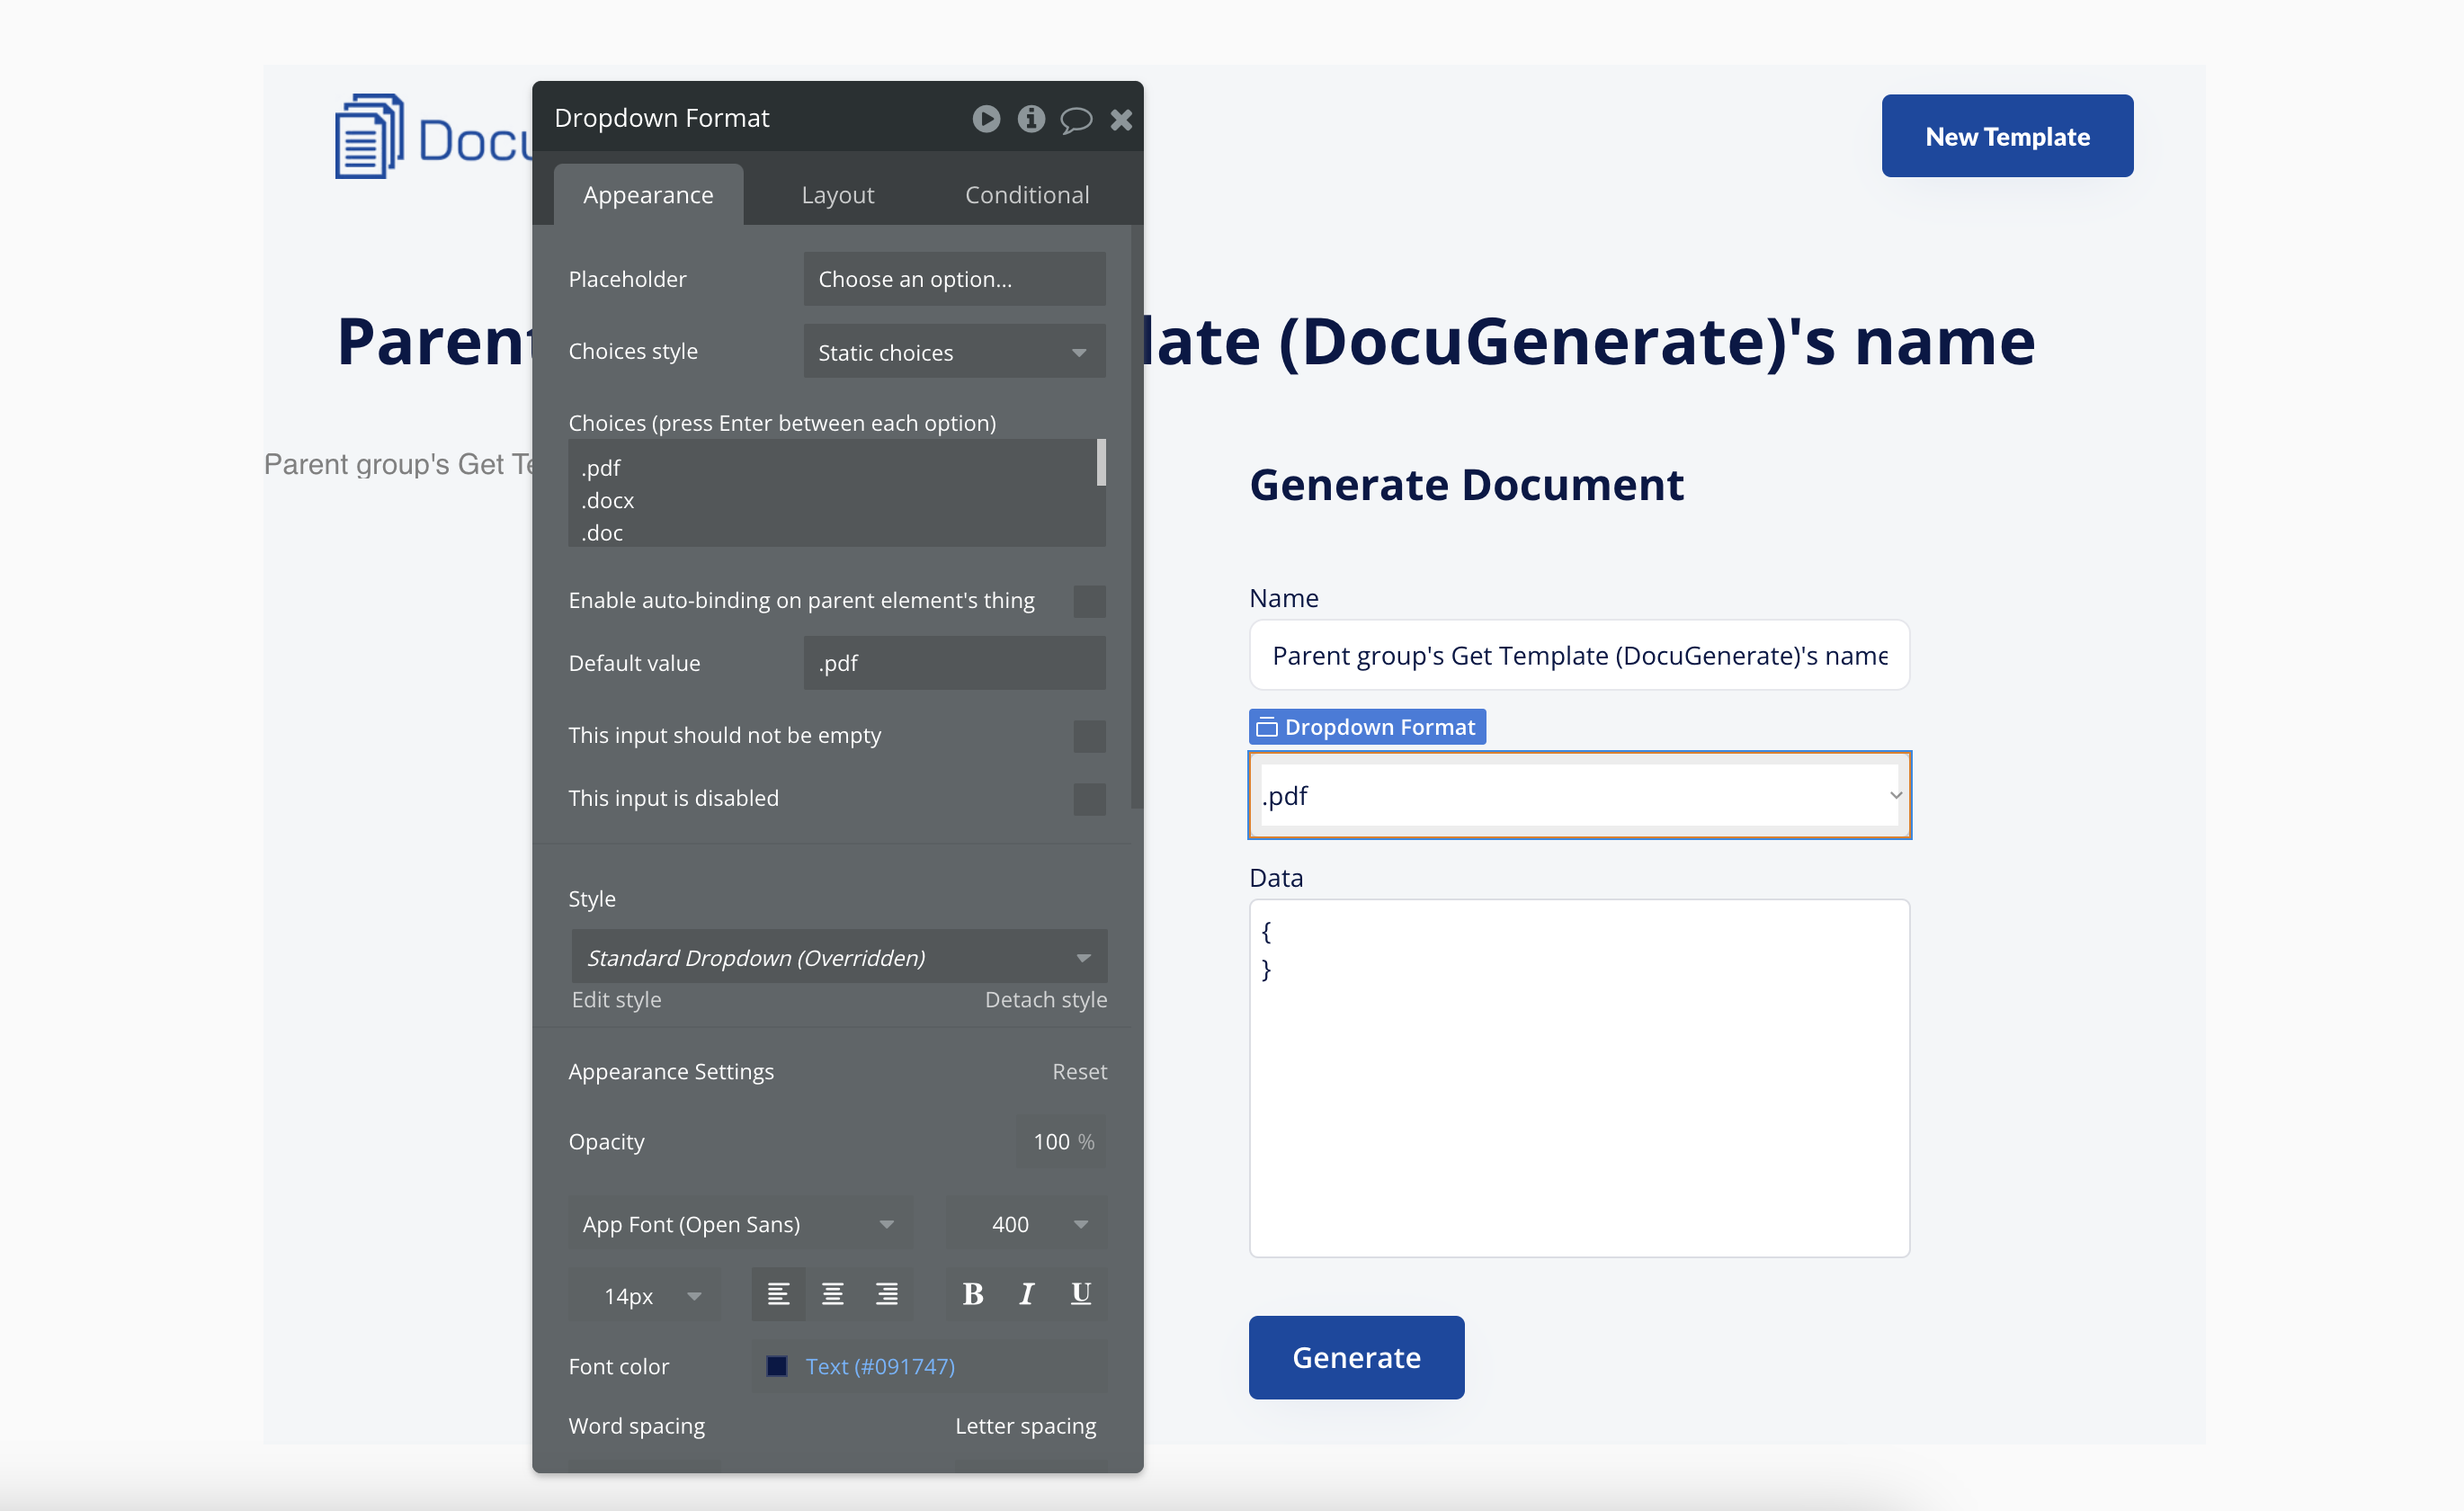
- Add a “Generate” button that:
- Calls the Generate Document action from the DocuGenerate plugin
- Passes all form values as parameters, along with the
template_id from the URL 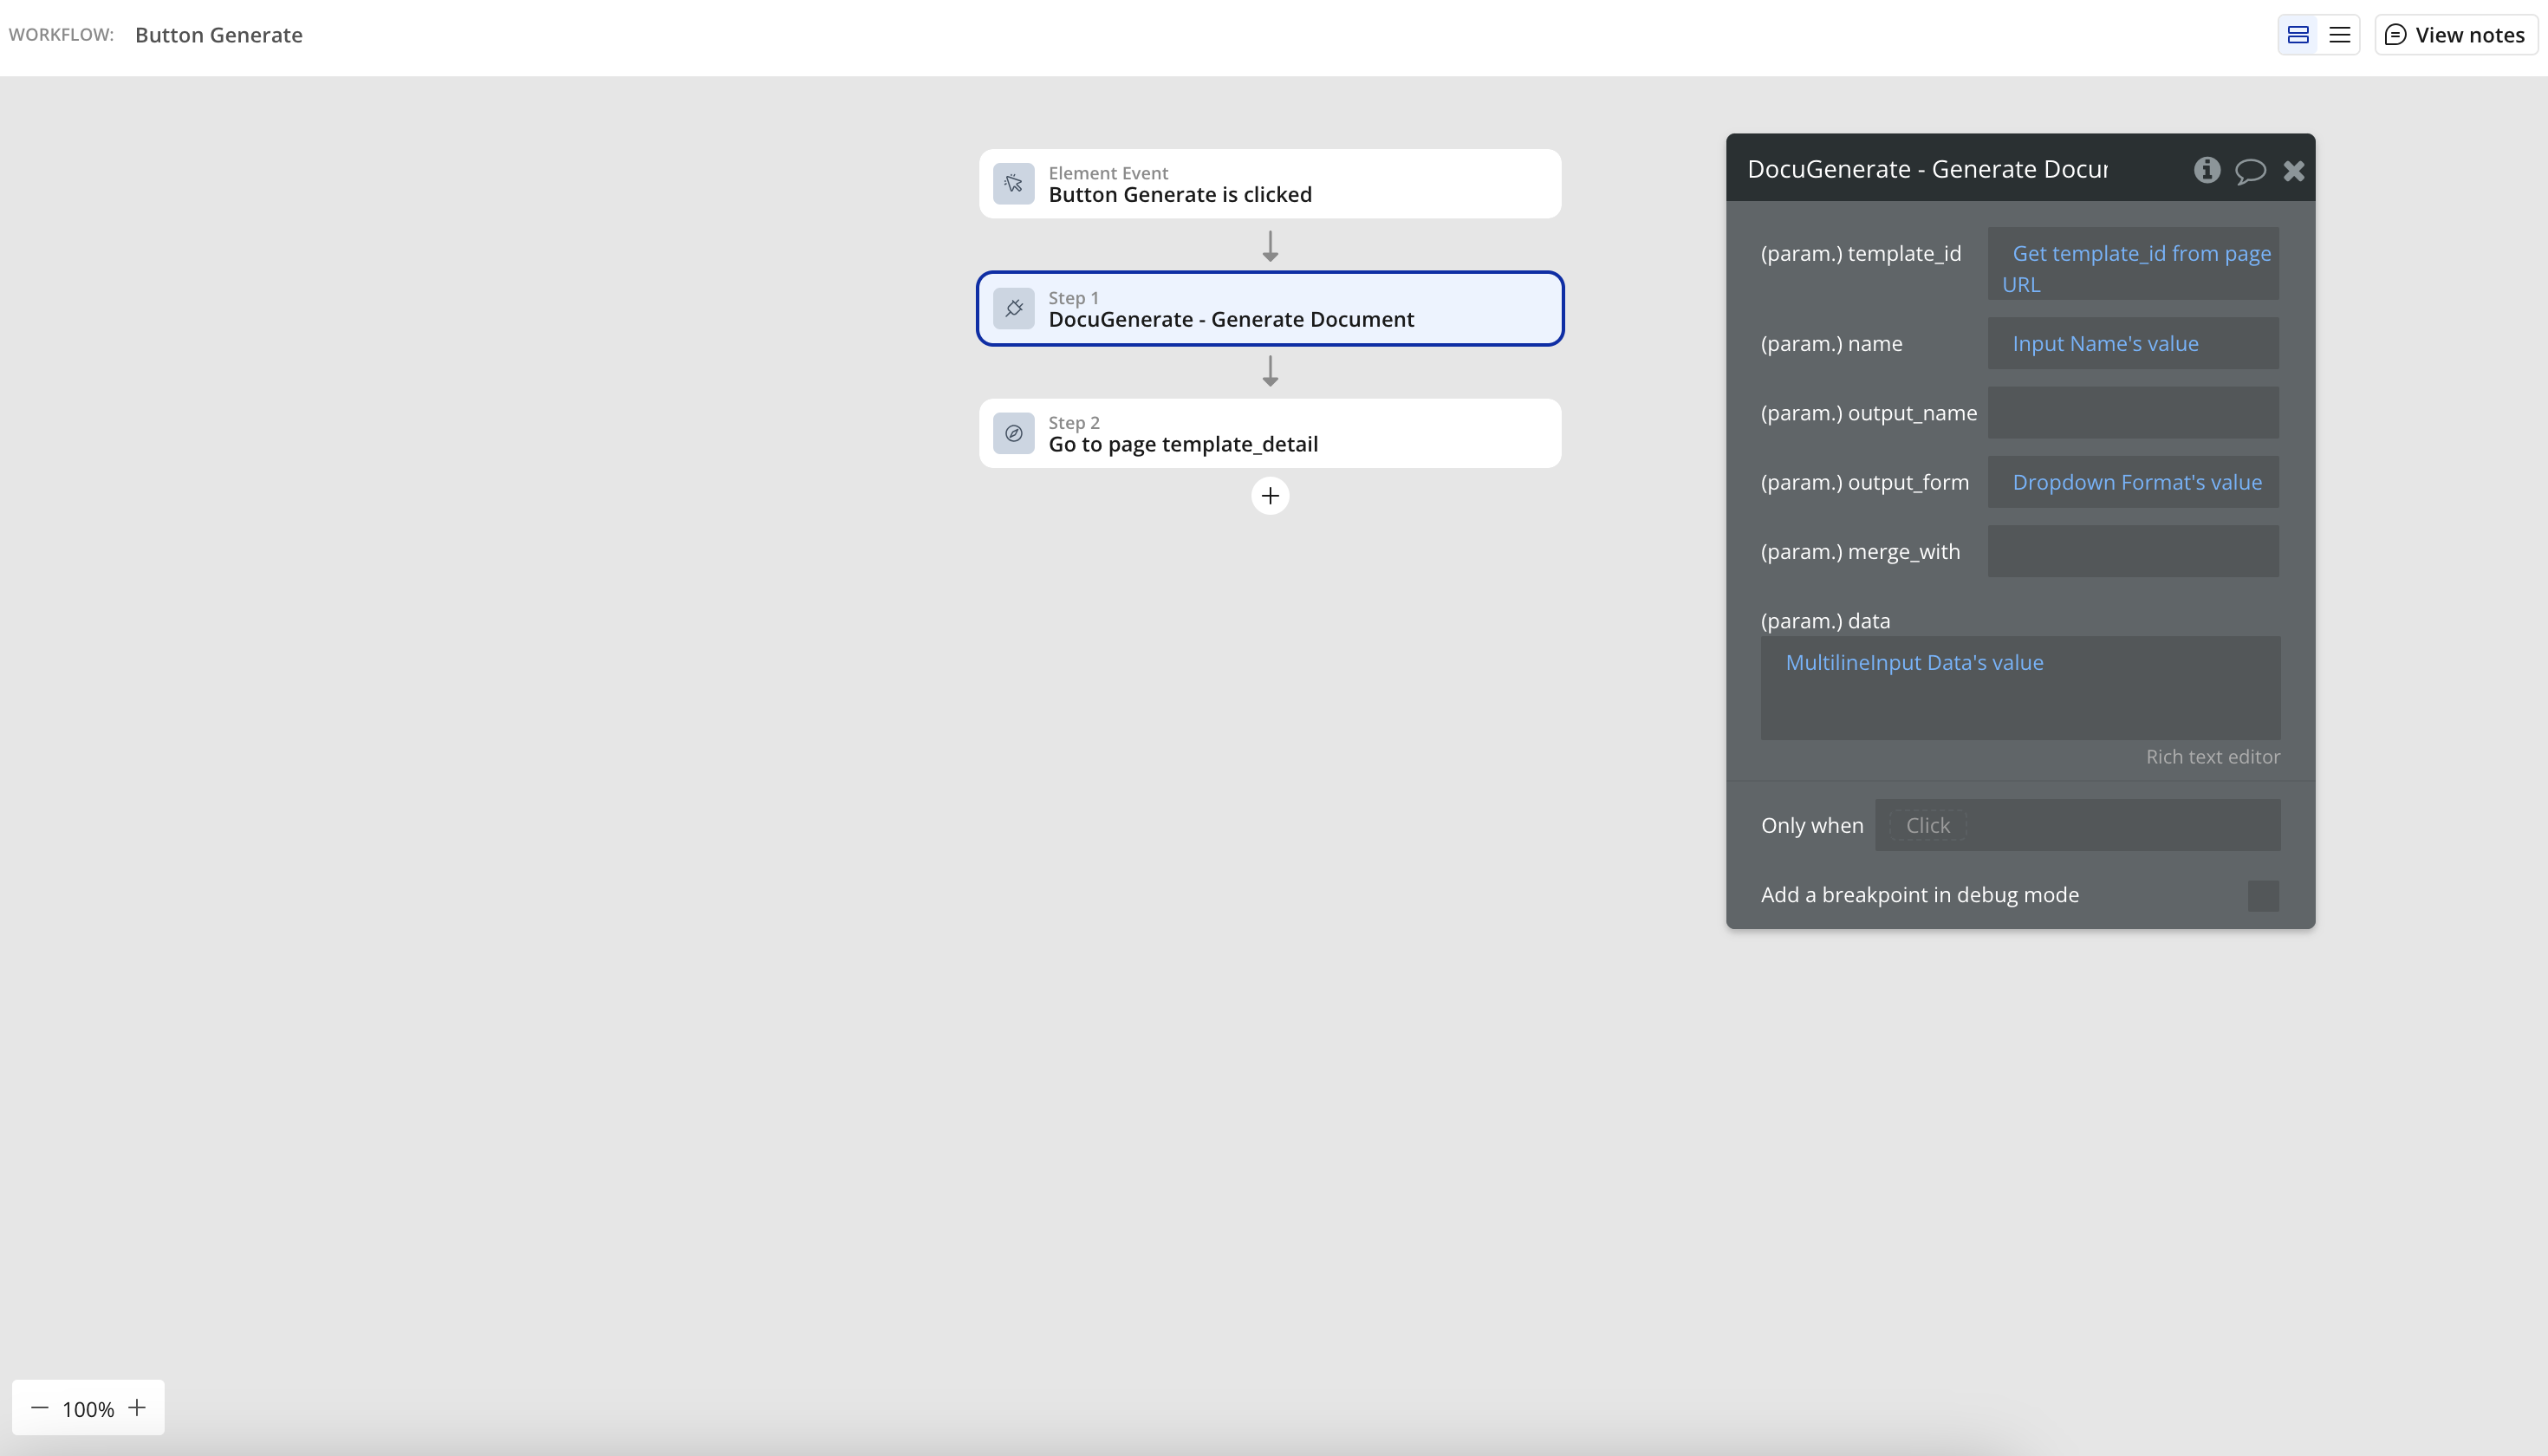
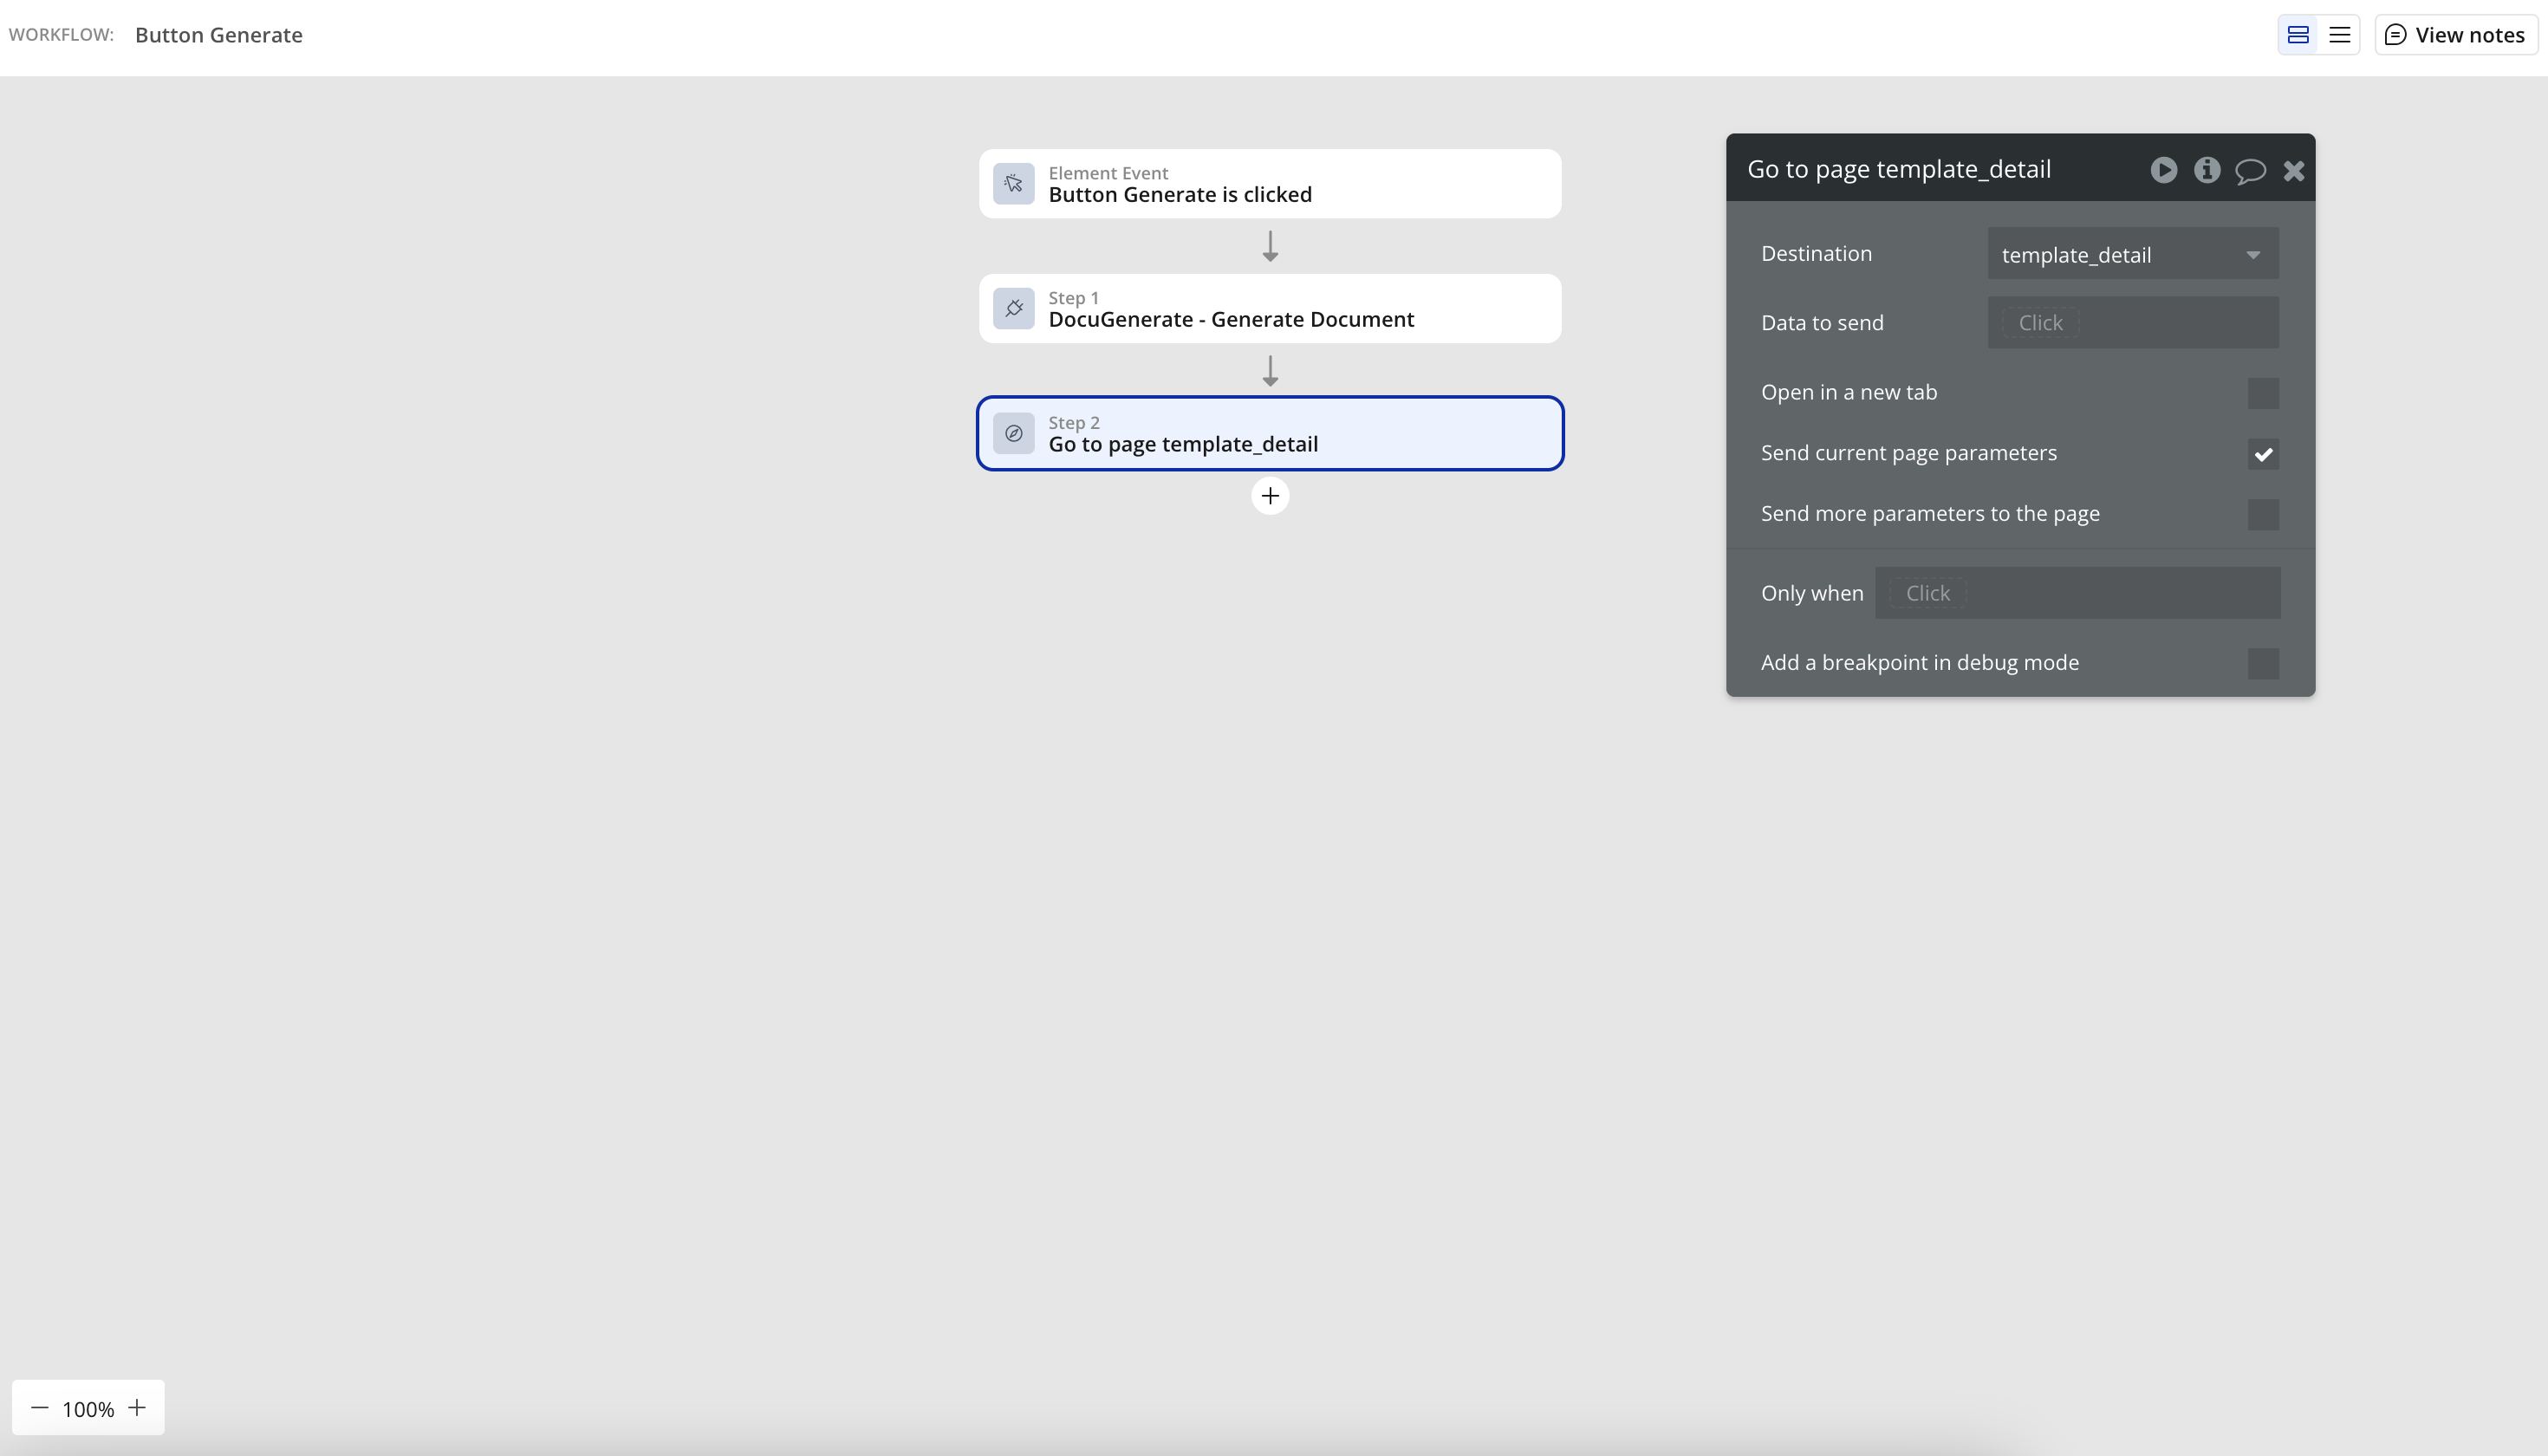
- After generation, navigates back to the template detail page
The MultiLine Input field is particularly important as it provides a flexible way for users to enter their JSON data. This approach supports both simple data structures for basic documents and complex nested objects or arrays for more sophisticated generation scenarios. For advanced users, this direct JSON editing capability offers precise control over the data being merged into their templates.
The output format dropdown demonstrates one of DocuGenerate’s key advantages: the ability to generate documents in multiple formats from a single template. Users can choose the format that best suits their needs, whether it’s a PDF for formal distribution, a DOCX for further editing, or another format for specific use cases.
After the document is generated, the page automatically navigates back to the template detail page, where the newly created document appears at the top of the list. This immediate feedback confirms that the generation was successful and provides quick access to the generated document.
Enhancement Opportunities
While our demo app provides the essential functionality for document generation, there are many ways it could be enhanced to create an even more powerful and user-friendly application:
- PDF Preview: Replace static images with embedded PDF previews of templates and documents.
- Alternative Views: Add options to view templates as a list instead of a grid.
- Template Editing: Allow users to update templates with new files or change settings.
- Template Navigation: Add a dropdown or a search bar to easily navigate between templates.
- Spreadsheet Support: Add the ability to upload Excel or CSV files for document generation.
These enhancements would transform our demo app from a proof of concept into a fully-featured document generation solution, tailored to specific business needs. The beauty of using Bubble’s visual development platform is that these features can be added incrementally, allowing the application to evolve alongside user requirements.
Conclusion
Building a document generation app with Bubble and the DocuGenerate plugin demonstrates the power of no-code development combined with specialized APIs. The demo app we’ve built serves as both a proof of concept and a starting point for your own document automation projects. By leveraging Bubble’s visual development platform and DocuGenerate’s document generation capabilities, you can create custom solutions tailored to your specific needs without writing a single line of code.
This approach is particularly valuable for businesses without dedicated development teams or those looking to quickly prototype and iterate on document generation workflows. The visual nature of Bubble makes it accessible to business analysts, operations specialists, and other non-technical team members, empowering them to create solutions that directly address their document automation challenges.
Whether you’re building internal tools for your team or customer-facing applications, this approach offers a fast and flexible way to implement document generation functionality. The combination of Bubble’s intuitive interface and DocuGenerate’s powerful API creates a synergy that brings sophisticated document automation within reach of organizations of all sizes.
Resources