Getting Started with Airtable
In today’s work processes, managers sometimes have to deal with a multitude of tools, which reduces productivity and increases the risk of errors when transferring data from one tool to another. So it’s in their interest to find the right combination of tools, for a straightforward and efficient process.
That is why in this article we will create a convenient workflow allowing you to automatically generate documents from your Airtable interface, without having to transfer your data from one application to another. Furthermore, you will be using a Word template, which can be easily edited with the text processing software that you’re most familiar with.
Here are the services needed to create this workflow :
-
Airtable: is a no-code collaboration platform allowing users to interact simply with a database using, among others, a spreadsheet-like interface, web forms for input, and user-friendly data reports and data visualization interfaces for output.
-
DocuGenerate: is a web app and API designed for generating documents from Word templates and JSON data, by replacing merge tags in templates with dynamic data.
This article is mainly intended for people already having a minimal knowledge of Airtable’s basic features. We won’t go into detail about its functionalities, and will only focus on the aspects necessary for setting up our process.
Using Airtable’s Page Designer
You could use Airtable’s page designer extension, to create your own custom template for invoices, business cards, catalogs, and more — all using the data directly from your records. When you’re done making everything look beautiful, you can print out your records or turn them into PDFs.
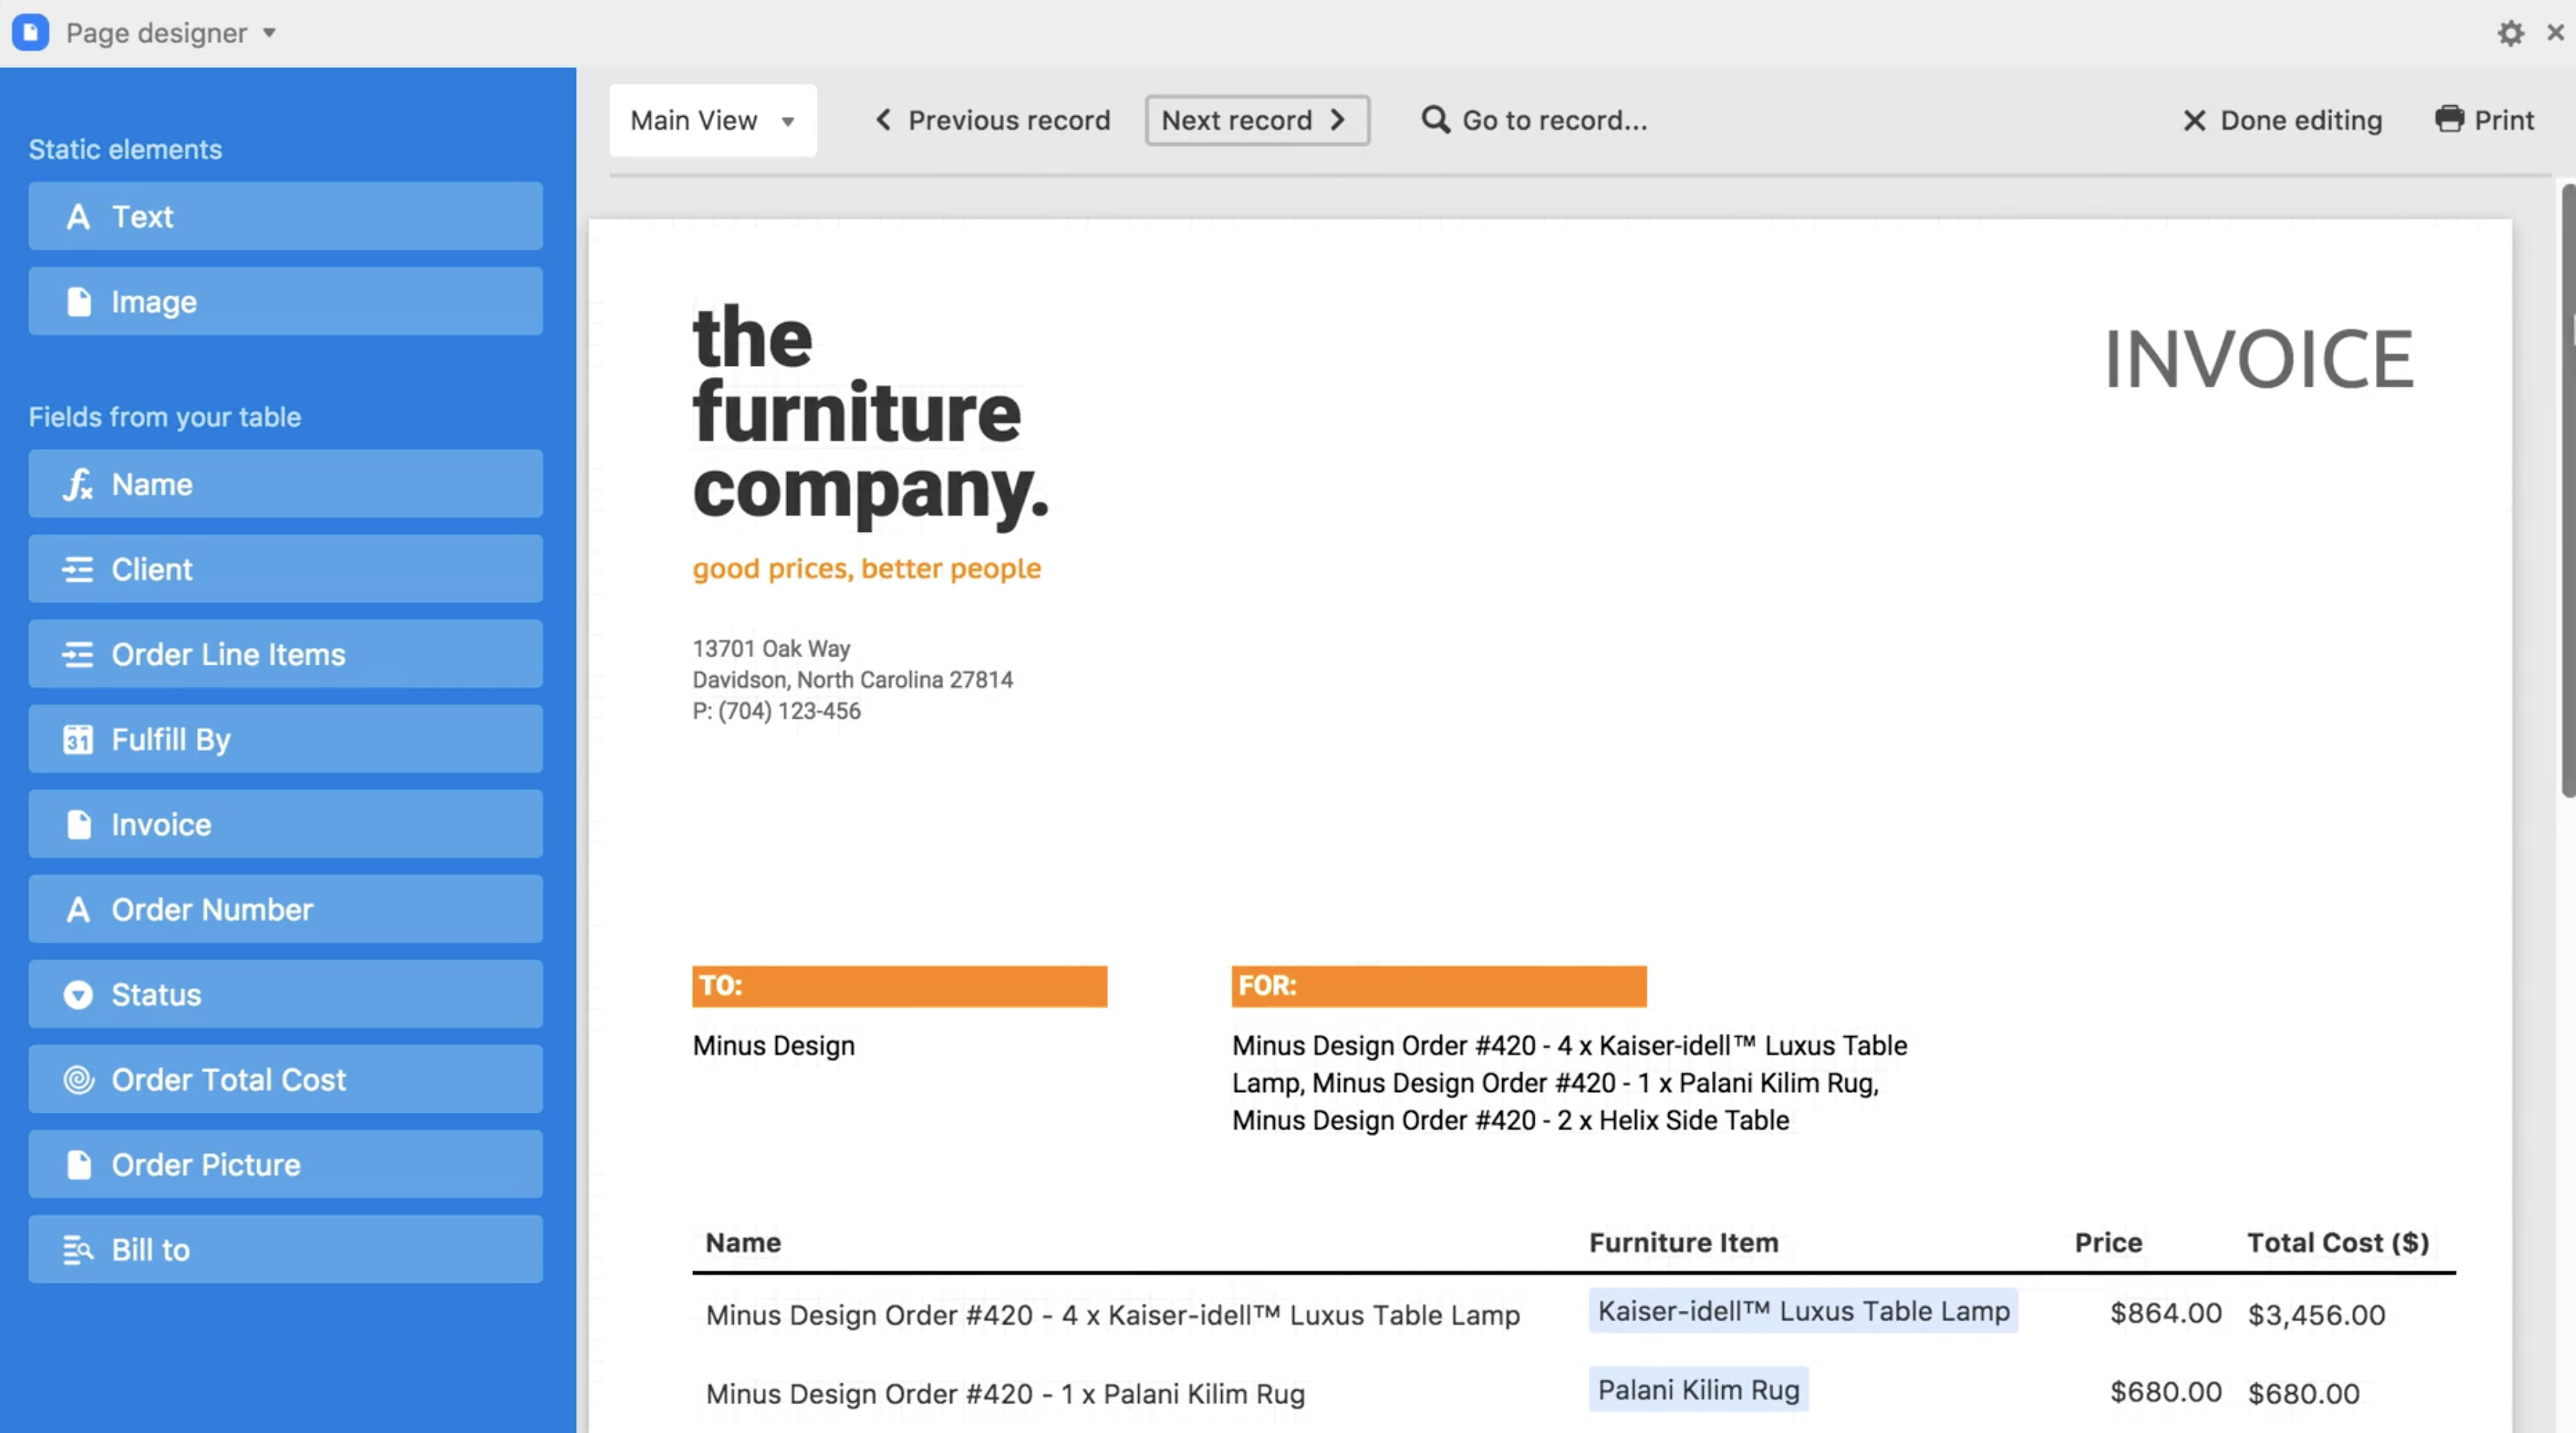
There are a few other limitations to consider for our use case:
- The files are generated one by one.
- It can only generate PDF files.
- It cannot store the generated files in your Airtable database.
The page designer layout editor is not that bad, but you will never be as productive as with your usual word processing software. Also, you will have to start from scratch again if you want to create a new layout in another base.
Creating the Word Template
Given the limitations of the page designer, we will be using a Word template instead. A template is a document that contains merge tags, which are placeholders intended to be replaced with dynamic data. They allow you to easily create documents that are visually very similar, but differ based on the data set that is used to populate the placeholders.
Our template is a slightly modified version of the Certificate of Completion template from the Template Library. The main changes were the addition of a profile photo to highlight our image resizing feature, and the integration of a skills list, to demonstrate using Airtable’s linked record fields together with DocuGenerate’s list syntax.

This template includes the following tags: {Company_Name}, {First_Name}, {Last_Name}, {Program}, {Photo}, {Start_Date}, {End_Date}, {Certificate_Date} and {Skills} (using the following syntax to create a skills list):
{#Skills}
- {.}
{/Skills}
💡 Going further The enhanced syntax is enabled for this template to allow the image resizing ability. You should avoid having whitespaces in your tag names in order to use it. That is why tag names composed of two words use an underscore between them.
Designing the Database
For our example, we started with the template and have then created an appropriate database structure. Of course, a real process will unfold in the other way: as your data will probably already be consistent, you will create a template matching your data and your base structure in order to generate the documents you need to, and not a database structure according to your template.
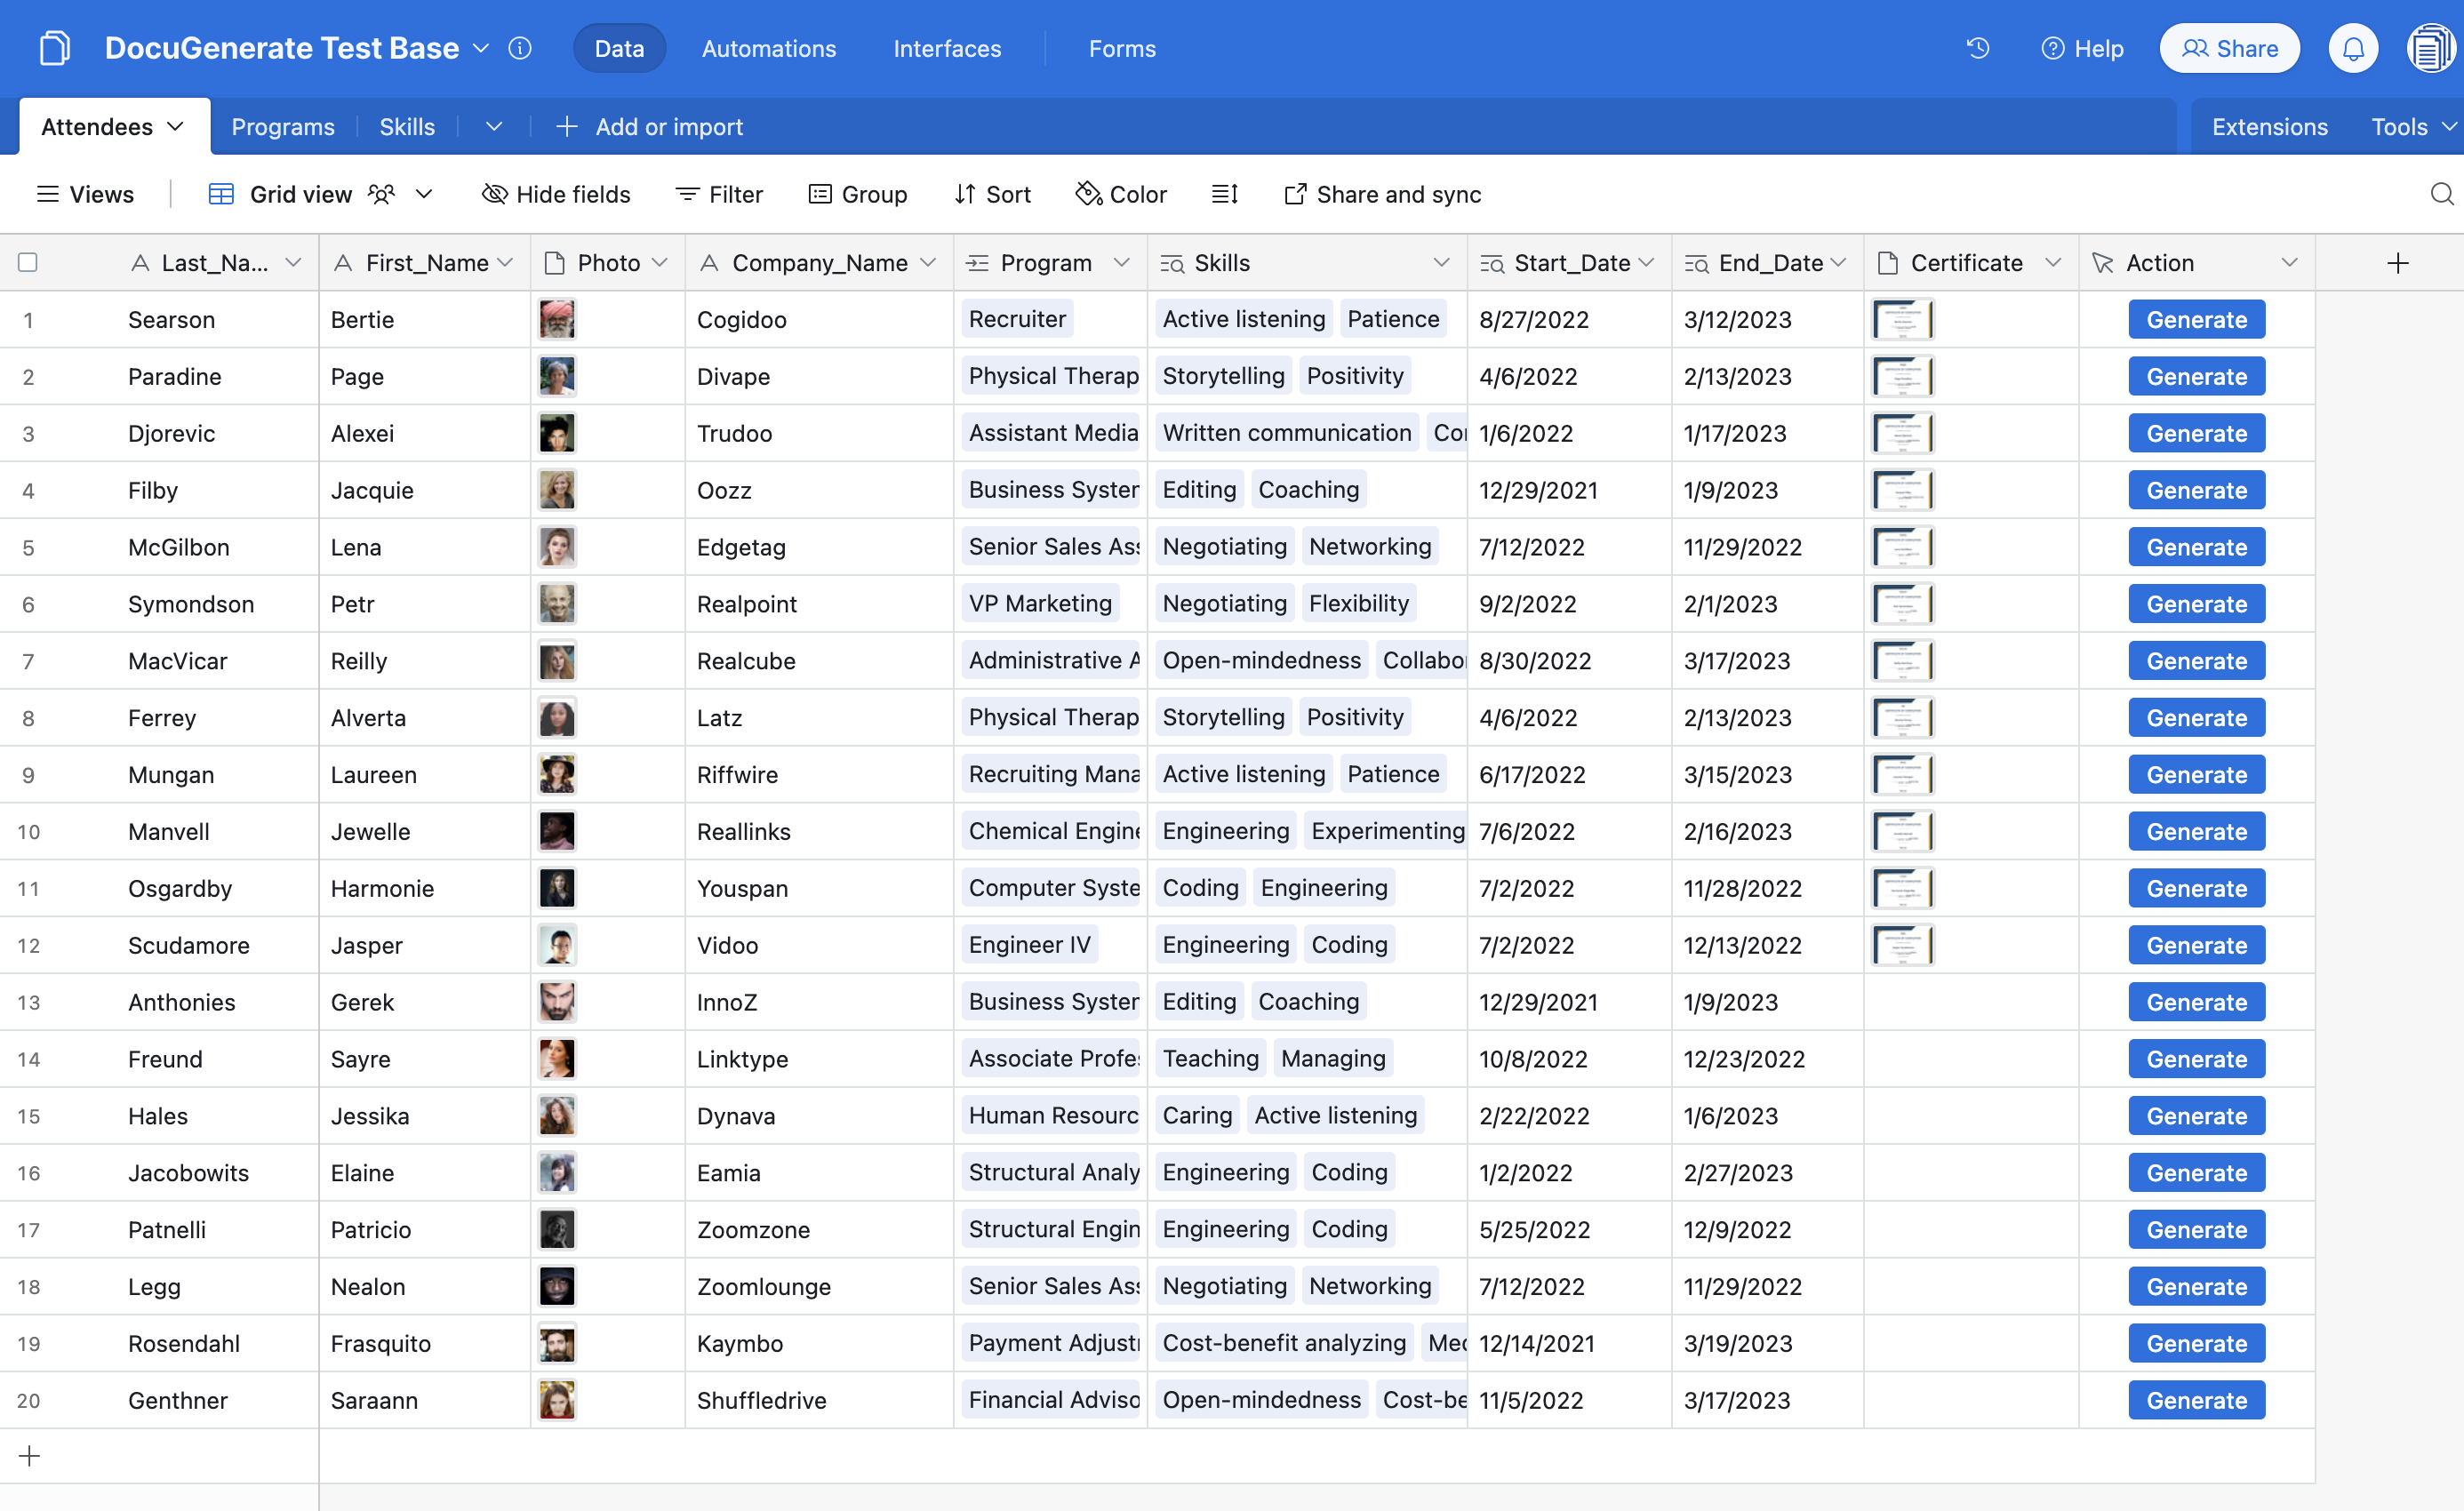
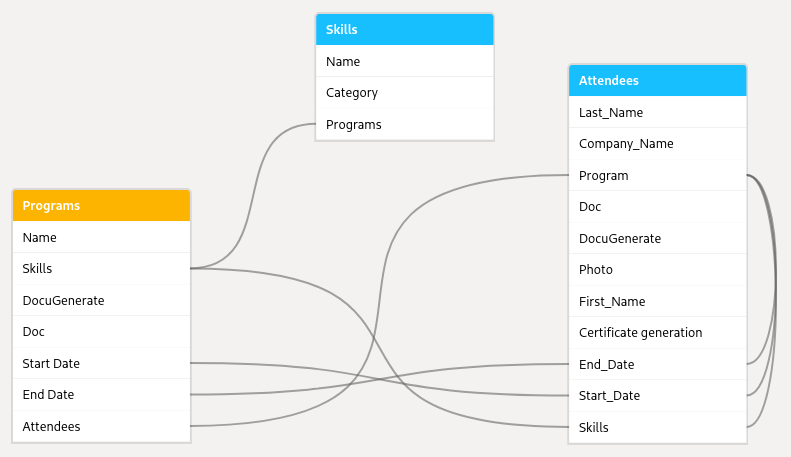
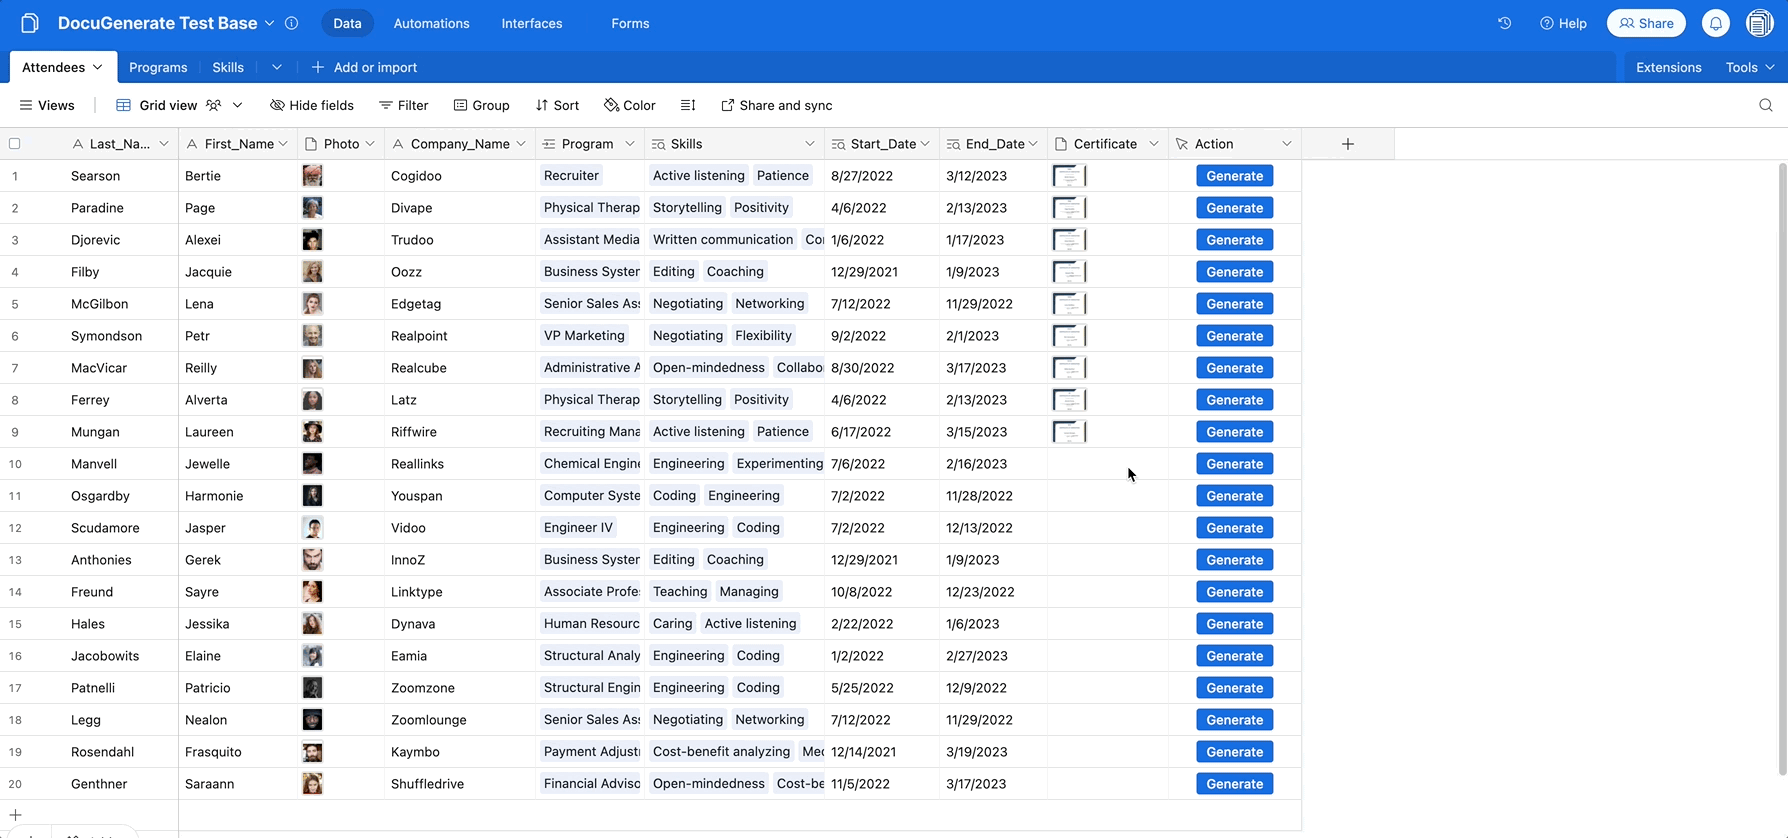
Here, our base includes three tables :
-
Skills table contains the skills acquired in the different programs, ordered by category.
-
Programs table contains data about each program : name, start date, end date, and the acquired skills (field linked to the Skills table).
-
Attendees table contains data about each attendee of the different programs, such as first name, last name and photo, and also a field link to the pursued program from which several lookup fields are created to access the program’s data directly in the Attendees table. This is needed as the script used to generate documents currently allows one single table selection, so every data has to be present in this table.
Please note that the certificate date needed in the template isn’t stored in the data. Don’t worry about that, it will be populated with today’s date when the document is generated.
If you want to see what our base looks like or start fiddling with it, you can simply explore the DocuGenerate script training data.
Populating the Database
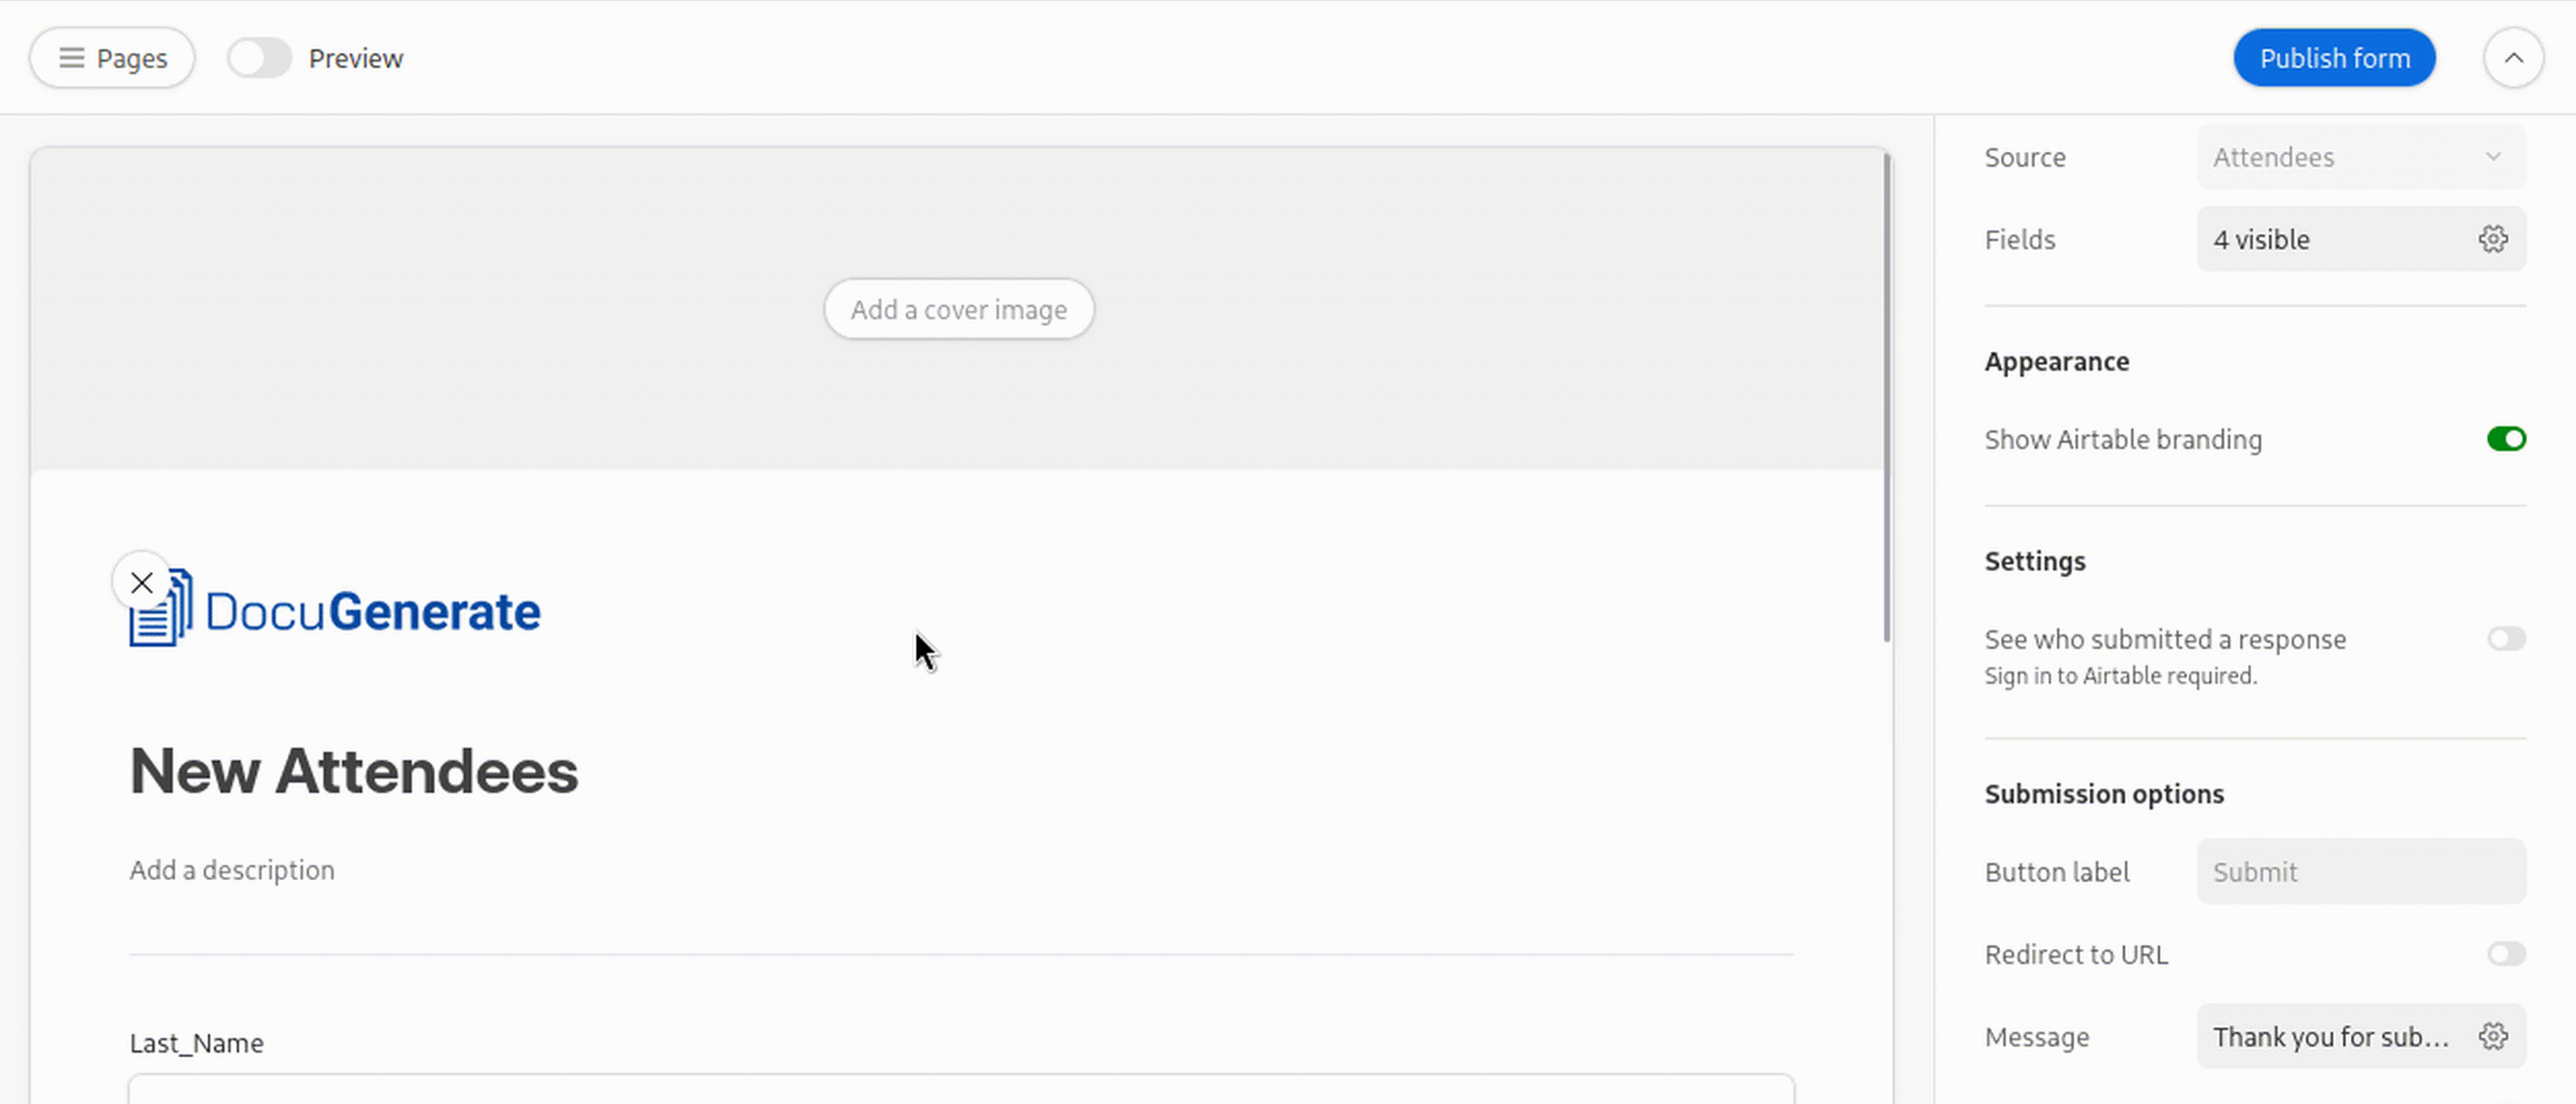
Our base is already filled with data allowing to test our workflow, but in an actual process you would need a mechanism to collect this data. To achieve this goal, one of the easiest way is to create forms that users can fill directly by themselves.
A form is basically a web page that you will make accessible to anyone, with several input fields linked to your table’s fields, so filling the form will create a new record in your table. For example, the process for creating a form for the Attendees table is pretty straightforward:
- Create a new form in the Views sidebar.
- Upload a logo and/or a cover image for your form.
- Choose which fields you want the user to fill in.
- For each field specify if it’s required, then add a title and a description.
- Publish your form in order to get a public URL to share.
💡 Going further To learn more about building and sharing forms in Airtable, please refer to their official documentation.
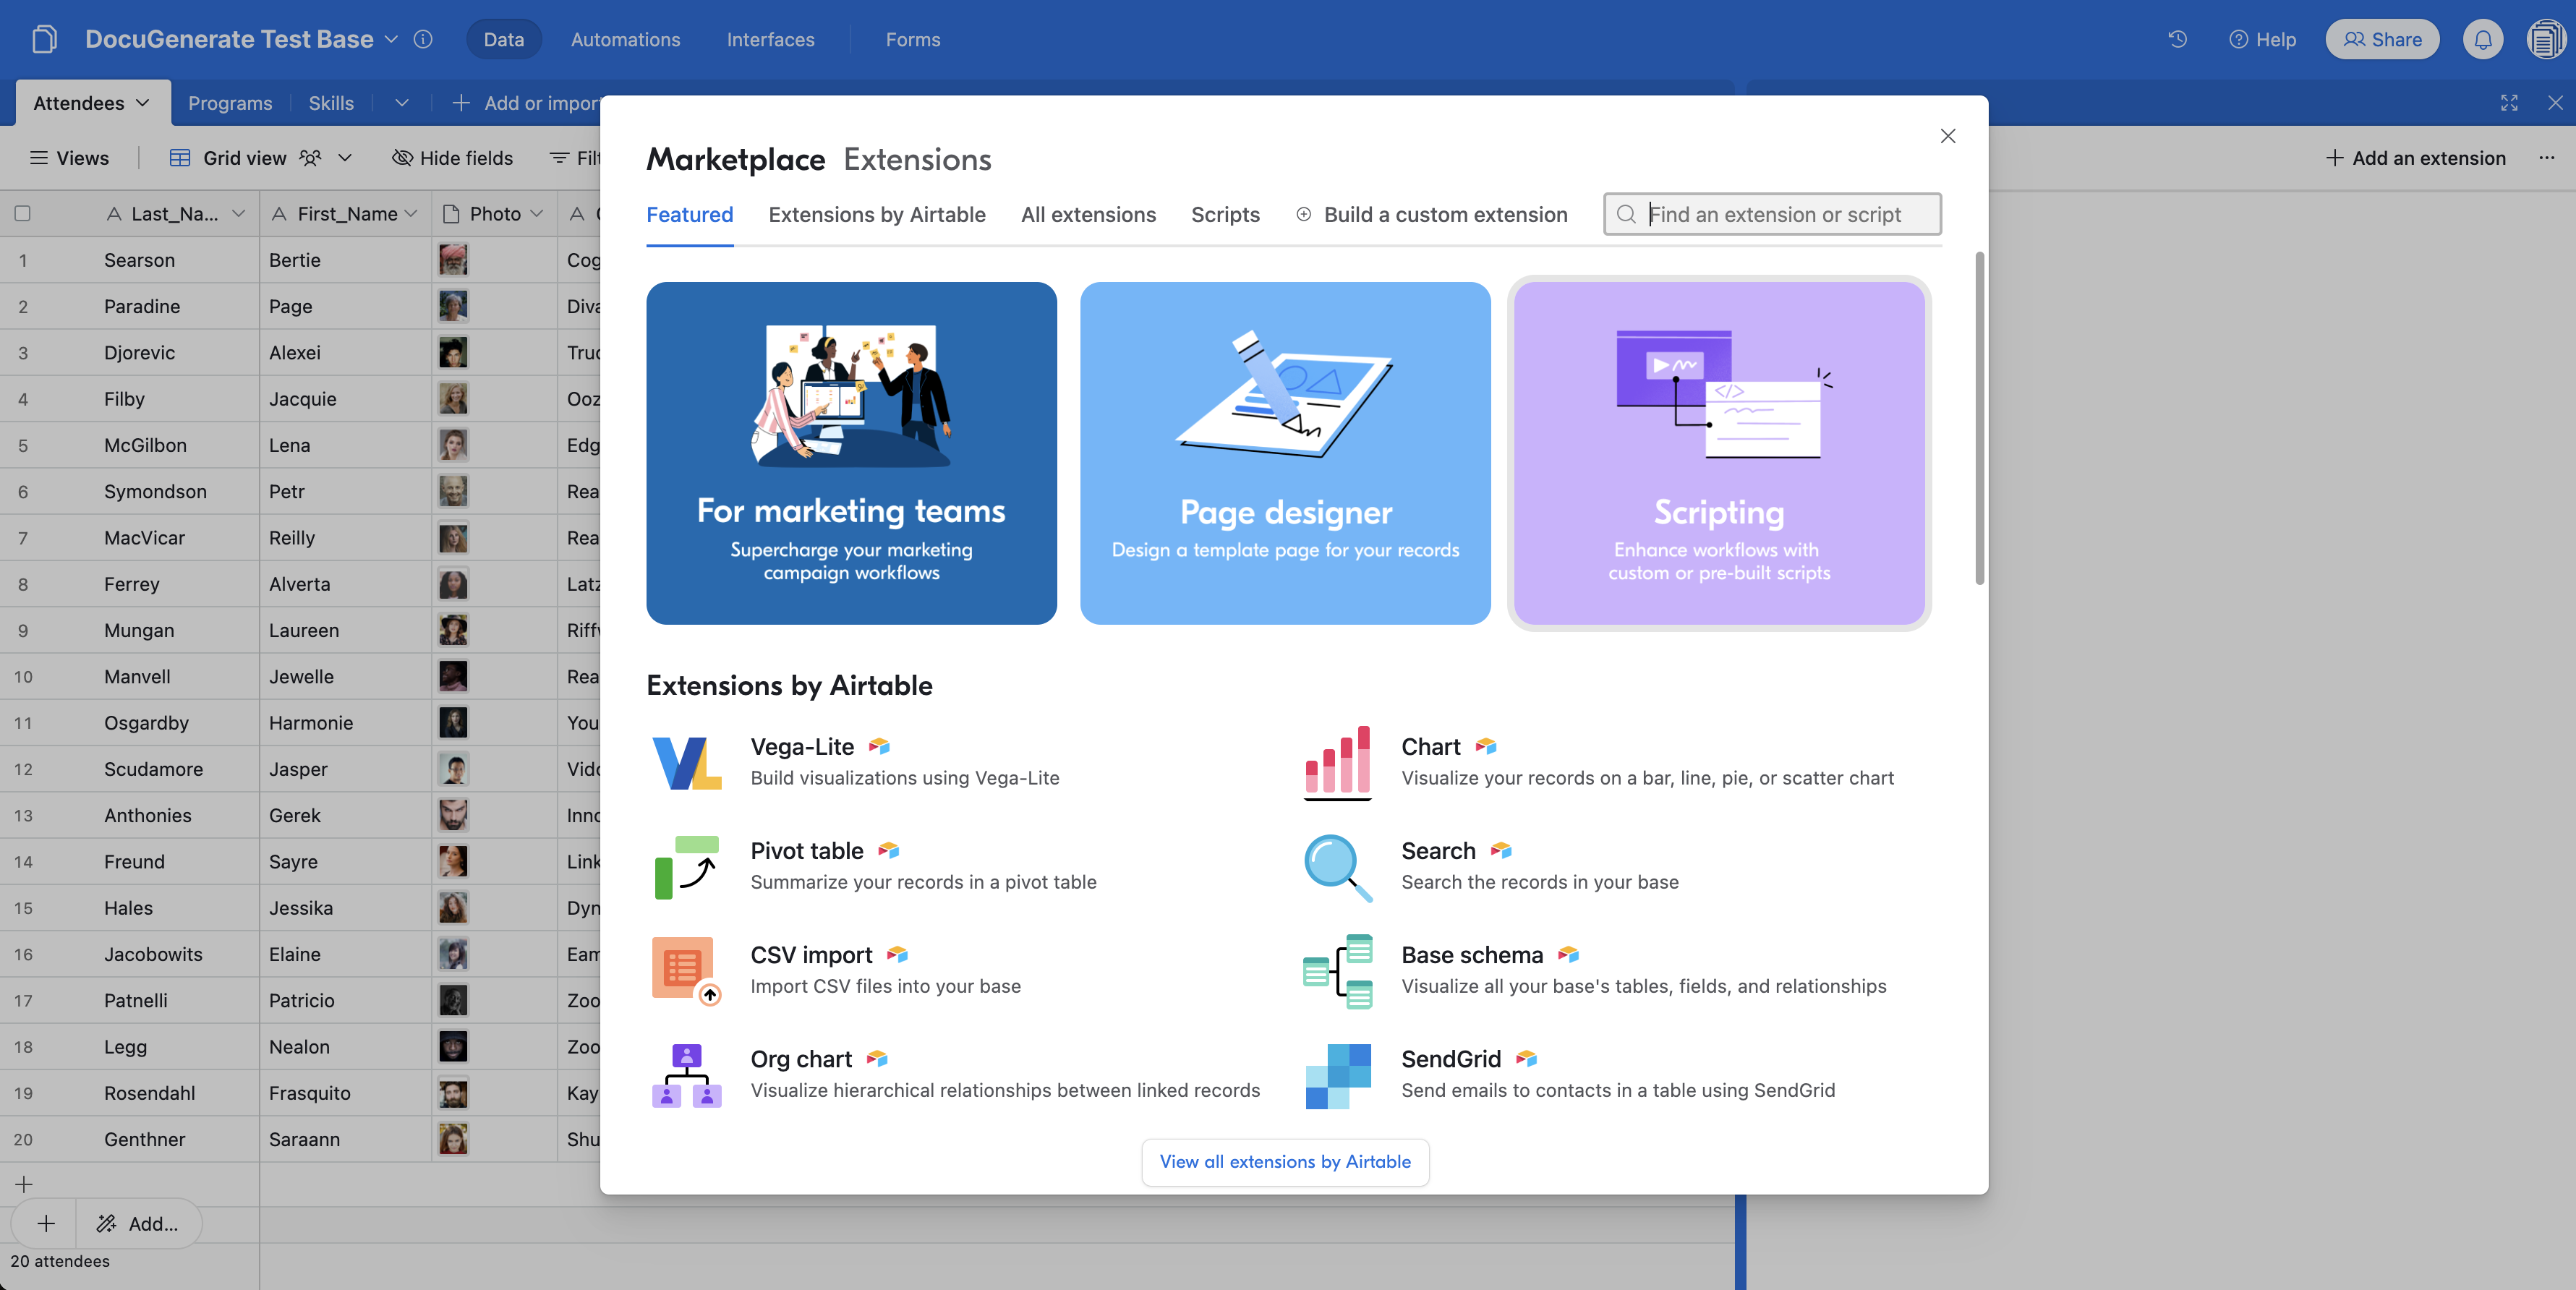
Setting up the Scripting Extension
Now that our template and our base are ready, we will set up the script used to generate the documents. For that, you will need to add a Scripting Extension in one of your dashboards. Please remember that extensions are only available in paid plans.
Next you’ll have to copy this JavaScript code and paste it in the scripting extension:
// Click the "gear" icon in the top right to view settings
const config = input.config({
    title: 'Generate Document',
    description: 'Automate document generation using DocuGenerate',
    items: [
        input.config.text('api_key', {
            label: 'API Key',
             description: 'Get your unique key from the Settings page in DocuGenerate'
        }),
        input.config.text('template_id', {
            label: 'Template ID',
            description: "ID of the template to use for generating the document"
        }),
        input.config.table('table', {
            label: 'Table',
            description: 'Source table for your records'
        }),
        input.config.field('storage_field', {
            label: 'Storage',
            description: 'Field for storing the generated documents (URL or Attachment)',
            parentTable: 'table',
        }),
        input.config.select('output_format', {
            label: 'Format',
            description: 'Output format of the generated documents',
            options: [
                {label: 'PDF (.pdf)', value: '.pdf'},
                {label: 'Microsoft Word (.docx)', value: '.docx'},
                {label: 'Microsoft Word 2007 (.doc)', value: '.doc'},
                {label: 'OpenDocument Format (.odt)', value: '.odt'},
                {label: 'Plain Text (.txt)', value: '.txt'},
                {label: 'HTML (.html)', value: '.html'},
                {label: 'PNG (.png)', value: '.png'}
            ]
        })
    ]
});

// Prompt the user to pick a record
// If this script is run from a button field, this will use the button's record instead
let record = await input.recordAsync('Select a record to use', config.table);

if (record) {
    // Customize this section to handle the selected record
    // You can use record.getCellValue("Field name") to access cell values from the record
    output.markdown(`Generating document for **${record.name}**`);

    // Get the program name
    const programsTable = base.getTable("Programs");
    const programRecord = record.getCellValue("Program")[0];
    const program = await programsTable.selectRecordAsync(programRecord.id);

    // Construct the data object based on the selected record's values
    const data = [{
        "Company Name": record.getCellValue("Company_Name"),
        "First Name": record.getCellValue("First_Name"),
        "Last Name": record.getCellValue("Last_Name"),
        "Program": program?.getCellValue("Name"),
        "Start Date": record.getCellValue("Start_Date"),
        "End Date": record.getCellValue("End_Date"),
        "Certificate Date": record.getCellValue("End_Date")
    }];

    const options = {
        method: 'POST',
        headers: {
            'Accept': 'application/json',
            'Content-Type': 'application/json',
            'Authorization': config.api_key
        },
        body: JSON.stringify({
            template_id: config.template_id,
            name: `Certificate for ${record.getCellValue("First_Name")} ${record.getCellValue("Last_Name")}`,
            output_format: config.output_format,
            data: data
        })
    };

    let status;
    const response = await fetch('https://api.docugenerate.com/v1/document', options)
        .then(response => {
            status = response.status;
            return response.json();
        })
        .catch(err => output.text(err));

    if (status !== 201) {
        output.markdown('Error generating document: ' + response.message);
    } else {
        const storageFieldValue = (config.storage_field.type === 'multipleAttachments') ? [{url: response.document_uri}] : response.document_uri;
        await config.table.updateRecordsAsync([{
            id: record.id,
            fields: {[config.storage_field.name]: storageFieldValue}
        }]);
        output.markdown('Document generated successfully! 🎉');
    }
} else {
    output.markdown('No record was selected');
}
If everything goes well, you should now be able to access the script’s settings page by clicking the gear icon that appears when hovering over the upper right corner of your extension. Do not hesitate to use the full-screen icon next to the settings icon, for better visibility.
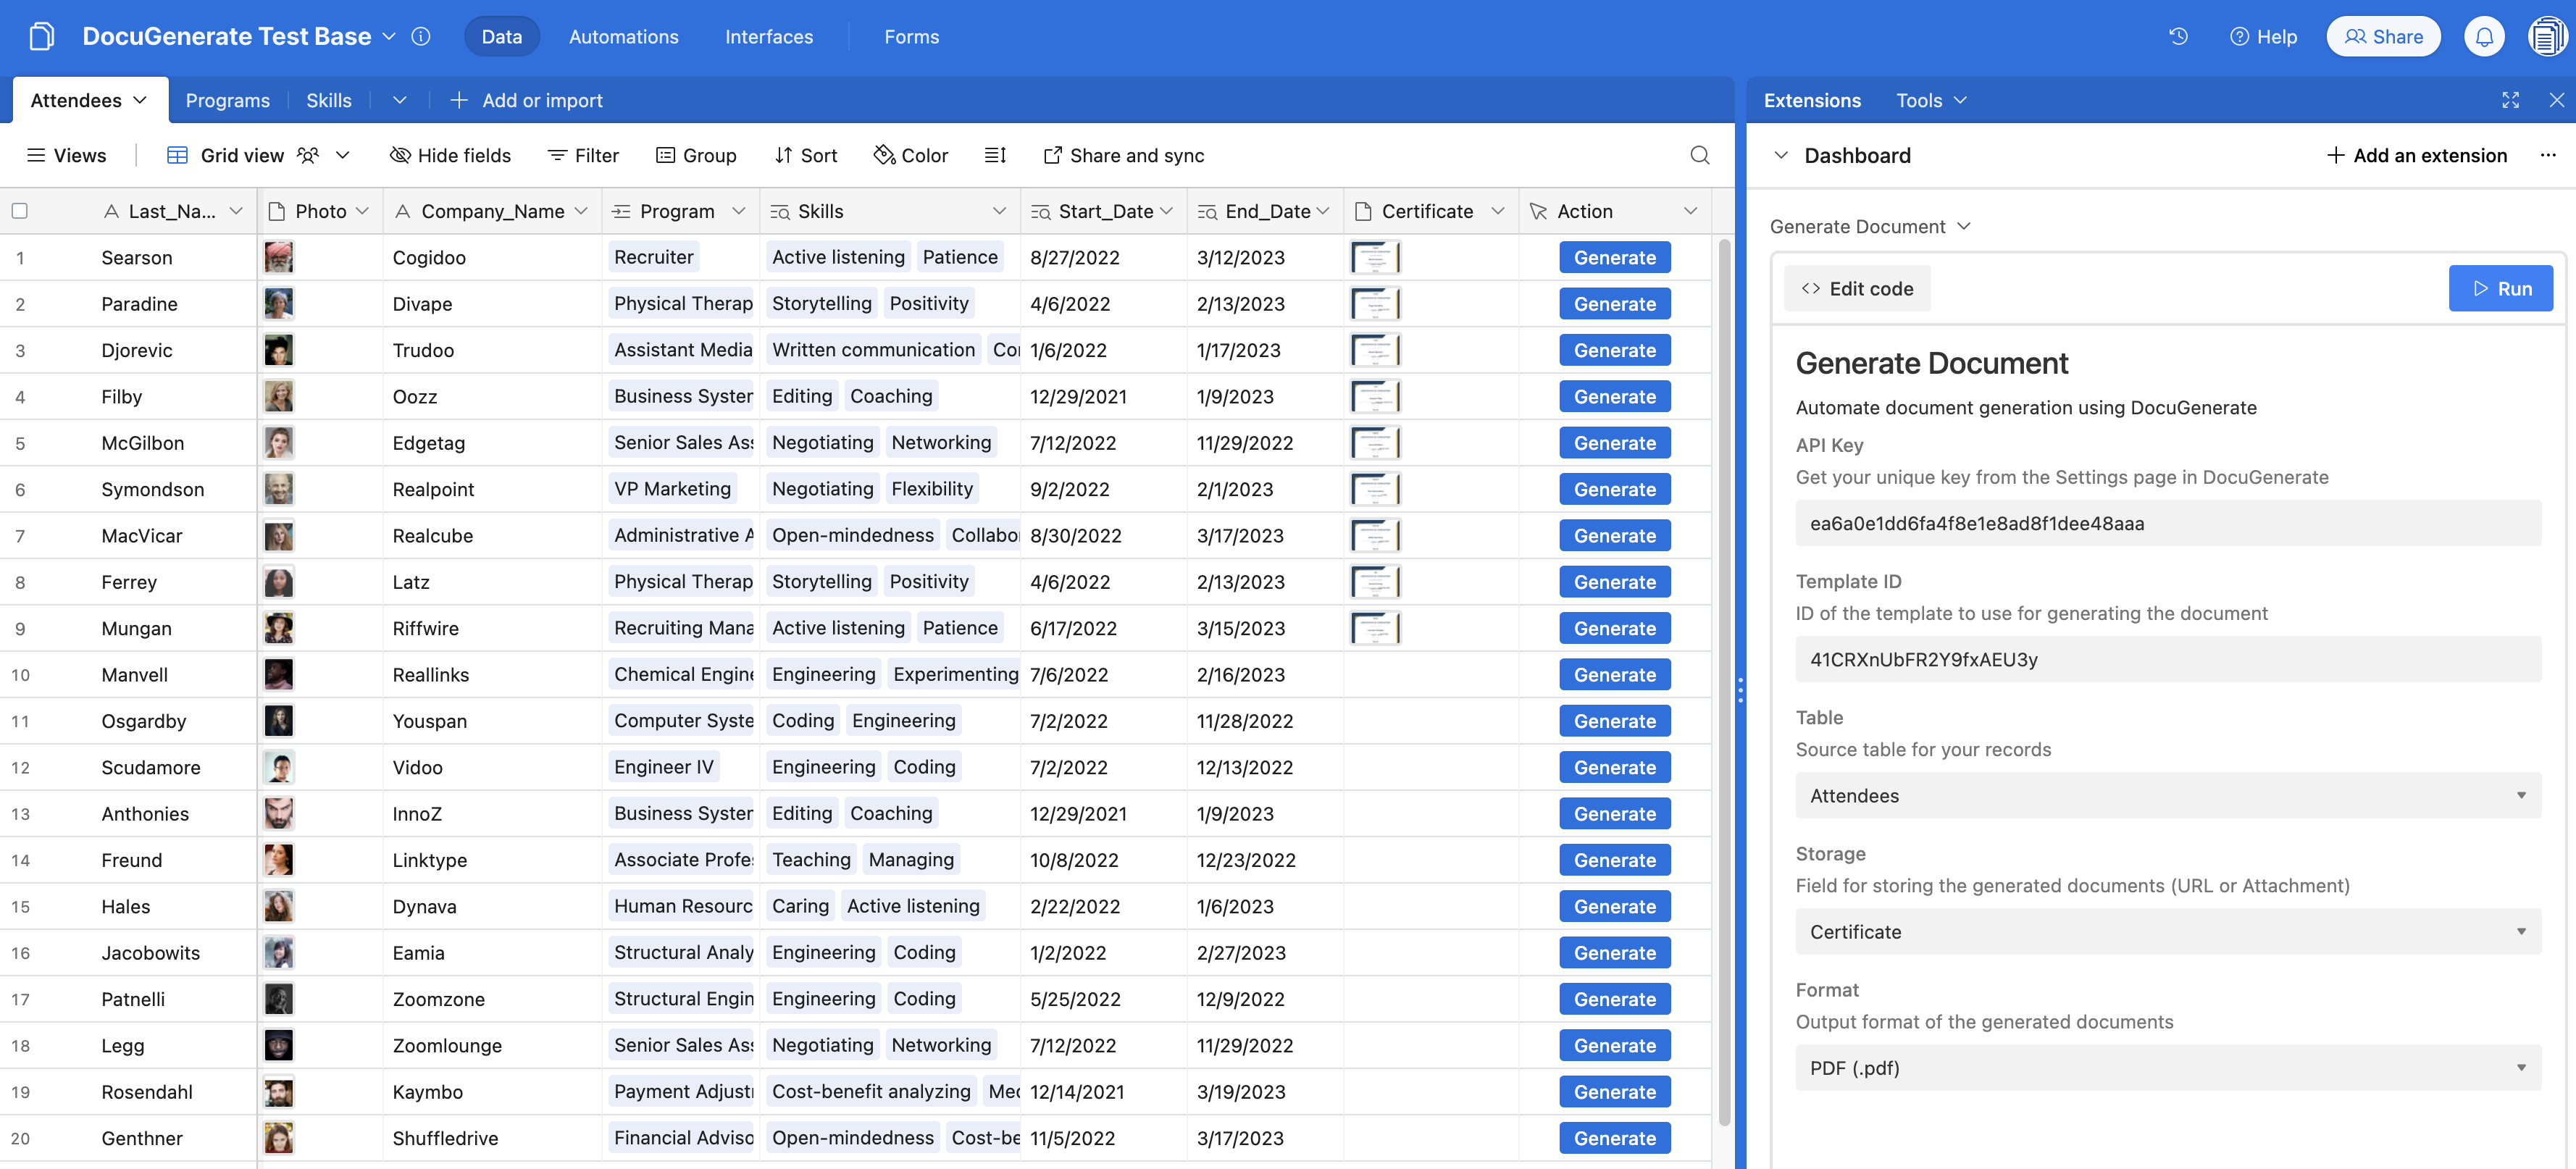
Here are the available settings :
-
API Key: your DocuGenerate API Key that you can get from your settings page once you’ve created your account. Simply copy the API Key to the clipboard by clicking on it.
-
Template ID: the ID of your template that you can copy from your template’s page. Please note that it also appears directly in the URL of your template’s page, the URL being of form https://app.docugenerate.com/templates/:template_id
-
Table: the table containing the records you will use to replace your template’s tags.
-
Storage: the field used to store the generated document. It can be either a URL field (which will store a link to the document) or a File type field (which will store the actual file).
-
Format: output format of the generated document. The options are .docx, .pdf, .doc, .odt, .txt, .html, or .png.
With all these parameters set, we are now ready to automate the process of document creation!
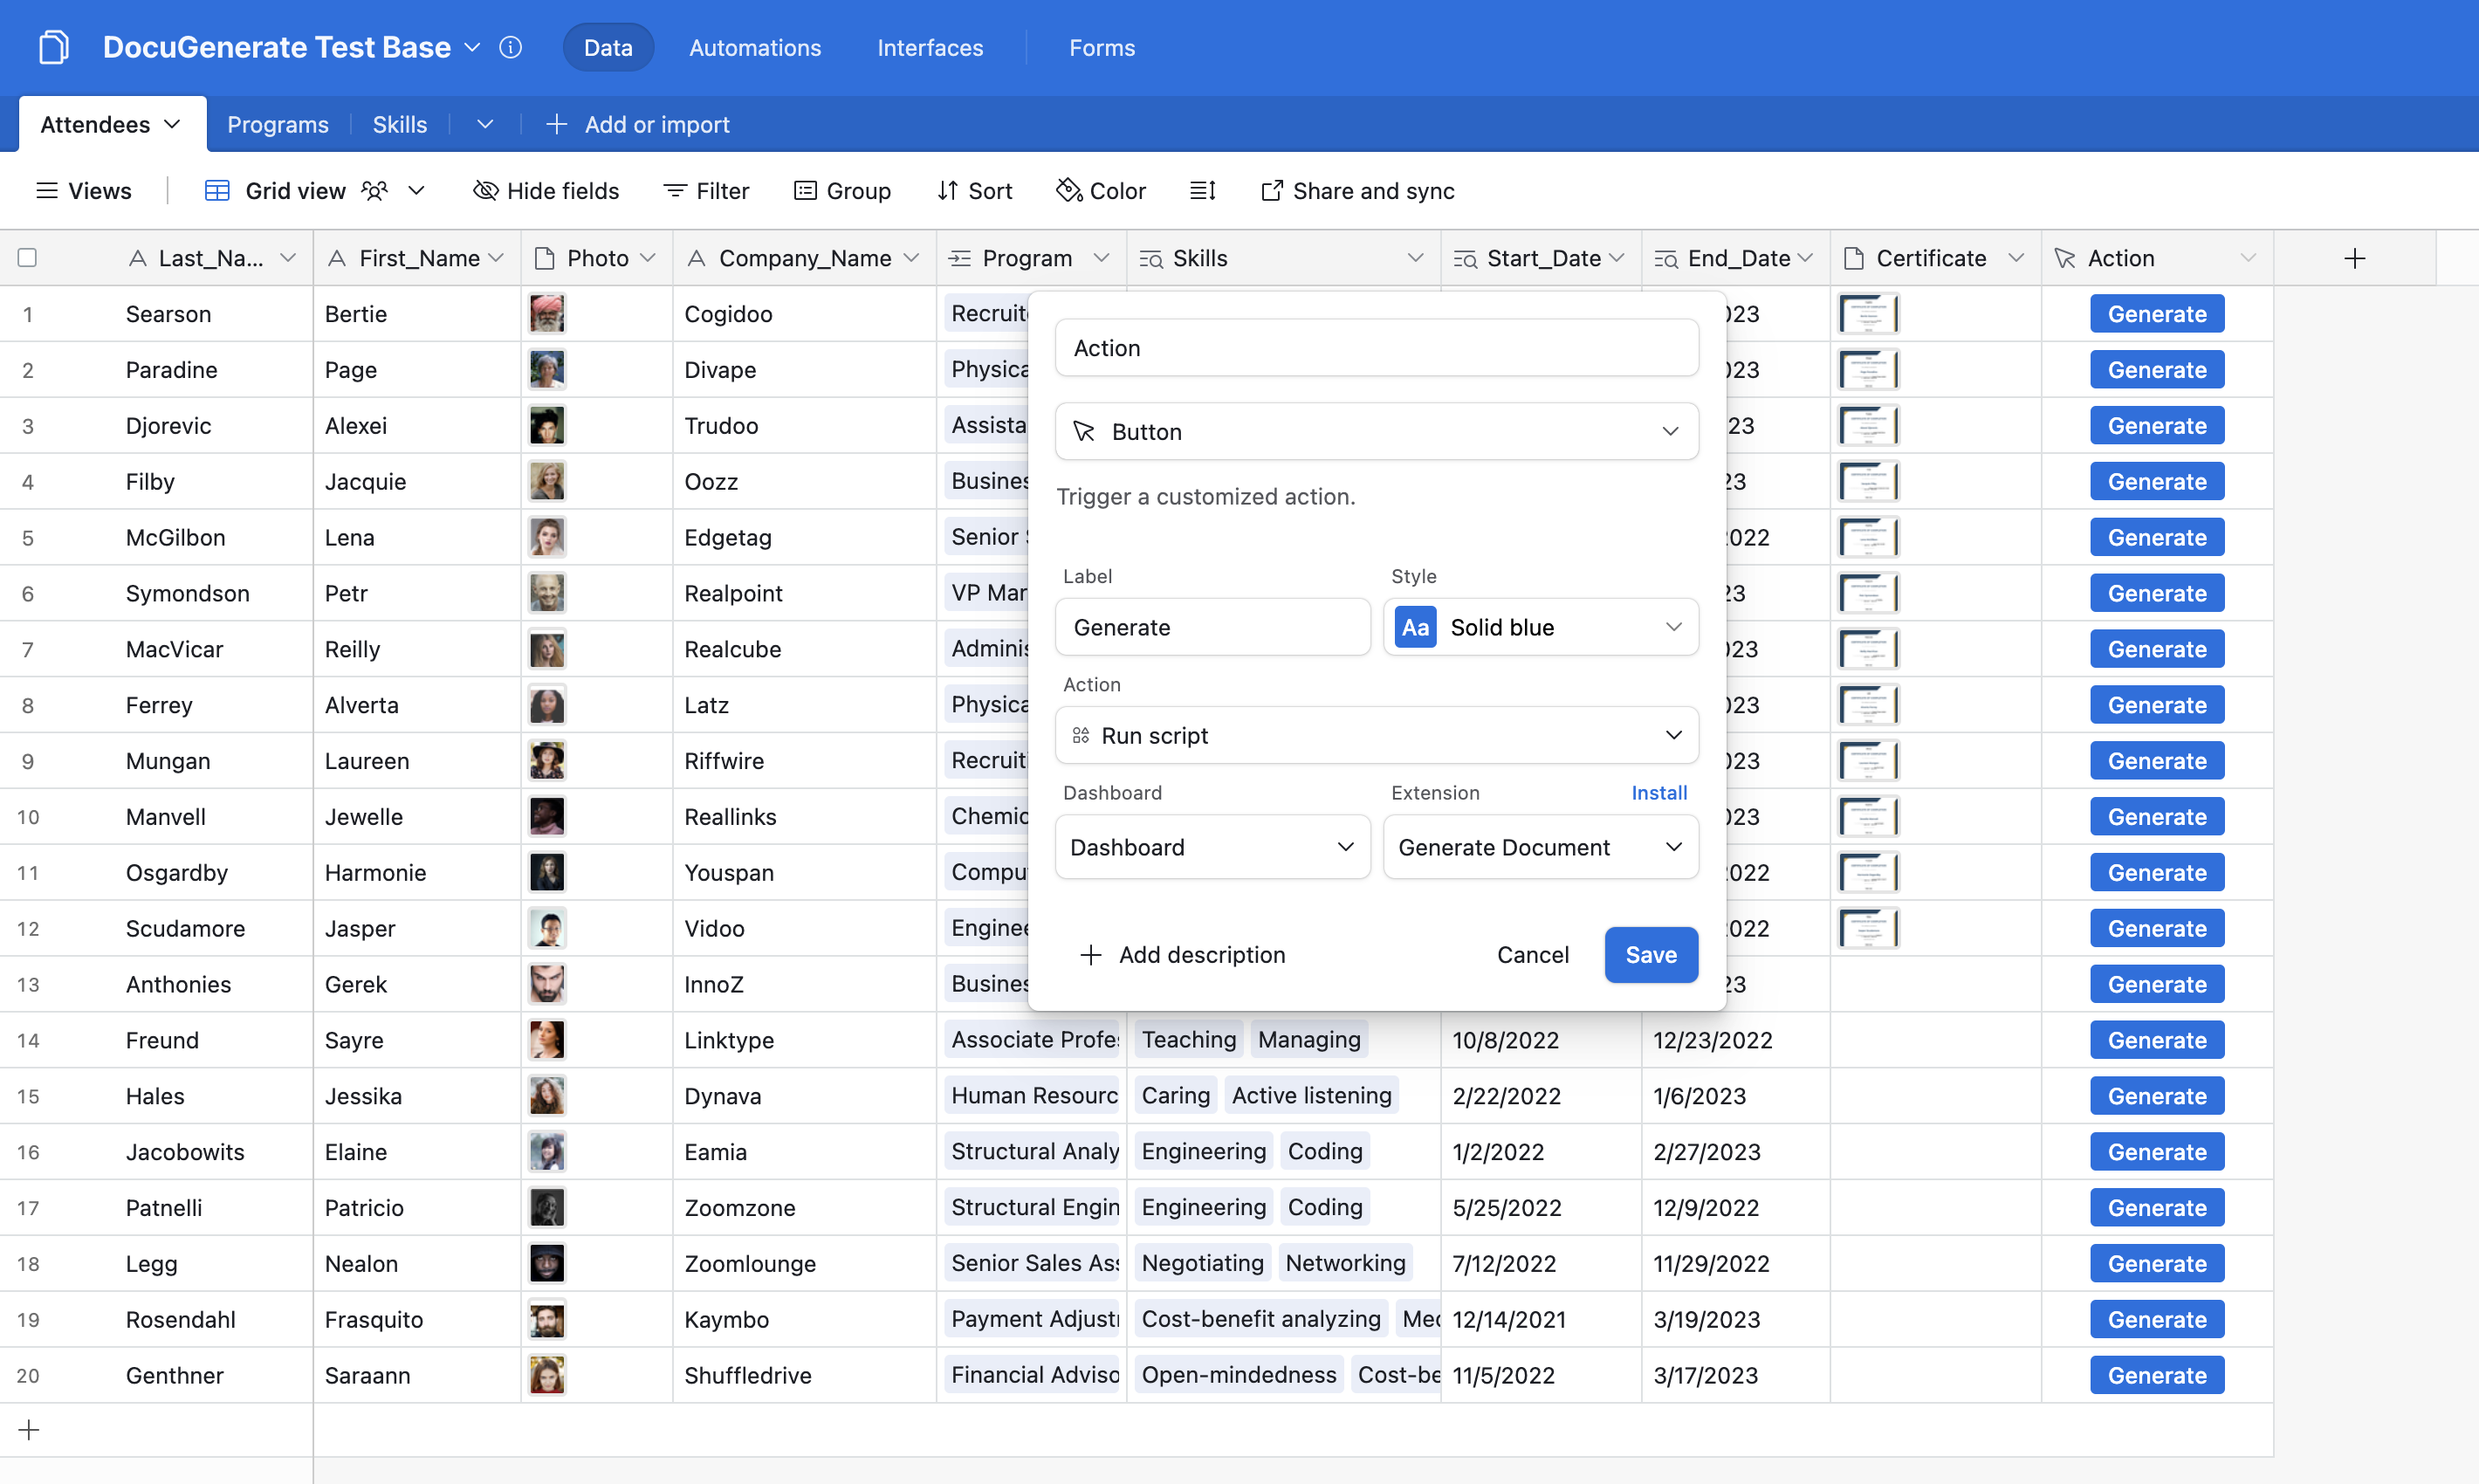
The scripting extension is waiting for the user to input a specific record to process. But in order to make things easier for the end-user, we want to generate the document simply by clicking on a button. For this to work, we’ll need to add a new Button Field, that will be configured to run our script when it’s clicked. This way, the record from which the button was clicked is automatically selected for running the script.
Generating and Storing Documents
With everything set up, let’s see how the document generation process works. When you click the Generate button on any record, the script executes and performs several actions:
- It gathers all the necessary data from the current record.
- It sends that data to DocuGenerate’s API along with your template ID.
- DocuGenerate processes the request, replacing all merge tags with your data.
- The generated document is returned and automatically stored in your database.
The result is a professional-looking certificate that’s ready to be shared with participants.
Going Further with Airtable Automations
While our button-triggered script is already quite powerful, you can take document generation to the next level by integrating it with Airtable Automations. This allows for completely hands-free document workflows that trigger based on specific conditions in your database.
Here are some powerful automation scenarios you could implement:
-
Automatic Certificate Generation: Generate certificates automatically when an attendee’s status changes to “ Completed” or when a program end date is reached, eliminating the need for manual button clicks.
-
Email Delivery: Send certificates directly to attendees via email as soon as they’re generated, creating a seamless experience for program participants.
-
Batch Processing: Set up weekly or monthly automations that generate certificates for all attendees who completed programs during that period.
-
Conditional Document Generation: Create different types of documents based on criteria like program type, achievement level, or geographic location.
-
Notification System: Notify program administrators when certificates have been generated and delivered, helping to track the process.
To set up these automations, you’ll need to adapt the scripting code we provided earlier into a “Run script” automation step. The core API integration will remain the same, but you’ll need to modify how records are selected and processed based on your trigger conditions.
Conclusion
In this tutorial, we’ve shown how you can transform your Airtable database into a powerful document generation system using DocuGenerate’s API and Airtable’s Scripting Extension. By combining these tools, you can generate professional documents directly from your Airtable data with a single click and store generated documents within your database for easy access and organization.
While automation tools like this can dramatically improve your productivity, it’s important to remember that they should serve as process facilitators. Don’t get lost in complex automation development when a simpler approach might be more efficient! Recognizing this balance is key to creating truly effective workflows. Start with the basic implementation we’ve provided, and then gradually expand your automation as your needs grow and evolve.
Resources
- DocuGenerate Test Base in Airtable, containing the Skills, Programs and Attendees tables.
- Airtable DocuGenerate GitHub repository created by Benjamin Hatton that contains the initial version of Airtable scripts for generating documents using DocuGenerate’s API.
- All profile photos are royalty-free and come from Pixabay, the royalty-free images & stock website.
- The Certificate of Completion template used in this tutorial.
- An example of PDF Certificate generated from Airtable data.