Introduction
Document automation doesn’t always require cloud-based solutions, sometimes the most effective workflows are the ones that run locally on your machine. In this tutorial, we’ll explore how to build an automated invoice generation system using n8n, a powerful workflow automation tool, combined with DocuGenerate to create professional PDF invoices.
The workflow we’ll build is straightforward yet powerful. It monitors a designated folder on your local machine for new Excel files containing invoice data. When a file appears, the workflow automatically reads the data, generates a separate invoice for each row, and saves the completed PDF documents to an output folder. This approach is particularly useful for businesses that need to process invoices locally and maintain full control over their data.
Throughout this guide, we’ll walk through each node in the n8n workflow, explaining its purpose and configuration. By the end of this tutorial, you’ll have a fully functional local invoice generation system that you can adapt to your specific needs.
Setting Up the Template
Before building the n8n workflow, we need to prepare our invoice template. DocuGenerate’s Template Library includes a ready-to-use Repair Invoice template that’s perfect for this tutorial. You can learn more about using templates from the library in our previous guide.
The template contains merge tags like Invoice No, Customer Name, Product Name, and other common invoice fields. These merge tags will be automatically replaced with actual data from the Excel file during the document generation process. The template also includes a sample Excel file with ten rows of invoice data, which we’ll use to demonstrate the workflow.
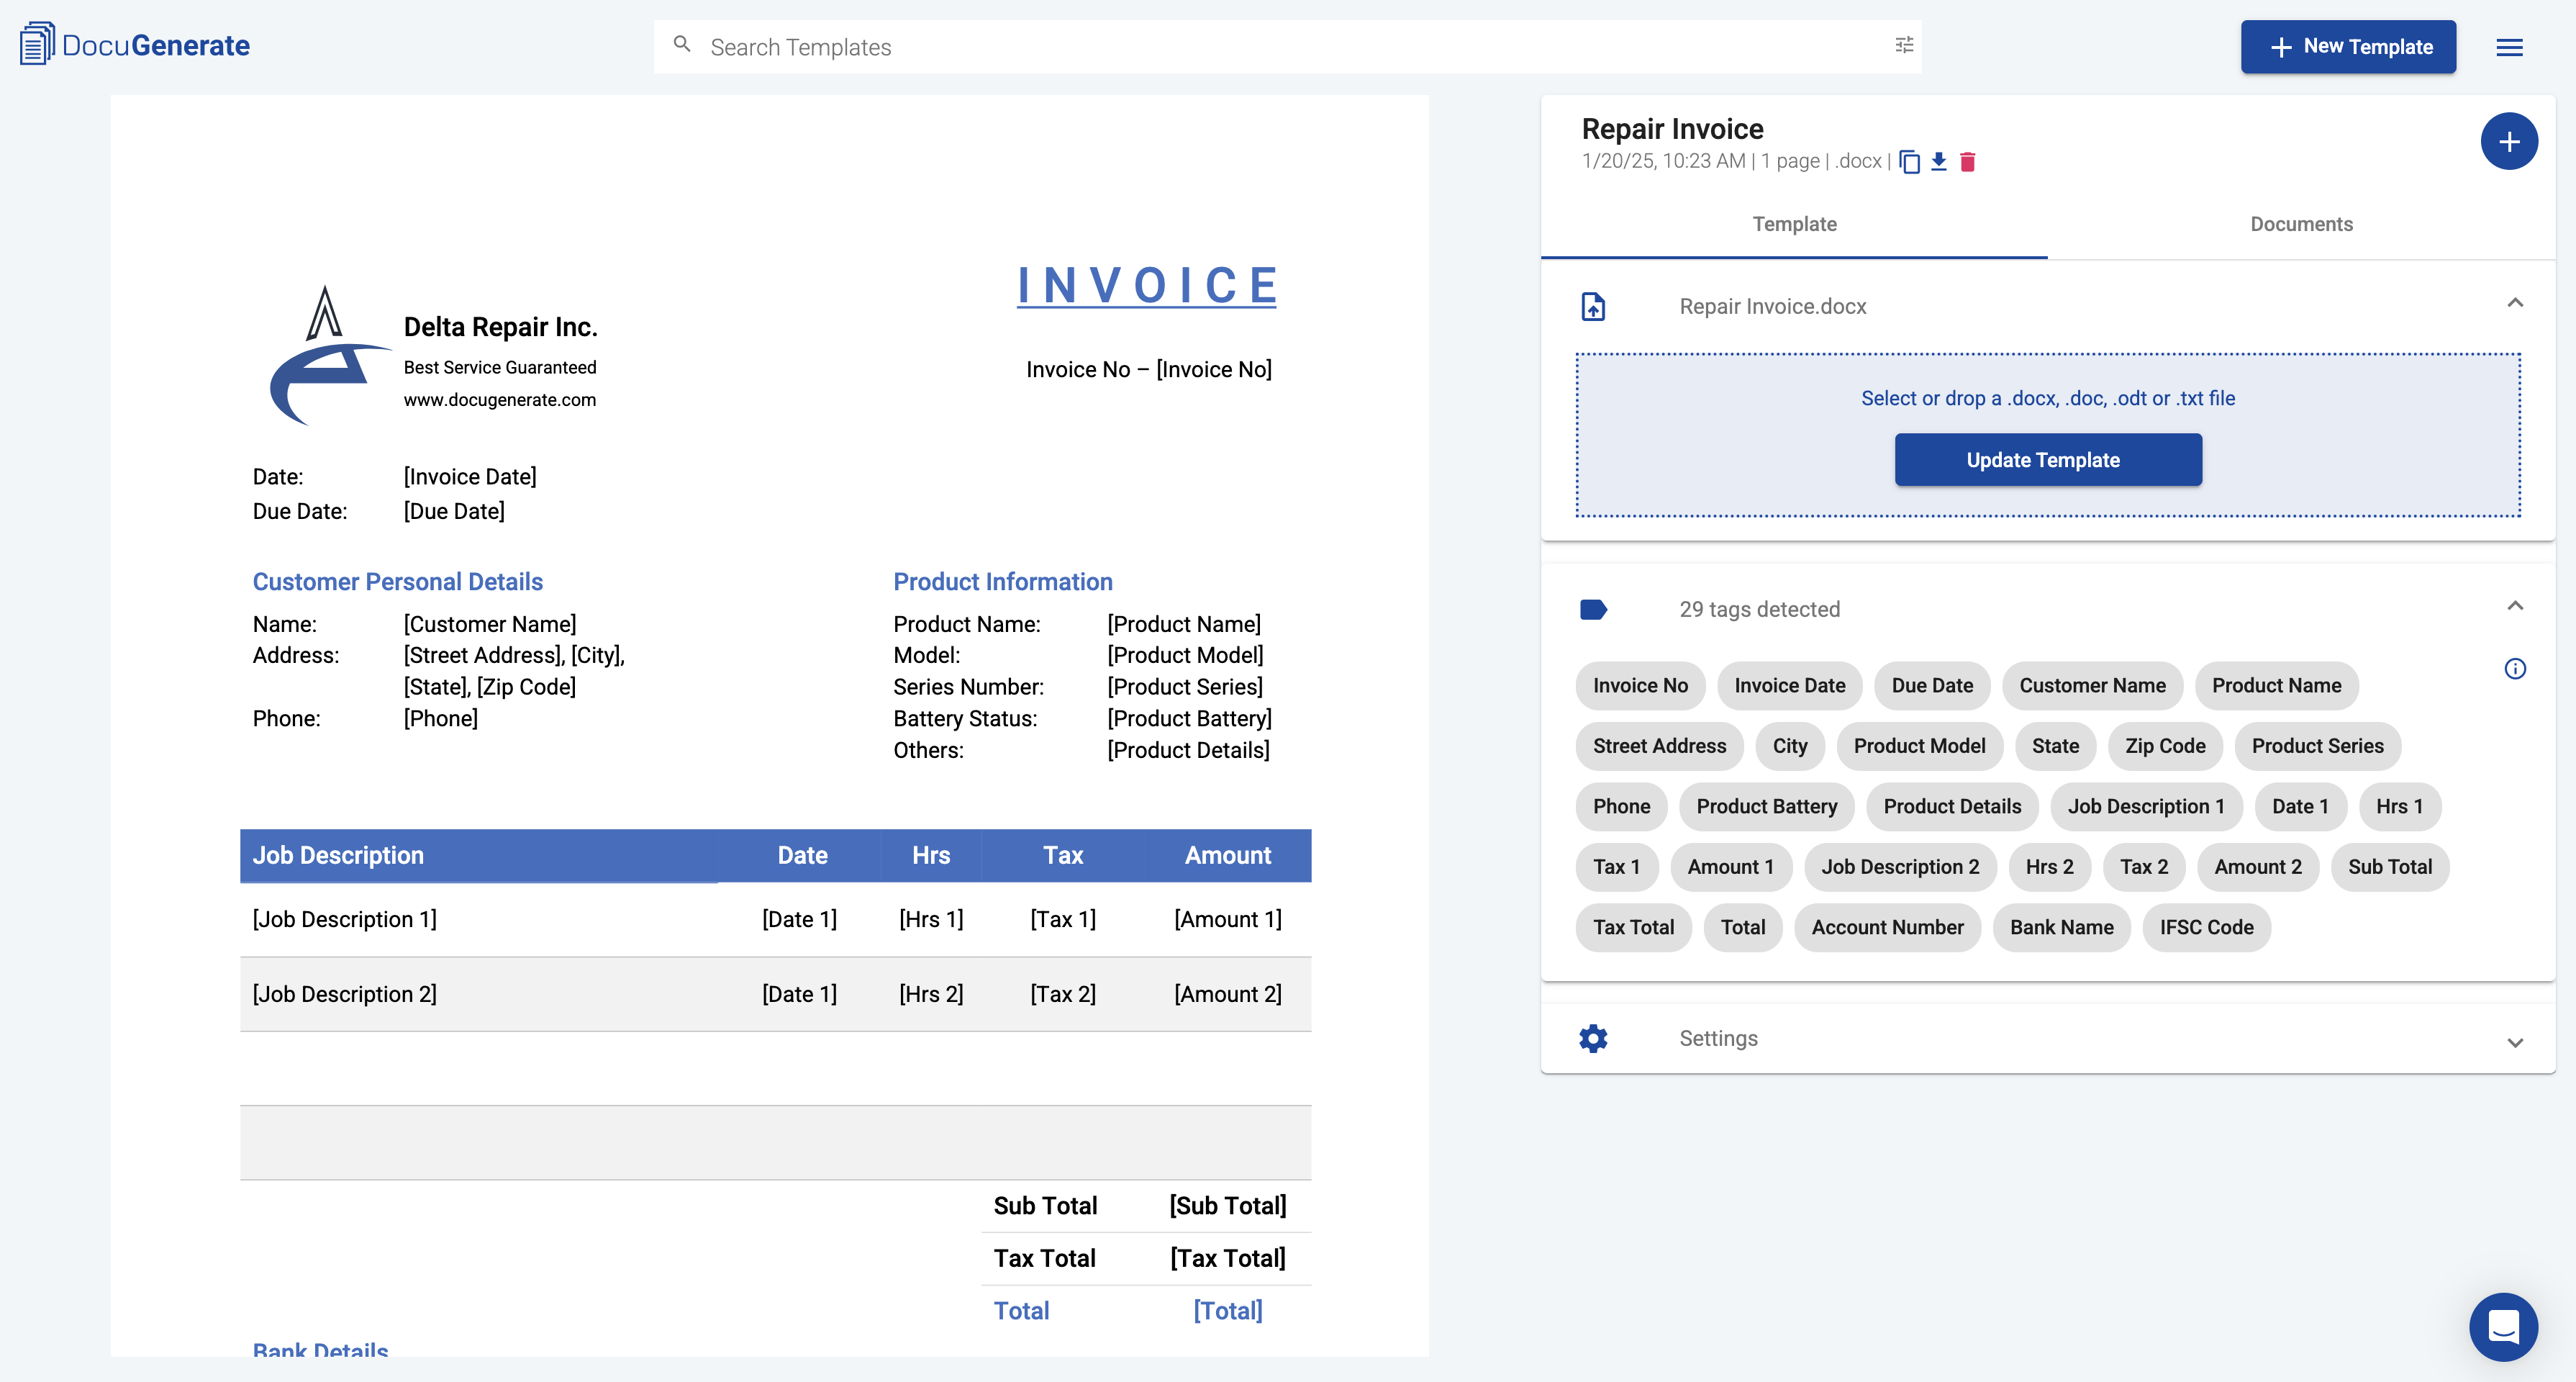
Once you’ve downloaded the template from the library, upload the file Repair Invoice.docx to your DocuGenerate account. With the template ready, we can now turn our attention to building the n8n workflow that will automate the entire invoice generation process.
The Complete Workflow Overview
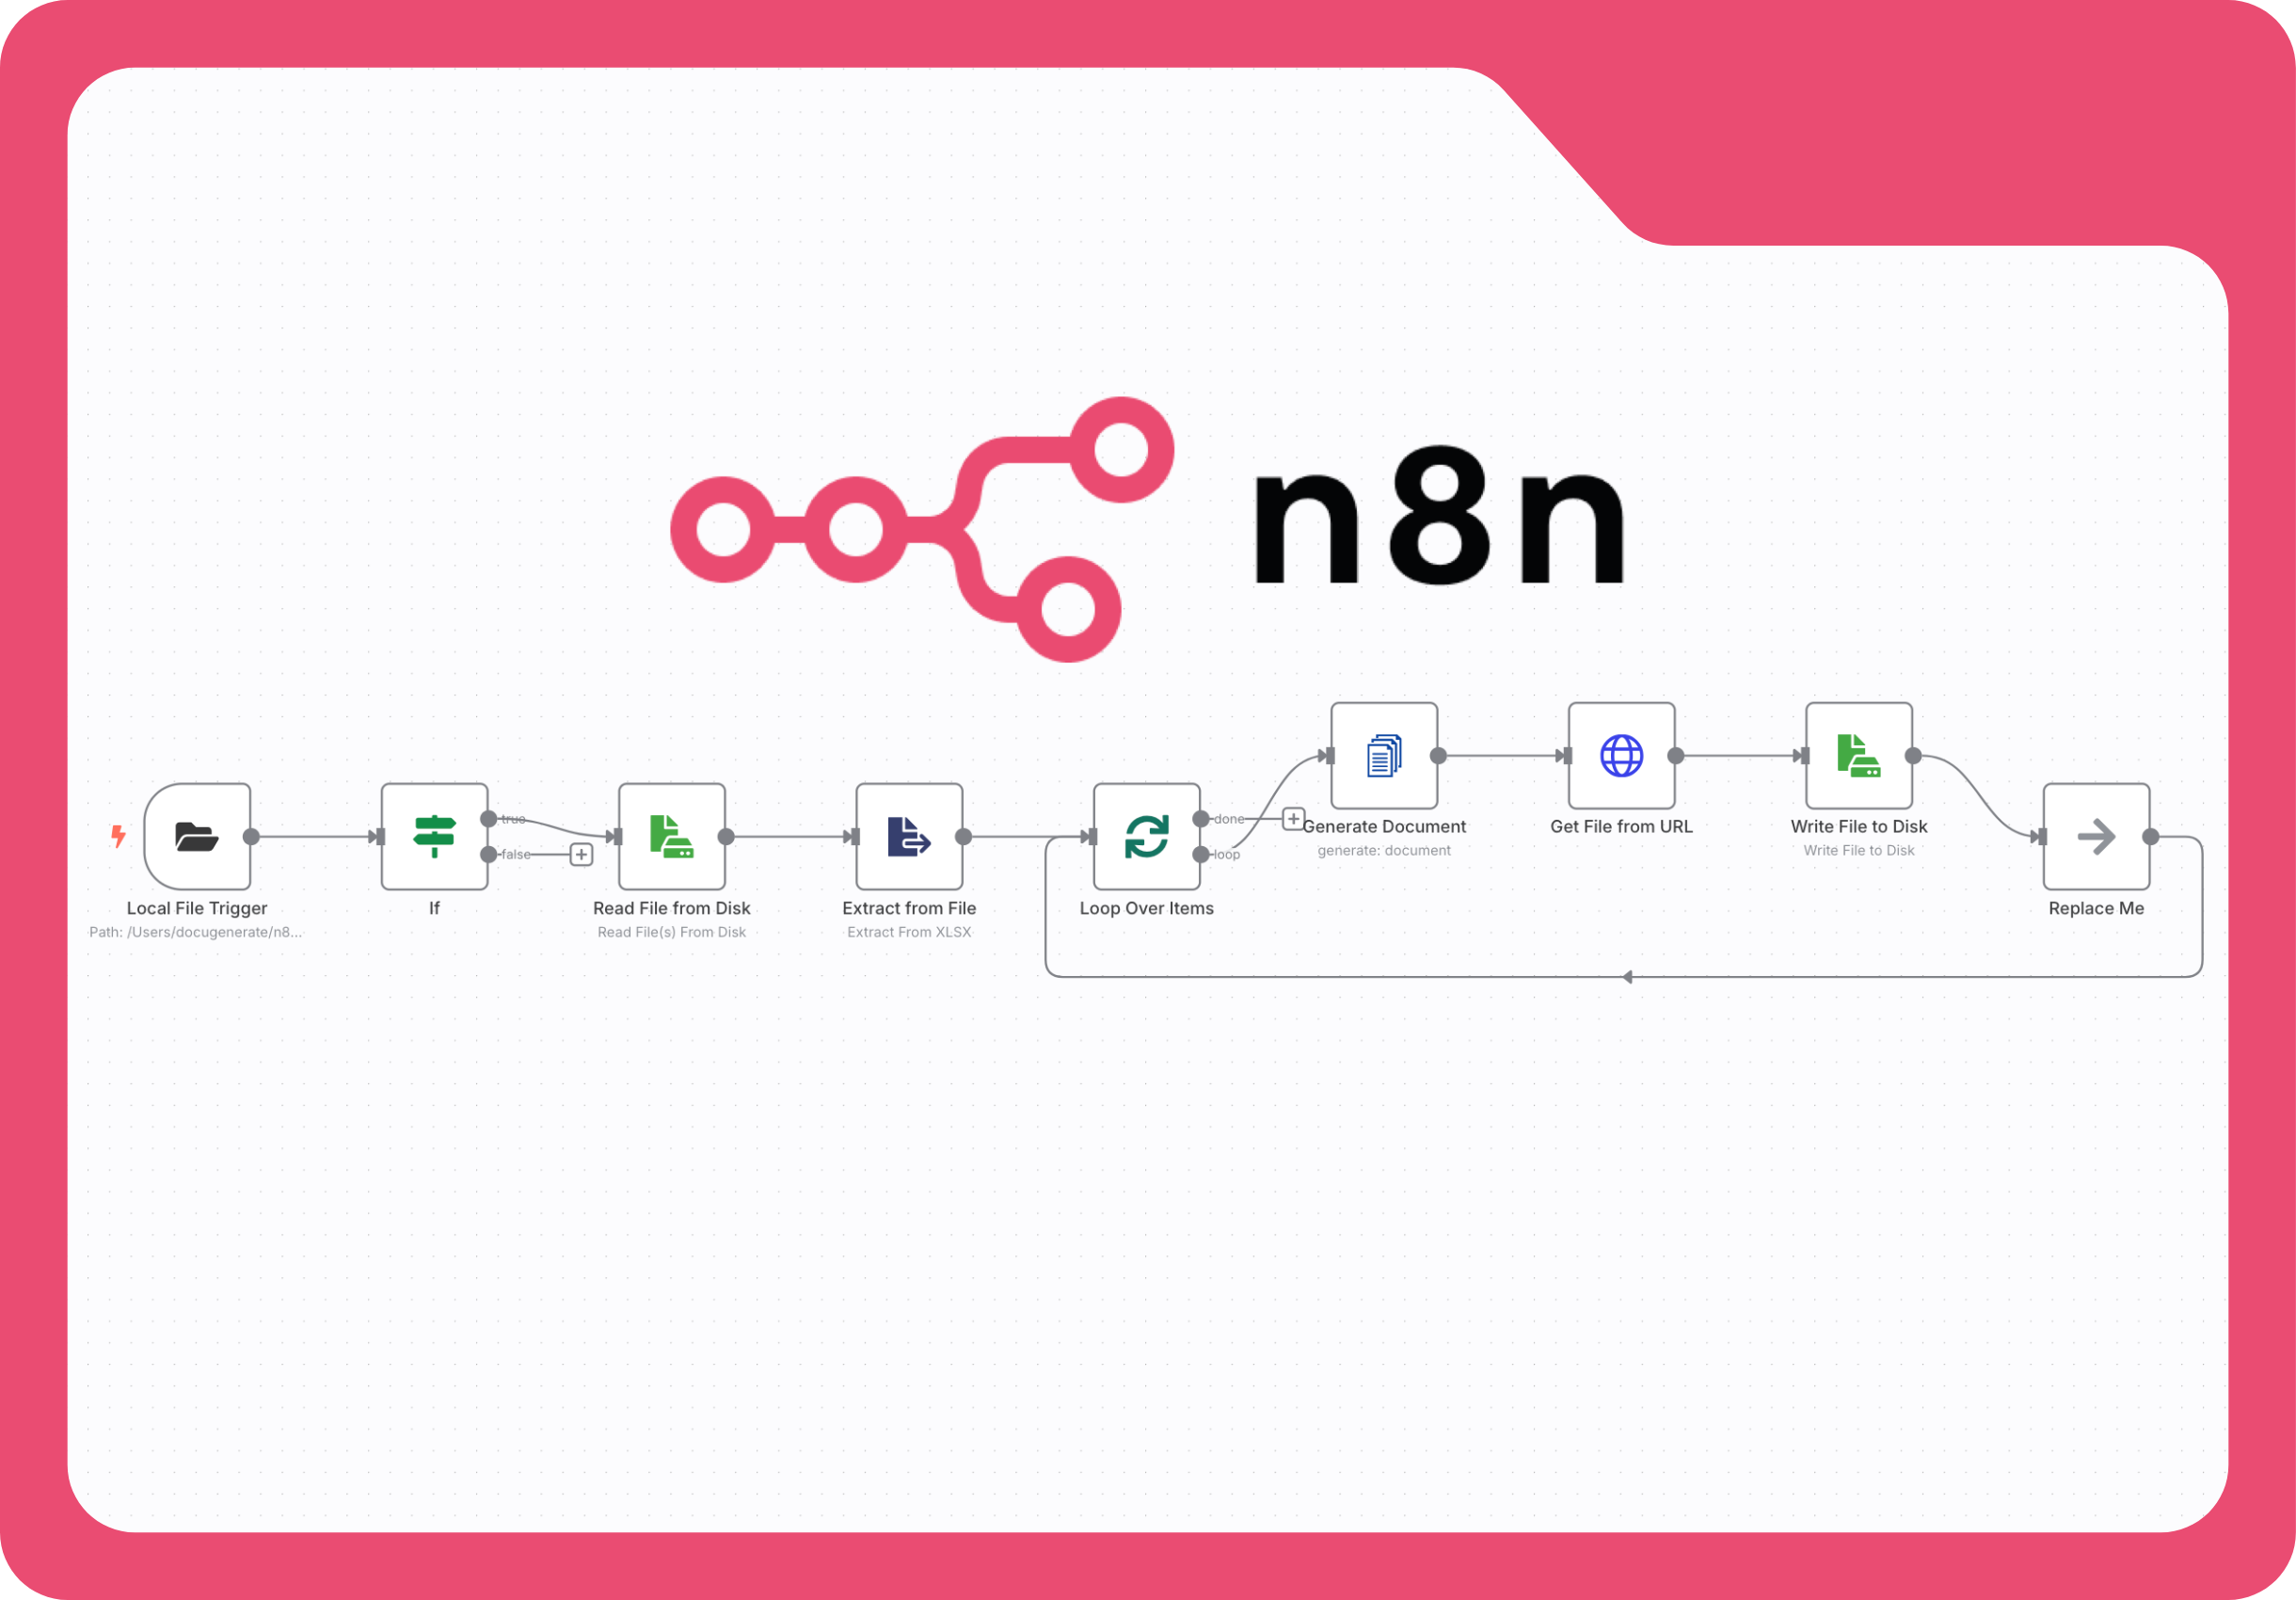
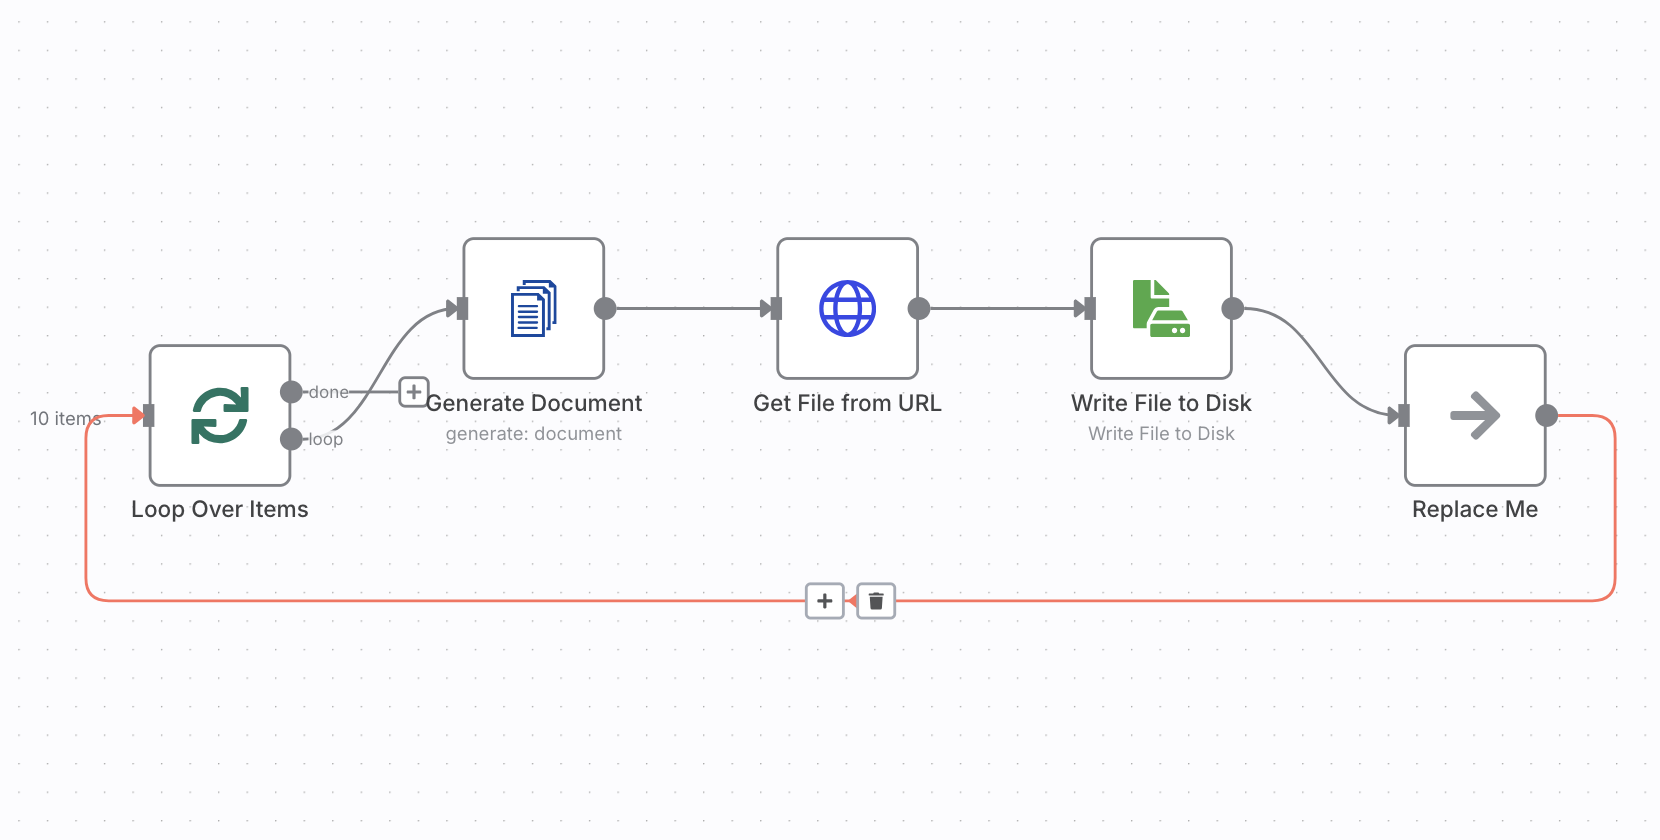
The workflow we’re building consists of several interconnected nodes that work together to monitor for files, process data, generate documents, and save the results on the disk. Here’s what the complete workflow looks like in n8n:

The workflow begins with a trigger that watches a local folder for new files. When an Excel file is added, the workflow validates the file extension, reads the file content, extracts the data into structured rows, and then loops through each row to generate an individual invoice. Each generated invoice is downloaded and saved to a designated output folder on your local machine. This entire process runs automatically, requiring no manual intervention once configured.
If you’d like to import this workflow directly into your n8n instance, you can download the workflow JSON file and import it. This can save you time and ensure all the nodes are configured correctly. Now let’s examine each node in detail to understand how the workflow operates.
Configuring the Local File Trigger
The workflow starts with the Local File Trigger node, which monitors a specific folder on your computer for new files. This trigger is the entry point for the entire automation process. For this tutorial, we’re watching the /Users/docugenerate/n8n/Data folder, but you can configure this to any directory on your system where you plan to add Excel files.
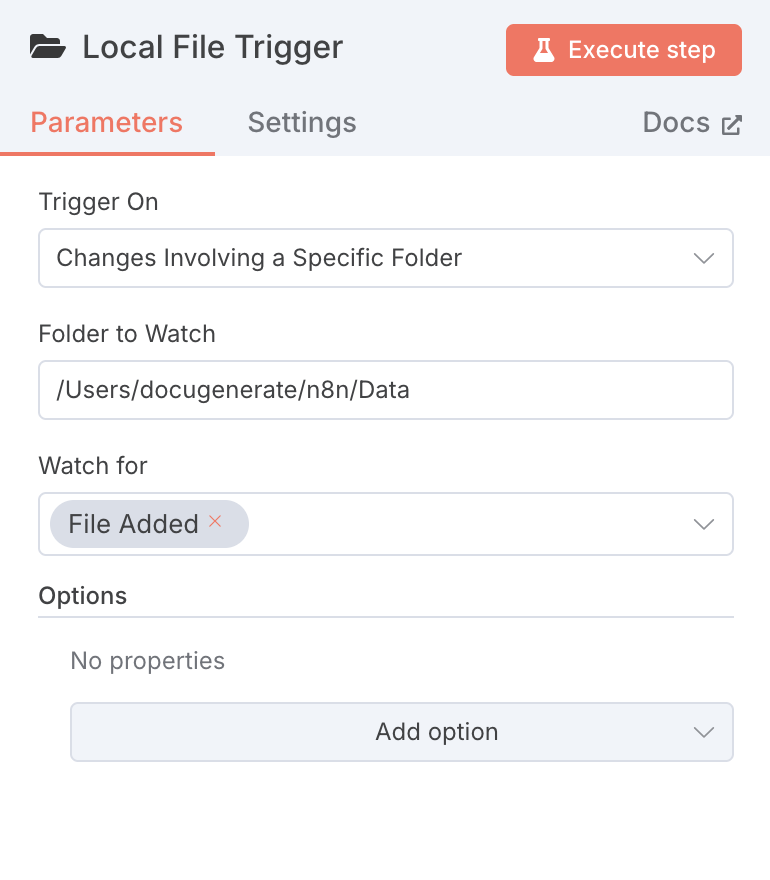
The trigger is configured to detect the File Added event, meaning it activates whenever a new file appears in the monitored folder. This is ideal for batch processing scenarios where you might drop multiple Excel files into a folder throughout the day and want them processed automatically. The trigger captures the file path and passes it to the next node in the workflow.
For this example, we’ll be using the Repair Invoice.xlsx file from the sample template, which contains ten rows of invoice data. Each row represents a separate invoice with details like invoice number, customer information, service descriptions, and amounts.
Validating the File Extension
After the trigger detects a new file, we need to verify that it’s actually an Excel file before attempting to process it. The If node serves this purpose by checking whether the file path ends with the .xlsx extension. This validation step prevents errors that could occur if someone accidentally drops a different file type into the monitored folder.
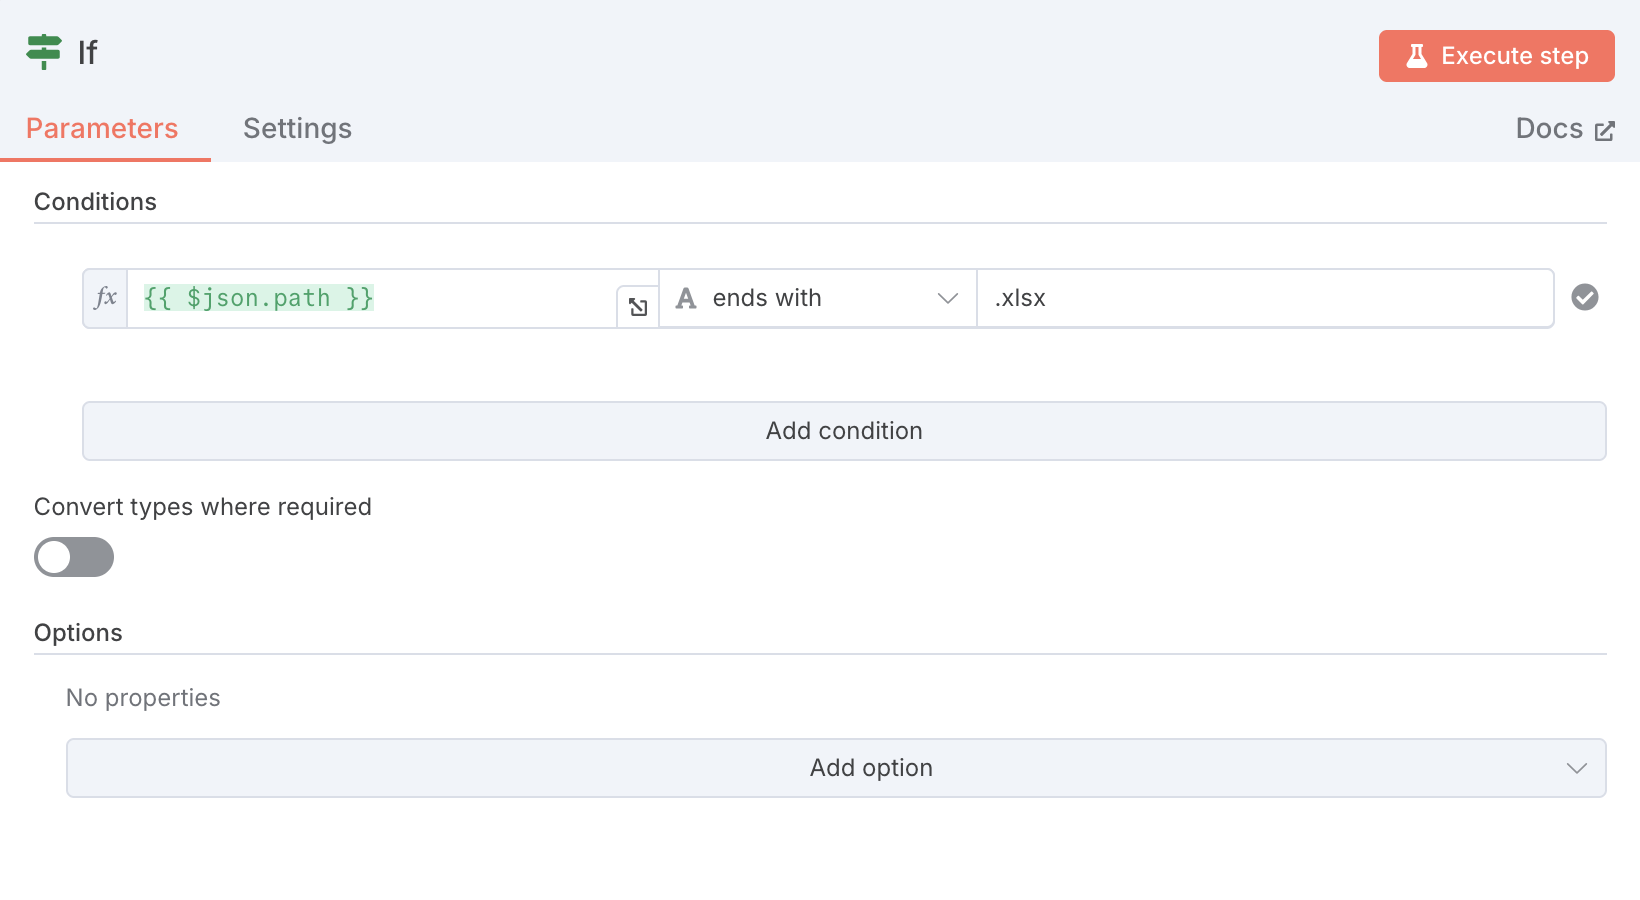
If the condition evaluates to true, the workflow continues to the next step. If false, the workflow stops, preventing unnecessary processing of incompatible files. This simple check adds robustness to the workflow and ensures that only valid Excel files are processed.
Reading the File from Disk
Once we’ve confirmed that the file is an Excel spreadsheet, the Read File from Disk node retrieves the actual file content from your local machine. This node uses the file path provided by the trigger to locate and read the binary data of the Excel file.

The configuration is straightforward. The File(s) Selector parameter is set to {{ $json.path }}, which references the path captured by the trigger. In the options section, we specify data as the name of the output binary field where the file content will be stored. This field name will be used in subsequent nodes to access the file data.
It’s important to note that this node works with files on the same computer running n8n. If you need to handle files between different computers, you would need to use alternative nodes such as FTP, HTTP Request, or AWS S3 nodes. For local processing scenarios like ours, this node provides a simple and efficient solution.
With the file content now available as binary data, we need to convert it into a structured format that can be processed by the workflow. The Extract from File node handles this transformation by parsing the Excel file and converting each row into a separate data item.
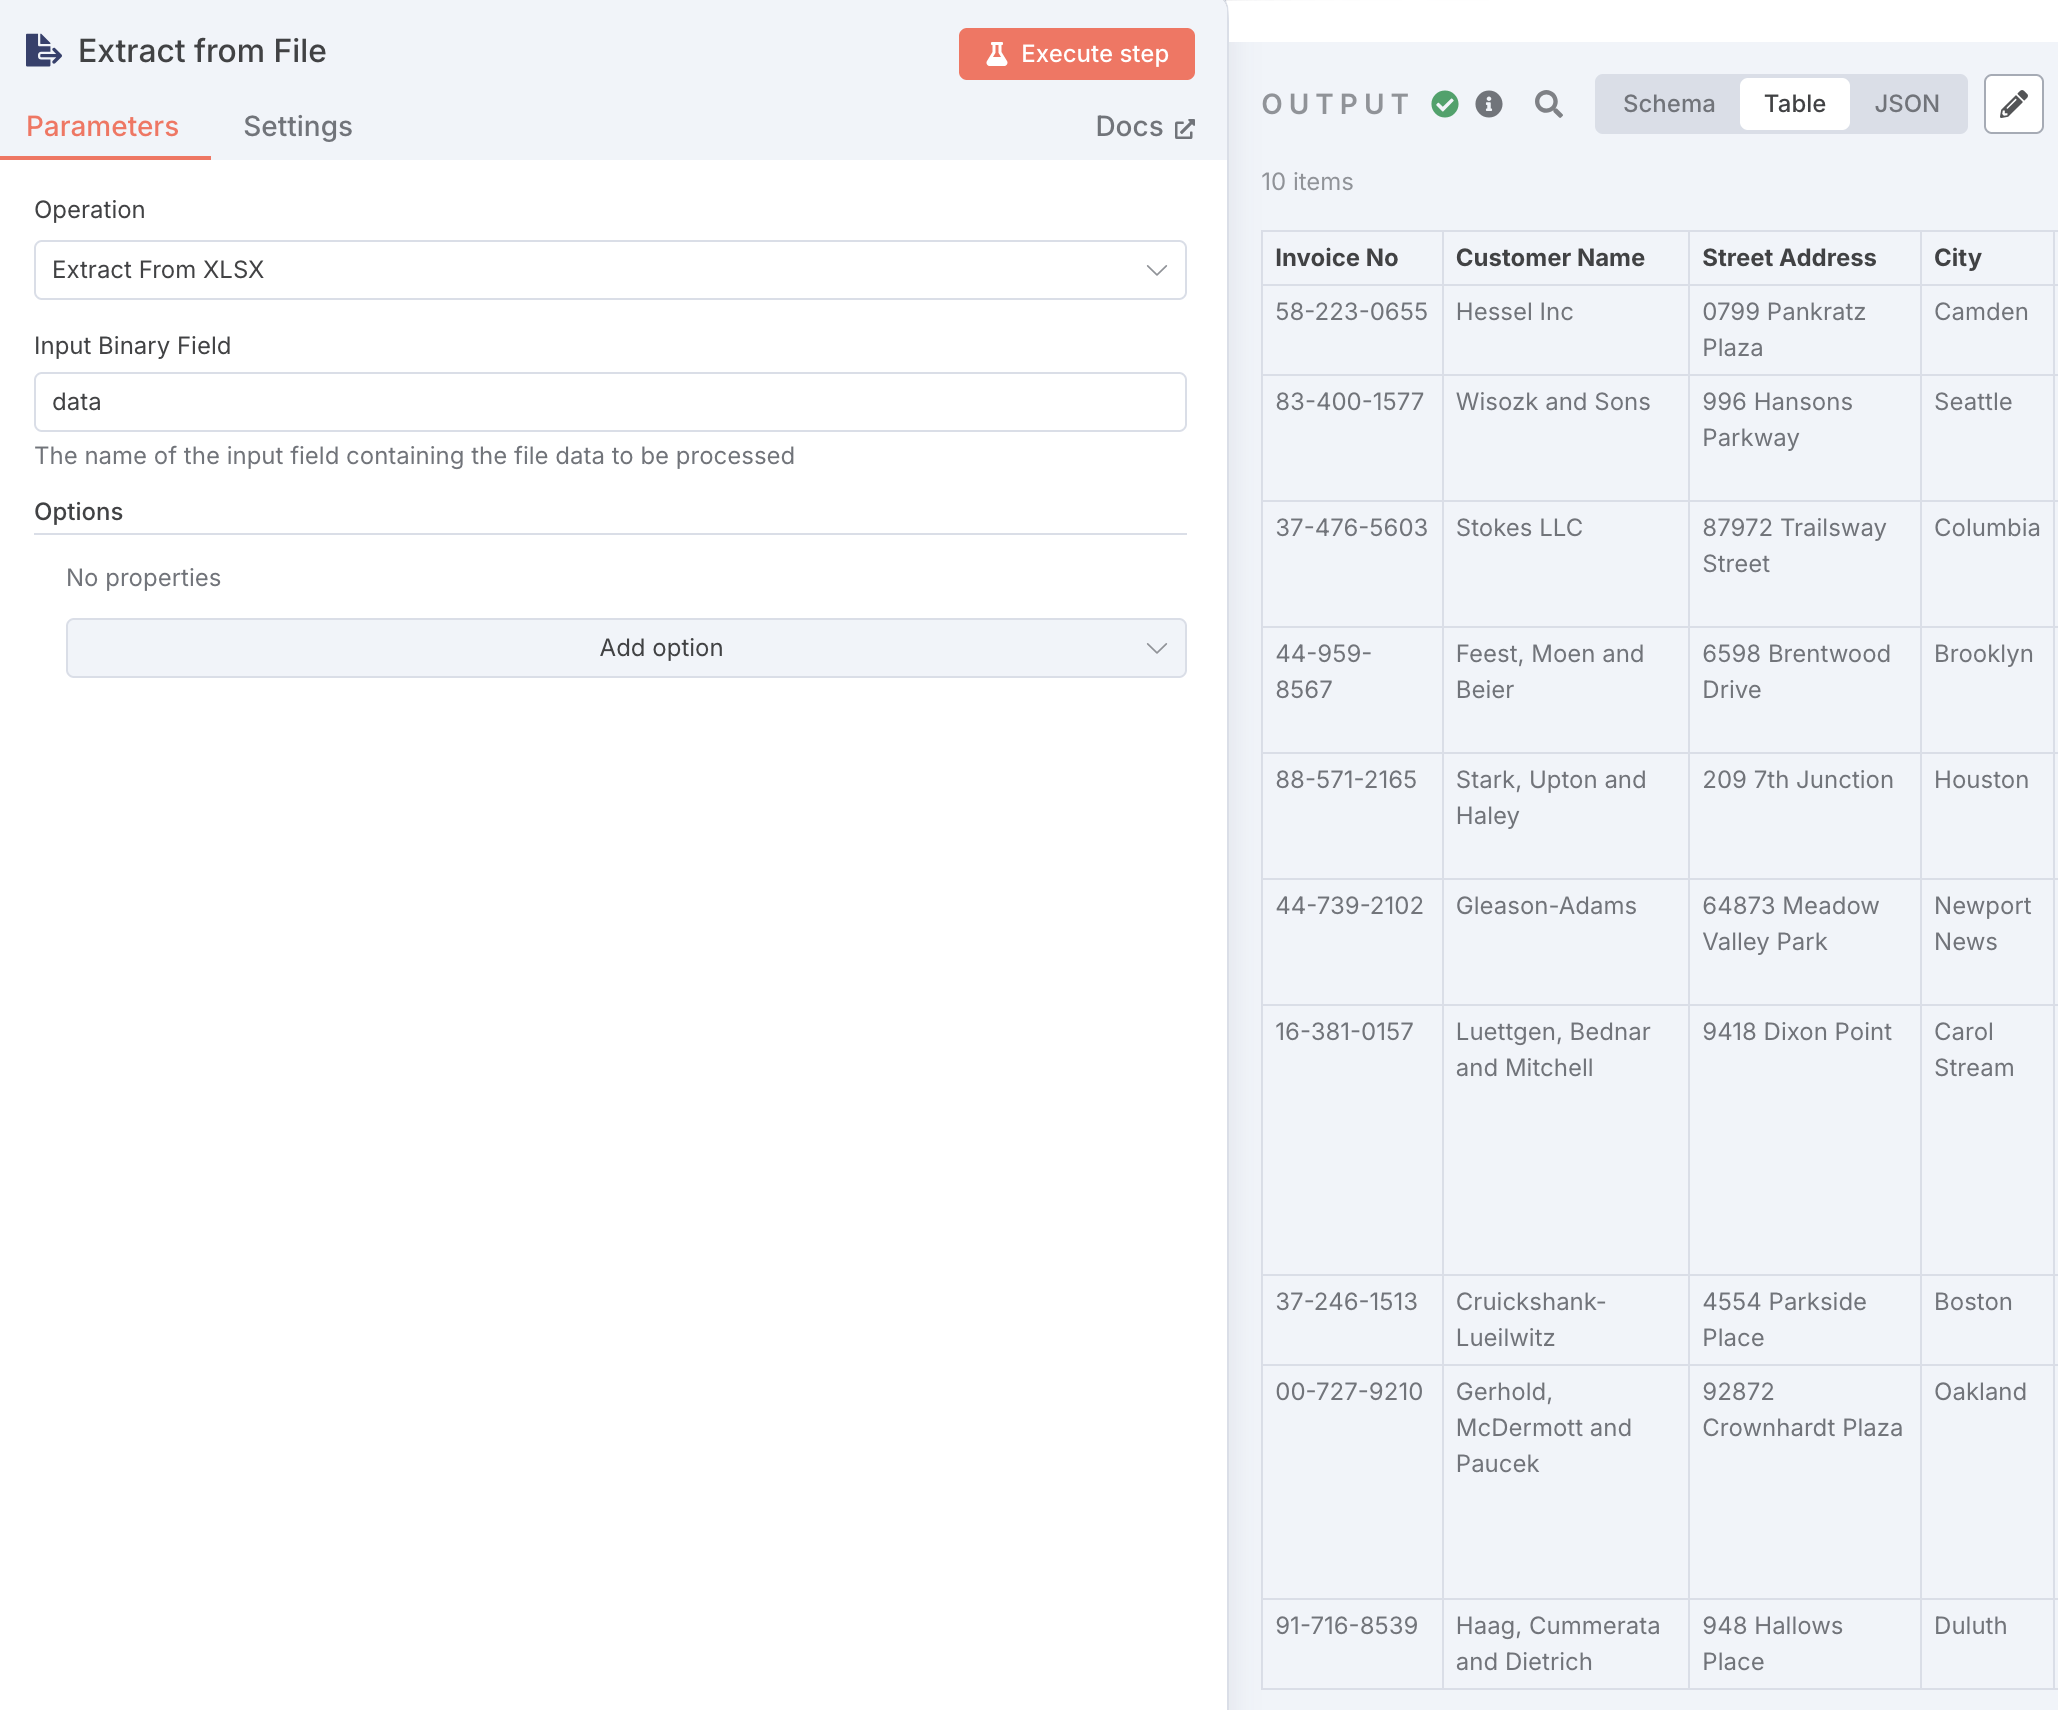
The node is configured with the Extract from XLSX operation, and the Input Binary Field is set to data, which matches the field name we specified in the previous node. This step is essential because it transforms the raw binary file data into structured JSON objects that contain the invoice information from each row. These structured data items can now be processed individually to generate invoices.
Looping Through Each Invoice Record
Now that we have the structured data items from the Excel file, we need to process each one individually to generate a separate invoice. The Loop Over Items node enables this by iterating through the items in batches. For this workflow, we’re using a batch size of one, meaning each invoice is generated and saved before moving to the next one.
This batching approach is particularly useful for document generation because it ensures that each invoice is completely processed before starting the next one. It also helps manage system resources when dealing with larger datasets. The loop continues until all items have been processed, with the workflow executing the same sequence of nodes for each invoice record.
Generating the Invoice Document
The Generate Document node that takes the data from each row and merges it with the template to create a PDF invoice. To use this node, you’ll need to install the DocuGenerate node in your n8n instance.
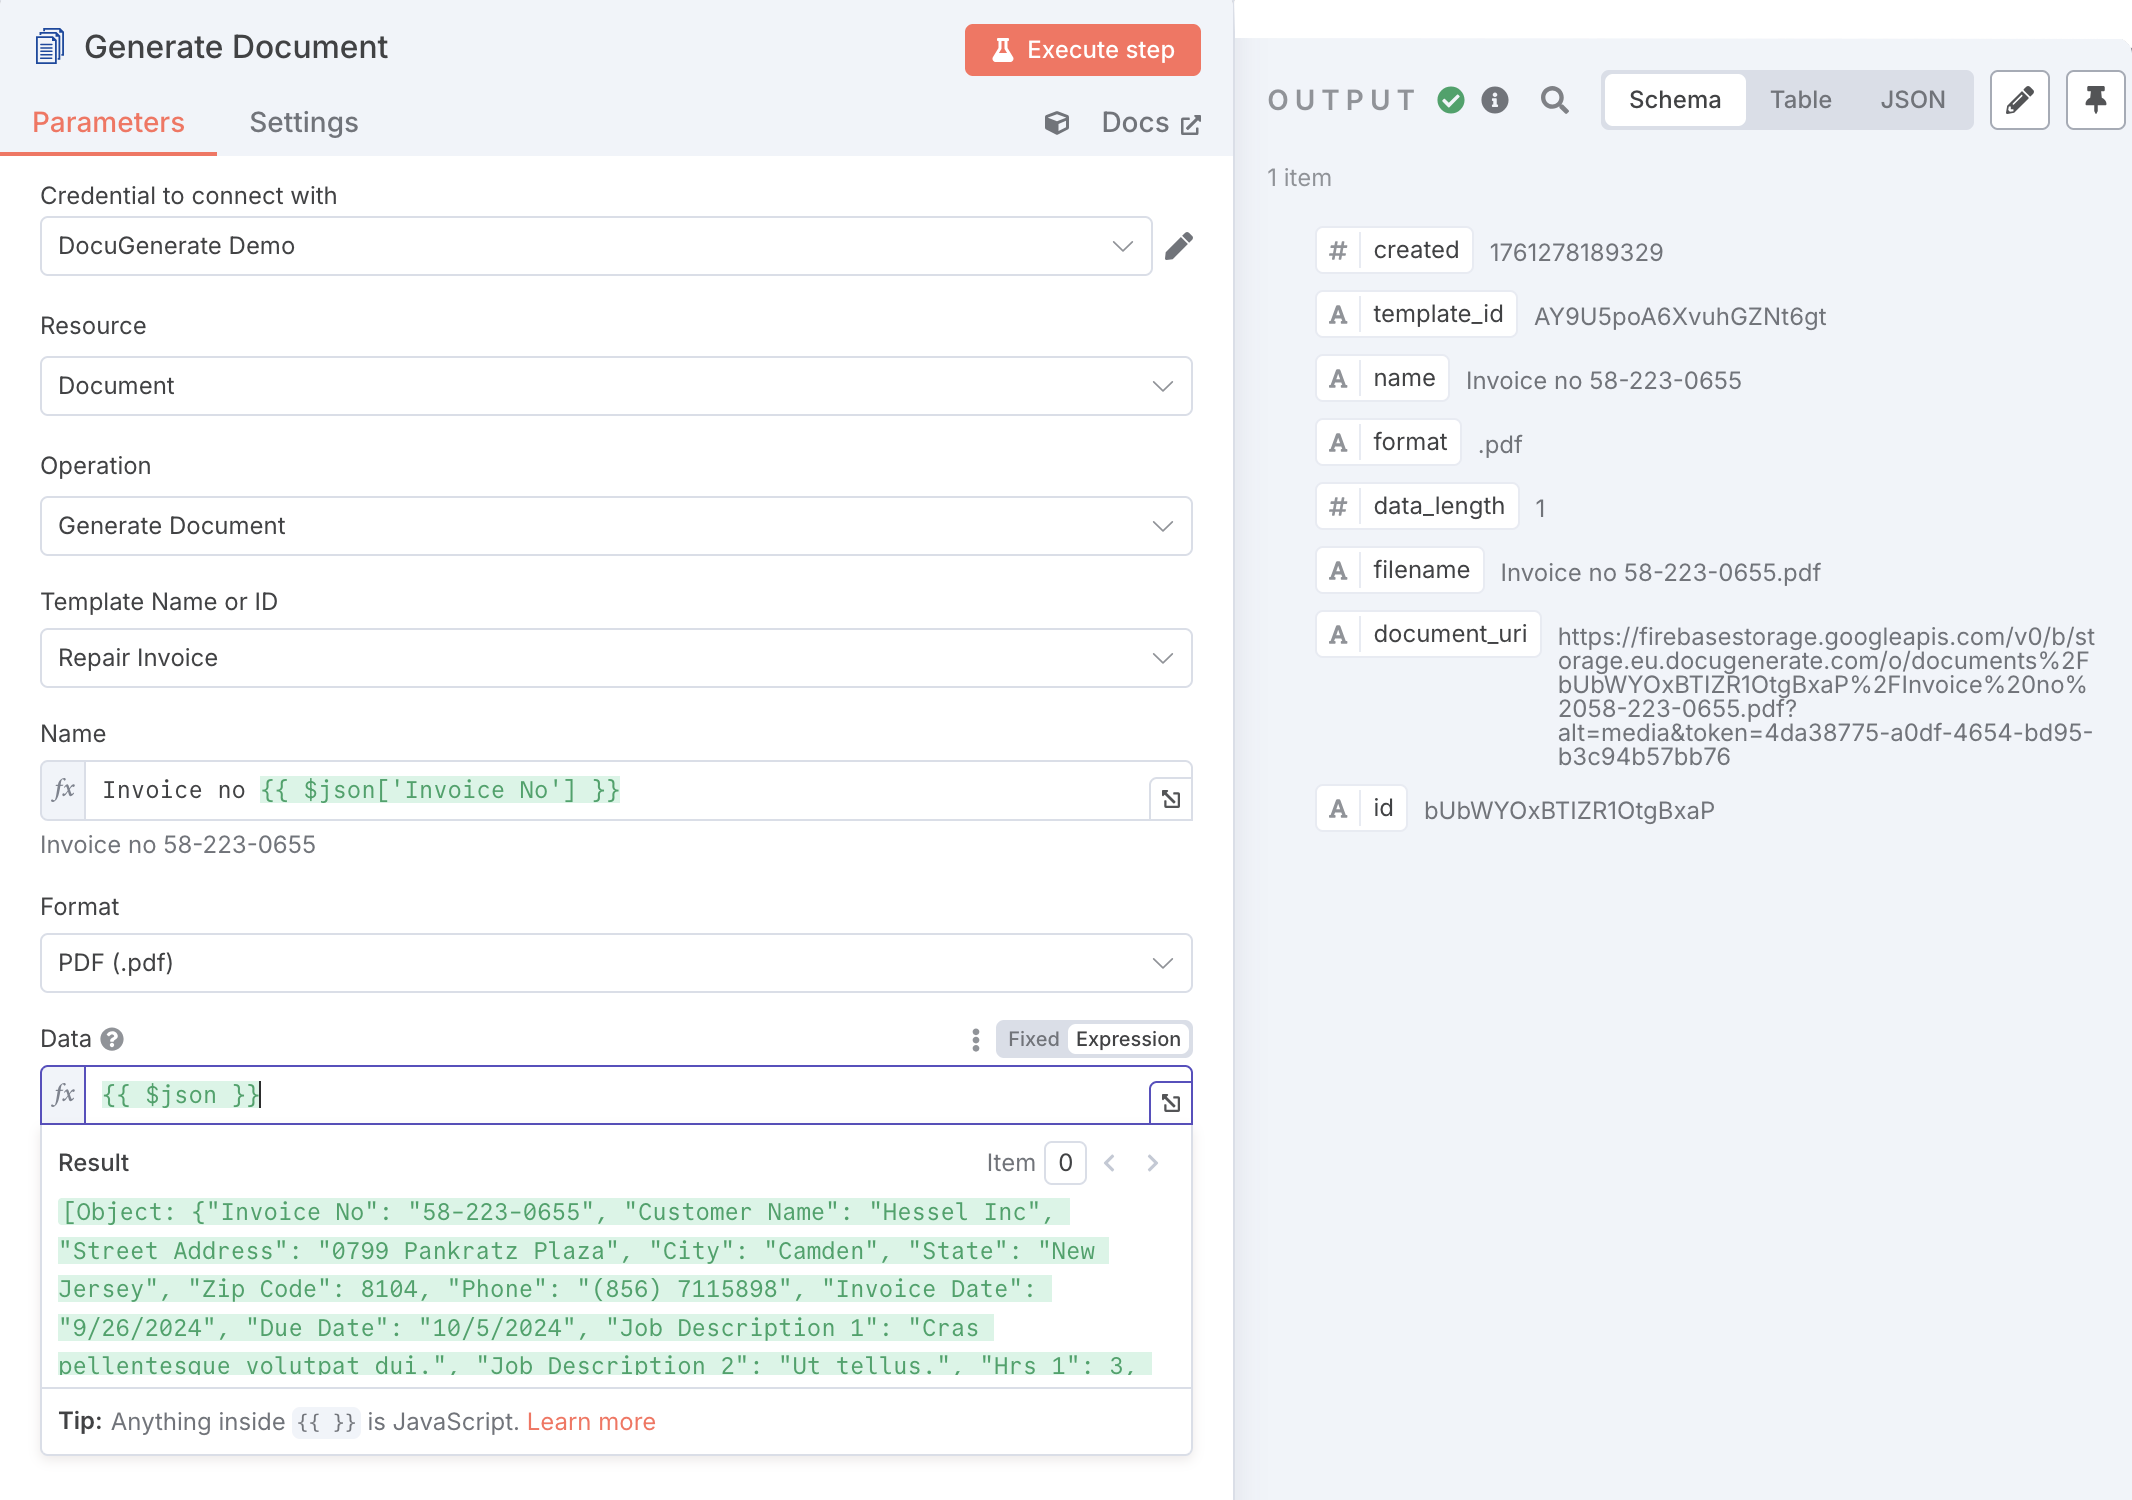
The node configuration requires several parameters:
- Template Name or ID is set to
Repair Invoice, which matches the template we uploaded earlier. - Name uses an expression
Invoice no {{ $json['Invoice No'] }} to dynamically name each document based on the invoice number from the data. - Format is set to
PDF (.pdf) to generate PDF documents. - Data is configured with
{{ $json }}, which passes the entire current data item to the document generation API. This means all the fields from the Excel row are available for merge tags in the template.
The API processes this request and returns a response that includes a document_uri field pointing to the generated document.
Downloading the Generated Document
After DocuGenerate creates the invoice, Get File from URL uses the built-in HTTP Request node to retrieve the generated PDF from the URL provided in the previous step’s response.
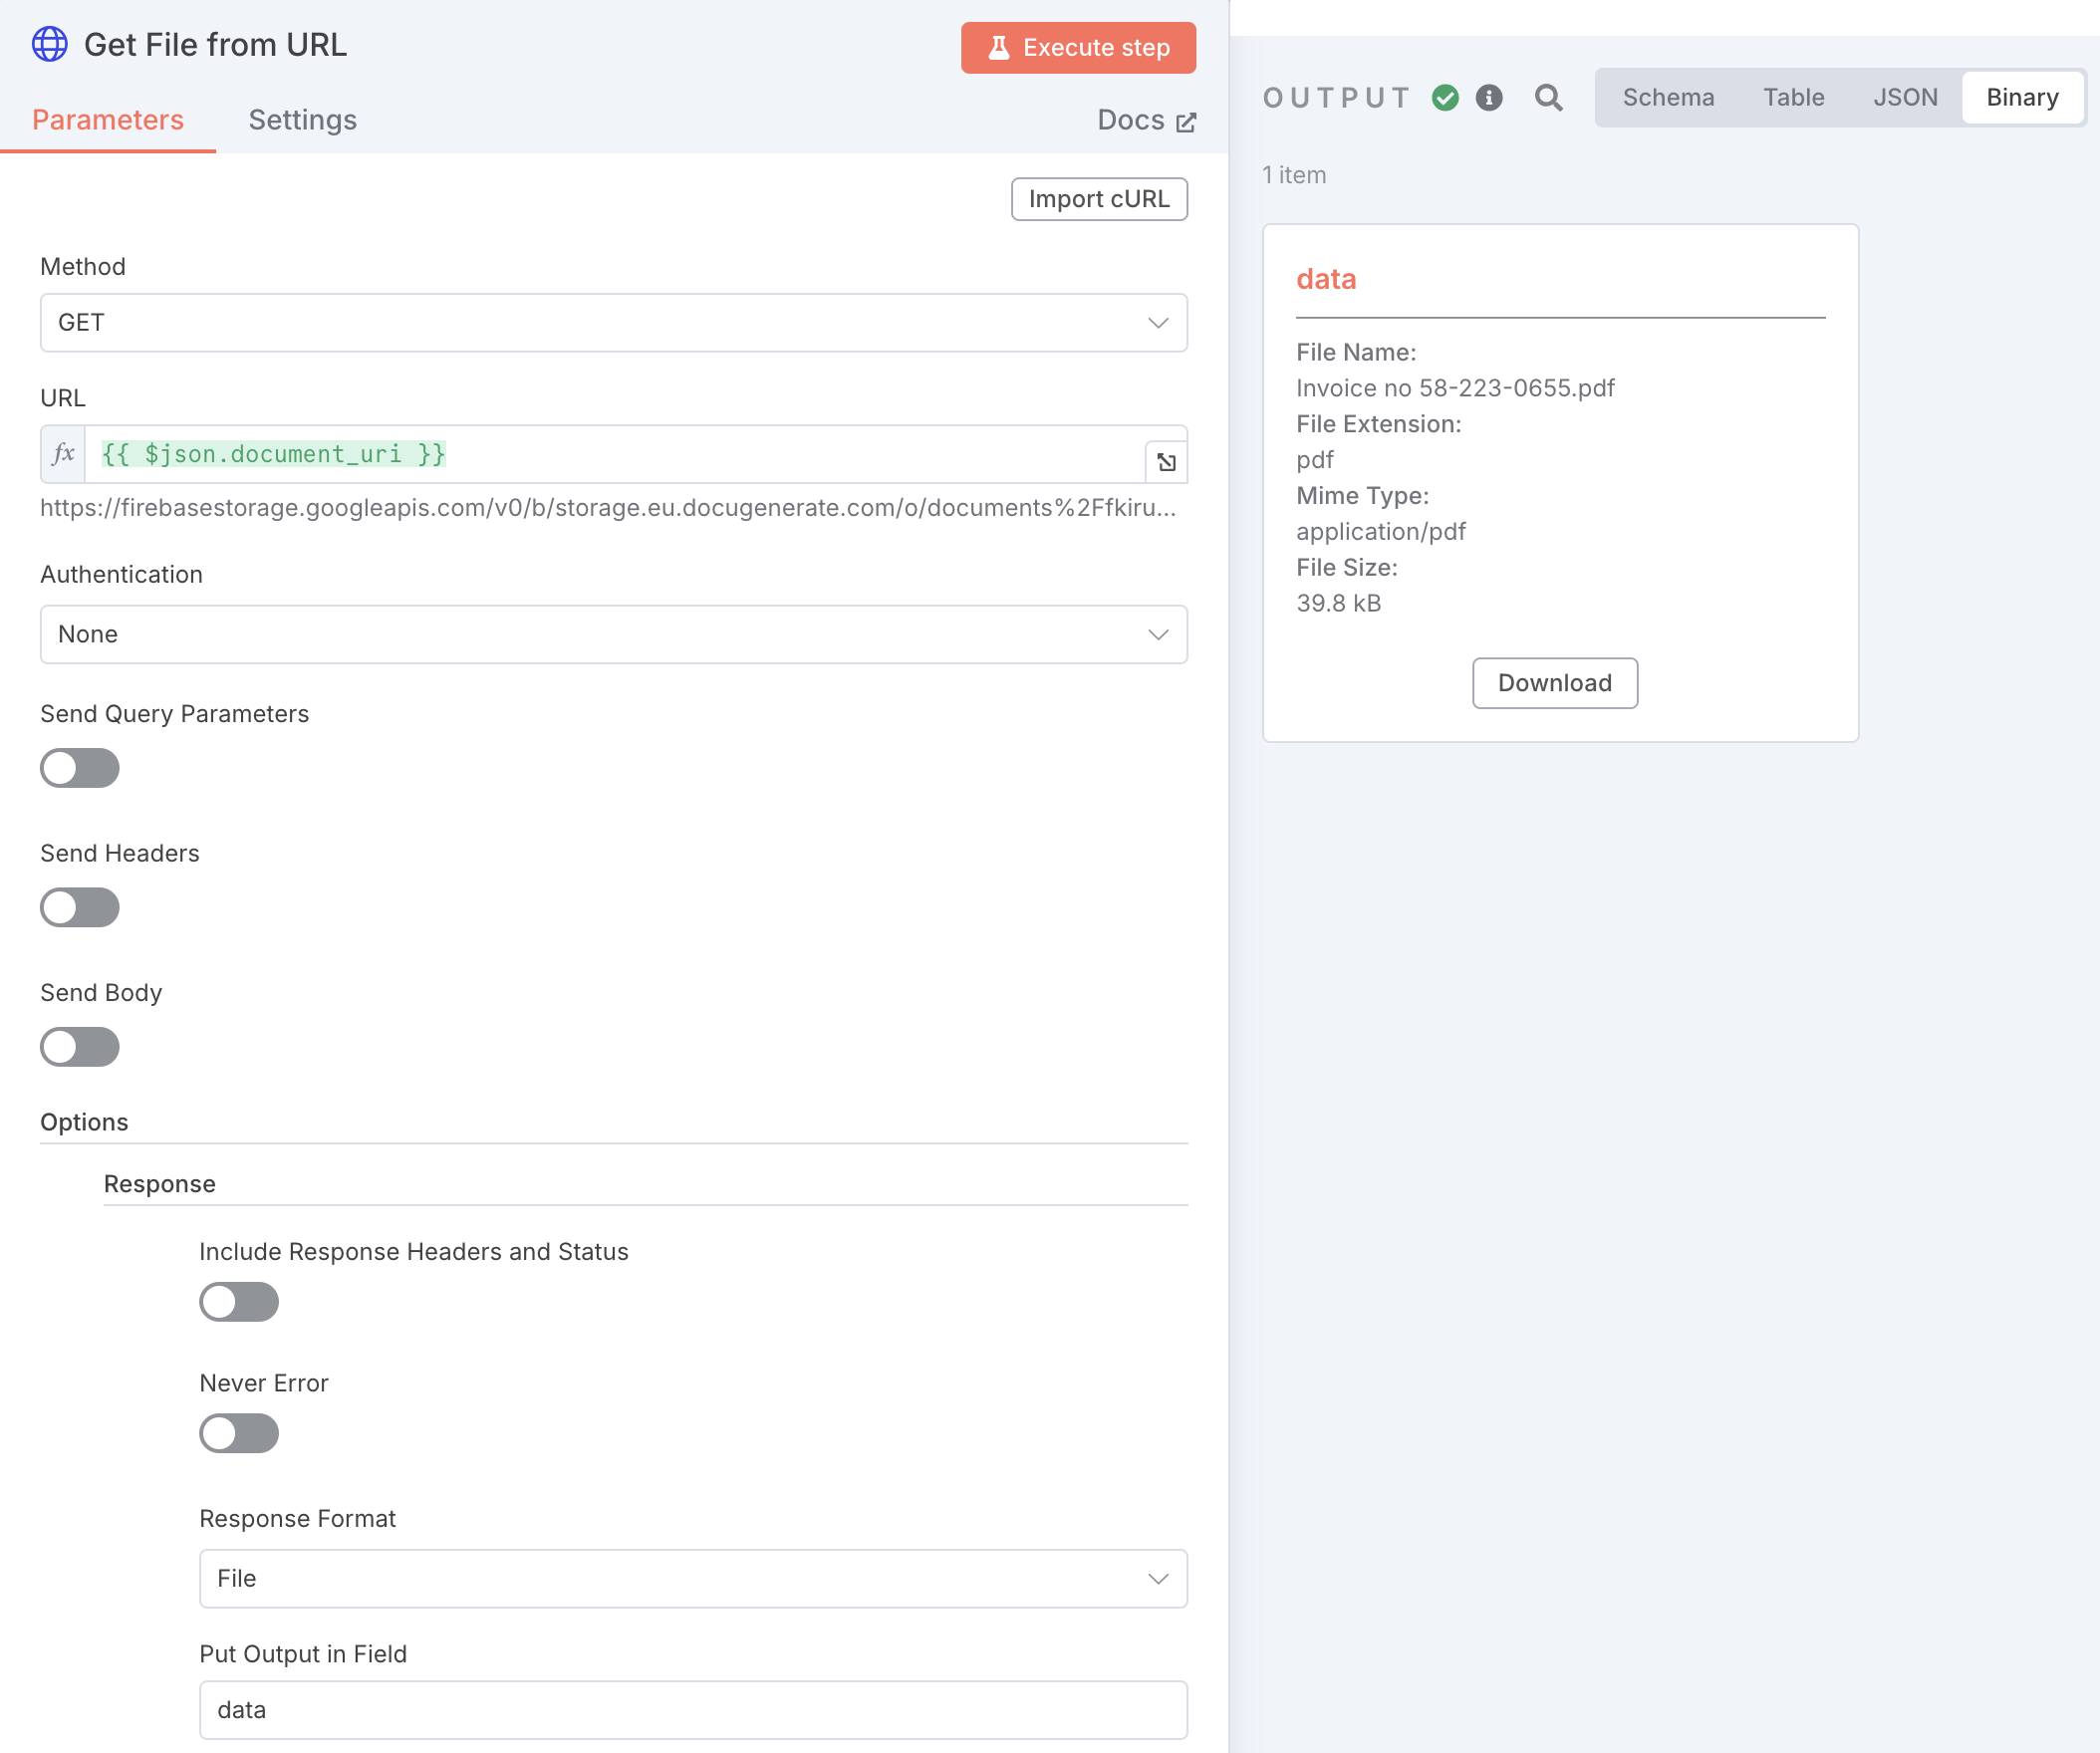
The URL parameter is set to {{ $json.document_uri }}, which references the document URL returned by the Generate Document node. In the options section, the Response Format is configured as File to ensure the data is treated as binary content rather than text. The Put Output in Field option is set to data, storing the PDF content in a field that can be accessed by the next node.
For this example, the generated document has the filename Invoice no 58-223-0655.pdf, which was dynamically created based on the invoice number in the first row of our sample data. Each subsequent invoice will have its own unique filename following the same pattern.
Saving the Invoice to Disk
The final step in the workflow saves the generated invoice PDF to a designated folder on your local machine. The Write File to Disk node handles this operation, storing each completed invoice where you can easily access it.
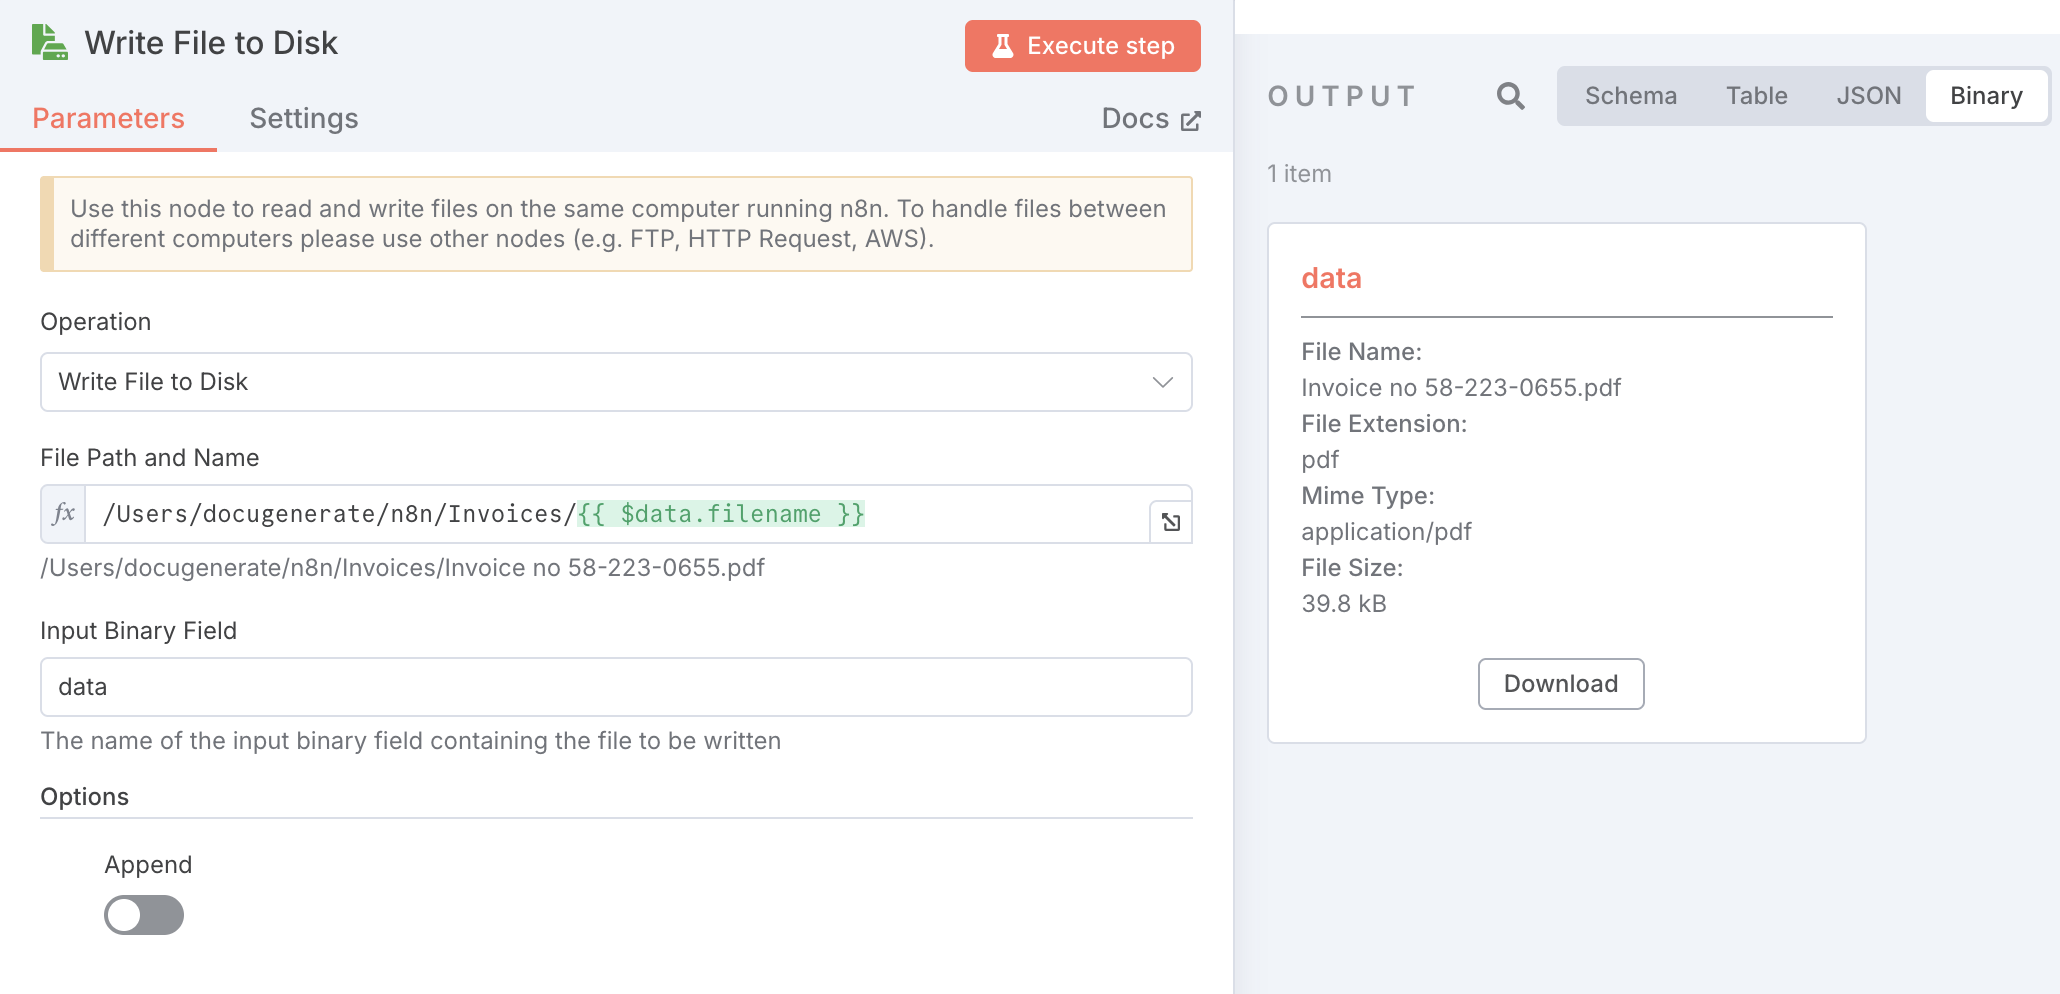
The File Path and Name parameter is configured with /Users/docugenerate/n8n/Invoices/{{ $data.filename }}, which combines a base directory path with the dynamic filename from the generated document. The Input Binary Field is set to data, which contains the PDF content retrieved in the previous step.
This configuration saves all invoices to the same folder, but you could customize this further. For example, you might organize invoices by date, or group them by customer name. The flexibility of n8n expressions allows you to create any folder structure that suits your business needs. Just keep in mind that this node is designed for working with files on the same computer running n8n.
Running the Workflow
With all the nodes configured, the workflow is ready to process invoices automatically. To test it, simply add the Repair Invoice.xlsx file to the Data folder that the trigger is monitoring. The workflow will immediately detect the new file and begin processing.
The animation above shows the Loop Over Items segment in action, iterating through all ten data items from the Excel file. For each item, the workflow generates an invoice using the template and data, downloads the PDF, and saves it to the destination folder. You can watch the progress in real-time through n8n’s visual interface, which provides excellent visibility into each step of the process.
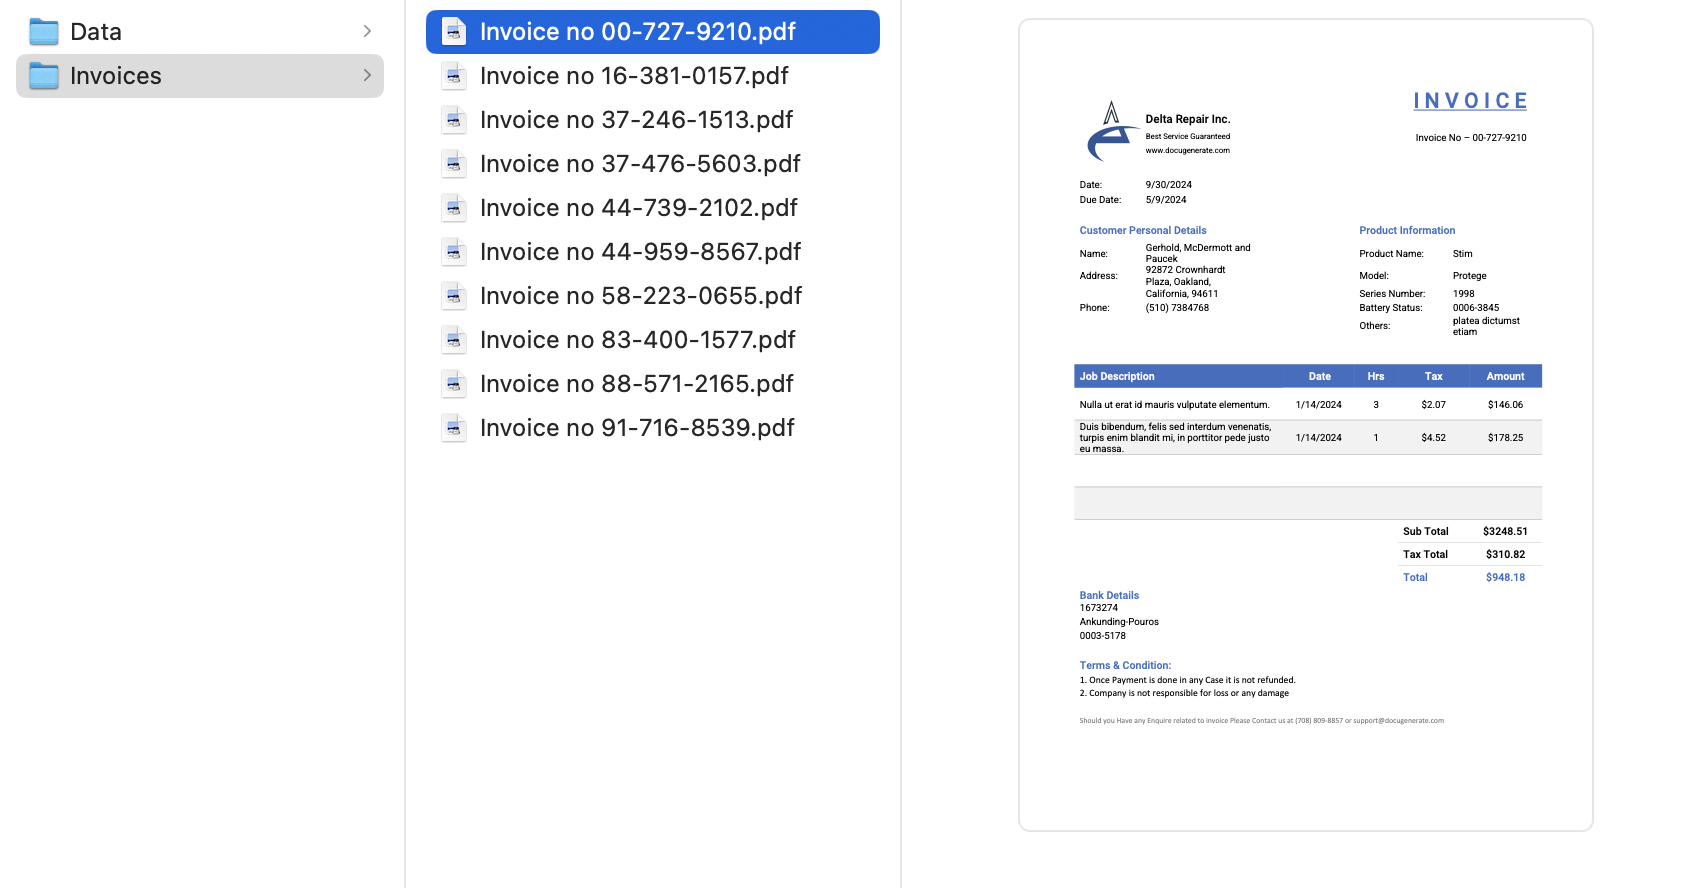
Once the workflow completes, all ten invoices have been generated and saved in the Invoices folder. This automated approach eliminates the need for manual document creation, saving significant time and reducing the potential for errors that can occur with manual data entry.
Conclusion
Building local automation workflows with n8n and DocuGenerate offers a powerful solution for businesses that need to process documents efficiently while maintaining full control over their data. The workflow we’ve built demonstrates how easy it is to monitor folders, validate files, extract data, and generate professional documents without relying on cloud services or complex integrations.
This approach is particularly valuable for scenarios where data privacy is paramount, internet connectivity is limited, or you simply prefer to keep your document processing pipeline local. The flexibility of n8n allows you to extend this workflow in numerous ways. You could add email notifications when invoices are generated, create backup copies, or integrate with your existing business systems with other solutions.
The workflow we’ve created processes repair invoices, but the same pattern can be applied to any document type supported by DocuGenerate. Whether you need to generate contracts, letters, certificates, or reports, the core workflow remains the same. You simply need to adjust the template and ensure your Excel data matches the merge tags in your chosen template.
Resources